2022 TOYOTA VENZA HYBRID steering wheel adjustment
[x] Cancel search: steering wheel adjustmentPage 156 of 548
1553-3. Adjusting the seats
3
Before driving
3-3.Adjusting the seats
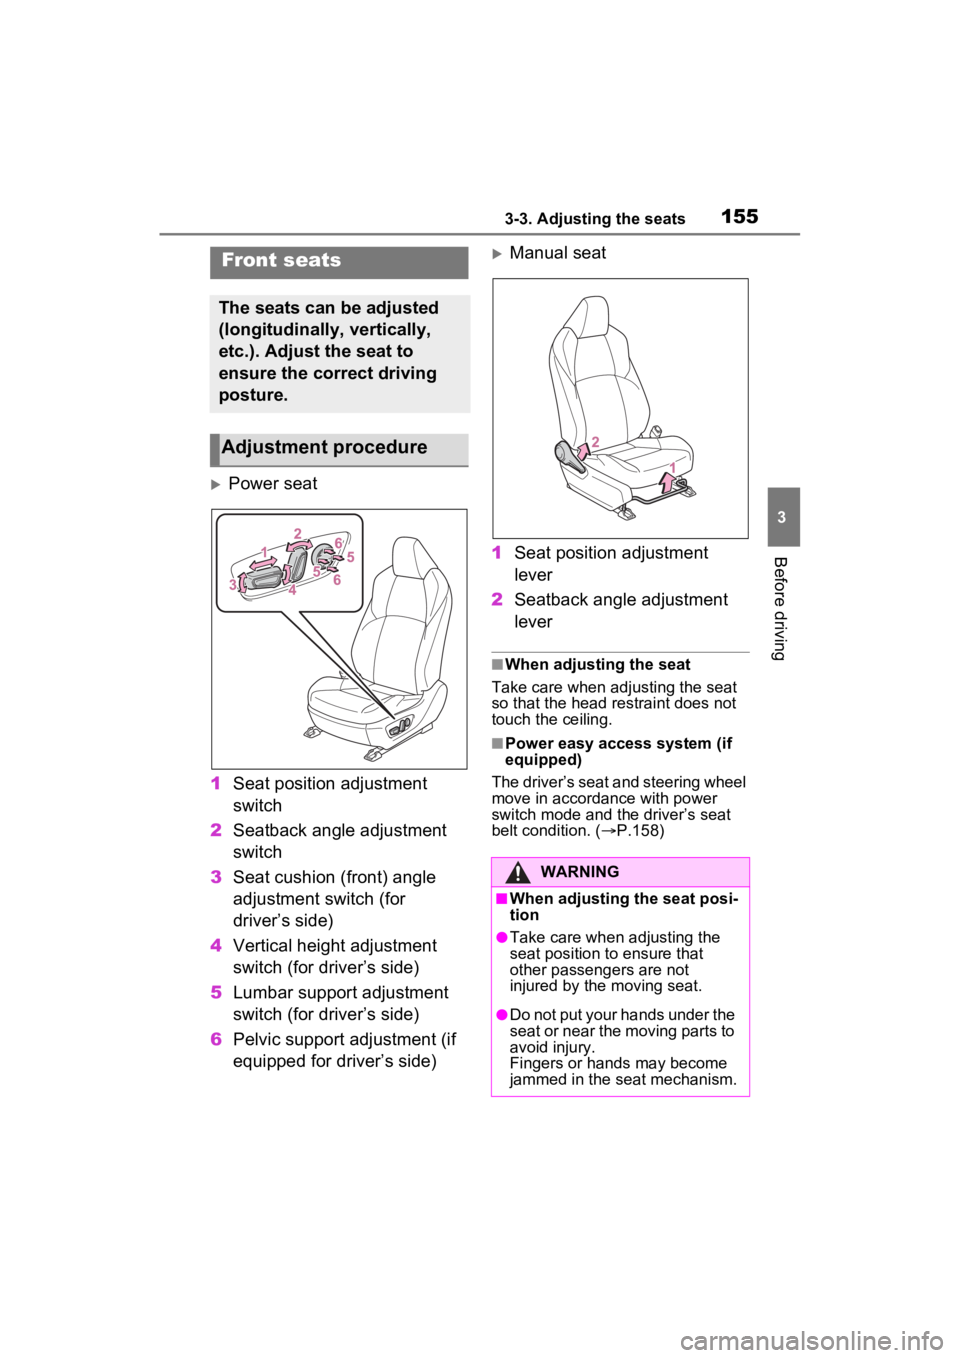
Power seat
1 Seat position adjustment
switch
2 Seatback angle adjustment
switch
3 Seat cushion (front) angle
adjustment switch (for
driver’s side)
4 Vertical height adjustment
switch (for driver’s side)
5 Lumbar support adjustment
switch (for driver’s side)
6 Pelvic support adjustment (if
equipped for driver’s side)
Manual seat
1 Seat position adjustment
lever
2 Seatback angle adjustment
lever
■When adjusting the seat
Take care when adjusting the seat
so that the head restraint does not
touch the ceiling.
■Power easy access system (if
equipped)
The driver’s seat and steering wheel
move in accordance with power
switch mode and th e driver’s seat
belt condition. ( P.158)
Front seats
The seats can be adjusted
(longitudinally, vertically,
etc.). Adjust the seat to
ensure the correct driving
posture.
Adjustment procedure
WARNING
■When adjusting the seat posi-
tion
●Take care when adjusting the
seat position to ensure that
other passengers are not
injured by the moving seat.
●Do not put your hands under the
seat or near the moving parts to
avoid injury.
Fingers or hands may become
jammed in the seat mechanism.
Page 161 of 548
1603-3. Adjusting the seats
●Operate the tilt and telescopic
steering control switch (only can-
cels steering wheel position
recall).
■Seat positions that can be
memorized (P.155)
The positions adjusted by the fol-
lowing procedure can be recorded:
●Seat position adjustment
●Seatback angle adjustment
●Seat cushion (front) angle adjust-
ment
●Vertical height adjustment
■Operating the driving position
memory after turning the power
switch to OFF
Recorded seat positions can be
activated up to 1 80 seconds after
the driver’s door is opened and
another 60 seconds after it is closed
again.
■In order to correctly use the
driving position memory func-
tion
If a seat position is already in the
furthest possible position and the
seat is operated in the same direc-
tion, the recorded position may be
slightly different w hen it is recalled.
■When recalling the driving posi-
tion
Take care when recalling the driving
position so that the head restraint
does not touch the ceiling.
■When the recorded seat posi-
tion cannot be recalled
The seat position may not be
recalled in some situations when the
seat position is recorded in a certain
range. For details, contact your
Toyota dealer.
■Registering procedure
Record your driving position to
button “1” or “2” before perform-
ing the following:
Carry only the key you want to
register, and then close the
driver’s door.
If 2 or more keys are in the vehi-
cle, the driving position cannot
be recorded properly.
1 Check that the shift lever is in
P.
2 Turn the power switch to ON.
3 Recall the driving position
that you want to record.
4 While pressing the recalled
button, press and hold the
door lock switch (either lock
or unlock) until the buzzer
sounds.
If the button could not be regis-
tered, the buzzer sounds continu-
WARNING
■Seat adjustment caution
Take care during seat adjustment
so that the seat does not strike
the rear passenger or squeeze
your body against the steering
wheel.
Registering/recall/cancel-
ing a driving position to
an electronic key (mem-
ory recall function)
Page 165 of 548
1643-4. Adjusting the steering wheel and mirrors
3-4.Adjusting the steering wheel and mirrors
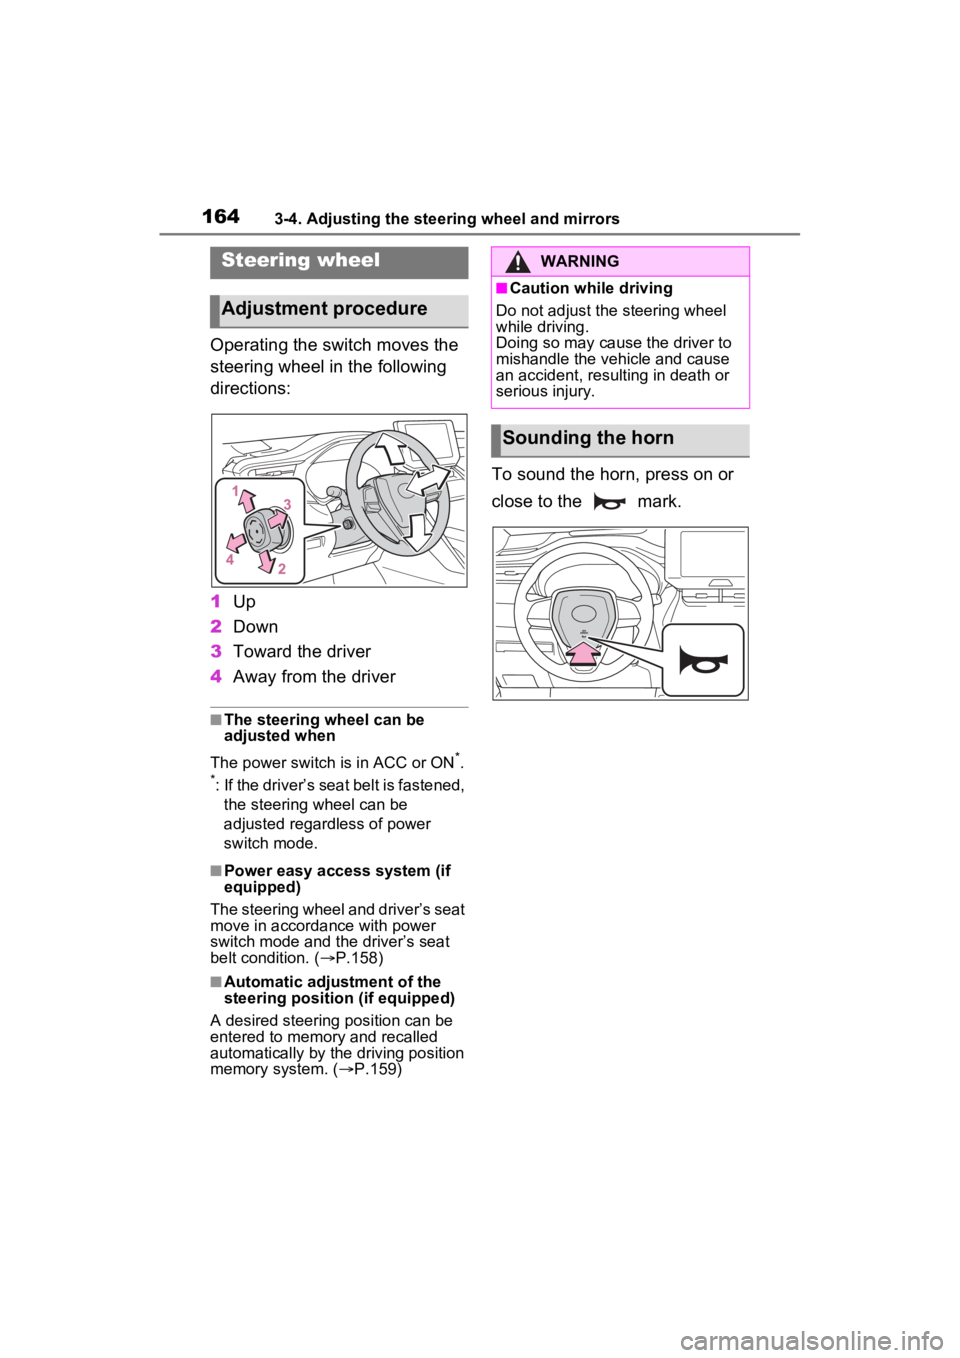
Operating the switch moves the
steering wheel in the following
directions:
1Up
2 Down
3 Toward the driver
4 Away from the driver
■The steering wheel can be
adjusted when
The power switch is in ACC or ON
*.
*: If the driver’s seat belt is fastened,
the steering wheel can be
adjusted regardless of power
switch mode.
■Power easy access system (if
equipped)
The steering wheel and driver’s seat
move in accordance with power
switch mode and the driver’s seat
belt condition. ( P.158)
■Automatic adjustment of the
steering position (if equipped)
A desired steering position can be
entered to memory and recalled
automatically by the driving position
memory system. ( P.159)
To sound the horn, press on or
close to the mark.
Steering wheel
Adjustment procedure
WARNING
■Caution while driving
Do not adjust the steering wheel
while driving.
Doing so may cause the driver to
mishandle the vehicle and cause
an accident, resulting in death or
serious injury.
Sounding the horn
Page 169 of 548
1683-4. Adjusting the steering wheel and mirrors
driving, make sure the back door
is closed.
●Vehicles with panoramic fixed
moon roof with one-touch frosted
glass control: If the display is diffi-
cult to see due to reflected light,
close the electronic sunshade.
●Any of the following conditions
may occur when d riving in the
dark, such as at night. None of
them indicates that a malfunction
has occurred.
• Colors of objects in the displayed
image may differ from their actual
color.
• Depending on the height of the
lights of the vehicle behind, the
area around the vehicle may
appear white and blurry.
• Automatic image adjustment for brighter surrounding image may
cause flickering.
If it is difficult to see the displayed
image or flickering bothers you,
change to optical mirror mode.
●The Digital Rear-view Mirror may
become hot while it is in digital
mirror mode.
This is not a malfunction.
●Depending on your physical con-
dition or age, it may take longer
than usual to focus on the dis-
played image. In this case,
change to optical mirror mode.
●Do not let passengers stare at the
displayed image when the vehicle
is being driven, as doing so may
cause motion sickness.
■When the system malfunctions
If the symbol show n in the illustra-
tion is displayed when using the
Digital Rear-view Mirror in digital
mirror mode, the system may be
malfunctioning. Th e symbol will dis-
appear in a few seconds. Operate
the lever, change to optical mirror
mode and have the vehicle
inspected by your Toyota dealer.
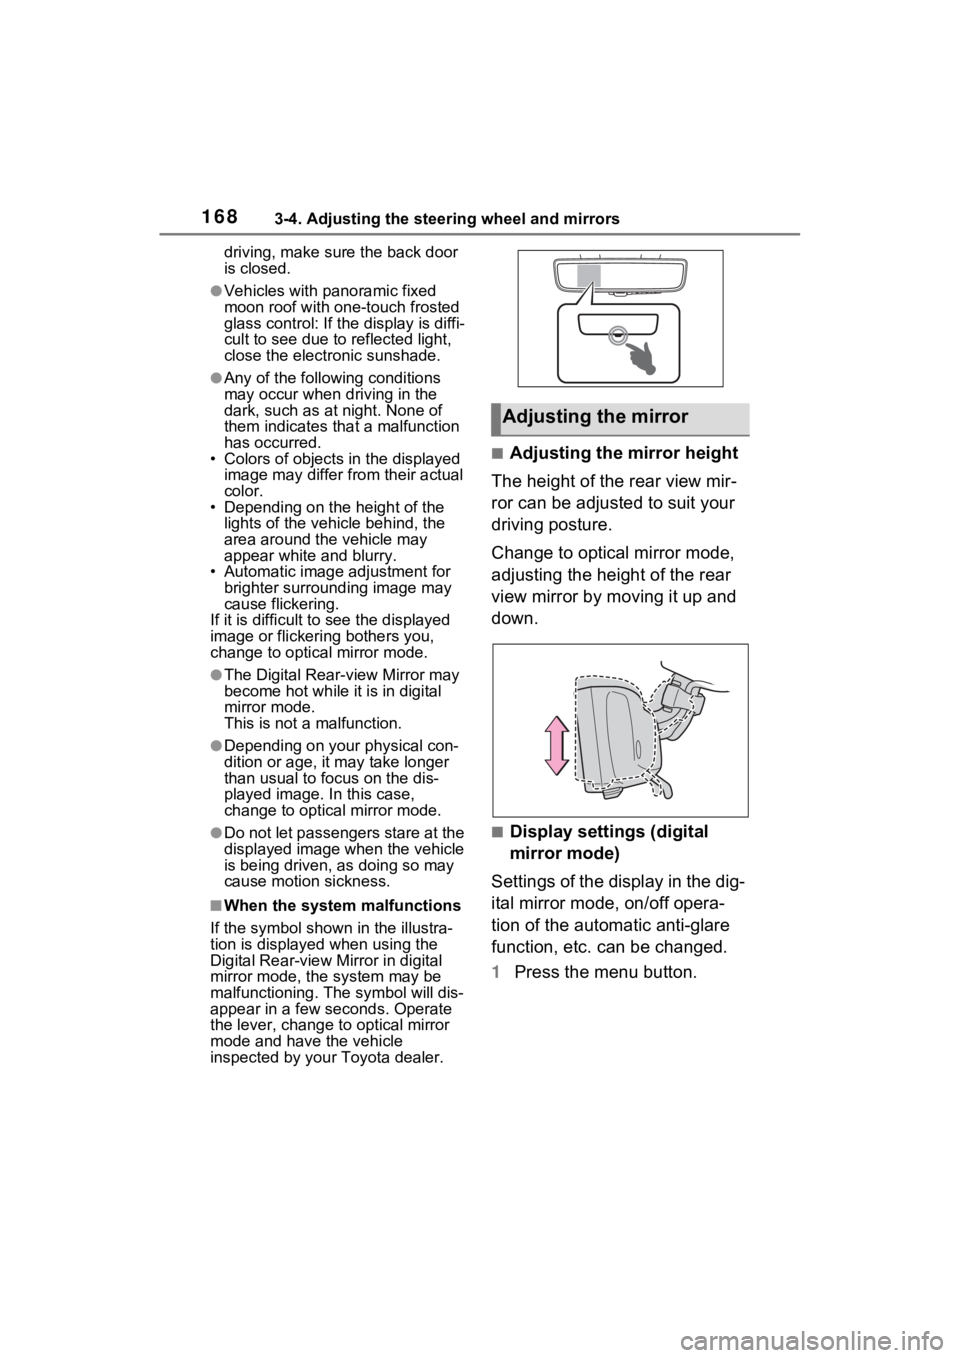
■Adjusting the mirror height
The height of the rear view mir-
ror can be adjusted to suit your
driving posture.
Change to optical mirror mode,
adjusting the height of the rear
view mirror by moving it up and
down.
■Display settings (digital
mirror mode)
Settings of the display in the dig-
ital mirror mode, on/off opera-
tion of the automatic anti-glare
function, etc. can be changed.
1 Press the menu button.
Adjusting the mirror
Page 178 of 548
1773-4. Adjusting the steering wheel and mirrors
3
Before driving
■Defogging the mirrors
The outside rear v iew mirrors can
be cleared using the mirror defog-
gers. Turn on the rear window
defogger to turn on the outside rear
view mirror defoggers.
( P.314, 321)
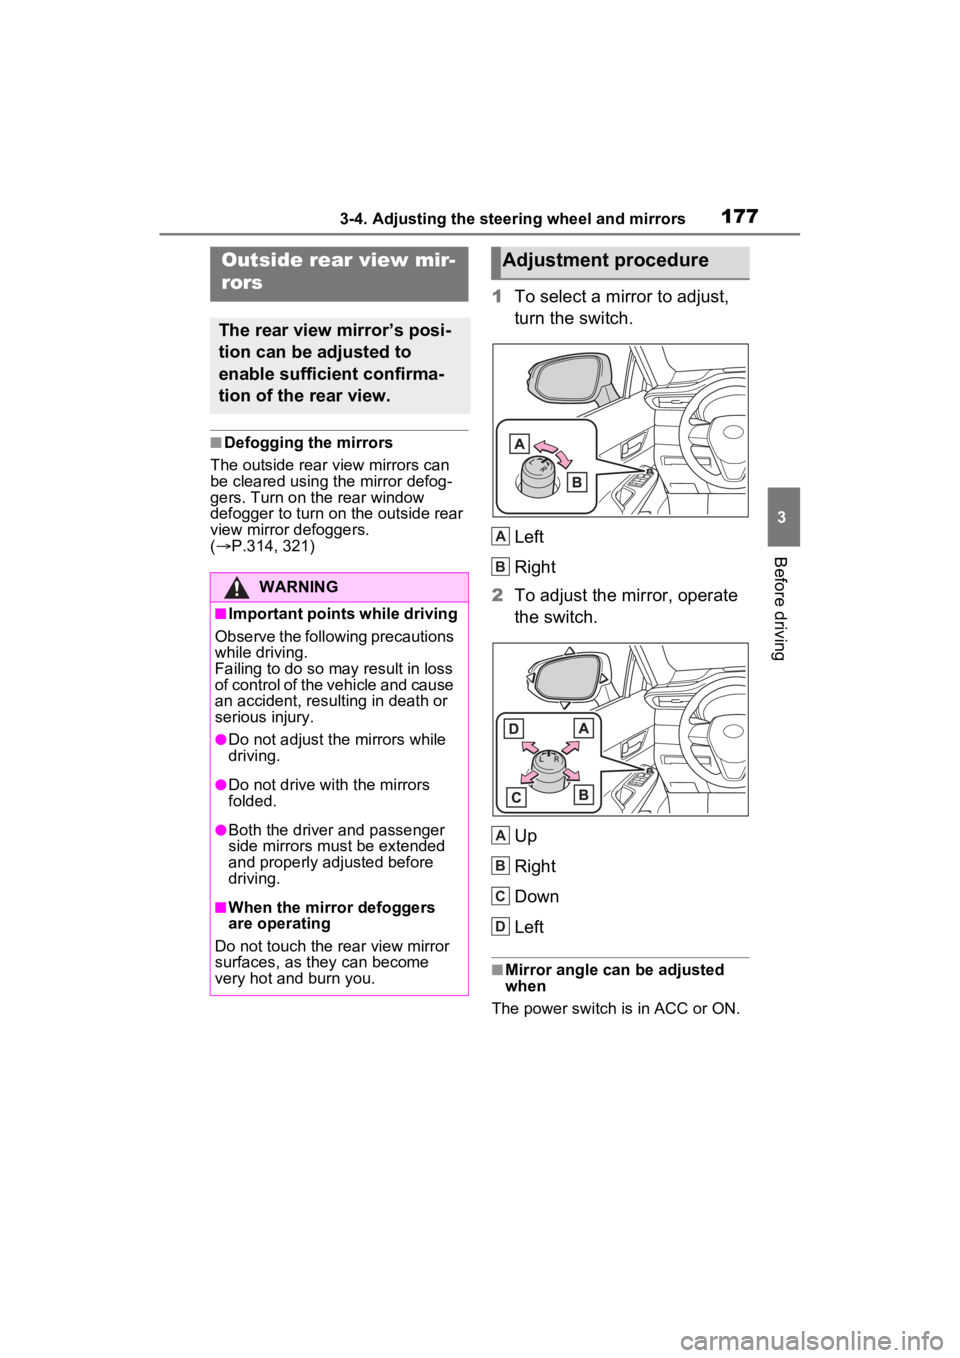
1 To select a mirror to adjust,
turn the switch.
Left
Right
2 To adjust the mirror, operate
the switch.
Up
Right
Down
Left
■Mirror angle can be adjusted
when
The power switch is in ACC or ON.
Outside rear view mir-
rors
The rear view mirror’s posi-
tion can be adjusted to
enable sufficient confirma-
tion of the rear view.
WARNING
■Important points while driving
Observe the following precautions
while driving.
Failing to do so may result in loss
of control of the vehicle and cause
an accident, resul ting in death or
serious injury.
●Do not adjust the mirrors while
driving.
●Do not drive with the mirrors
folded.
●Both the driver and passenger
side mirrors must be extended
and properly adjusted before
driving.
■When the mirror defoggers
are operating
Do not touch the rear view mirror
surfaces, as they can become
very hot and burn you.
Adjustment procedure
A
B
A
B
C
D
Page 436 of 548
4367-2. Steps to take in an emergency
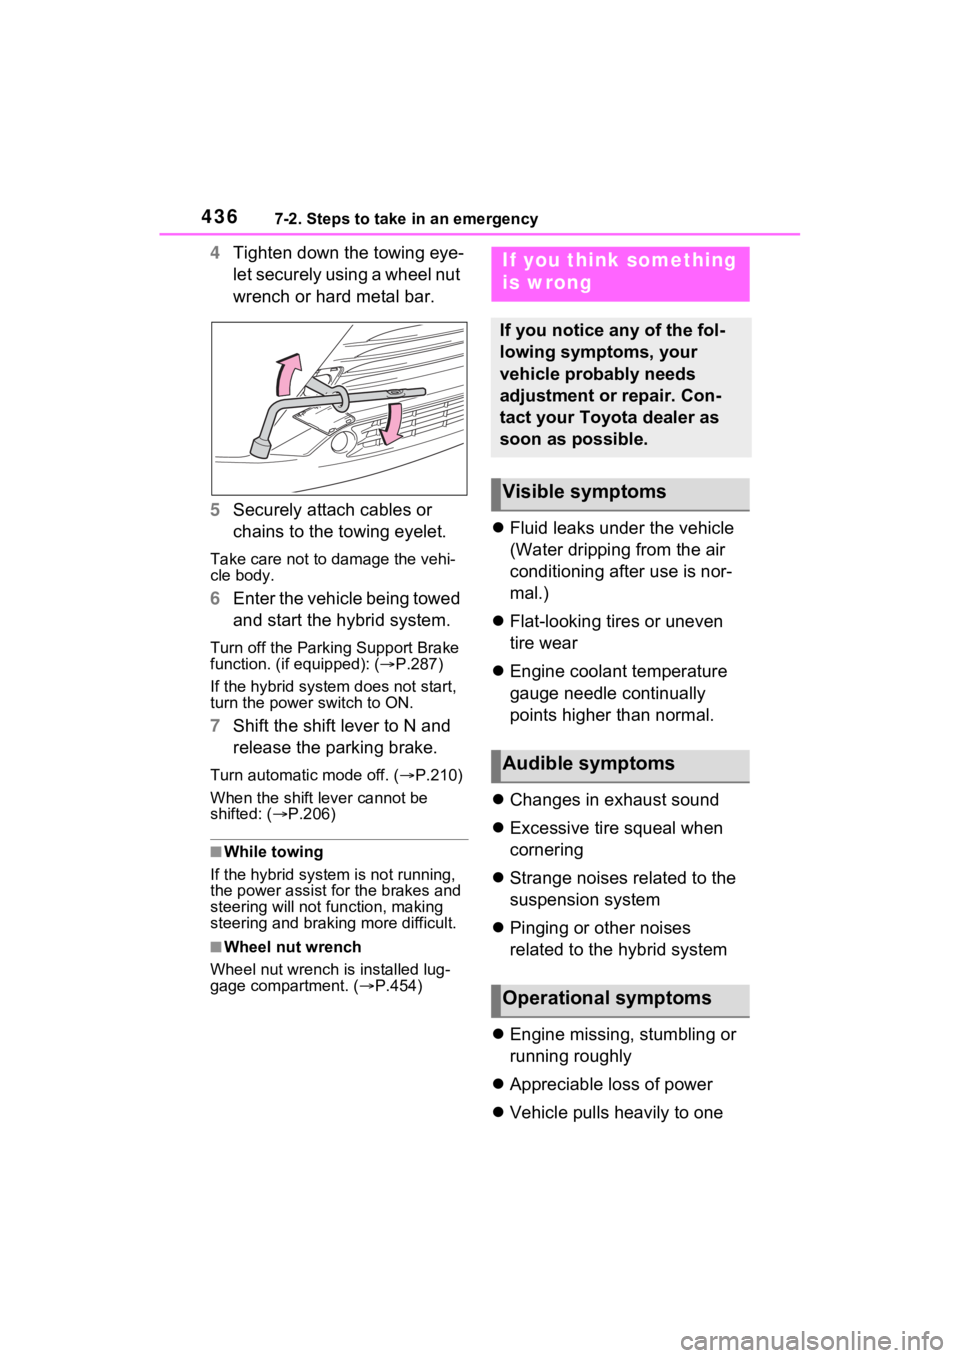
4Tighten down the towing eye-
let securely using a wheel nut
wrench or hard metal bar.
5 Securely attach cables or
chains to the towing eyelet.
Take care not to damage the vehi-
cle body.
6Enter the vehicle being towed
and start the hybrid system.
Turn off the Parkin g Support Brake
function. (if equipped): ( P.287)
If the hybrid system does not start,
turn the power switch to ON.
7 Shift the shift lever to N and
release the parking brake.
Turn automatic mode off. ( P.210)
When the shift le ver cannot be
shifted: ( P.206)
■While towing
If the hybrid system is not running,
the power assist for the brakes and
steering will not function, making
steering and braking more difficult.
■Wheel nut wrench
Wheel nut wrench is installed lug-
gage compartment. ( P.454)
Fluid leaks under the vehicle
(Water dripping from the air
conditioning after use is nor-
mal.)
Flat-looking tires or uneven
tire wear
Engine coolant temperature
gauge needle continually
points higher than normal.
Changes in exhaust sound
Excessive tire squeal when
cornering
Strange noises related to the
suspension system
Pinging or other noises
related to the hybrid system
Engine missing, stumbling or
running roughly
Appreciable loss of power
Vehicle pulls heavily to one
If you think something
is wrong
If you notice any of the fol-
lowing symptoms, your
vehicle probably needs
adjustment or repair. Con-
tact your Toyota dealer as
soon as possible.
Visible symptoms
Audible symptoms
Operational symptoms
Page 447 of 548
4477-2. Steps to take in an emergency
7
When trouble arises
■When a tire is replaced with a
compact spare tire
The compact spare tire is not
equipped with a tire pressure warn-
ing valve and transmitter. If a tire
goes flat, the tire pressure warning
light will not turn o ff even though the
flat tire has been replaced with the
spare tire. Replace the spare tire
with the standard tire and adjust the
tire inflation pressure. The tire pres-
sure warning light will go off after a
few minutes.
■Conditions that the tire pres-
sure warning system may not
function properly
P.400
WARNING
■If a warning light comes on or
a warning buzzer sounds
when a warning message is
shown on the multi-informa-
tion display
*
Check and follow the message
shown on the multi-information
display.
Failure to do so m ay result in
death or serious injury.
*: Warning lights illuminate in red
or yellow and the warning
buzzer beeps on ce or sounds
continuously.
■When the electric power
steering system warning light
comes on
When the light comes on yellow,
the assist to the power steering is
restricted. When the light comes
on red, the assist to the power
steering is lost and handling oper-
ations of the steering wheel
become extremely heavy.
If the steering wheel becomes
heavier than usual when operat-
ing, hold firmly and operate using
more force than usual.
■If the tire pr essure warning
light comes on
Be sure to observe the following
precautions. Failure to do so
could cause a loss of vehicle con-
trol and result in death or serious
injury.
●Stop your vehicle in a safe
place as soon as possible.
Adjust the tire inflation pressure
immediately.
●If the tire pressure warning light
comes on even after tire infla-
tion pressure adjustment, it is
probable that you have a flat
tire. Check the tires. If a tire is
flat, change it with the spare tire
and have the flat tire repaired by
the nearest Toyota dealer.
●Avoid abrupt maneuvering and
braking. If the vehicle tires dete-
riorate, you could lose control of
the steering wheel or the
brakes.
■If a blowout or sudden air
leakage should occur
The tire pressure warning system
may not activate immediately.
■Maintenance of the tires
Each tire, includi ng the spare (if
provided), should be checked
monthly when cold and inflated to
the inflation pressure recom-
mended by the vehicle manufac-
turer on the vehicle placard or tire
inflation pressure label (tire and
load information label). (If your
vehicle has tires of a different size
than the size indicated on the
vehicle placard or tire inflation
pressure label [tire and load infor-
mation label], you should deter-
mine the proper tire inflation
pressure for those tires.)
Page 539 of 548

Alphabetical Index539
from P................................. 206
Shift lock system .................... 206
Side airbags .............................. 33
Side doors ............................... 133
Side marker lights Light switch .......................... 215
Replacing light bulbs ............ 428
Side mirrors ............................ 177 Adjustment ........................... 177
BSM (Blind Spot Monitor)..... 269
Folding ................................. 178
Heaters......................... 314, 321
Side turn signal lights Replacing light bulbs ............ 428
Turn signal lever................... 208
Side windows ...... ................... 179
Smart key system ................... 150 Antenna location .................. 150
Entry functions ............. 133, 139
Starting the hybrid system.... 197
Warning message ................ 449
Snow tires ............................... 304
Spare tire Storage location ................... 454
Specifications ......................... 476
Speedometer ...................... 89, 93
Sport mode ............................. 295
Steering wheel Adjustment ........................... 164
Driving position memory....... 159
Heated steering wheel . 329, 330
Memory recall function ......... 160
Meter control switches ... 97, 107
Power easy access system .. 158
Stop lights Replacing light bulbs ............ 428
Storage feature ....................... 337
Storage precautions .............. 337
Stuck If the vehicle becomes stuck 474
Suggestion function....... 105, 116
Sunshade ................................ 346 Sun visors ...............................349
Switches
“ODO TRIP” switch ...........91, 95
“SOS” button ..........................65
Automatic High Beam switch 218
Brake hold switch .................212
Digital Rear-view Mirror control switches..............................166
Door lock switch ...................136
Driving mode select switch ...295
Driving position memory switches..............................158
Dynamic radar cruise control with full-speed range ..........258
Electronic sunshade switch ..346
Emergency flashers switch...430
EV drive mode switch ...........202
Fog light switch .....................221
Garage door opener switches ...........................................360
Heated steering wheel..........330
Ignition switch (power switch) ...........................................197
Light switch...........................215
LTA switch ............................249
Meter control switches....97, 107
Outside rear v iew mirror
switches..............................177
Panoramic moon roof switches ...........................................346
Parking brake switch ............209
Power back door s witch .......140
Power door lock switch.........136
Power switch ........................197
Power window switch ...........179
Rear window and outside rear view mirror defoggers switch...................................314, 321
Rear window wiper and washer switch .................................225
Seat adjustment ...................155
Seat heater switches ............330