2022 TOYOTA VENZA HYBRID lights
[x] Cancel search: lightsPage 261 of 548

2614-5. Using the driving support systems
4
Driving
When there are no vehicles ahead
The vehicle travels at the speed set by the driver.
Example of deceleration crui sing and follow-up cruising
When a preceding vehicle driving slower than the set speed
appears
When a vehicle is detected runni ng ahead of you, the system automatically
decelerates your vehicle. When a greater reduction in vehicle s peed is nec-
essary, the system applies the brakes (the stop lights will come on at this
time). The system will respond to changes i n the speed of the vehicle
ahead in order to maintain the ve hicle-to-vehicle distance set by the driver.
Approach warning warns you when the system cannot decelerate suffi-
ciently to prevent your vehicle from closing in on the vehicle ahead.
When the vehicle ahead of you st ops, your vehicle will also stop (vehicle is
stopped by system control). Afte r the vehicle ahead starts off, pressing the
“+RES” switch or depressing the accelerator pedal (start-off operation) will
resume follow-up cruising. If the start-off operation is not performed, system
control continues to keep your vehicle stopped.
When the turn signal lever is ope rated and your vehicle moves to an over-
taking lane while driving at 50 mph (80 km/h) or more, the vehi cle will accel-
erate to help to overt ake a passing vehicle.
The system’s identifi cation of what is an overtaking lane may be deter-
mined solely based on the location of the steering wheel in the vehicle (left
side driver position versus righ t side driver position.) If the vehicle is driven
to a region where the overtaking lane is on a different side fr om where the
vehicle is normally driven, the v ehicle may accelerate when the turn signal
lever is operated in the opposite direction to the overtaking l ane (e.g., if the
driver normally operates the vehicle in a region where the over taking lane is
to the right but then drives to a region where the overtaking l ane is to the
left, the vehicle may accelerate when the right turn signal is activated).
Example of acceleration
When there are no longer any preceding vehicles driving slower
than the set speed
The system accelerates until the set speed is reached. The system then
returns to constan t speed cruising.
1Press the cruise control main
switch to activate the cruise control.
Dynamic radar cruise control indi-
cator will come on and a message
will be displayed on
the multi-infor-
mation display. Press the switch
again to deactivate the cruise con-
trol.
B
C
Setting the vehicle speed
(vehicle-to-vehicle dis-
tance control mode)
Page 279 of 548
2794-5. Using the driving support systems
4
Driving
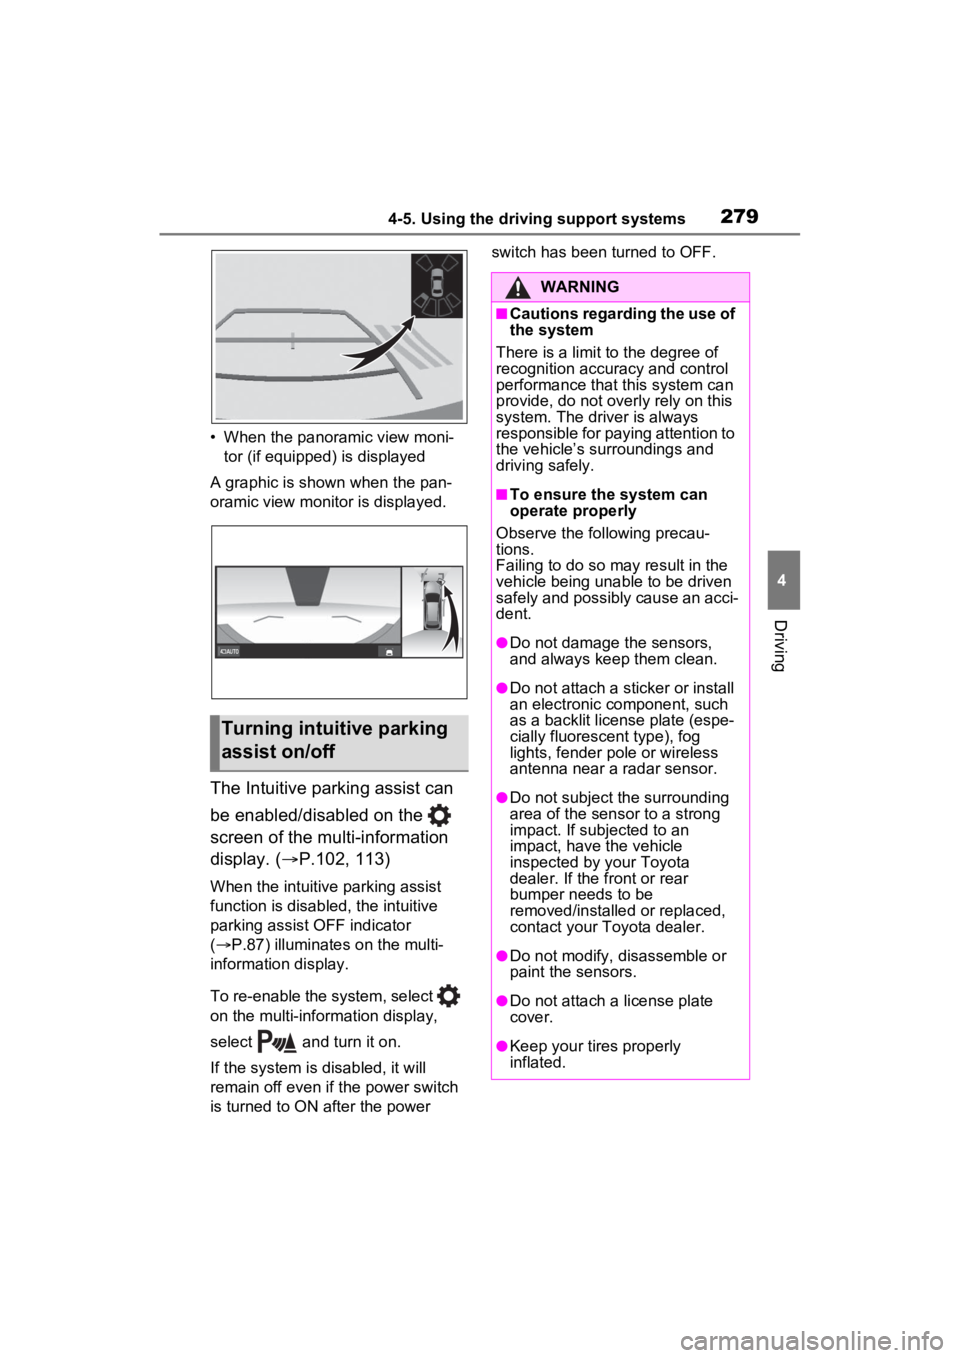
• When the panoramic view moni-tor (if equipped) is displayed
A graphic is shown when the pan-
oramic view monitor is displayed.
The Intuitive parking assist can
be enabled/disabled on the
screen of the multi-information
display. ( P.102, 113)
When the intuitive parking assist
function is disabled, the intuitive
parking assist OFF indicator
( P.87) illuminates on the multi-
information display.
To re-enable the system, select
on the multi-inform ation display,
select and turn it on.
If the system is disabled, it will
remain off even if the power switch
is turned to ON after the power switch has been turned to OFF.
Turning intuitive parking
assist on/off
WARNING
■Cautions regarding the use of
the system
There is a limit t o the degree of
recognition accuracy and control
performance that this system can
provide, do not overly rely on this
system. The driver is always
responsible for paying attention to
the vehicle’s su rroundings and
driving safely.
■To ensure the system can
operate properly
Observe the following precau-
tions.
Failing to do so may result in the
vehicle being unable to be driven
safely and possibly cause an acci-
dent.
●Do not damage the sensors,
and always keep them clean.
●Do not attach a sticker or install
an electronic component, such
as a backlit licen se plate (espe-
cially fluorescent type), fog
lights, fender po le or wireless
antenna near a radar sensor.
●Do not subject the surrounding
area of the sensor to a strong
impact. If subjected to an
impact, have the vehicle
inspected by your Toyota
dealer. If the front or rear
bumper needs to be
removed/installed or replaced,
contact your Toyota dealer.
●Do not modify, disassemble or
paint the sensors.
●Do not attach a license plate
cover.
●Keep your tires properly
inflated.
Page 297 of 548
2974-5. Using the driving support systems
4
Driving
■VSC (Vehicle Stability Con-
trol)
Helps the driver to control skid-
ding when swerving suddenly or
turning on slippery road sur-
faces.
■Enhanced VSC (Enhanced
Vehicle Stability Control)
Provides cooperative control of
the ABS, TRAC, VSC and EPS.
Helps to maintai n directional
stability when swerving on slip-
pery road surfaces by con-
trolling steering performance.
■TRAC (Traction Control)
Helps to maintain drive power
and prevent the drive wheels
from spinning when starting the
vehicle or accelerating on slip-
pery roads
■Active Cornering Assist
(ACA)
Helps to prevent the vehicle
from drifting to the outer side by
performing inner wheel brake
control when attempting to
accelerate while turning
■Hill-start assist control
Helps to reduce the backward
movement of the vehicle when
starting on an uphill
■EPS (Electric Power Steer-
ing)
Employs an electric motor to
reduce the amount of effort
needed to turn the steering wheel
■E-Four (Electronic On-
Demand AWD system)
Automatically switches from
front wheel drive to all-wheel
drive (AWD) according to the
driving conditions, helping to
ensure reliable handling and
stability. Examples of condi-
tions where the system will
switch to AWD are when corner-
ing, going uphill, starting off or
accelerating, and when the road
surface is slippery due to snow,
rain, etc.
■The Secondary Collision
Brake
When the SRS airbag sensor
detects a collision and the sys-
tem operates, the brakes and
brake lights are automatically
controlled to reduce the vehicle
speed and help reduce the pos-
sibility of further damage due to
a secondary collision.
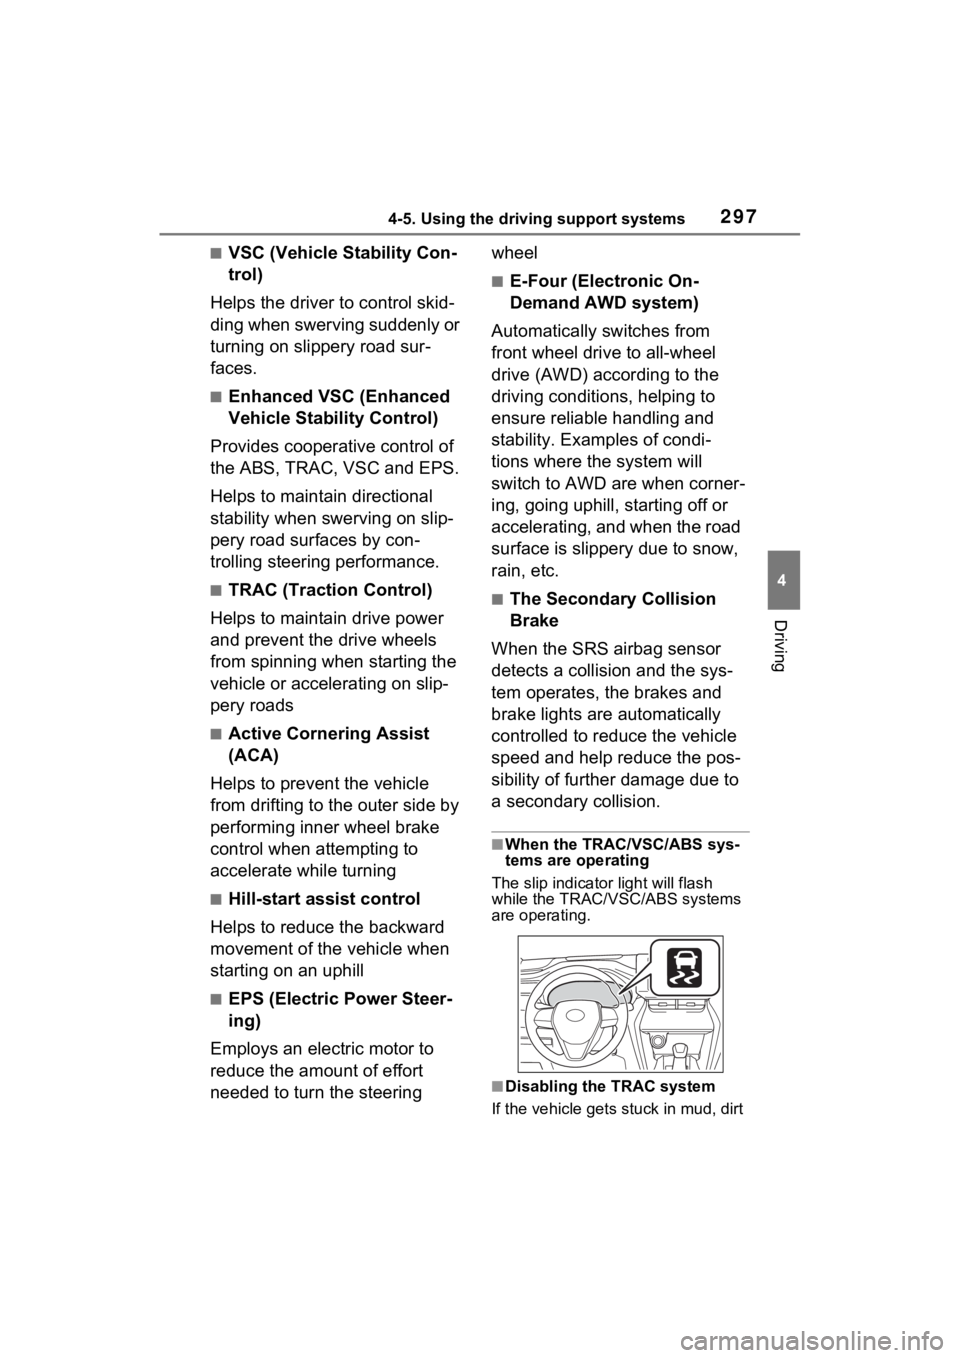
■When the TRAC/VSC/ABS sys-
tems are operating
The slip indicator light will flash
while the TRAC/VSC/ABS systems
are operating.
■Disabling the TRAC system
If the vehicle gets stuck in mud, dirt
Page 302 of 548
3024-6. Driving tips
4-6.Driving tips
When using Eco drive mode, the
torque corresponding to the
accelerator pedal depression
amount can be generated more
smoothly than it is in normal
conditions. In addition, the oper-
ation of the air conditioning sys-
tem (heating/cooling) will be
minimized, improving the fuel
economy. (P.295)
The Eco-friendly driving is pos-
sible by keeping the indicate of
Hybrid System Indicator within
Eco area. ( P.90, 94)
Shift the shift lever to D when
stopped at a traffic light, or driv-
ing in heavy traffic etc. Shift the
shift lever to P when parking.
When using the N, there is no
positive effect on fuel consump-
tion. In the N, the gasoline
engine operates but electricity
cannot be generated. Also,
when using the air conditioning system, etc., the hybrid battery
(traction battery) power is con-
sumed.
Drive your vehicle smoothly.
Avoid abrupt acceleration and
deceleration. Gradual accel-
eration and deceleration will
make more effective use of
the electric motor (traction
motor) without having to use
gasoline engine power.
Avoid repeated acceleration.
Repeated acceleration con-
sumes hybrid battery (trac-
tion battery) power, resulting
in poor fuel consumption. Bat-
tery power can be restored by
driving with the accelerator
pedal slightly released.
Make sure to operate the brakes
gently and in a timely manner. A
greater amount of electrical
energy can be regenerated
when slowing down.
Repeated acceleration and
deceleration, as well as long
waits at traffic lights, will lead to
bad fuel economy. Check traffic
reports before leaving and avoid
delays as much as possible.
Hybrid Electric Vehi-
cle driving tips
For economical and ecolog-
ical driving, pay attention to
the following points:
Using Eco drive mode
Use of Hybrid System
Indicator
Shift lever operation
Accelerator pedal/brake
pedal operation
When braking
Delays
Page 305 of 548
3054-6. Driving tips
4
Driving
Perform the following according
to the driving conditions:
Do not try to forcibly open a
window or move a wiper that
is frozen. Pour warm water
over the frozen area to melt
the ice. Wipe away the water
immediately to prevent it from
freezing.
To ensure proper operation of
the climate control system
fan, remove any snow that
has accumulated on the air
inlet vents in front of the wind-
shield.
Check for and remove any
excess ice or snow that may
have accumulated on the
exterior lights, vehicle’s roof,
chassis, around the tires or on
the brakes.
Remove any snow or mud
from the bottom of your shoes
before getting in the vehicle.
Accelerate the vehicle slowly,
keep a safe distance between
you and the vehicle ahead, and
drive at a reduced speed suit-
able to road conditions.
Turn automatic mode of the
parking brake off. Otherwise, the parking brake
may freeze and not be able to
be released automatically.
Also, avoid using the following as
the parking brake may operate
automatically, even if automatic
mode is off.
• Brake hold system
Park the vehicle and move
the shift lever to P without set-
ting the parking brake. The
parking brake may freeze up,
preventing it from being
released. If the vehicle is
parked without setting the
parking brake, make sure to
block the wheels. Failure to
do so may be dangerous
because it may cause the
vehicle to move unexpect-
edly, possibly leading to an
accident.
When the parking brake is in auto-
matic mode, release the parking
brake after shifting the shift lever to
P. ( P.210)
If the vehicle is parked without
setting the parking brake,
confirm that the shift lever
cannot be moved out of P.
If the vehicle is left parked
with the brakes damp in cold
temperatures, there is a pos-
sibility of the brakes freezing.
Before driving the vehicle
When driving the vehicle
When parking the vehicle
Page 311 of 548

311
5
5
Interior features
Interior features
5-1. Using the air conditioning system and defogger
Automatic air conditioning system (vehicles with 8-
inch display) .............. 312
Automatic air conditioning system (vehicles with
12.3-inch display) ...... 319
Heated steering wheel/seat heaters/seat ventilators
.................................. 329
5-2. Using the interior lights Interior lights list .......... 333
5-3. Using the storage features List of storage features 337
Luggage compartment fea- tures .......................... 340
5-4. Using the other interior features
Toyota multi-operation touch (vehicle with the
12.3-inch display) ...... 344
Panoramic fixed moon roof with one-touch frosted
glass control .............. 346
Other interior features . 349
Garage door opener.... 360
Page 333 of 548
3335-2. Using the interior lights
5
Interior features
5-2.Using the interior lights
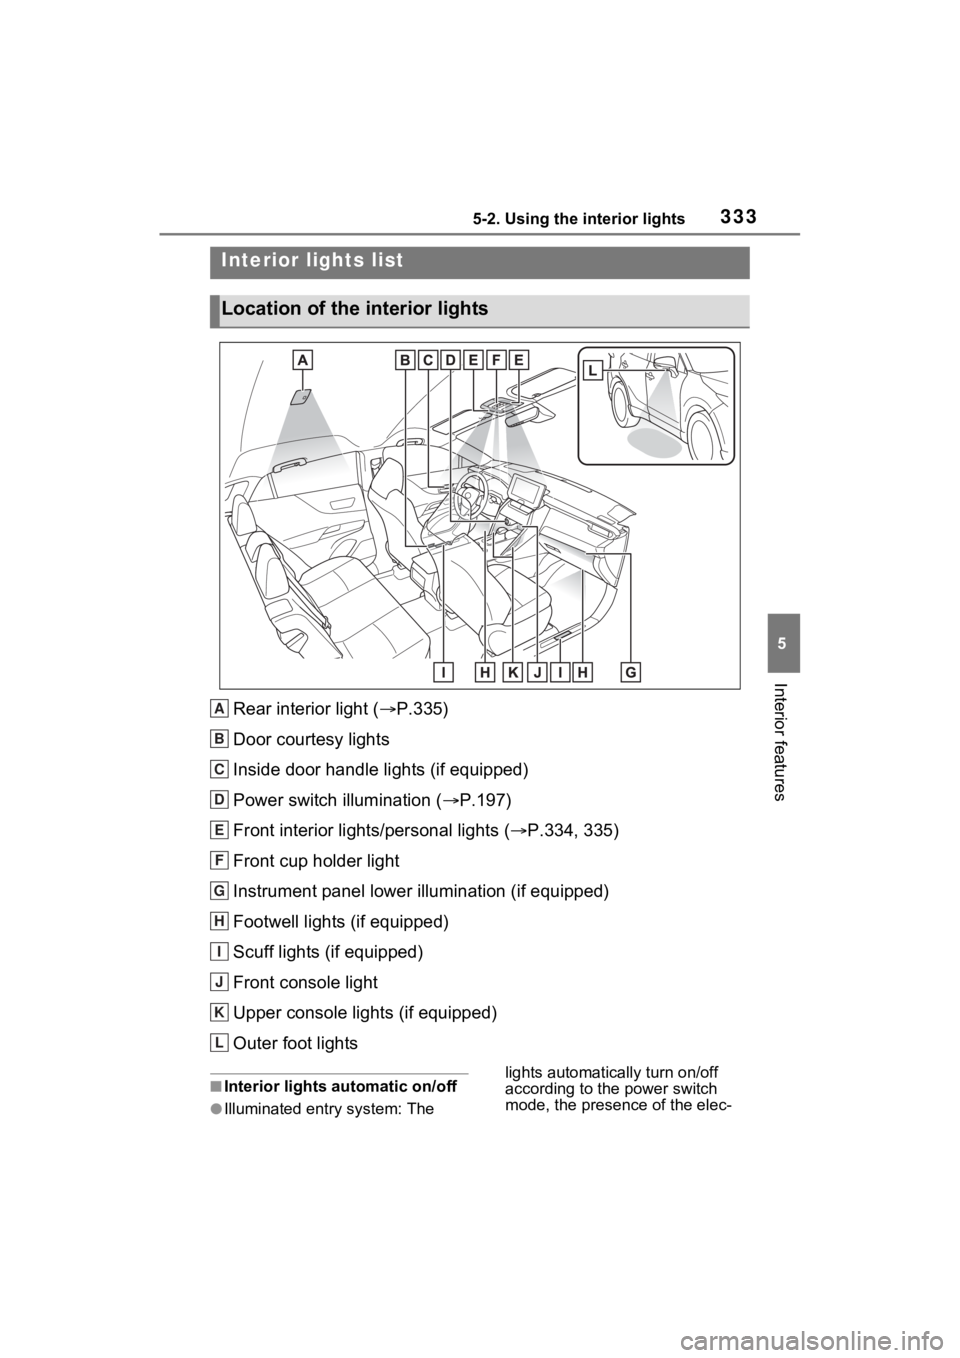
Rear interior light (P.335)
Door courtesy lights
Inside door handle lights (if equipped)
Power switch illumination ( P.197)
Front interior lights/personal lights ( P.334, 335)
Front cup holder light
Instrument panel lower illumination (if equipped)
Footwell lights (if equipped)
Scuff lights (if equipped)
Front console light
Upper console lights (if equipped)
Outer foot lights
■Interior lights automatic on/off
●Illuminated entry system: The lights automatically turn on/off
according to the power switch
mode, the presence of the elec-
Interior lights list
Location of the i
nterior lights
A
B
C
D
E
F
G
H
I
J
K
L
Page 334 of 548
3345-2. Using the interior lights
tronic key, whether the doors are
locked/unlocked, and whether the
doors are opened/closed.
●If the interior lights remain on
when the power switch is turned to
OFF, the lights will go off automat-
ically after 20 minutes.
■Interior lights brightness reduc-
tion
The brightness of the following
lights will be reduc ed when shifting
the shift lever to any position other
than P.
●Instrument panel lower illumina-
tion (if equipped)
●Footwell lights (if equipped)
●Upper console lights (if equipped)
●Front console light
●Inside door handle lights (if
equipped)
■The interior lights may turn on
automatically when
If any of the SRS airbags deploy
(inflate) or in the event of a strong
rear impact, the interior lights will
turn on automatically.
The interior lights will turn off auto-
matically after approximately 20
minutes.
The interior lights can be turned off
manually. However, in order to help
prevent further collisions, it is rec-
ommended that they be left on until
safety can be ensured.
(The interior lights may not turn on
automatically depending on the
force of the impact and conditions of
the collision.)
■Customization
Setting (e.g. the time elapsed before
the lights turn off) can be changed.
(Customizable features: P.510)
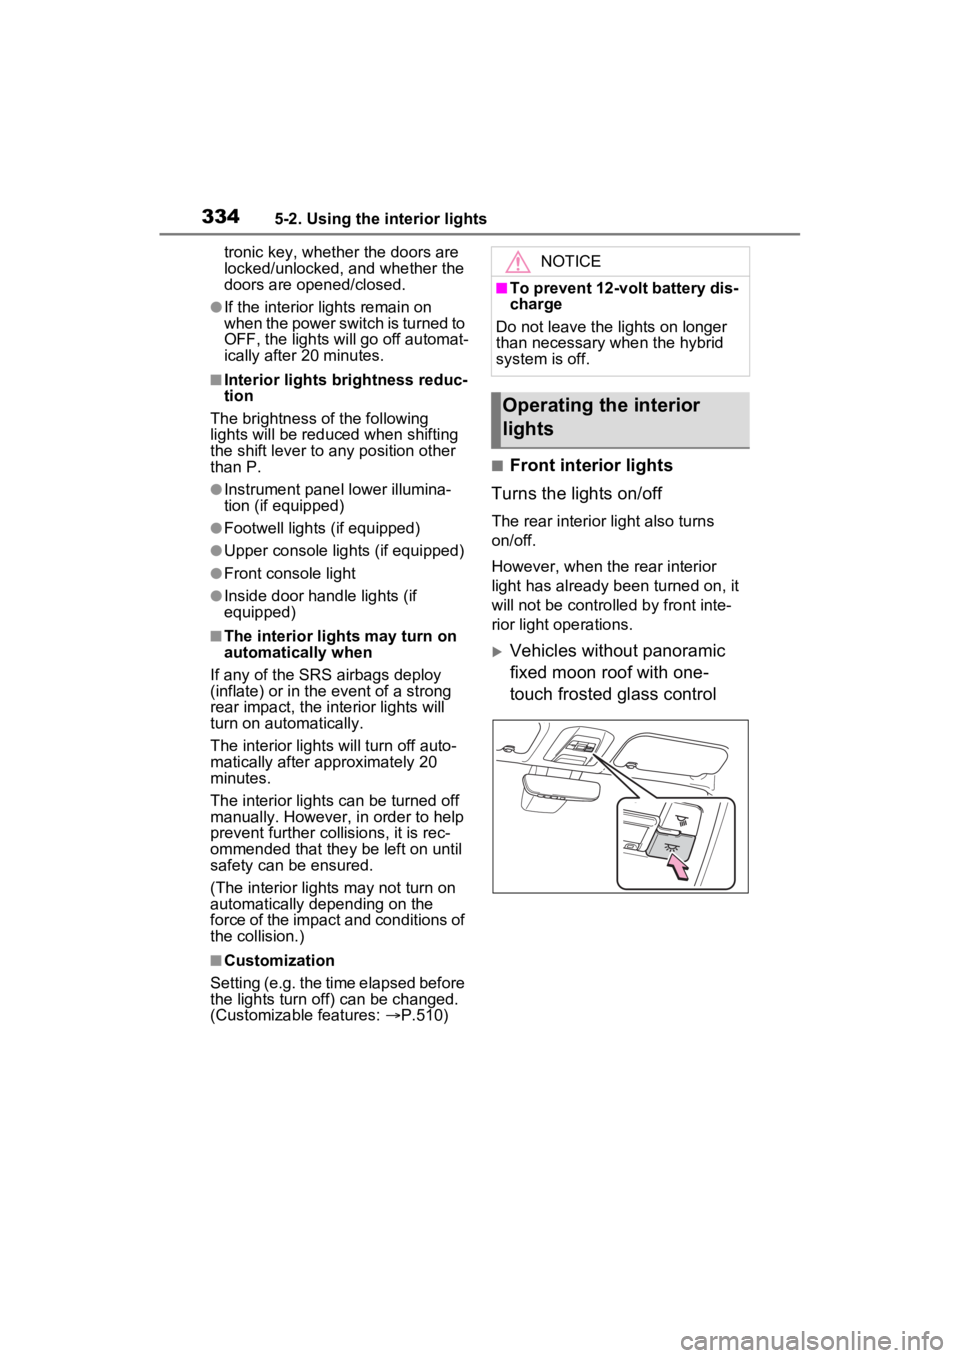
■Front interior lights
Turns the lights on/off
The rear interior light also turns
on/off.
However, when the rear interior
light has already been turned on, it
will not be controlle d by front inte-
rior light operations.
Vehicles without panoramic
fixed moon roof with one-
touch frosted glass control
NOTICE
■To prevent 12-volt battery dis-
charge
Do not leave the lights on longer
than necessary when the hybrid
system is off.
Operating the interior
lights