2022 TOYOTA VENZA HYBRID lights
[x] Cancel search: lightsPage 168 of 548
1673-4. Adjusting the steering wheel and mirrors
3
Before driving
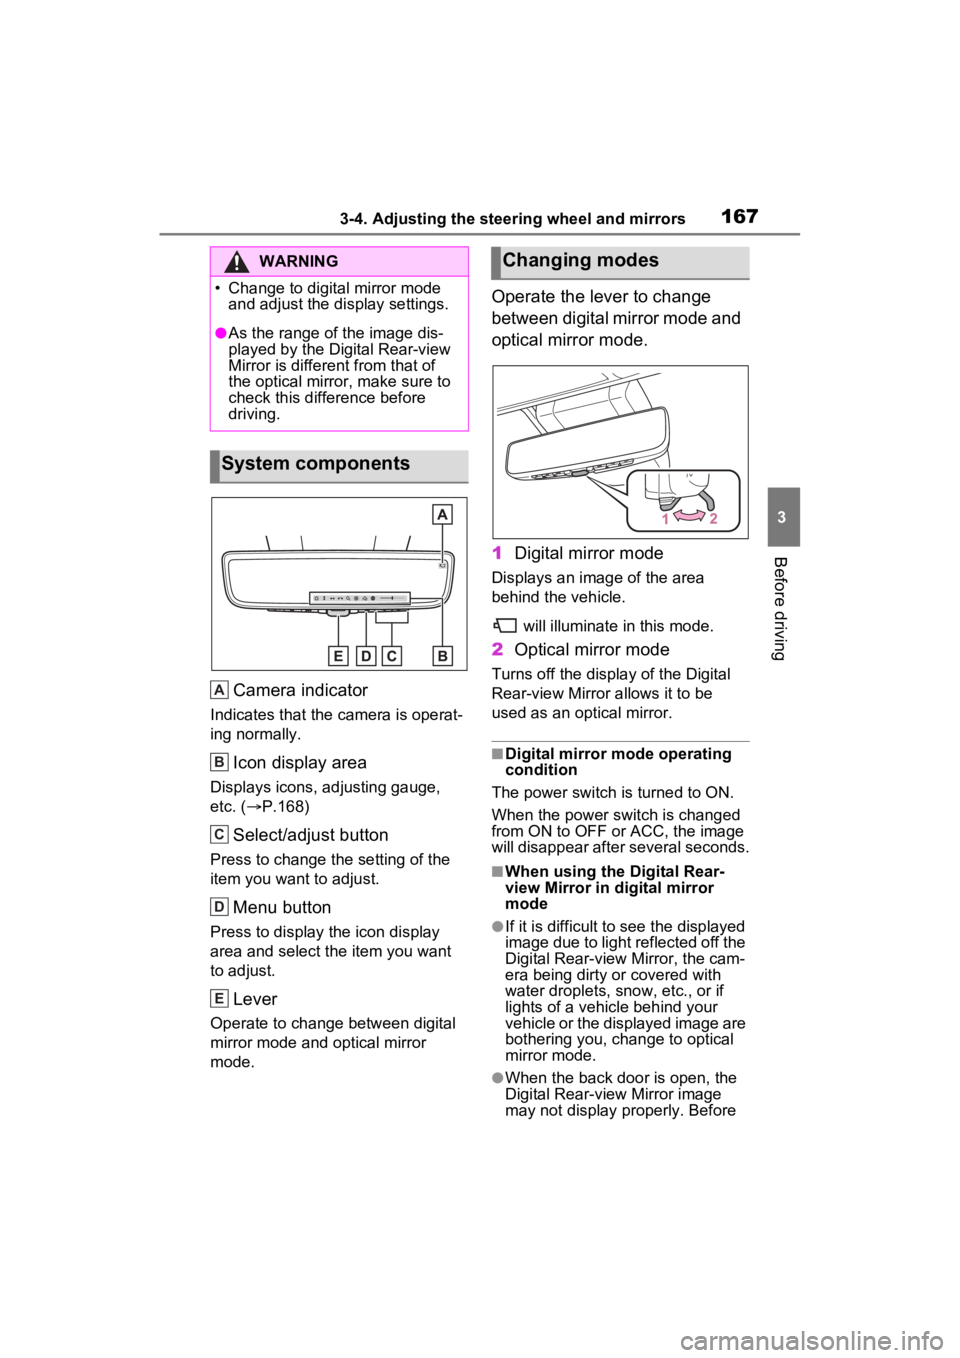
Camera indicator
Indicates that the camera is operat-
ing normally.
Icon display area
Displays icons, adjusting gauge,
etc. ( P.168)
Select/adjust button
Press to change the setting of the
item you want to adjust.
Menu button
Press to display the icon display
area and select the item you want
to adjust.
Lever
Operate to change between digital
mirror mode and optical mirror
mode.
Operate the lever to change
between digital mirror mode and
optical mirror mode.
1 Digital mirror mode
Displays an ima ge of the area
behind the vehicle.
will illuminate in this mode.
2Optical mirror mode
Turns off the display of the Digital
Rear-view Mirror allows it to be
used as an optical mirror.
■Digital mirror mode operating
condition
The power switch is turned to ON.
When the power switch is changed
from ON to OFF or ACC, the image
will disappear after several seconds.
■When using the Digital Rear-
view Mirror in d igital mirror
mode
●If it is difficult to see the displayed
image due to light reflected off the
Digital Rear-view Mirror, the cam-
era being dirty or covered with
water droplets, snow, etc., or if
lights of a vehicle behind your
vehicle or the displayed image are
bothering you, change to optical
mirror mode.
●When the back door is open, the
Digital Rear-view Mirror image
may not display properly. Before
WARNING
�
Page 169 of 548
1683-4. Adjusting the steering wheel and mirrors
driving, make sure the back door
is closed.
●Vehicles with panoramic fixed
moon roof with one-touch frosted
glass control: If the display is diffi-
cult to see due to reflected light,
close the electronic sunshade.
●Any of the following conditions
may occur when d riving in the
dark, such as at night. None of
them indicates that a malfunction
has occurred.
• Colors of objects in the displayed
image may differ from their actual
color.
• Depending on the height of the
lights of the vehicle behind, the
area around the vehicle may
appear white and blurry.
• Automatic image adjustment for brighter surrounding image may
cause flickering.
If it is difficult to see the displayed
image or flickering bothers you,
change to optical mirror mode.
●The Digital Rear-view Mirror may
become hot while it is in digital
mirror mode.
This is not a malfunction.
●Depending on your physical con-
dition or age, it may take longer
than usual to focus on the dis-
played image. In this case,
change to optical mirror mode.
●Do not let passengers stare at the
displayed image when the vehicle
is being driven, as doing so may
cause motion sickness.
■When the system malfunctions
If the symbol show n in the illustra-
tion is displayed when using the
Digital Rear-view Mirror in digital
mirror mode, the system may be
malfunctioning. Th e symbol will dis-
appear in a few seconds. Operate
the lever, change to optical mirror
mode and have the vehicle
inspected by your Toyota dealer.
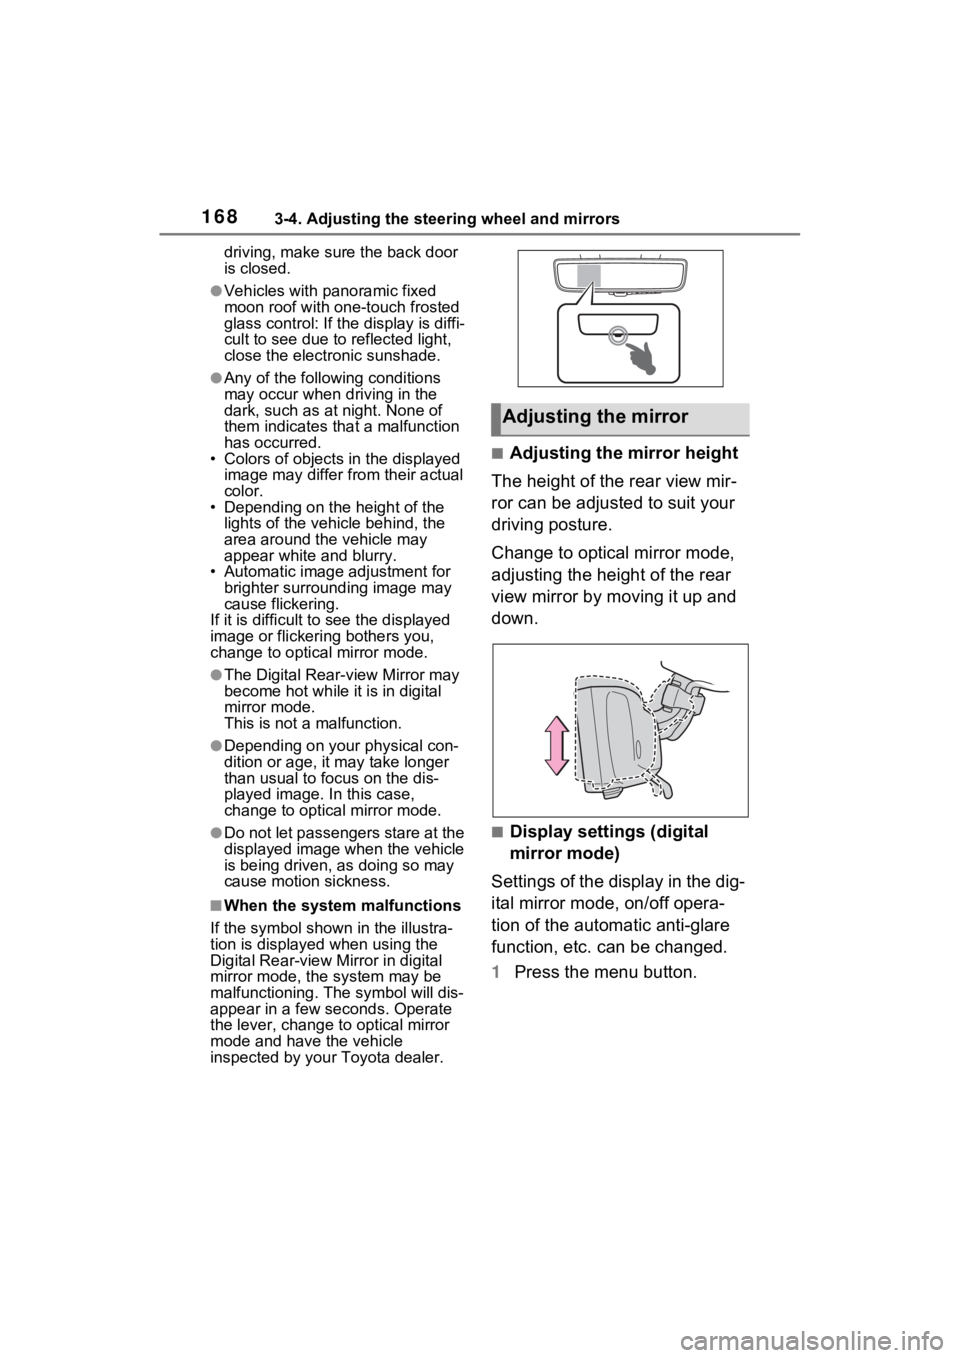
■Adjusting the mirror height
The height of the rear view mir-
ror can be adjusted to suit your
driving posture.
Change to optical mirror mode,
adjusting the height of the rear
view mirror by moving it up and
down.
■Display settings (digital
mirror mode)
Settings of the display in the dig-
ital mirror mode, on/off opera-
tion of the automatic anti-glare
function, etc. can be changed.
1 Press the menu button.
Adjusting the mirror
Page 170 of 548
1693-4. Adjusting the steering wheel and mirrors
3
Before driving
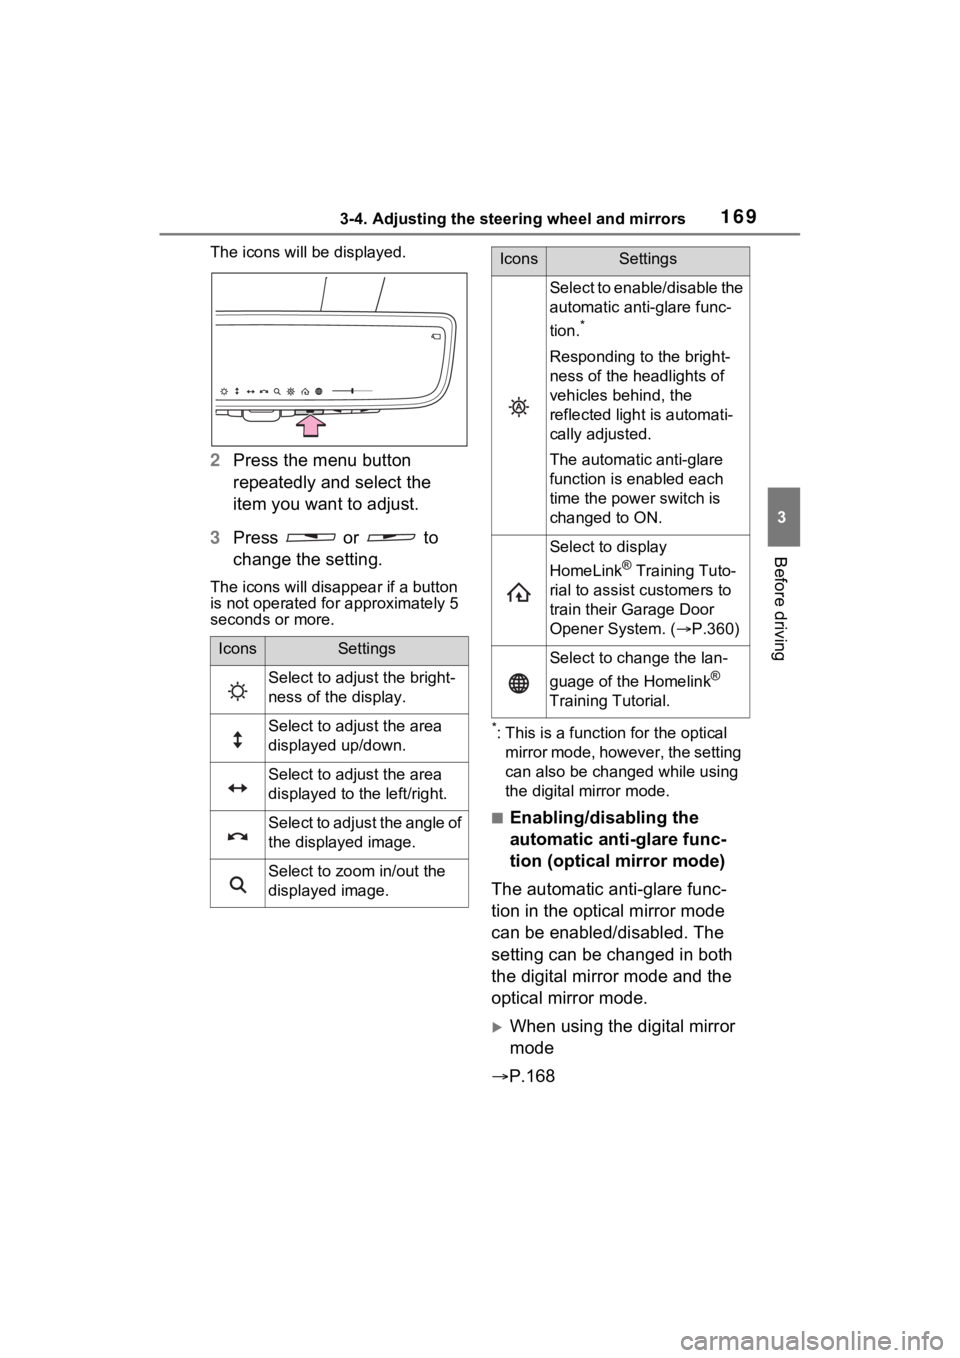
The icons will be displayed.
2Press the menu button
repeatedly and select the
item you want to adjust.
3 Press or to
change the setting.
The icons will disapp ear if a button
is not operated fo r approximately 5
seconds or more.
*: This is a functi on for the optical
mirror mode, however, the setting
can also be changed while using
the digital mirror mode.
■Enabling/disabling the
automatic anti-glare func-
tion (optical mirror mode)
The automatic anti-glare func-
tion in the optical mirror mode
can be enabled/disabled. The
setting can be changed in both
the digital mirror mode and the
optical mirror mode.
When using the digital mirror
mode
P.168
IconsSettings
Select to adjust the bright-
ness of the display.
Select to adjust the area
displayed up/down.
Select to adjust the area
displayed to the left/right.
Select to adjust the angle of
the displayed image.
Select to zoom in/out the
displayed image.
Select to enable/disable the
automatic anti-glare func-
tion.
*
Responding to the bright-
ness of the headlights of
vehicles behind, the
reflected light is automati-
cally adjusted.
The automatic anti-glare
function is enabled each
time the power switch is
changed to ON.
Select to display
HomeLink
® Training Tuto-
rial to assist customers to
train their Garage Door
Opener System. ( P.360)
Select to change the lan-
guage of the Homelink
®
Training Tutorial.
IconsSettings
Page 175 of 548
1743-4. Adjusting the steering wheel and mirrors
SymptomLikely causeSolution
The image is difficult to
see.
The mirror surface is
dirty.Clean the mirror surface
gently, using a soft dry
cloth.
Sunlight or headlights
are shining directly into
the Digital Rear-view
Mirror.
Change to optical mirror
mode.
(Vehicles with pan-
oramic fixed moon roof
with one-touch frosted
glass control: If the light
is coming through the
moon roof, close the
electronic sunshade.)
• T h e v e h i c l e i s i n a d a r k area.
• The vehicle is near a TV tower, broadcast-
ing station, electric
power plant, or other
location where strong
radio waves or electri-
cal noise may be pres-
ent.
• The temperature around the camera is
extremely high/low.
• The ambient tempera- ture is extremely low.
• It is raining or humid.
• Sunlight or headlights are shining directly into
the camera lens.
• The vehicle is under fluorescent lights,
sodium lights, mer-
cury lights, etc.
• Exhaust gas is obstructing the cam-
era.
Change to optical mirror
mode.
(Change back to digital
mirror mode when the
conditions have
improved.)
Foreign matters such as
water droplets or dust is
on the camera lens.Wipe the camera lens
with a damp soft cloth.
Page 183 of 548
183
4
4
Driving
Driving
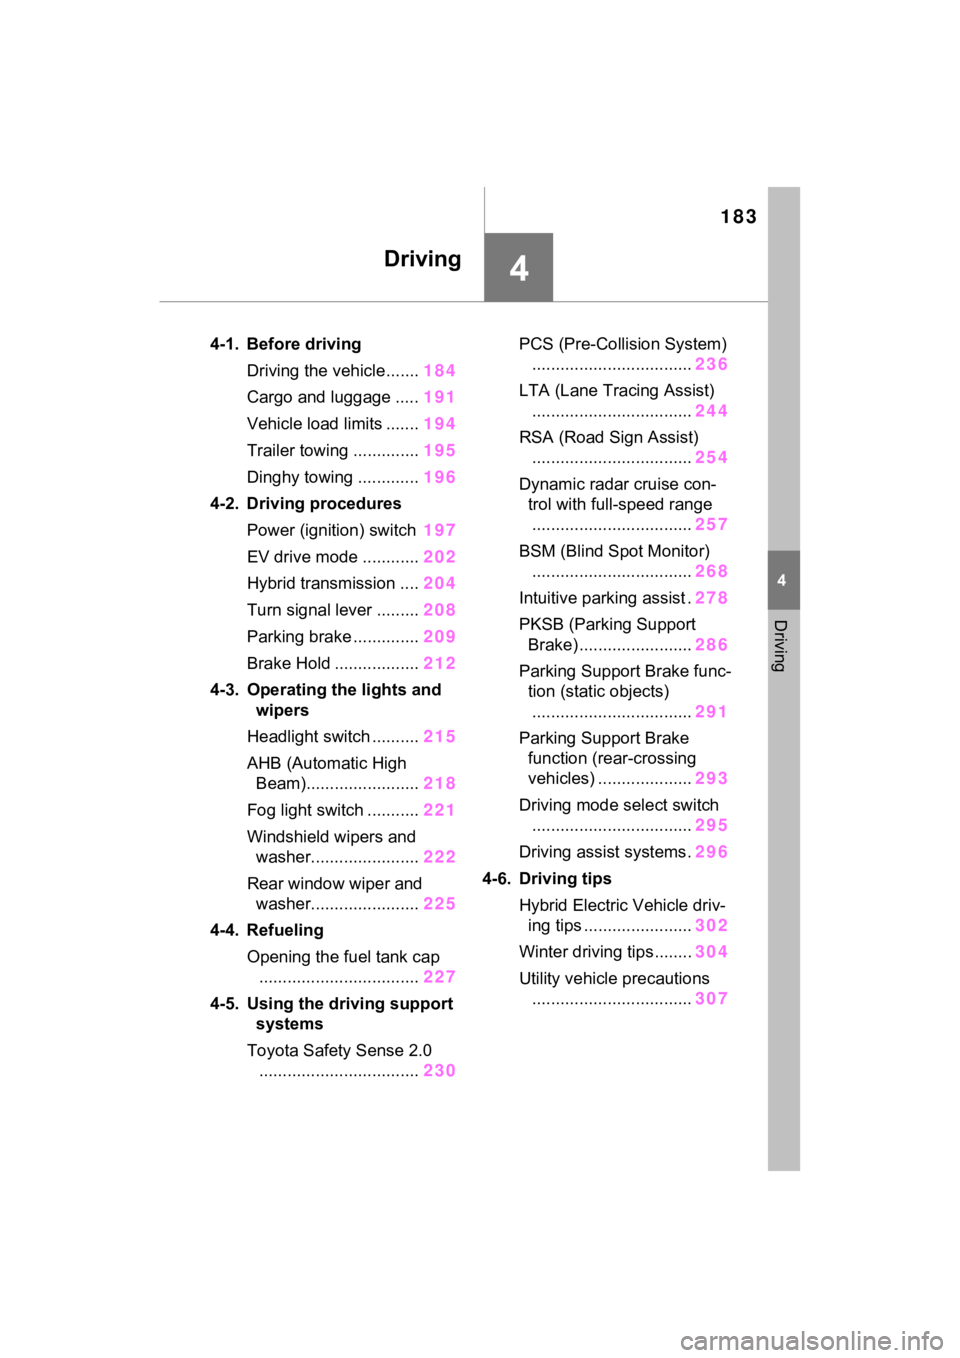
4-1. Before drivingDriving the vehicle....... 184
Cargo and luggage ..... 191
Vehicle load limits ....... 194
Trailer towing .............. 195
Dinghy towing ............. 196
4-2. Driving procedures Power (ignition) switch 197
EV drive mode ............ 202
Hybrid transmission .... 204
Turn signal lever ......... 208
Parking brake .............. 209
Brake Hold .................. 212
4-3. Operating the lights and wipers
Headlight switch .......... 215
AHB (Automatic High Beam)........................ 218
Fog light switch ........... 221
Windshield wipers and washer....................... 222
Rear window wiper and washer....................... 225
4-4. Refueling Opening the fuel tank cap.................................. 227
4-5. Using the driving support
systems
Toyota Safety Sense 2.0 .................................. 230PCS (Pre-Collision System)
.................................. 236
LTA (Lane Tracing Assist) .................................. 244
RSA (Road Sign Assist) .................................. 254
Dynamic radar cruise con- trol with full-speed range.................................. 257
BSM (Blind Spot Monitor) .................................. 268
Intuitive parking assist . 278
PKSB (Parking Support Brake) ........................ 286
Parking Support Brake func- tion (static objects)
.................................. 291
Parking Support Brake function (rear-crossing
vehicles) .................... 293
Driving mode select switch .................................. 295
Driving assist systems. 296
4-6. Driving tips Hybrid Electric Vehicle driv-ing tips ....................... 302
Winter driving tips........ 304
Utility vehicle precautions .................................. 307
Page 208 of 548
2084-2. Driving procedures
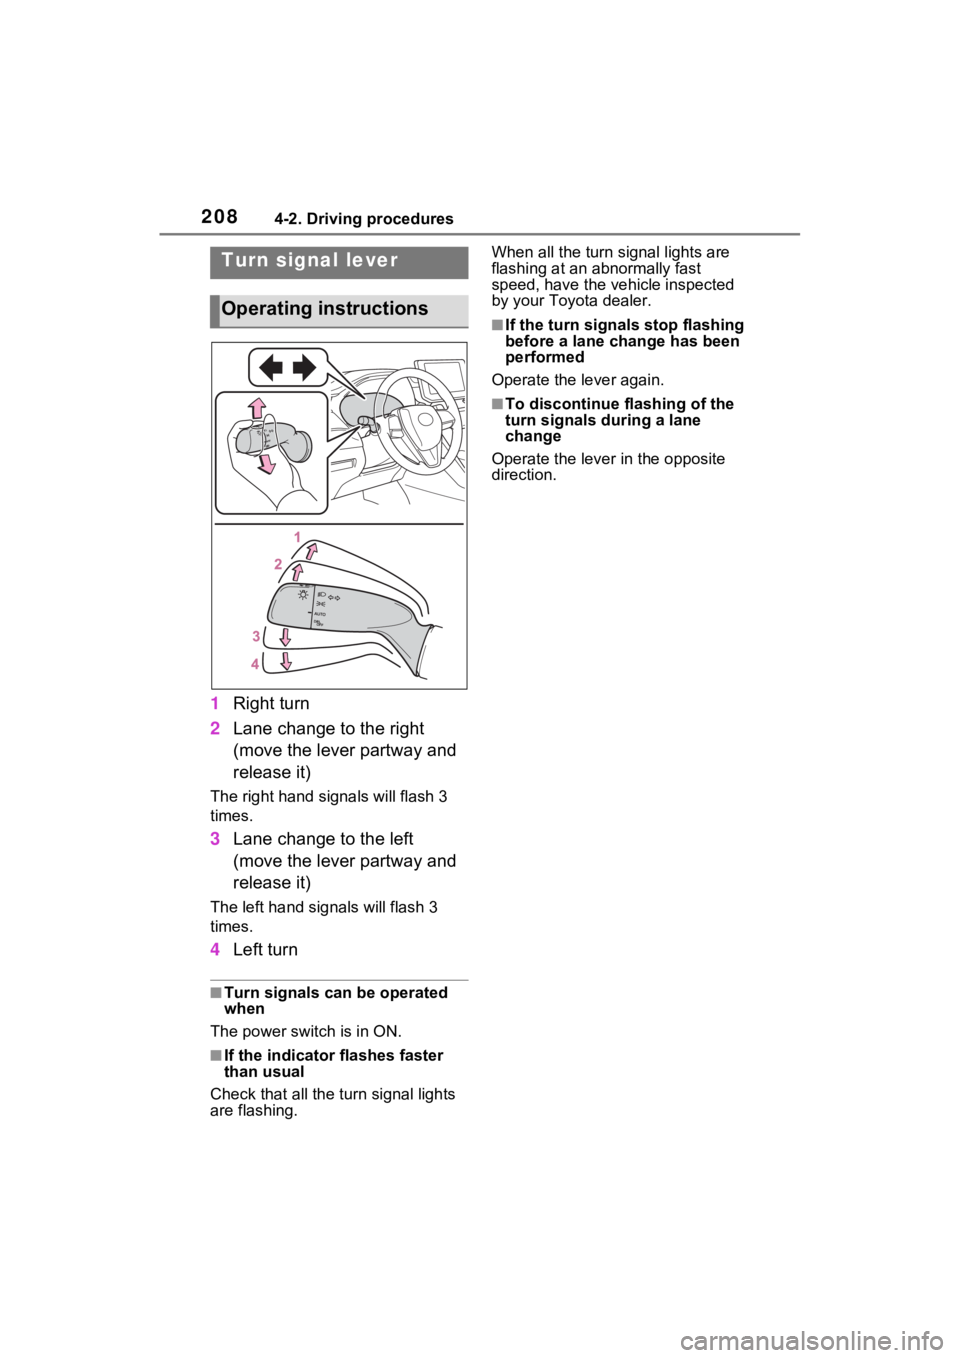
1Right turn
2 Lane change to the right
(move the lever partway and
release it)
The right hand signals will flash 3
times.
3Lane change to the left
(move the lever partway and
release it)
The left hand signals will flash 3
times.
4Left turn
■Turn signals can be operated
when
The power swit ch is in ON.
■If the indicator flashes faster
than usual
Check that all the turn signal lights
are flashing. When all the turn signal lights are
flashing at an abnormally fast
speed, have the vehicle inspected
by your Toyo
ta dealer.
■If the turn signals stop flashing
before a lane change has been
performed
Operate the lever again.
■To discontinue flashing of the
turn signals during a lane
change
Operate the lever in the opposite
direction.
Turn signal lever
Operating instructions
Page 215 of 548
2154-3. Operating the lights and wipers
4
Driving
4-3.Operating the lights and wipers
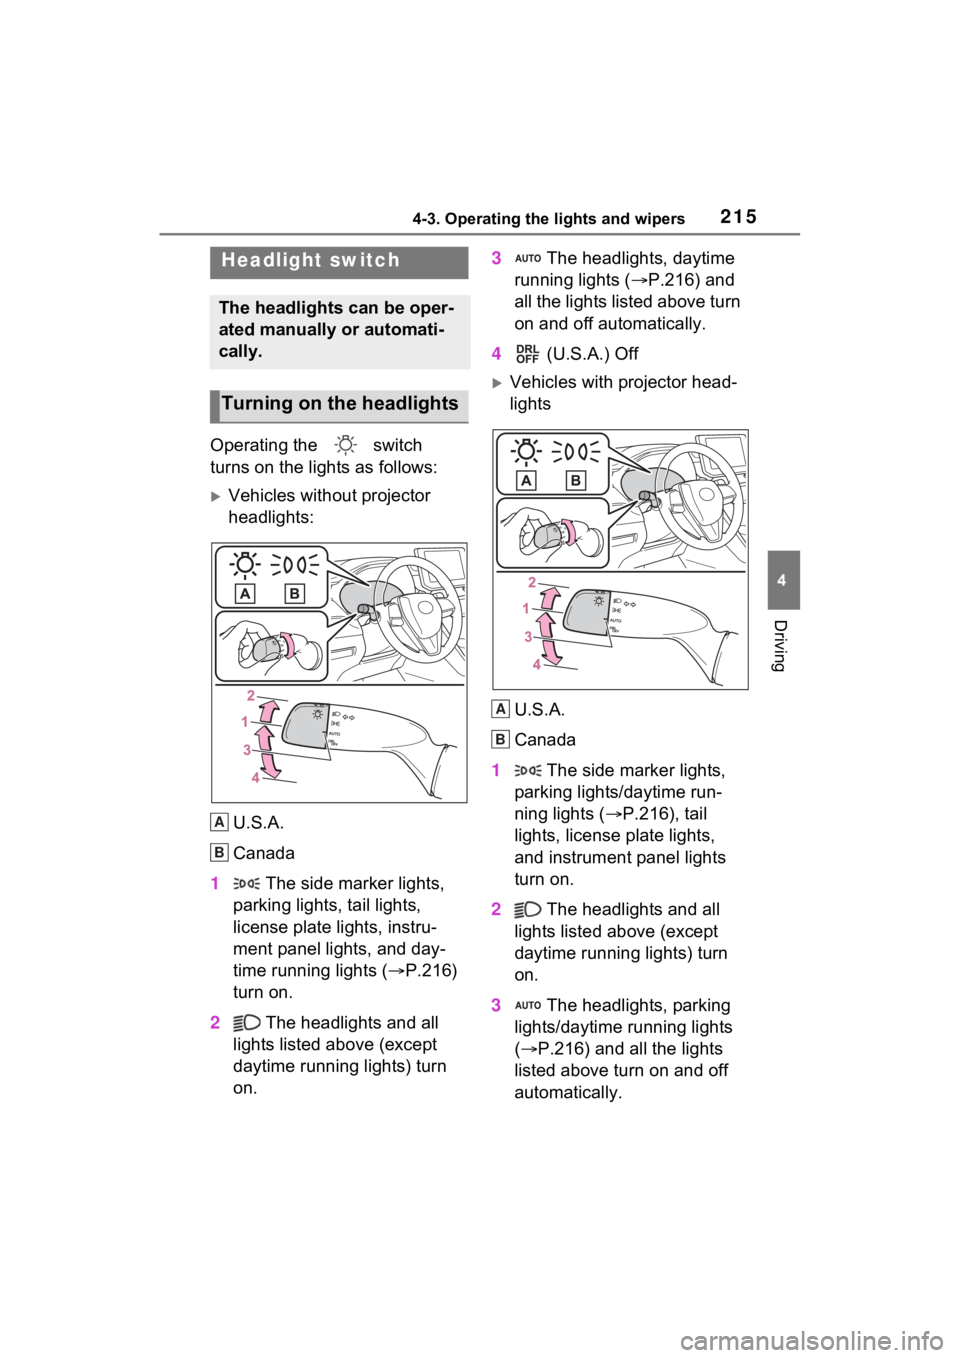
Operating the switch
turns on the lights as follows:
Vehicles without projector
headlights:
U.S.A.
Canada
1 The side marker lights,
parking lights, tail lights,
license plate lights, instru-
ment panel lights, and day-
time running lights ( P.216)
turn on.
2 The headlights and all
lights listed above (except
daytime running lights) turn
on. 3
The headlights, daytime
running lights ( P.216) and
all the lights listed above turn
on and off automatically.
4 (U.S.A.) Off
Vehicles with projector head-
lights
U.S.A.
Canada
1 The side marker lights,
parking lights/daytime run-
ning lights ( P.216), tail
lights, license plate lights,
and instrument panel lights
turn on.
2 The headlights and all
lights listed above (except
daytime running lights) turn
on.
3 The headlights, parking
lights/daytime running lights
( P.216) and all the lights
listed above turn on and off
automatically.
Headlight switch
The headlights can be oper-
ated manually or automati-
cally.
Turning on the headlights
A
B
A
B
Page 216 of 548
2164-3. Operating the lights and wipers
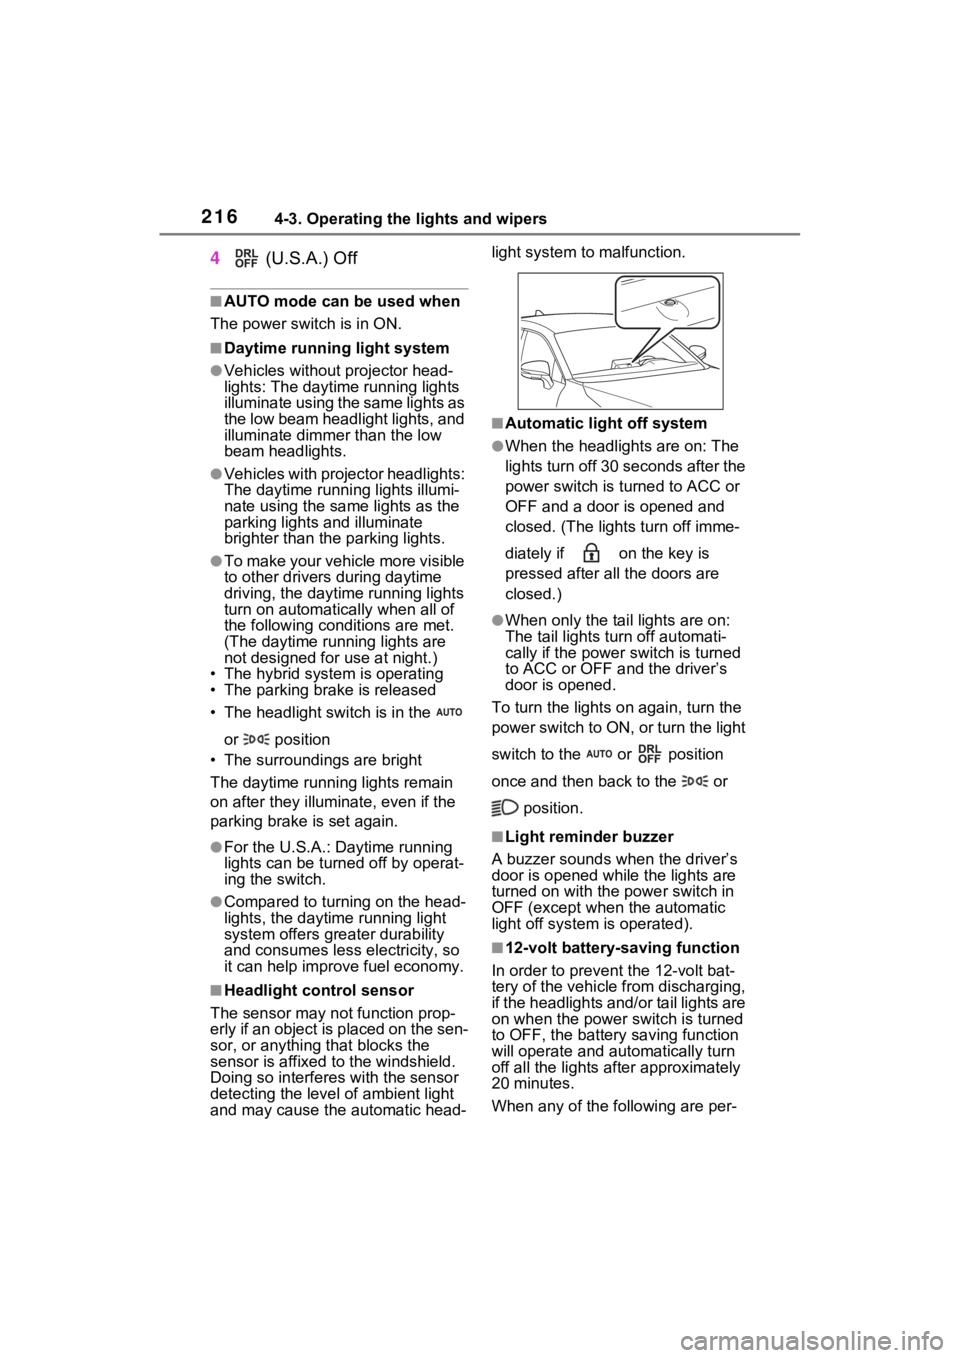
4 (U.S.A.) Off
■AUTO mode can be used when
The power swit ch is in ON.
■Daytime running light system
●Vehicles without projector head-
lights: The daytime running lights
illuminate using the same lights as
the low beam headlight lights, and
illuminate dimme r than the low
beam headlights.
●Vehicles with projector headlights:
The daytime running lights illumi-
nate using the same lights as the
parking lights and illuminate
brighter than the parking lights.
●To make your vehicle more visible
to other drivers during daytime
driving, the daytime running lights
turn on automatically when all of
the following condi tions are met.
(The daytime running lights are
not designed for use at night.)
• The hybrid system is operating
• The parking brake is released
• The headlight s witch is in the
or position
• The surroundings are bright
The daytime running lights remain
on after they illumi nate, even if the
parking brake is set again.
●For the U.S.A.: Daytime running
lights can be turned off by operat-
ing the switch.
●Compared to turning on the head-
lights, the daytime running light
system offers gre ater durability
and consumes less electricity, so
it can help improve fuel economy.
■Headlight control sensor
The sensor may not function prop-
erly if an object is placed on the sen-
sor, or anything that blocks the
sensor is affixed to the windshield.
Doing so interfere s with the sensor
detecting the level of ambient light
and may cause the automatic head- light system to malfunction.
■Automatic light off system
●When the headlights are on: The
lights turn off 30 s
econds after the
power switch is turned to ACC or
OFF and a door is opened and
closed. (The lights turn off imme-
diately if on the key is
pressed after all the doors are
closed.)
●When only the tail lights are on:
The tail lights turn off automati-
cally if the power switch is turned
to ACC or OFF and the driver’s
door is opened.
To turn the lights on again, turn the
power switch to ON, or turn the light
switch to the or position
once and then back to the or
position.
■Light reminder buzzer
A buzzer sounds when the driver’s
door is opened wh ile the lights are
turned on with the power switch in
OFF (except when the automatic
light off system is operated).
■12-volt battery-saving function
In order to prevent the 12-volt bat-
tery of the vehicle from discharging,
if the headlights and/or tail lights are
on when the power switch is turned
to OFF, the battery saving function
will operate and au tomatically turn
off all the lights af ter approximately
20 minutes.
When any of the following are per-