2022 TOYOTA VENZA HYBRID battery
[x] Cancel search: batteryPage 326 of 548
3265-1. Using the air conditioning system and defogger
1Press the “AUTO” switch on
the air conditioning control
panel.
When automatic mode is on, the
switch operation indicator illumi-
nates and is displayed on the
air conditioner control screen.
2Adjust the temperature set-
ting.
3 To stop the operation, press
the “OFF” switch on the air
conditioning control panel.
If the fan speed setting or air
flow modes are operated, the
automatic mode indicator goes
off. However, automatic mode
for functions other than that
operated is maintained.
■Using automatic mode
Fan speed is adjusted automati-
cally according to the temperature
setting and the ambient conditions. Therefore, the fan may stop for a
while until warm or
cool air is ready
to flow immediately after the auto-
matic mode switch is pressed.
To turn on the “SYNC” mode,
select the “SYNC” switch on the
air conditioning control screen.
The driver’s side temperature con-
trol switches can b e used to adjust
the temperature for the driver’s and
passenger’s side. To enter individ-
ual mode, operate the passenger’s
side temperature co ntrol switches
or select the “SYNC” switch again.
When the “SYNC” mode is on, the
indicator illuminates on the “SYNC”
switch.
This function automatically con-
trols the air conditioning airflow
so that priority is given to the
front seats. When the front pas-
senger seat is not occupied, air-
flow may switch to only the
driver’s seat. Unnecessary air
conditioning is suppressed, con-
tributing to increased fuel effi-
ciency.
Front seat concentrated airflow
mode operates in the following
situations.
No passengers are detected
WARNING
■When the outside rear view
mirror defoggers are operat-
ing
Do not touch the rear view mirror
surfaces when the outside rear
view mirror defoggers are on.
NOTICE
■To prevent 12-volt battery dis-
charge
Do not leave the air conditioning
system on longer than necessary
when the hybrid system is off.
Using automatic mode
Adjusting the temperature
for driver and passenger
seats simultaneously
(“SYNC” mode)
Front seat concentrated
airflow mode (S-FLOW)
Page 330 of 548
3305-1. Using the air conditioning system and defogger
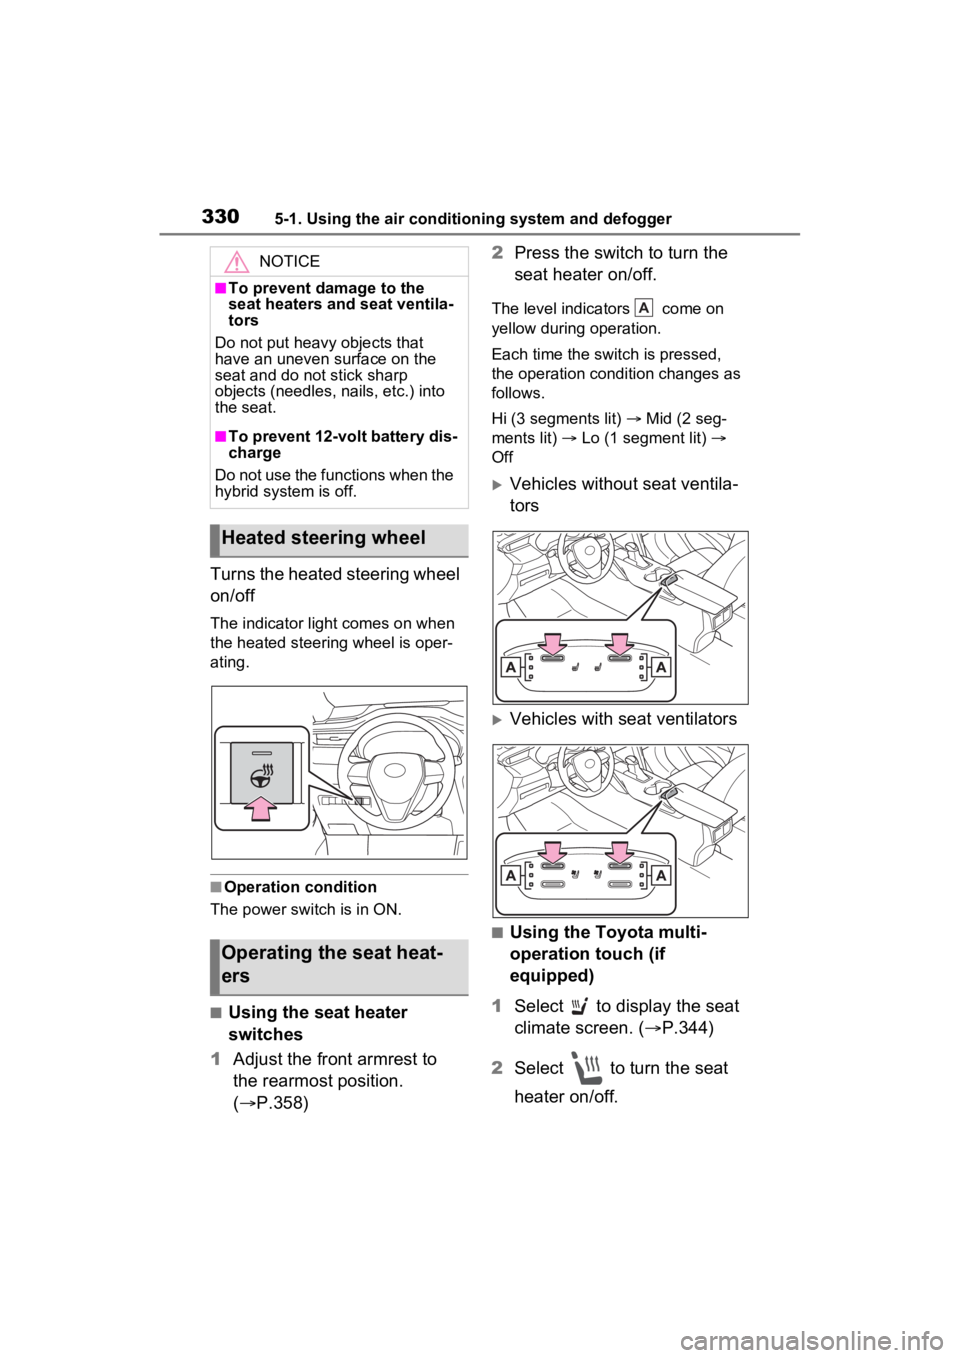
Turns the heated steering wheel
on/off
The indicator light comes on when
the heated steering wheel is oper-
ating.
■Operation condition
The power swit ch is in ON.
■Using the seat heater
switches
1 Adjust the front armrest to
the rearmost position.
( P.358) 2
Press the switch to turn the
seat heater on/off.
The level indica tors come on
yellow during operation.
Each time the switch is pressed,
the operation condition changes as
follows.
Hi (3 segments lit) Mid (2 seg-
ments lit) Lo (1 segment lit)
Off
Vehicles without seat ventila-
tors
Vehicles with seat ventilators
■Using the Toyota multi-
operation touch (if
equipped)
1 Select to display the seat
climate screen. ( P.344)
2 Select to turn the seat
heater on/off.
NOTICE
■To prevent damage to the
seat heaters and seat ventila-
tors
Do not put heavy objects that
have an uneven surface on the
seat and do not stick sharp
objects (needles, nails, etc.) into
the seat.
■To prevent 12-volt battery dis-
charge
Do not use the functions when the
hybrid system is off.
Heated steering wheel
Operating the seat heat-
ers
A
Page 334 of 548
3345-2. Using the interior lights
tronic key, whether the doors are
locked/unlocked, and whether the
doors are opened/closed.
●If the interior lights remain on
when the power switch is turned to
OFF, the lights will go off automat-
ically after 20 minutes.
■Interior lights brightness reduc-
tion
The brightness of the following
lights will be reduc ed when shifting
the shift lever to any position other
than P.
●Instrument panel lower illumina-
tion (if equipped)
●Footwell lights (if equipped)
●Upper console lights (if equipped)
●Front console light
●Inside door handle lights (if
equipped)
■The interior lights may turn on
automatically when
If any of the SRS airbags deploy
(inflate) or in the event of a strong
rear impact, the interior lights will
turn on automatically.
The interior lights will turn off auto-
matically after approximately 20
minutes.
The interior lights can be turned off
manually. However, in order to help
prevent further collisions, it is rec-
ommended that they be left on until
safety can be ensured.
(The interior lights may not turn on
automatically depending on the
force of the impact and conditions of
the collision.)
■Customization
Setting (e.g. the time elapsed before
the lights turn off) can be changed.
(Customizable features: P.510)
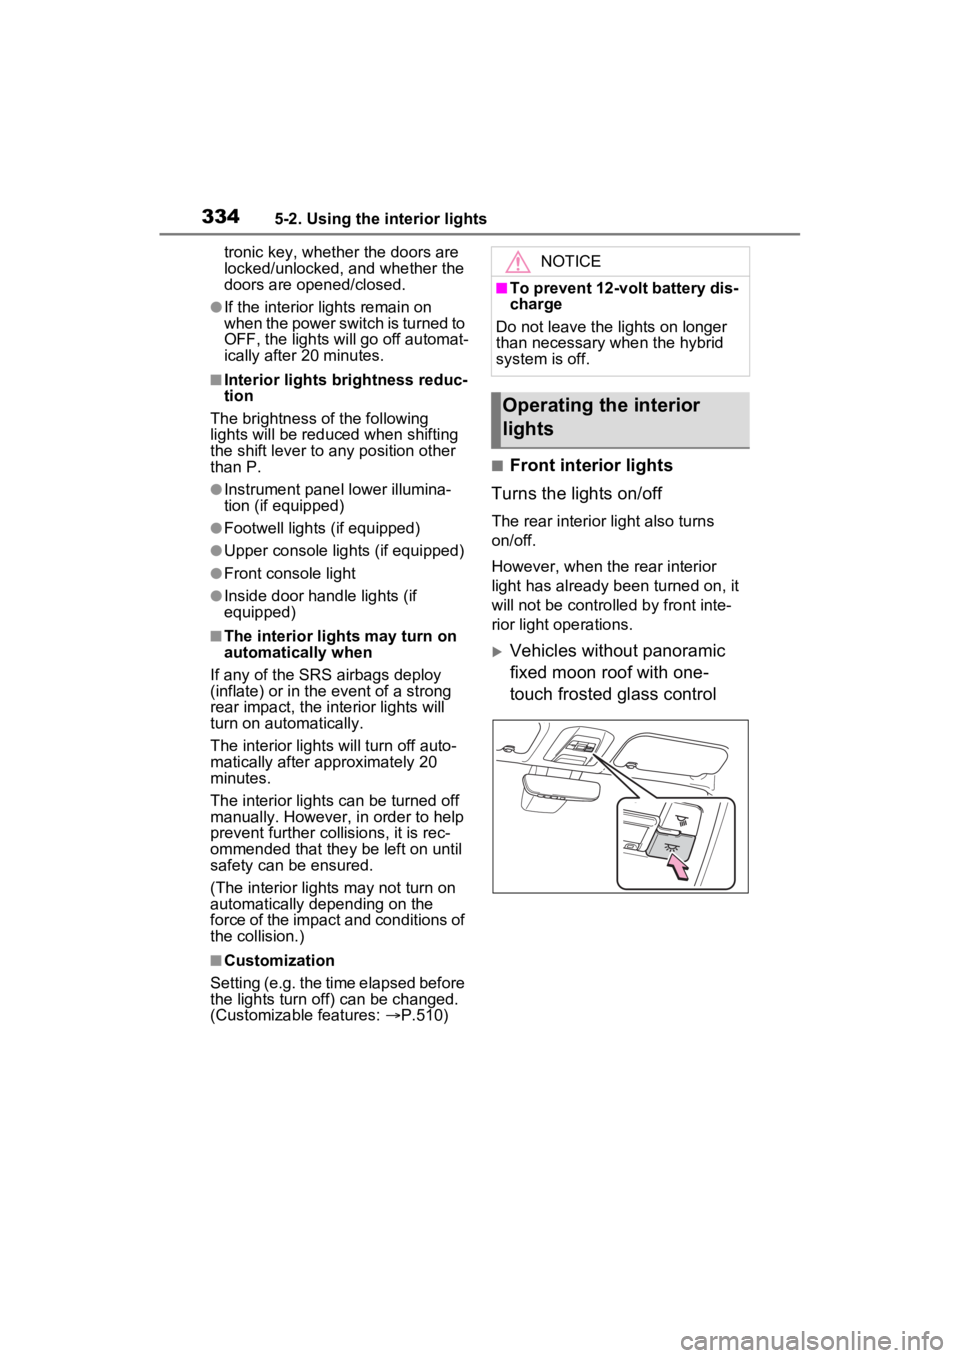
■Front interior lights
Turns the lights on/off
The rear interior light also turns
on/off.
However, when the rear interior
light has already been turned on, it
will not be controlle d by front inte-
rior light operations.
Vehicles without panoramic
fixed moon roof with one-
touch frosted glass control
NOTICE
■To prevent 12-volt battery dis-
charge
Do not leave the lights on longer
than necessary when the hybrid
system is off.
Operating the interior
lights
Page 349 of 548
3495-4. Using the other interior features
5
Interior features
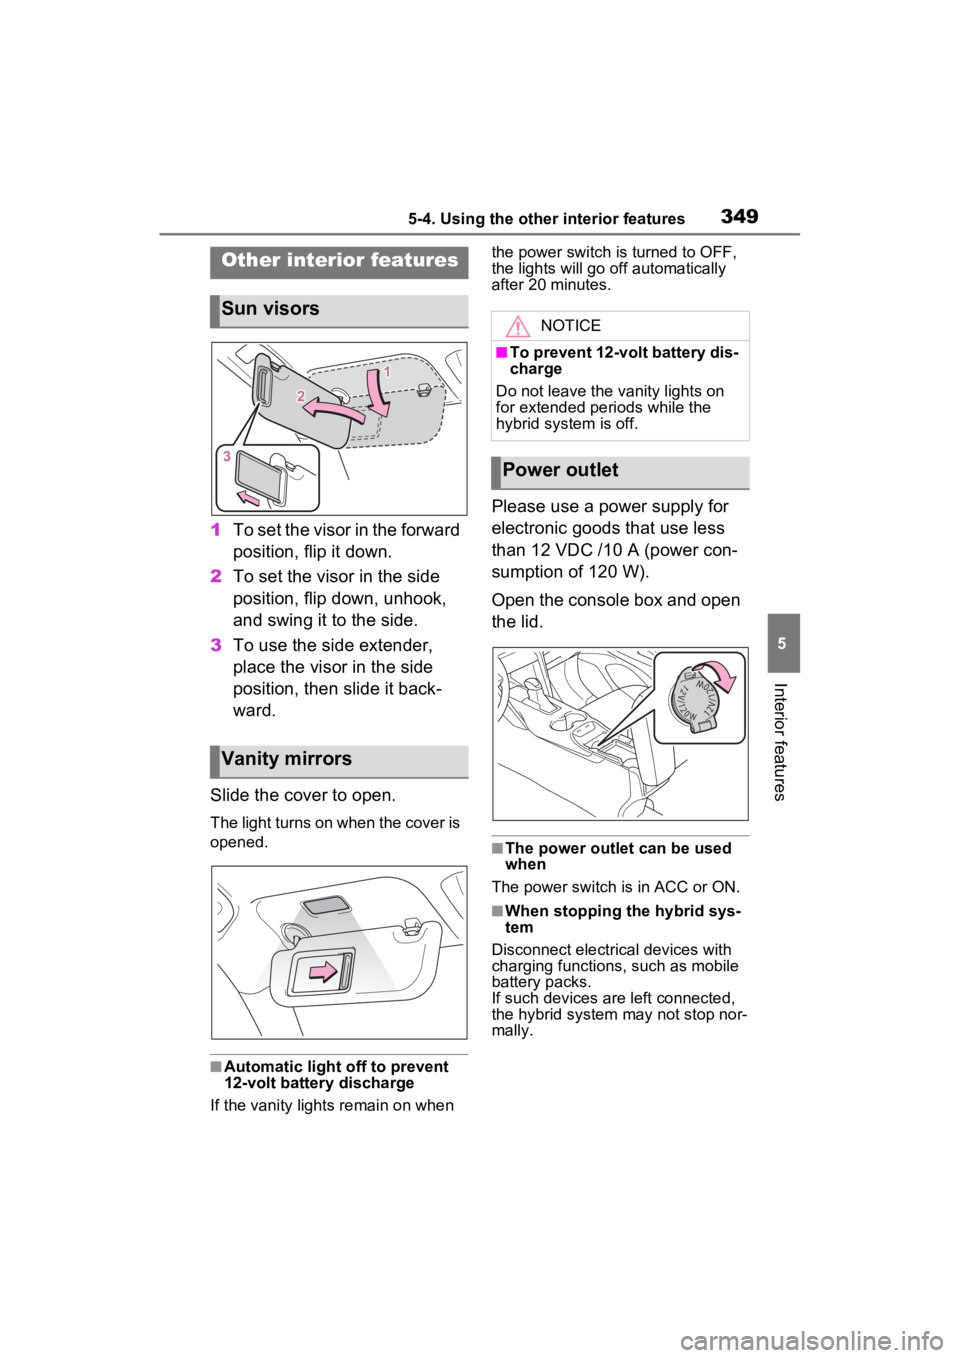
1To set the visor in the forward
position, flip it down.
2 To set the visor in the side
position, flip down, unhook,
and swing it to the side.
3 To use the side extender,
place the visor in the side
position, then slide it back-
ward.
Slide the cover to open.
The light turns on when the cover is
opened.
■Automatic light off to prevent
12-volt battery discharge
If the vanity light s remain on when the power switch is turned to OFF,
the lights will go off automatically
after 20 minutes.
Please use a power supply for
electronic goods that use less
than 12 VDC /10 A (power con-
sumption of 120 W).
Open the console box and open
the lid.
■The power outlet can be used
when
The power switch is in ACC or ON.
■When stopping the hybrid sys-
tem
Disconnect electrical devices with
charging functions, such as mobile
battery packs.
If such devices are left connected,
the hybrid system may not stop nor-
mally.
Other interior features
Sun visors
Vanity mirrors
NOTICE
■To prevent 12-volt battery dis-
charge
Do not leave the vanity lights on
for extended periods while the
hybrid system is off.
Power outlet
Page 350 of 548
3505-4. Using the other interior features
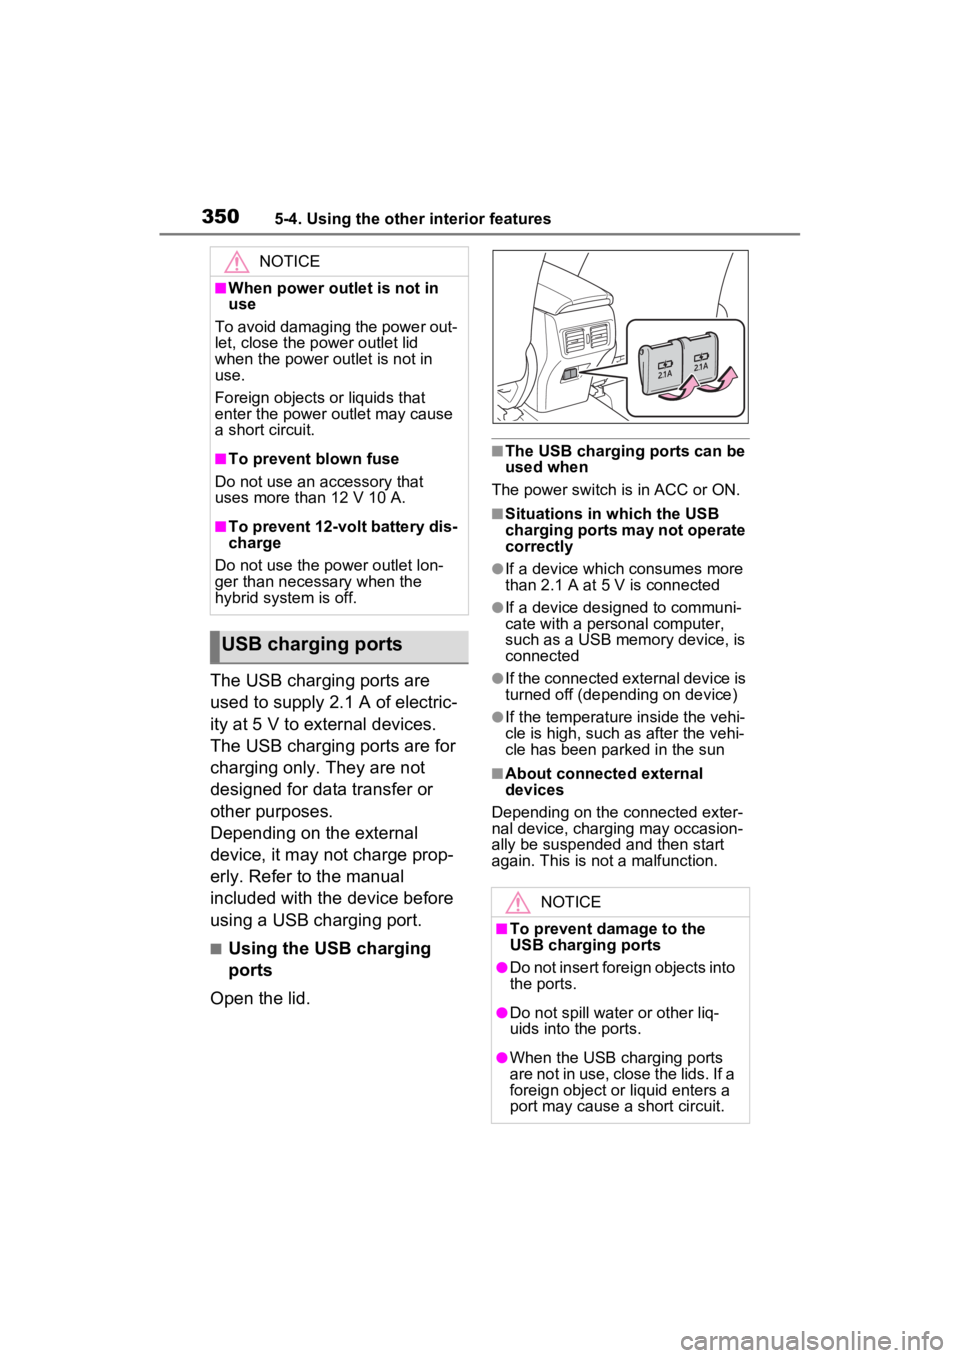
The USB charging ports are
used to supply 2.1 A of electric-
ity at 5 V to external devices.
The USB charging ports are for
charging only. They are not
designed for data transfer or
other purposes.
Depending on the external
device, it may not charge prop-
erly. Refer to the manual
included with the device before
using a USB charging port.
■Using the USB charging
ports
Open the lid.
■The USB charging ports can be
used when
The power switch is in ACC or ON.
■Situations in which the USB
charging ports may not operate
correctly
●If a device which consumes more
than 2.1 A at 5 V is connected
●If a device designed to communi-
cate with a personal computer,
such as a USB memory device, is
connected
●If the connected external device is
turned off (depend ing on device)
●If the temperature inside the vehi-
cle is high, such as after the vehi-
cle has been parked in the sun
■About connected external
devices
Depending on the connected exter-
nal device, charging may occasion-
ally be suspended and then start
again. This is not a malfunction.
NOTICE
■When power outlet is not in
use
To avoid damaging the power out-
let, close the p ower outlet lid
when the power outlet is not in
use.
Foreign objects or liquids that
enter the power outlet may cause
a short circuit.
■To prevent blown fuse
Do not use an accessory that
uses more than 12 V 10 A.
■To prevent 12-volt battery dis-
charge
Do not use the power outlet lon-
ger than necessary when the
hybrid system is off.
USB charging ports
NOTICE
■To prevent damage to the
USB charging ports
●Do not insert foreign objects into
the ports.
●Do not spill water or other liq-
uids into the ports.
●When the USB charging ports
are not in use, close the lids. If a
foreign object or liquid enters a
port may cause a short circuit.
Page 351 of 548
3515-4. Using the other interior features
5
Interior features
A portable device can be
charged by just placing Qi stan-
dard wireless charge compatible
portable devices according to
the Wireless Power Consortium,
such as smartphones and
mobile batteries, etc., on the
charge area.
This function cannot be used
with portable devices that are
larger than the charging area.
Also, depending on the portable
device, it may not operate as
normal. Please read the opera-
tion manual for portable devices
to be used.
■The “Qi” logo
The “Qi” logo is a trademark of
the Wireless Power Consortium.
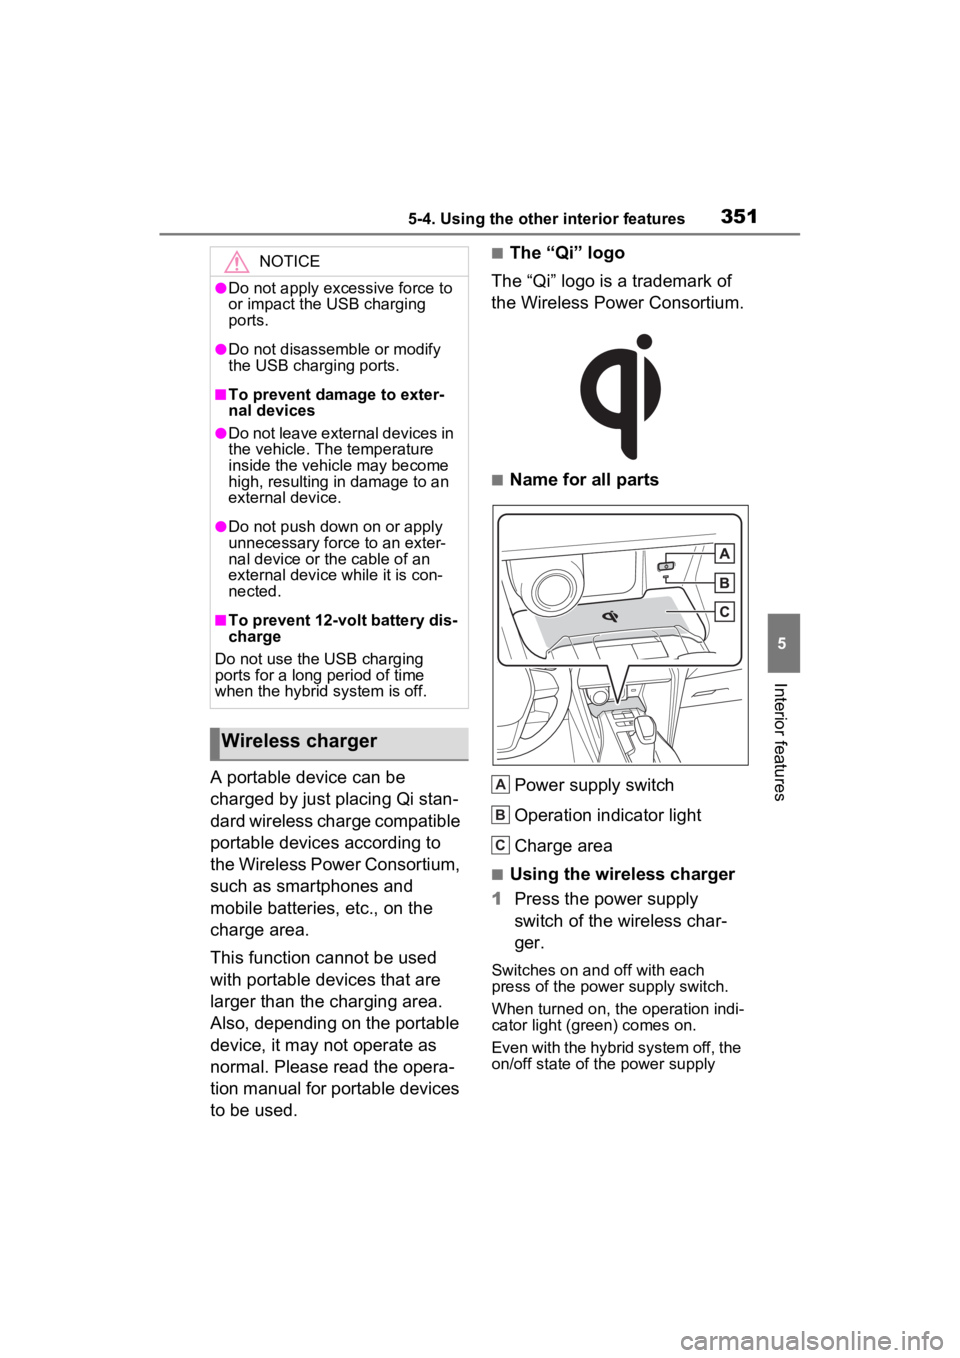
■Name for all parts
Power supply switch
Operation indicator light
Charge area
■Using the wireless charger
1 Press the power supply
switch of the wireless char-
ger.
Switches on and off with each
press of the power supply switch.
When turned on, the operation indi-
cator light (green) comes on.
Even with the hybrid system off, the
on/off state of the power supply
NOTICE
●Do not apply excessive force to
or impact the USB charging
ports.
●Do not disassemble or modify
the USB charging ports.
■To prevent damage to exter-
nal devices
●Do not leave external devices in
the vehicle. The temperature
inside the vehicle may become
high, resulting in damage to an
external device.
●Do not push down on or apply
unnecessary force to an exter-
nal device or the cable of an
external device while it is con-
nected.
■To prevent 12-volt battery dis-
charge
Do not use the USB charging
ports for a long period of time
when the hybrid system is off.
Wireless charger
A
B
C
Page 358 of 548
3585-4. Using the other interior features
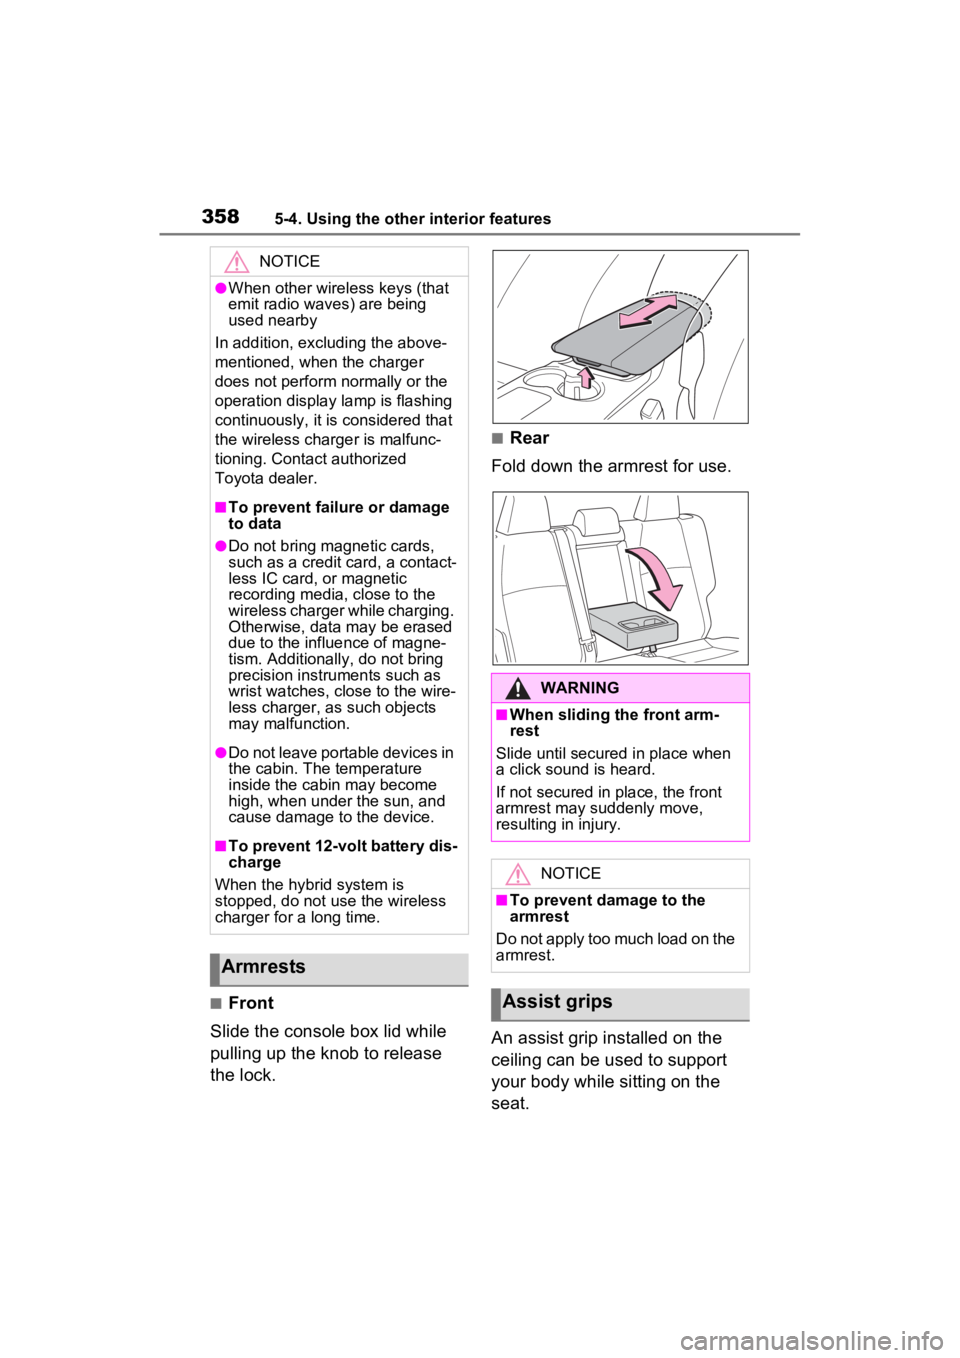
■Front
Slide the console box lid while
pulling up the knob to release
the lock.
■Rear
Fold down the armrest for use.
An assist grip installed on the
ceiling can be used to support
your body while sitting on the
seat.
NOTICE
●When other wireless keys (that
emit radio waves) are being
used nearby
In addition, excl uding the above-
mentioned, when the charger
does not perform normally or the
operation display lamp is flashing
continuously, it is considered that
the wireless charger is malfunc-
tioning. Contact authorized
Toyota dealer.
■To prevent failure or damage
to data
●Do not bring magnetic cards,
such as a credit card, a contact-
less IC card, or magnetic
recording media, close to the
wireless charger while charging.
Otherwise, data may be erased
due to the influence of magne-
tism. Additionally, do not bring
precision instruments such as
wrist watches, close to the wire-
less charger, as such objects
may malfunction.
●Do not leave portable devices in
the cabin. The temperature
inside the cabin may become
high, when under the sun, and
cause damage to the device.
■To prevent 12-volt battery dis-
charge
When the hybrid system is
stopped, do not use the wireless
charger for a long time.
Armrests
WARNING
■When sliding the front arm-
rest
Slide until secured in place when
a click sound is heard.
If not secured in place, the front
armrest may suddenly move,
resulting in injury.
NOTICE
■To prevent damage to the
armrest
Do not apply too much load on the
armrest.
Assist grips
Page 361 of 548
3615-4. Using the other interior features
5
Interior features
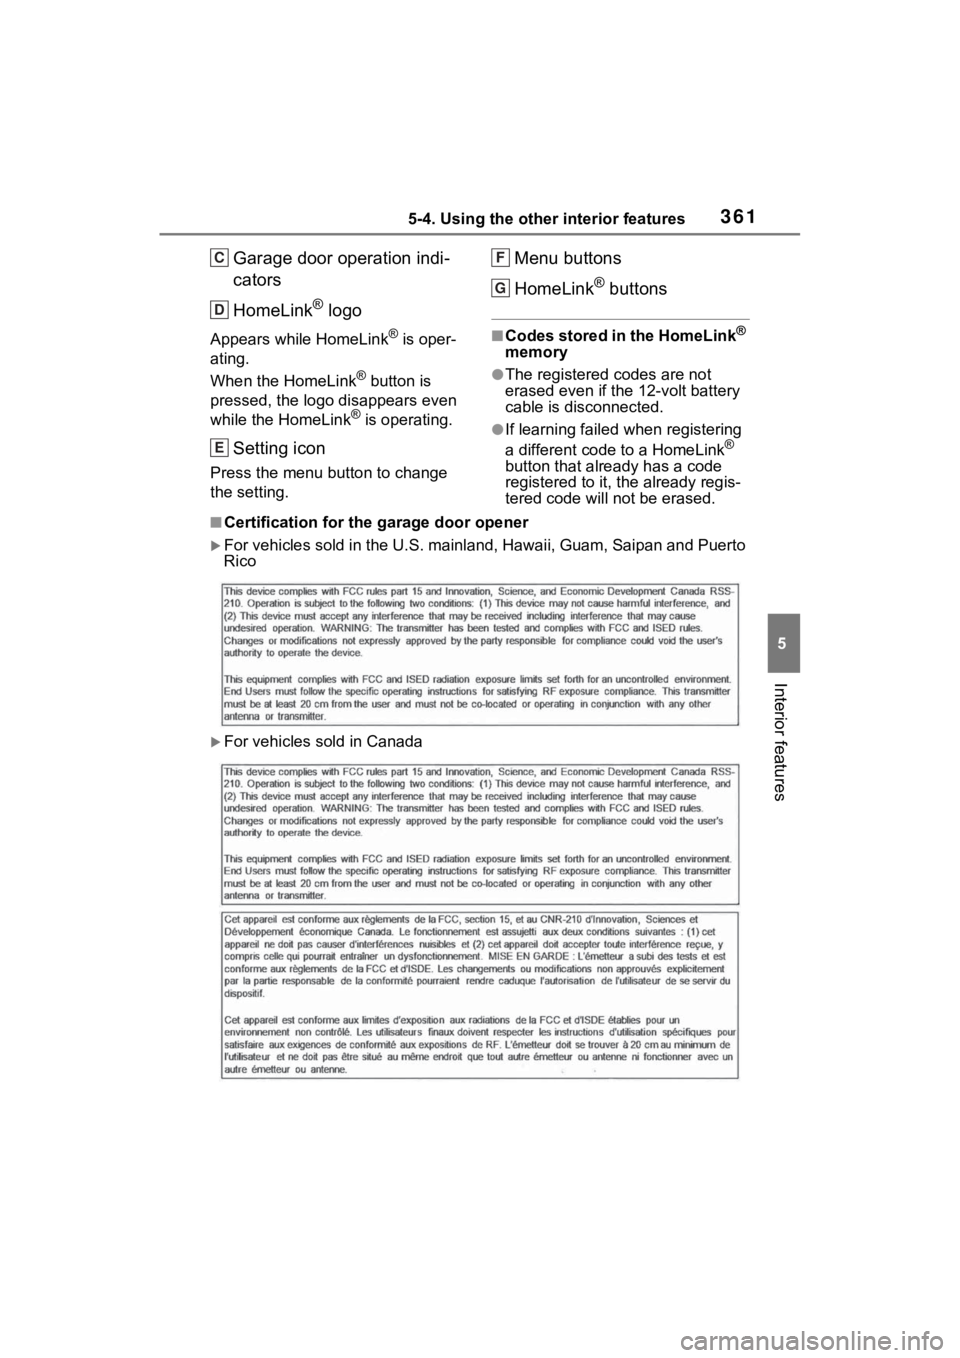
Garage door operation indi-
cators
HomeLink
® logo
Appears while HomeLink® is oper-
ating.
When the HomeLink
® button is
pressed, the logo disappears even
while the HomeLink
® is operating.
Setting icon
Press the menu button to change
the setting.
Menu buttons
HomeLink
® buttons
■Codes stored in the HomeLink®
memory
●The registered codes are not
erased even if the 12-volt battery
cable is disconnected.
●If learning failed when registering
a different code to a HomeLink®
button that already has a code
registered to it, the already regis-
tered code will not be erased.
■Certification for the garage door opener
For vehicles sold in the U.S. ma inland, Hawaii, Guam, Saipan an d Puerto
Rico
For vehicles sold in Canada
C
D
E
F
G