2022 TOYOTA TUNDRA HYBRID mirror
[x] Cancel search: mirrorPage 400 of 618

4025-1. Using the air conditioning system and defogger
Owners Manual_USA_M0C031_en
outside rear view mirrors.
Press the rear window and out-
side rear view mirror defoggers
switch.
The defoggers will automatically
turn off after 15 minutes.
When the rear window and outside
rear view mirror defoggers switch is
on, the indicator illuminates on the
rear window and ou tside rear view
mirror defoggers switch.
■When the outside temperature
exceeds 75°F (24°C) and the air
conditioning system is on
●In order to reduce the air condi-
tioning power consumption, the air
conditioning system may switch to
recirculated air mode automati-
cally.
This may also reduce fuel con-
sumption.
●Recirculated air mode is selected
as a default mode when the power
switch is turned to ON.
It is possible to switch to outside air
mode at any time by pressing the
outside air mode switch.
■Fogging up of the windows
●The windows will easily fog up
when the humidity in the vehicle is
high. Turning the cooling and
dehumidification function on will
dehumidify the air from the outlets
and defog the windshield effec-
tively.
●If you turn the cooling and dehu-
midification function off, the win-
dows may fog up more easily.
●The windows may fog up if the
recirculated air mode is used.
■When driving on dusty roads
Close all windows. If dust thrown up
by the vehicle is still drawn into the
vehicle after closing the windows, it
is recommended that the air intake mode be set to outside air mode and
the fan speed to a
ny setting except
off.
■Outside/recirculated air mode
●Setting to the recirculated air
mode temporarily is recom-
mended in preventing dirty air
from entering the vehicle interior
and helping to c ool the vehicle
when the outside air temperature
is high.
●Outside/recirculated air mode may
automatically switch depending on
the temperature setting or the
inside temperature.
■When the outside temperature
falls to nearly 32°F (0°C)
The dehumidification function may
not operate even when “A/C” switch
is pressed.
■Ventilation and air conditioning
odors
●To let fresh air in, set the air condi-
tioning system to the outside air
mode.
●During use, various odors from
inside and outside the vehicle may
enter into and accumulate in the
air conditioning system. This may
then cause odor to be emitted
from the vents.
●In order to suppr ess odors that
occur when the air conditioning
system starts, the air flow mode
may change to blow air to the feet
or air may stop blowing for a short
period of time immediately after
the air conditioning system is
started in automatic mode.
●When parking, the system auto-
matically switches to outside air
mode to encourage better air cir-
culation throughout the vehicle,
helping to reduce odors that occur
when starting the vehicle.
■Air conditioning filter
P.479
Page 401 of 618
4035-1. Using the air conditioning system and defogger
Owners Manual_USA_M0C031_en
5
Interior features
■Air conditioning system refrig-
erant
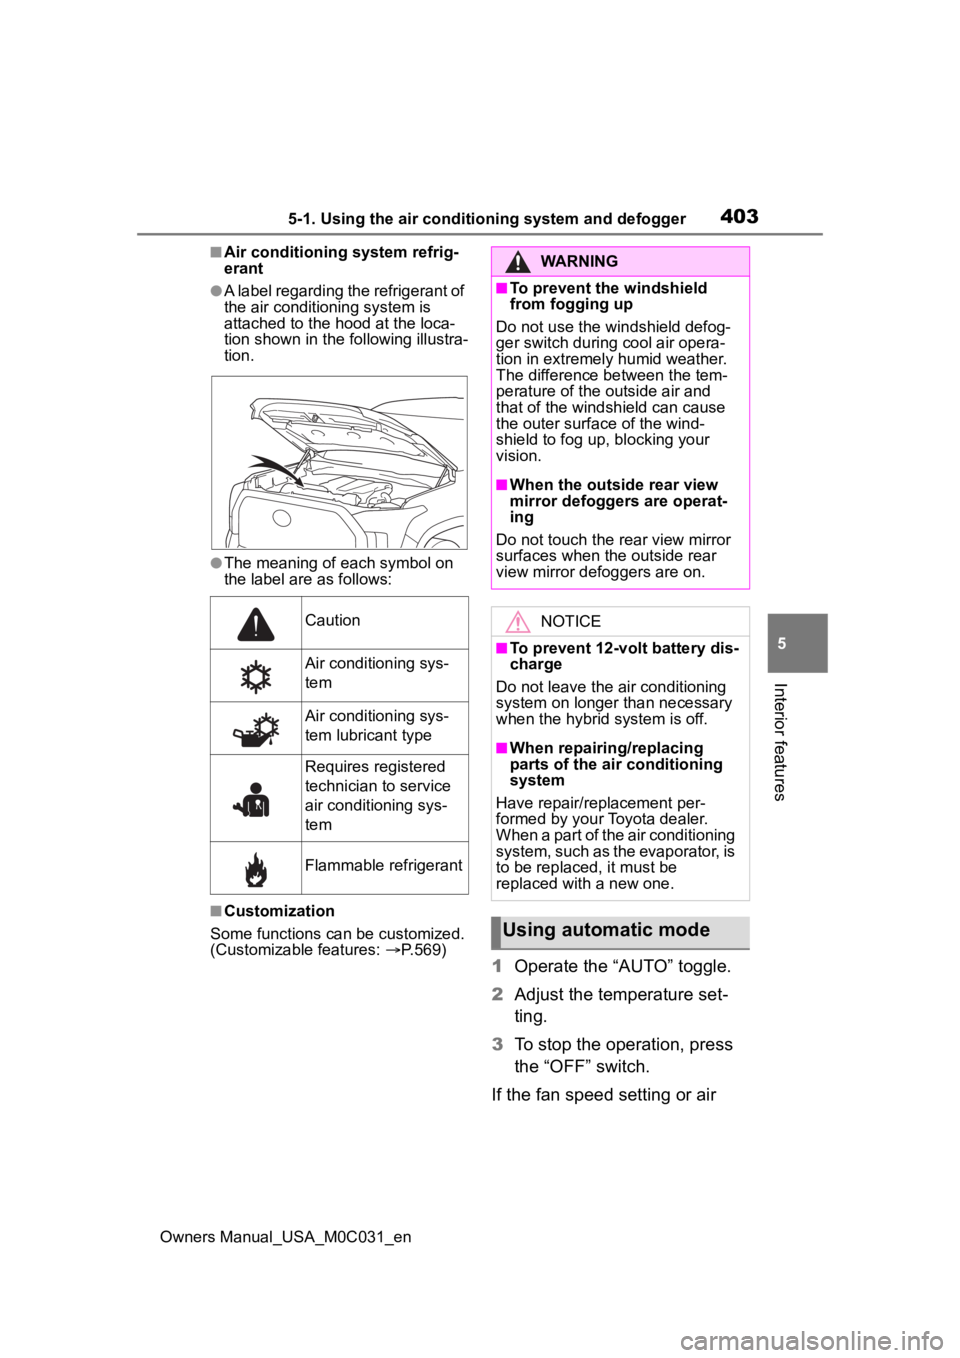
●A label regarding the refrigerant of
the air conditioning system is
attached to the ho od at the loca-
tion shown in the f ollowing illustra-
tion.
●The meaning of each symbol on
the label are as follows:
■Customization
Some functions can be customized.
(Customizable features: P.569)
1 Operate the “AUTO” toggle.
2 Adjust the temperature set-
ting.
3 To stop the operation, press
the “OFF” switch.
If the fan speed setting or air
Caution
Air conditioning sys-
tem
Air conditioning sys-
tem lubricant type
Requires registered
technician to service
air conditioning sys-
tem
Flammable refrigerant
WARNING
■To prevent the windshield
from fogging up
Do not use the windshield defog-
ger switch during cool air opera-
tion in extremely humid weather.
The difference between the tem-
perature of the outside air and
that of the windshield can cause
the outer surface of the wind-
shield to fog up, blocking your
vision.
■When the outside rear view
mirror defoggers are operat-
ing
Do not touch the rear view mirror
surfaces when the outside rear
view mirror def oggers are on.
NOTICE
■To prevent 12-volt battery dis-
charge
Do not leave the air conditioning
system on longer than necessary
when the hybrid system is off.
■When repairing/replacing
parts of the air conditioning
system
Have repair/replacement per-
formed by your Toyota dealer.
When a part of the air conditioning
system, such as the evaporator, is
to be replaced, it must be
replaced with a new one.
Using automatic mode
Page 403 of 618
4055-1. Using the air conditioning system and defogger
Owners Manual_USA_M0C031_en
5
Interior features
To turn on the “SYNC” mode,
operate the “SYNC” toggle
upwards or downwards.
The driver’s side temperature con-
trol toggle can be used to adjust the
temperature for the driver’s and
front passenger’s side. To enter
individual mode, operate the front
passenger’s side temperature con-
trol toggle or press the “SYNC” tog-
gle again.
When the “SYNC” mode is on, the
“SYNC” indicator is illuminate.
This feature is used to prevent
ice from building up on the wind-
shield and wiper blades.
Press the rear window and out-
side rear view mirror defoggers
switch.
The windshield wiper de-icer will
automatically turn off after 15 min-
utes.
Turning the rear window and out-
side rear view mirror defoggers on
will turn the windshield wiper de-
icer on.
When the rear window and outside
rear view mirror defoggers switch is
on, the indicator illuminates on the
rear window and ou tside rear view
mirror defoggers switch.
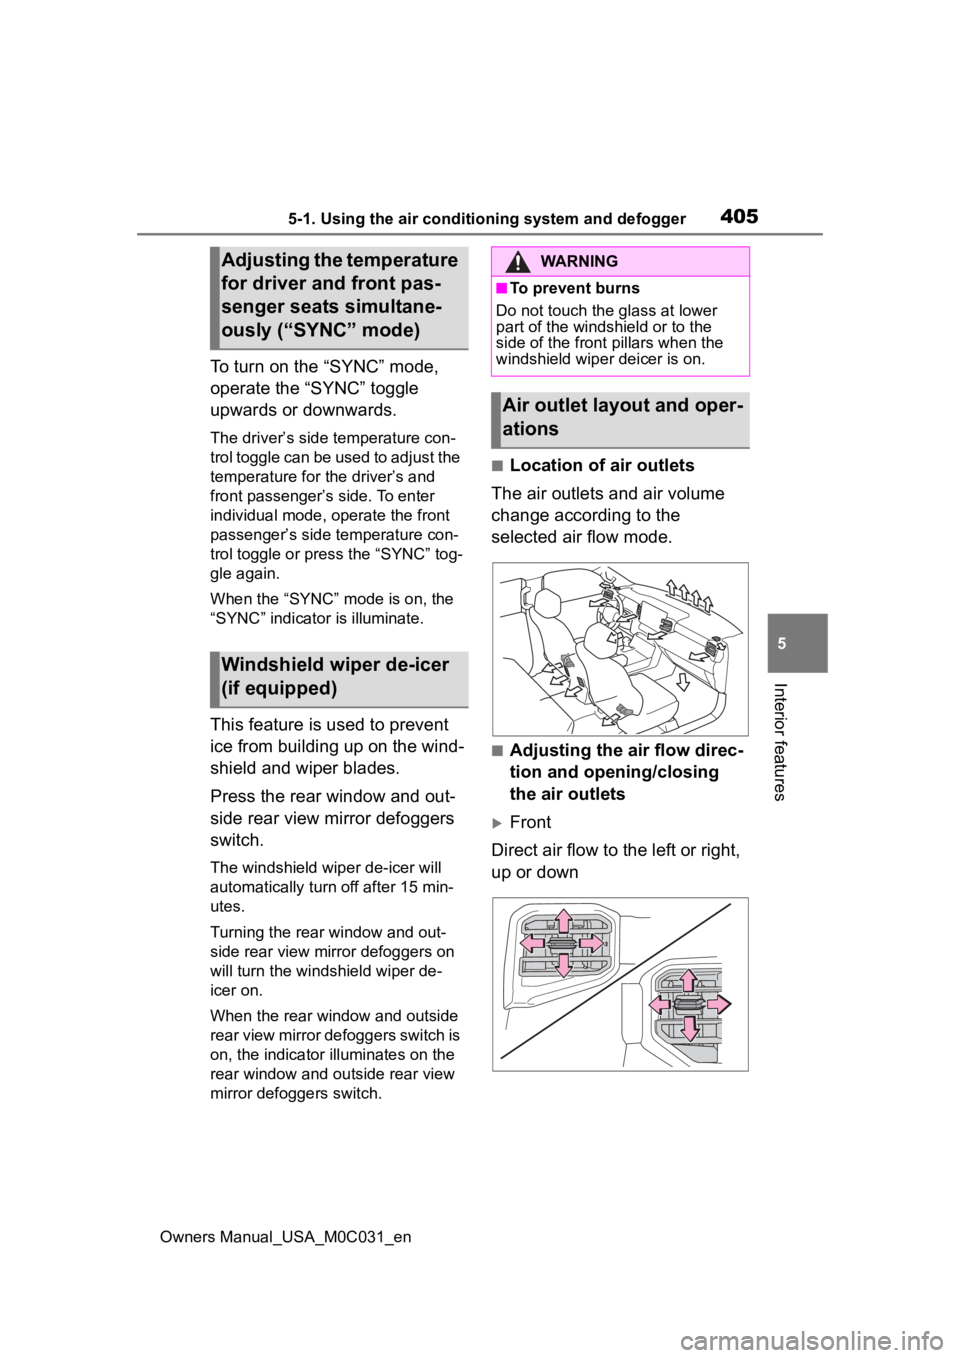
■Location of air outlets
The air outlets and air volume
change according to the
selected air flow mode.
■Adjusting the air flow direc-
tion and opening/closing
the air outlets
Front
Direct air flow to the left or right,
up or down
Adjusting the temperature
for driver and front pas-
senger seats simultane-
ously (“SYNC” mode)
Windshield wiper de-icer
(if equipped)
WARNING
■To prevent burns
Do not touch the glass at lower
part of the windshield or to the
side of the front p illars when the
windshield wiper deicer is on.
Air outlet layout and oper-
ations
Page 429 of 618
4315-4. Using the other interior features
Owners Manual_USA_M0C031_en
5
Interior features
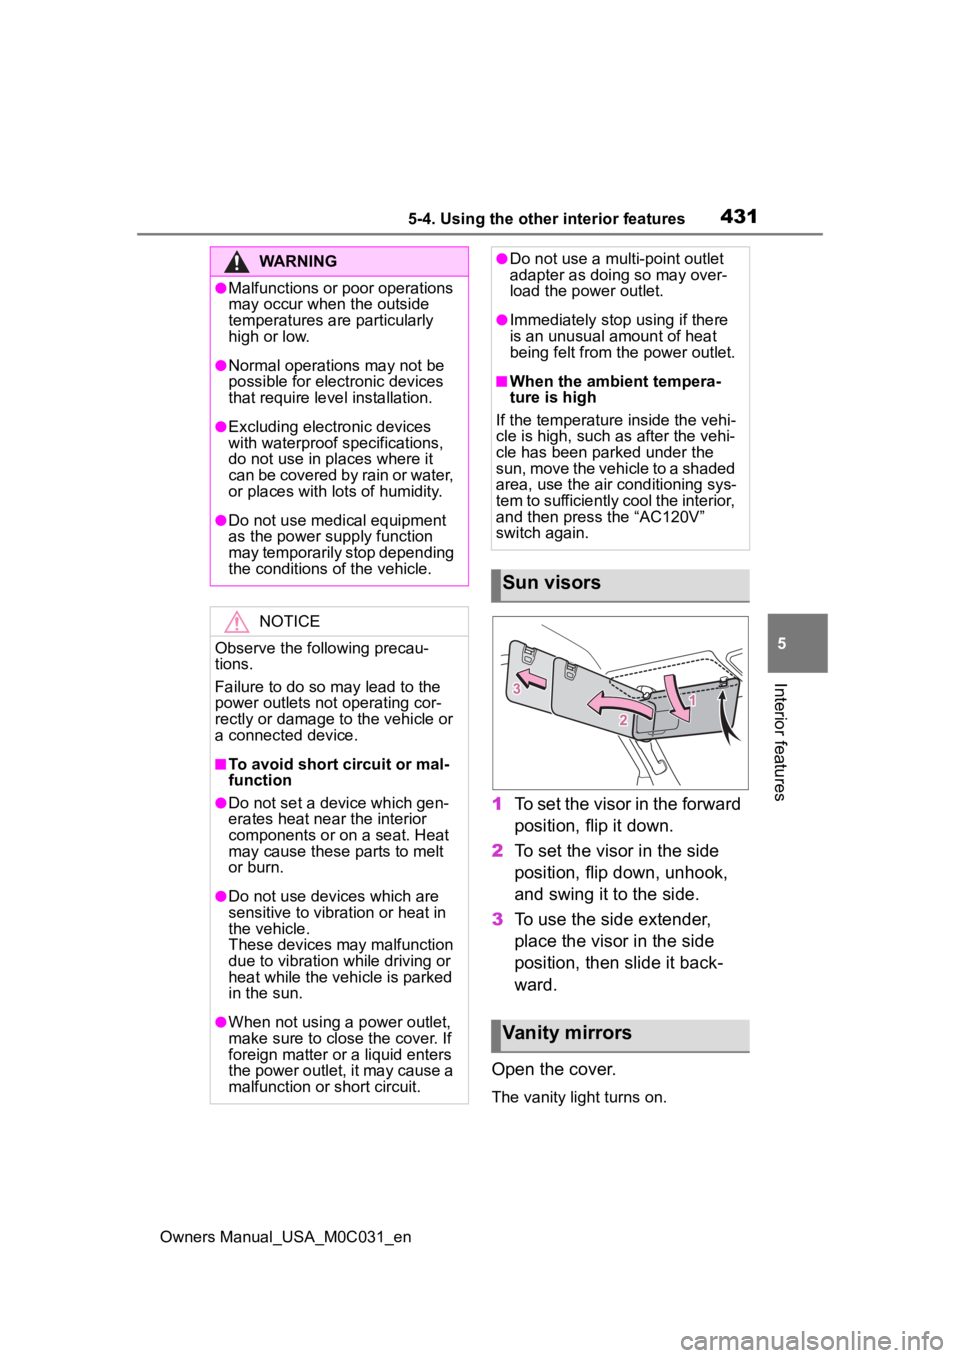
1 To set the visor in the forward
position, flip it down.
2 To set the visor in the side
position, flip down, unhook,
and swing it to the side.
3 To use the side extender,
place the visor in the side
position, then slide it back-
ward.
Open the cover.
The vanity lig ht turns on.
WARNING
●Malfunctions or poor operations
may occur when the outside
temperatures are particularly
high or low.
●Normal operations may not be
possible for electronic devices
that require level installation.
●Excluding electronic devices
with waterproof specifications,
do not use in places where it
can be covered by rain or water,
or places with lots of humidity.
●Do not use medical equipment
as the power s upply function
may temporarily stop depending
the conditions of the vehicle.
NOTICE
Observe the following precau-
tions.
Failure to do so m ay lead to the
power outlets not operating cor-
rectly or damage to the vehicle or
a connected device.
■To avoid short circuit or mal-
function
●Do not set a device which gen-
erates heat near the interior
components or on a seat. Heat
may cause these parts to melt
or burn.
●Do not use devices which are
sensitive to vibration or heat in
the vehicle.
These devices may malfunction
due to vibration while driving or
heat while the vehicle is parked
in the sun.
●When not using a power outlet,
make sure to close the cover. If
foreign matter or a liquid enters
the power outlet, it may cause a
malfunction or short circuit.
●Do not use a mul ti-point outlet
adapter as doing so may over-
load the power outlet.
●Immediately stop using if there
is an unusual amount of heat
being felt from th e power outlet.
■When the ambient tempera-
ture is high
If the temperature inside the vehi-
cle is high, such as after the vehi-
cle has been parked under the
sun, move the vehicle to a shaded
area, use the air conditioning sys-
tem to sufficiently cool the interior,
and then press the “AC120V”
switch again.
Sun visors
Vanity mirrors
Page 431 of 618
4335-4. Using the other interior features
Owners Manual_USA_M0C031_en
5
Interior features
■HomeLink® programming pro-
cedure
The programming procedures can
also be found at the following URL.
Website: www.homelink.com/toyota
For support, contact customer sup-
port at the following.
Help Line: 1-800-355-3515
The HomeLink® wireless control
system in your vehicle has 3
buttons which can be pro-
grammed to operate 3 different
devices. Refer to the program-
ming methods on the following
pages to determine the method
which is appropriate for the
device.
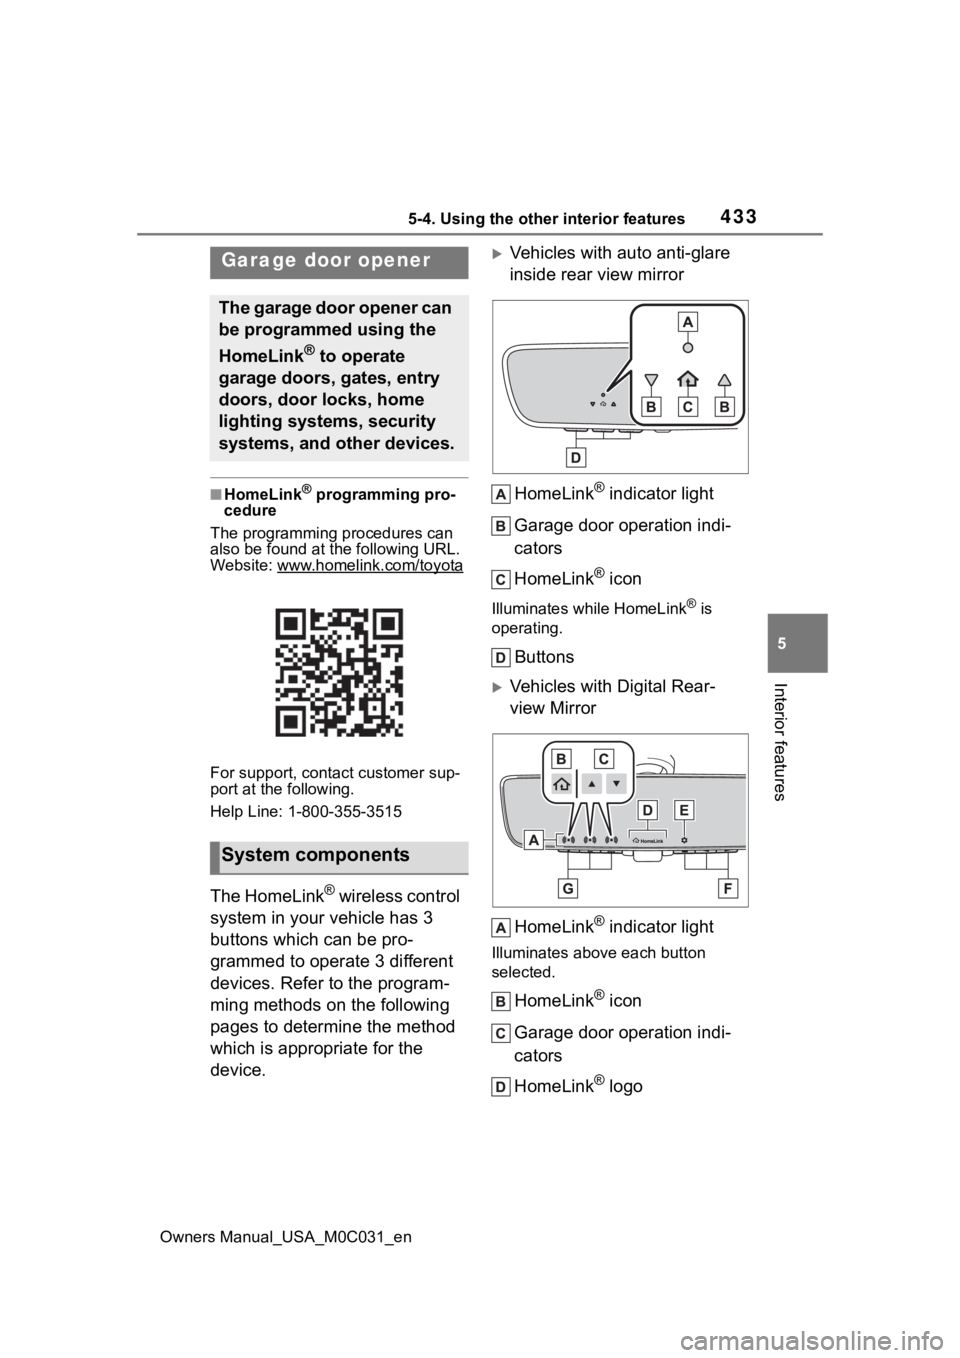
Vehicles with auto anti-glare
inside rear view mirror
HomeLink
® indicator light
Garage door operation indi-
cators
HomeLink
® icon
Illuminates while HomeLink® is
operating.
Buttons
Vehicles with Digital Rear-
view Mirror
HomeLink
® indicator light
Illuminates above each button
selected.
HomeLink® icon
Garage door operation indi-
cators
HomeLink
® logo
Garage door opener
The garage door opener can
be programmed using the
HomeLink
® to operate
garage doors, gates, entry
doors, door locks, home
lighting systems, security
systems, and other devices.
System components
Page 433 of 618
4355-4. Using the other interior features
Owners Manual_USA_M0C031_en
5
Interior features
you may need a stepladder or
other sturdy, safe device to
reach the “Learn” or “Smart”
button on the garage door
opener motor.
■Programming HomeLink®
Steps 2 through 4 must be per-
formed within 60 seconds, oth-
erwise the indicator light will
stop flashing and programming
will not be successfully com-
pleted.
1 Vehicles with Digital Rear-
view Mirror: Press the Home-
Link
® button or menu button
When the HomeLink
® button
is pressed: Homelink
® Train-
ing Tutorial will be displayed
to assist you programming
the HomeLink
®.
When the menu button is pressed:
Press the menu button and
select the “SET UP”. Homelink
®
Training Tutorial will be displayed to
assist you programming the Home-
Link
®.
2 Press and release the Home-
Link
® button you want to pro-
gram and check that the
HomeLink
® indicator light
flashes (orange).
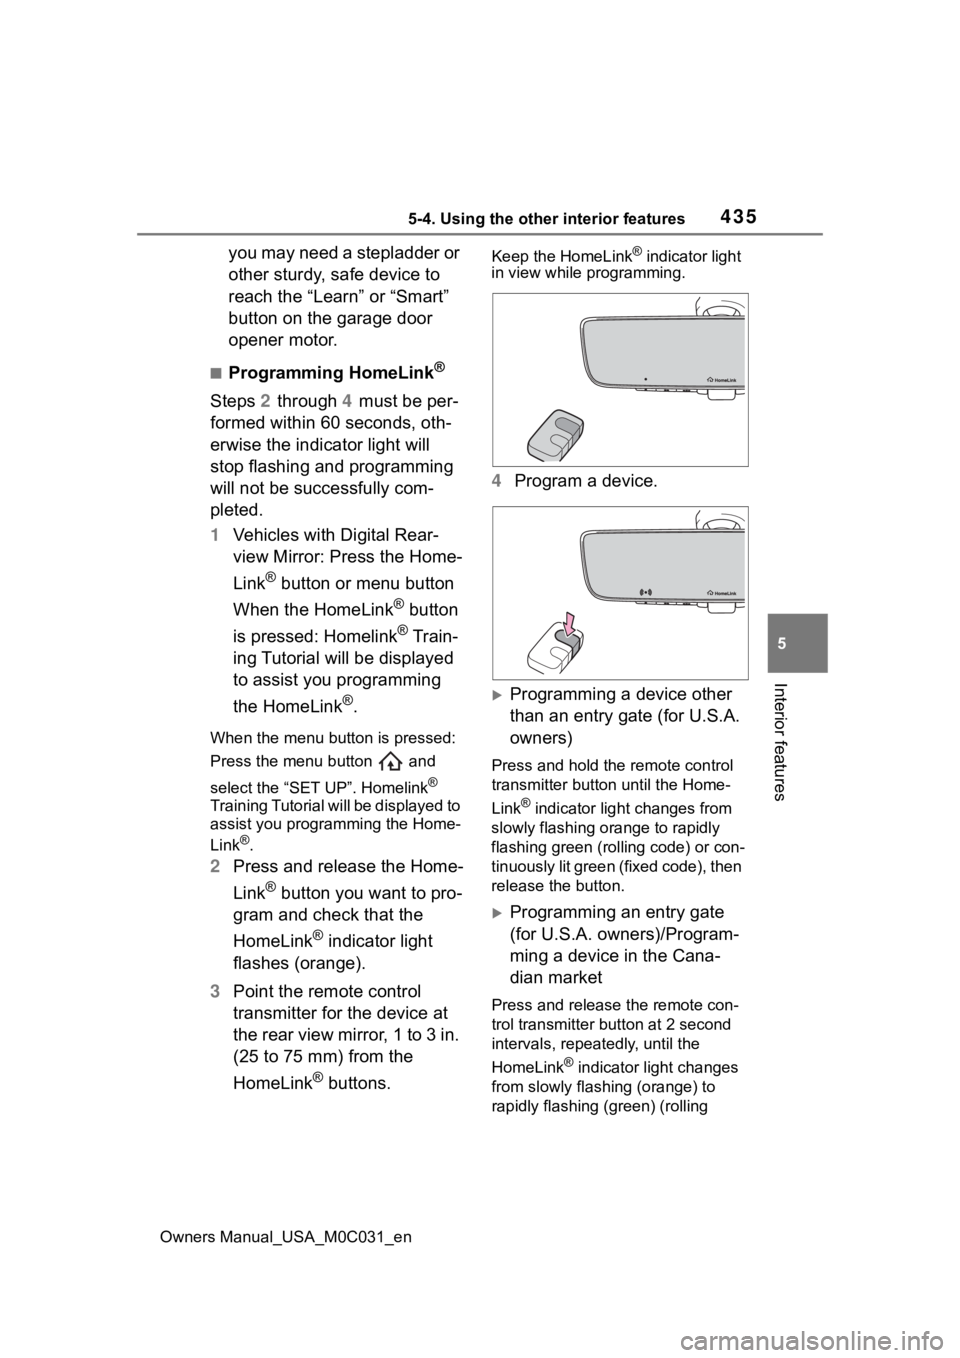
3 Point the remote control
transmitter for the device at
the rear view mirror, 1 to 3 in.
(25 to 75 mm) from the
HomeLink
® buttons.
Keep the HomeLink® indicator light
in view while programming.
4 Program a device.
Programming a device other
than an entry gate (for U.S.A.
owners)
Press and hold the remote control
transmitter button until the Home-
Link
® indicator light changes from
slowly flashing orange to rapidly
flashing green (rolling code) or con-
tinuously lit green (fixed code), then
release the button.
Programming an entry gate
(for U.S.A. owners)/Program-
ming a device in the Cana-
dian market
Press and release the remote con-
trol transmitter button at 2 second
intervals, repeatedly, until the
HomeLink
® indicator light changes
from slowly flashing (orange) to
rapidly flashing (green) (rolling
Page 436 of 618
4385-4. Using the other interior features
Owners Manual_USA_M0C031_en
Link® indicator to start flash-
ing).
■Before programming
●Install a new battery in the trans-
mitter.
●The battery side of the transmitter
must be pointed away from the
HomeLink
® buttons.
Press the appropriate Home-
Link
® button. The HomeLink®
indicator light should turn on.
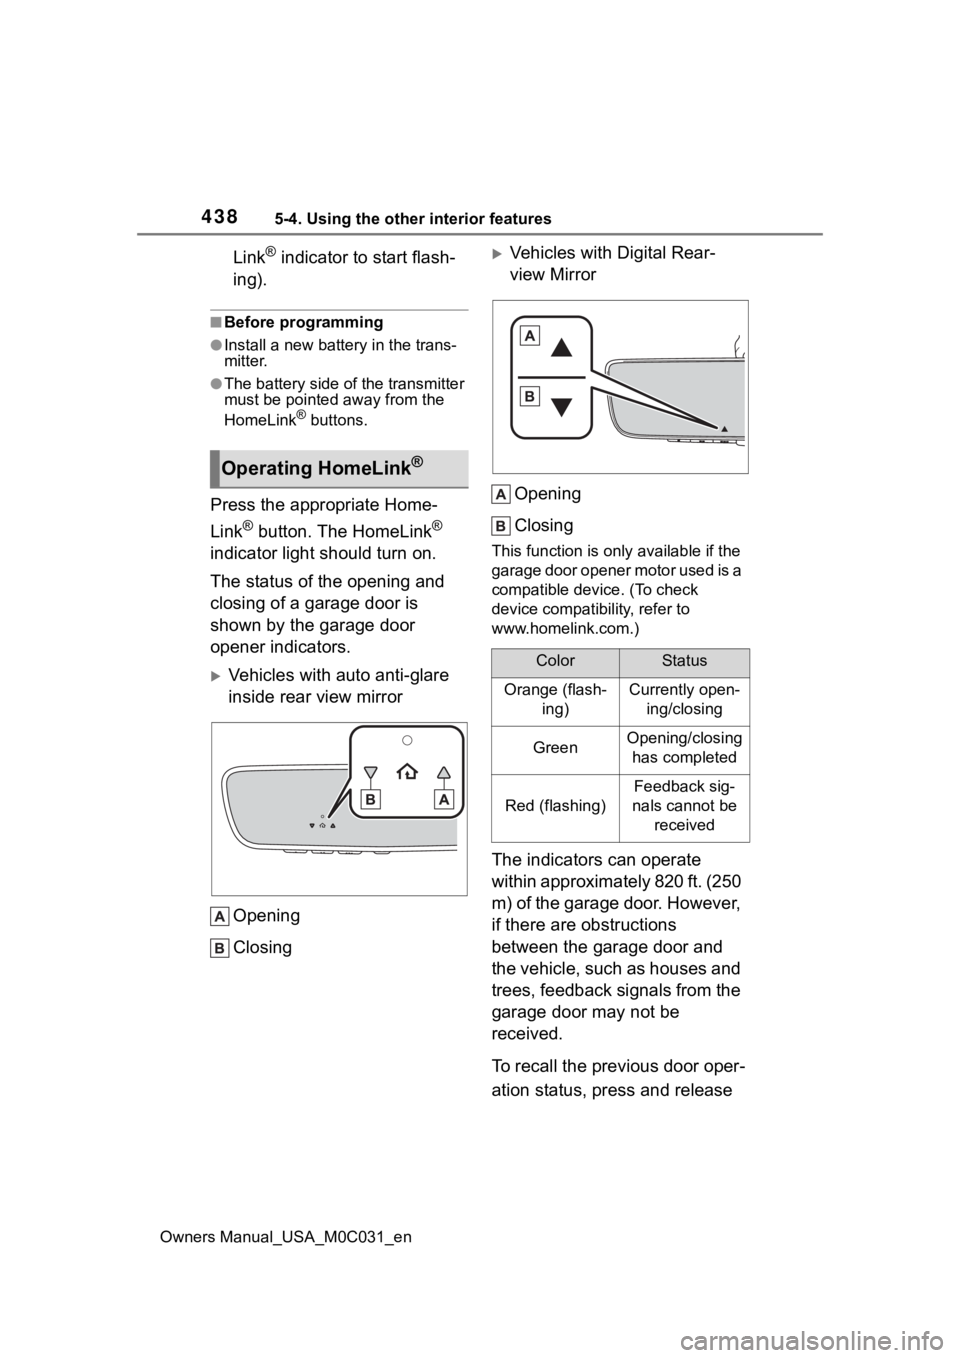
The status of the opening and
closing of a garage door is
shown by the garage door
opener indicators.
Vehicles with auto anti-glare
inside rear view mirror
Opening
Closing
Vehicles with Digital Rear-
view MirrorOpening
Closing
This function is only available if the
garage door opener motor used is a
compatible device. (To check
device compatibility, refer to
www.homelink.com.)
The indicators can operate
within approximately 820 ft. (250
m) of the garage door. However,
if there are obstructions
between the garage door and
the vehicle, such as houses and
trees, feedback signals from the
garage door may not be
received.
To recall the previous door oper-
ation status, press and release
Operating HomeLink®
ColorStatus
Orange (flash- ing)Currently open-ing/closing
GreenOpening/closing has completed
Red (flashing)
Feedback sig-
nals cannot be received
Page 437 of 618
4395-4. Using the other interior features
Owners Manual_USA_M0C031_en
5
Interior features
either HomeLink® buttons
and or and (vehicles
with auto anti-glare inside rear
view mirror), and
or and (vehicles
with Digital Rea r-view Mirror),
simultaneously. The last
recorded status will be dis-
played for 3 seconds.
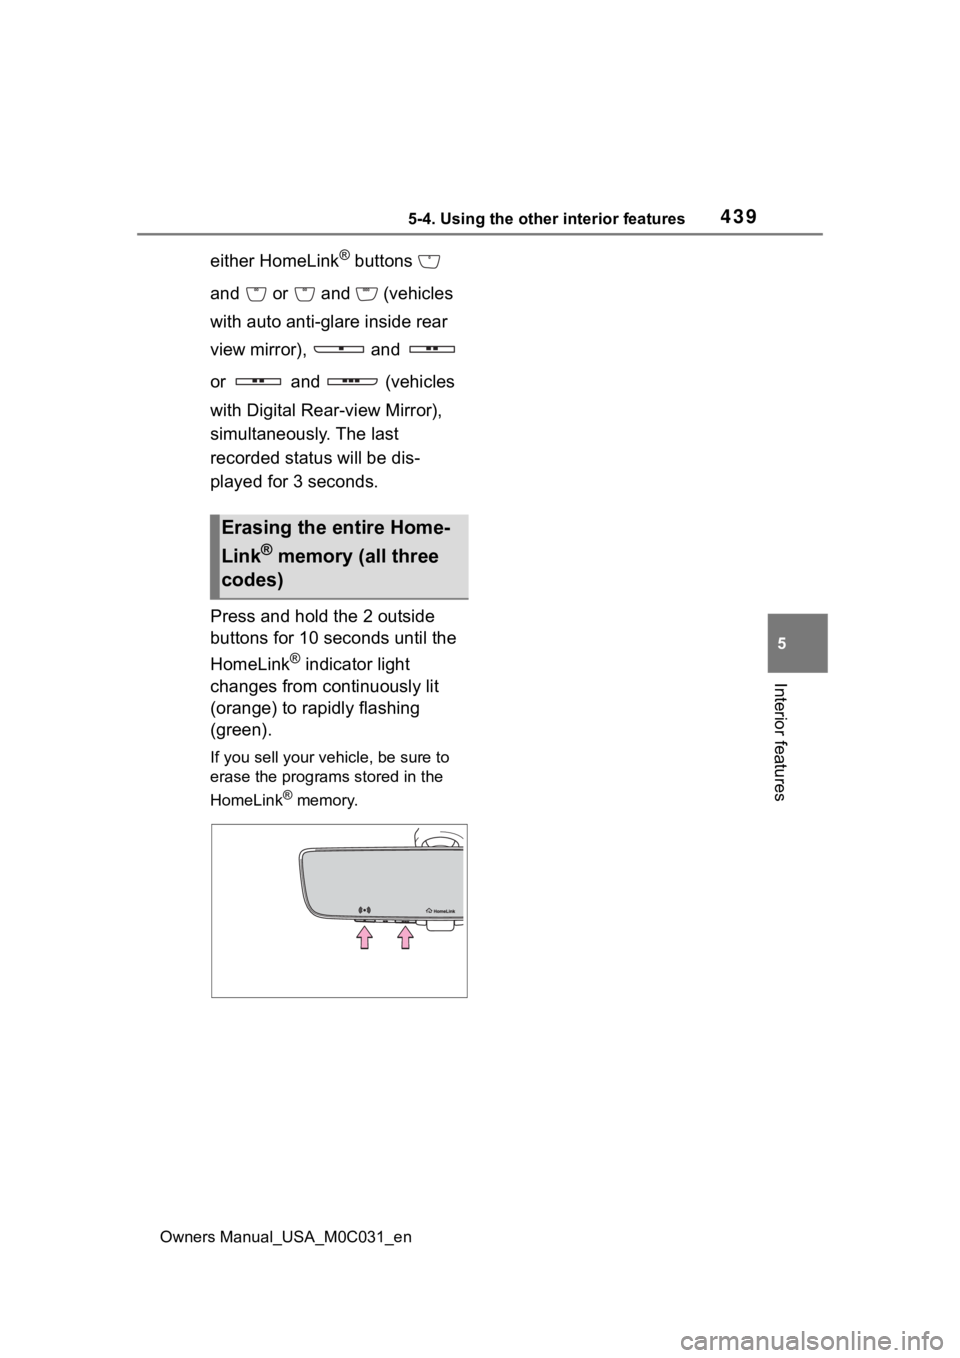
Press and hold the 2 outside
buttons for 10 seconds until the
HomeLink
® indicator light
changes from continuously lit
(orange) to rapidly flashing
(green).
If you sell your vehicle, be sure to
erase the programs stored in the
HomeLink
® memory.
Erasing the entire Home-
Link
® memory (all three
codes)