2022 TOYOTA SIENNA HYBRID ECO mode
[x] Cancel search: ECO modePage 350 of 600

3505-1. Using the air conditioning system and defogger
switch.
■Defogging the rear window
and outside rear view mir-
rors (if equipped), and de-
icing windshield wipers (if
equipped)
Defoggers are used to defog the
rear window and to remove rain-
drops, dew and frost from the
outside rear view mirrors (if
equipped).
The windshield wiper de-icer is
used to prevent ice from building
up on the windshield and wiper
blades.
Press the rear window defog-
ger/outside rear view mirror
defoggers /windshield wiper de-
icer switch.
The defoggers and windshield
wiper de-icer will automatically turn
off after 15 minutes.
When the rear window defog-
ger/outside rear v iew mirror defog-
gers /windshield wiper de-icer
switch is on, the indicator illumi-
nates on the switch.
■Eco air conditioning mode
The air conditioning is controlled
with low fuel consumption priori-
tized such as reducing fan
speed, etc.
Select the eco air conditioning
mode switch on the control
screen. ( P.352)
When the eco air conditioning
mode is on, the indicator illumi-
nates on the eco air conditioning mode switch.
■Fogging up of the windows
●The windows will
easily fog up
when the humidity in the vehicle is
high. Turning “A/C” switch on will
dehumidify the air from the outlets
and defog the windshield effec-
tively.
●If you turn “A/C” switch off, the
windows may fog up more easily.
●The windows may fog up if the
recirculated air mode is used.
■When driving on dusty roads
Close all windows. If dust thrown up
by the vehicle is still drawn into the
vehicle after closing the windows, it
is recommended that the air intake
mode be set to outside air mode
and the fan speed to any setting
except off.
■Outside/recirculated air mode
●Setting to the recirculated air
mode temporarily is recom-
mended in preventing dirty air
from entering the vehicle interior
and helping to c ool the vehicle
when the outside air temperature
is high.
●Outside/recirculated air mode may
automatically switch depending on
the temperature setting or the
inside temperature.
■When the outside temperature
exceeds 75°F (24°C) and the air
conditioning system is on
●In order to reduce the air condi-
tioning power consumption, the air
conditioning system may switch to
recirculated air mode automati-
cally. This may also reduce fuel
consumption.
●Recirculated air mode is selected
as a default mode when the power
switch is turned to ON.
●It is possible to switch to outside
air mode at any time by pressing
the outside/recirculated air mode
Page 351 of 600
3515-1. Using the air conditioning system and defogger
5
Interior features
switch.
■Operation of the air condition-
ing system in Eco drive mode
●In Eco drive mode, the air condi-
tioning system is controlled as fol-
lows to prioritize fuel efficiency:
• Engine speed and compressor operation controlled to restrict
heating/cooling capacity
• Fan speed restr icted when auto-
matic mode is selected
●To improve air conditioning perfor-
mance, perform the following
operations:
• Adjust the fan speed
• Turn off Eco drive mode ( P.333)
• Turn off Eco air conditioning mode
●When the driving mode is set to
Eco driving mode, the Eco air con-
ditioning mode will be turned on
automatically. Even in this case,
the Eco air conditioning mode can
be turned off by pressing the Eco
air conditioning mode switch.
■When the outside temperature
falls to nearly 32°F (0°C)
The dehumidification function may
not operate even when “A/C” switch
is pressed.
■Ventilation and air conditioning
odors
●To let fresh air in, set the air condi-
tioning system to the outside air
mode.
●During use, various odors from
inside and outside the vehicle may
enter into and a ccumulate in the
air conditioning system. This may
then cause odor to be emitted
from the vents.
●To reduce potential odors from
occurring:
• It is recommended that the air conditioning system be set to out-
side air mode prior to turning the
vehicle off.
• The start timing of the blower may
be delayed for a short period of
time immediately after the air con-
ditioning system is started in auto- matic mode.
●When parking, the system auto-
matically switches to outside air
mode to encourage better air cir-
culation throughout the vehicle,
helping to reduce odors that occur
when starting the vehicle.
■Air conditioning filter
P.438
■Air conditioning system refrig-
erant
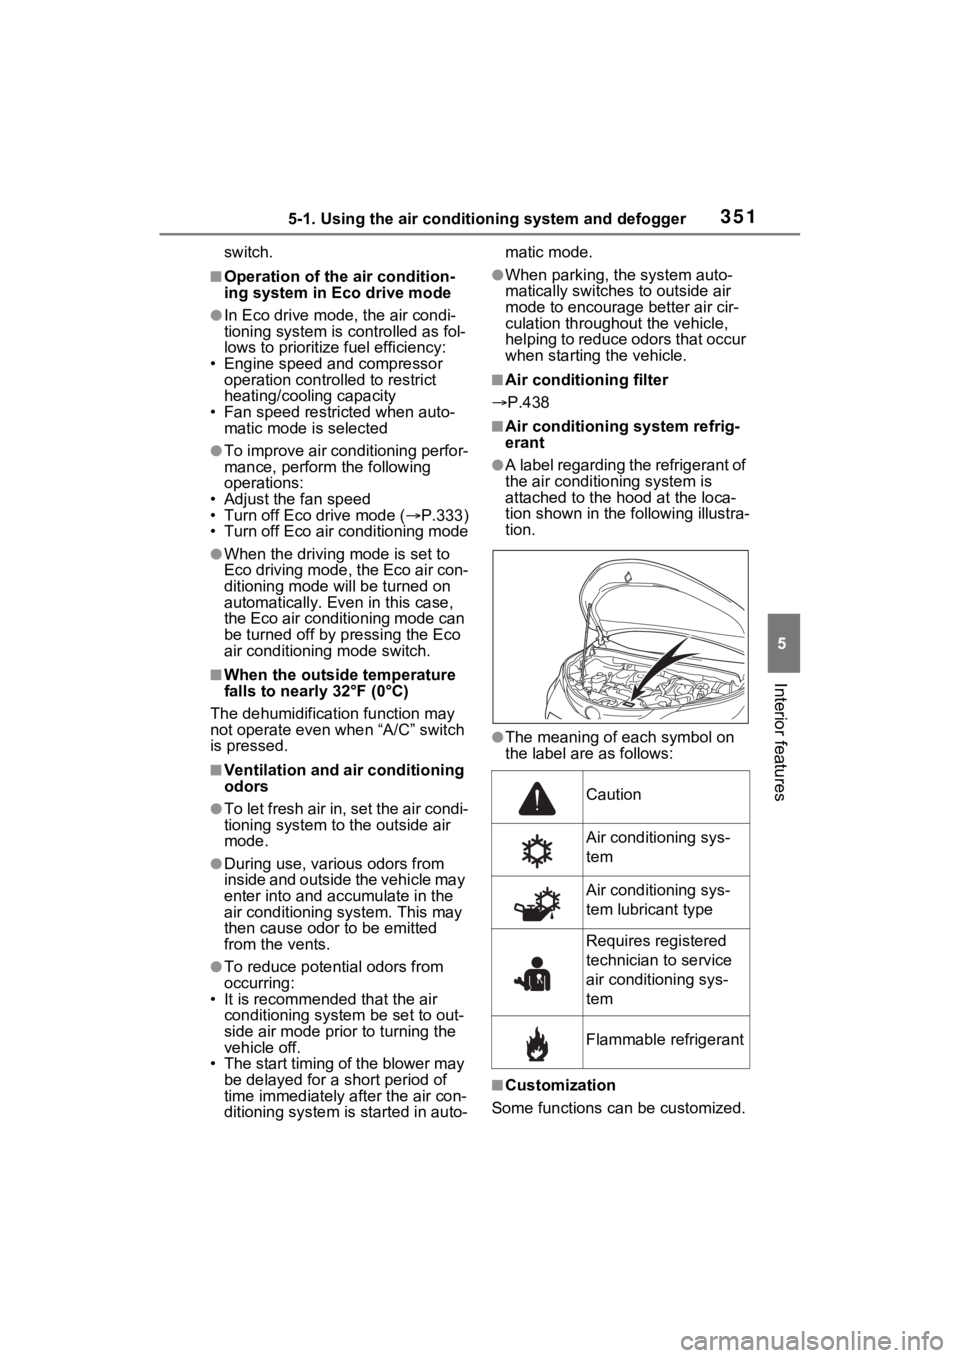
●A label regarding the refrigerant of
the air conditioning system is
attached to the h ood at the loca-
tion shown in the following illustra-
tion.
●The meaning of each symbol on
the label are as follows:
■Customization
Some functions can be customized.
Caution
Air conditioning sys-
tem
Air conditioning sys-
tem lubricant type
Requires registered
technician to service
air conditioning sys-
tem
Flammable refrigerant
Page 352 of 600
3525-1. Using the air conditioning system and defogger
(Customizable features: P.549)
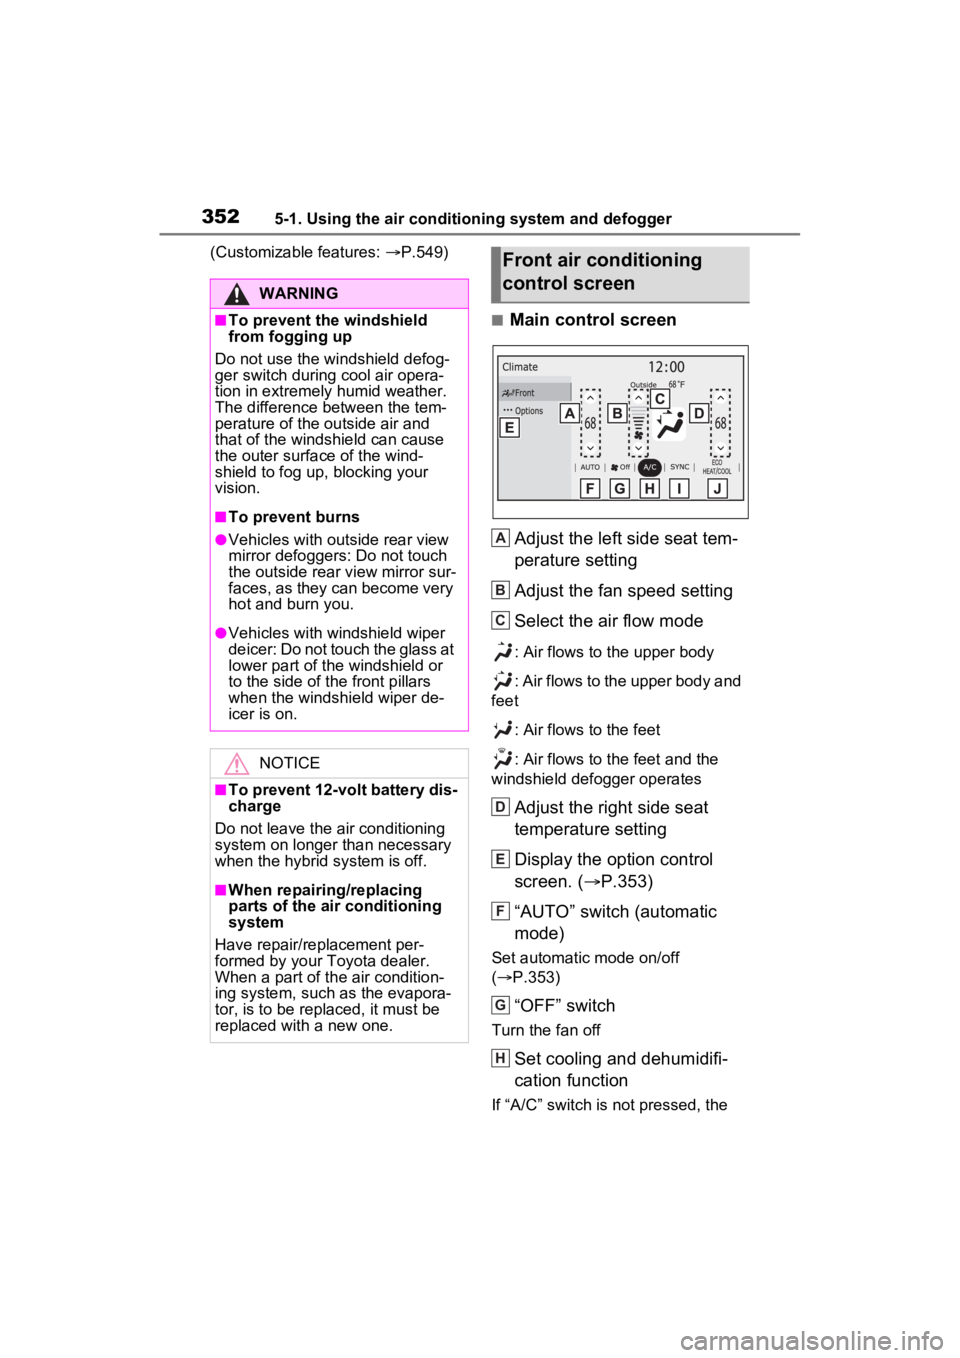
■Main control screen
Adjust the left side seat tem-
perature setting
Adjust the fan speed setting
Select the air flow mode
: Air flows to the upper body
: Air flows to the upper body and
feet
: Air flows to the feet
: Air flows to the feet and the
windshield defogger operates
Adjust the right side seat
temperature setting
Display the option control
screen. ( P.353)
“AUTO” switch (automatic
mode)
Set automatic mode on/off
( P.353)
“OFF” switch
Turn the fan off
Set cooling and dehumidifi-
cation function
If “A/C” switch is not pressed, the
WARNING
■To prevent the windshield
from fogging up
Do not use the windshield defog-
ger switch during cool air opera-
tion in extremely humid weather.
The difference between the tem-
perature of the outside air and
that of the windshield can cause
the outer surface of the wind-
shield to fog up, blocking your
vision.
■To prevent burns
●Vehicles with outside rear view
mirror defoggers: Do not touch
the outside rear view mirror sur-
faces, as they can become very
hot and burn you.
●Vehicles with windshield wiper
deicer: Do not touch the glass at
lower part of the windshield or
to the side of the front pillars
when the windshield wiper de-
icer is on.
NOTICE
■To prevent 12-volt battery dis-
charge
Do not leave the air conditioning
system on longer than necessary
when the hybrid system is off.
■When repairing/replacing
parts of the air conditioning
system
Have repair/replacement per-
formed by your Toyota dealer.
When a part of th e air condition-
ing system, such as the evapora-
tor, is to be replaced, it must be
replaced with a new one.
Front air conditioning
control screen
A
B
C
D
E
F
G
H
Page 353 of 600
3535-1. Using the air conditioning system and defogger
5
Interior features
system will blow ambient tempera-
ture air or heated air.
“SYNC” switch ( P.355)
Vehicles with “3-ZONE” mode: If
the indicator on the “SYNC” switch
is off, the temperature for the driver,
front passenger and rear seats can
be adjusted separately.
Vehicles with “4-ZONE” mode: The
temperature for the driver, front
passenger, left-hand side rear
seats and right-hand side rear
seats can be adjusted separately.
Set eco air conditioning
mode
The air conditioning is controlled
with low fuel consumption priori-
tized such as reducing fan speed,
etc.
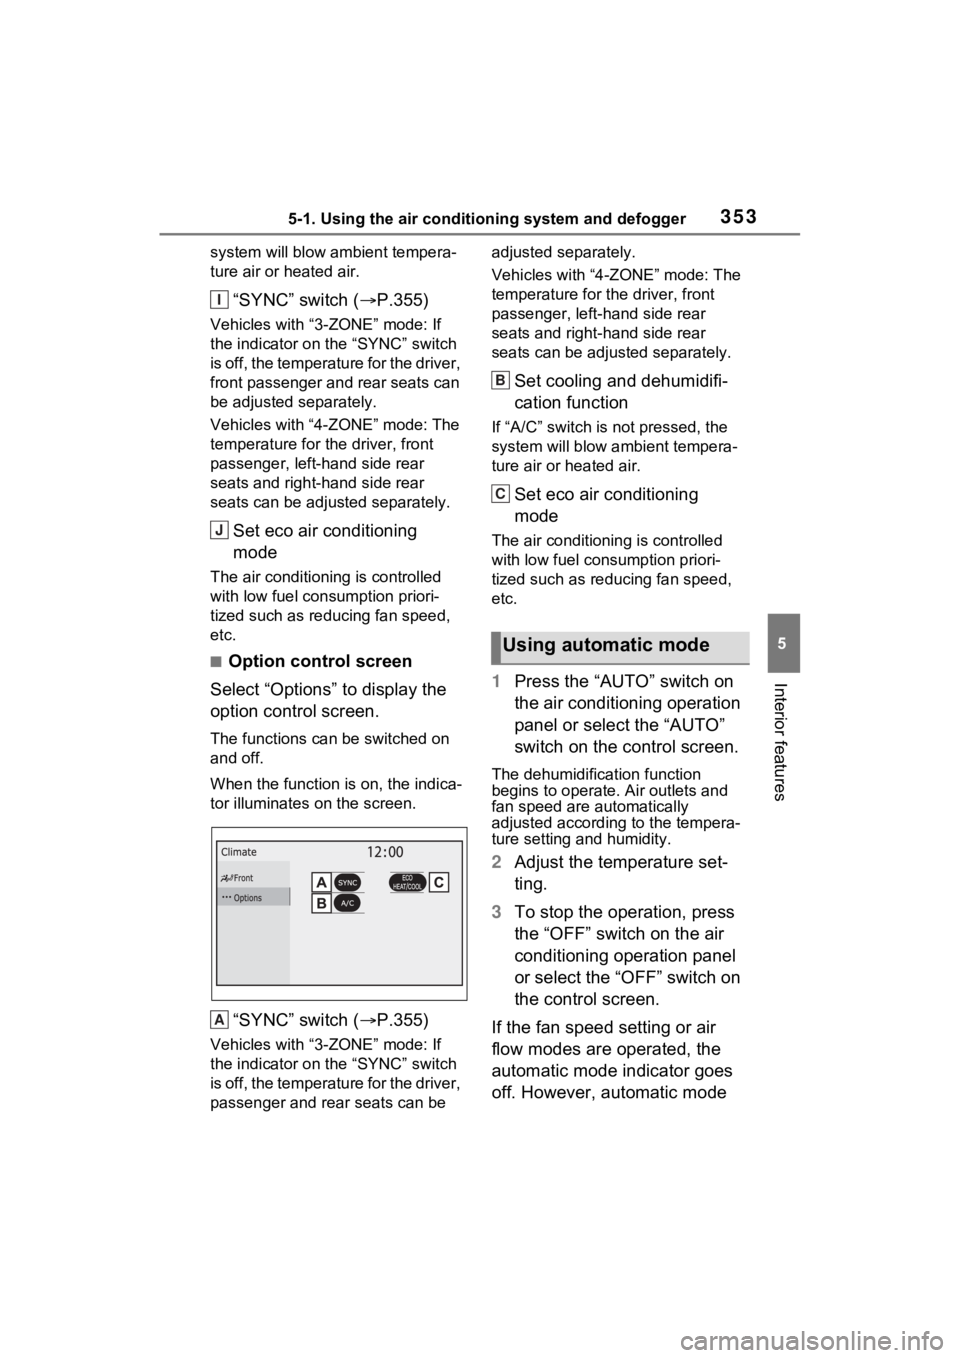
■Option control screen
Select “Options” to display the
option control screen.
The functions can be switched on
and off.
When the function i s on, the indica-
tor illuminates on the screen.
“SYNC” switch ( P.355)
Vehicles with “3-ZONE” mode: If
the indicator on the “SYNC” switch
is off, the temperature for the driver,
passenger and rear seats can be adjusted separately.
Vehicles with “4-ZONE” mode: The
temperature for the driver, front
passenger, left-hand side rear
seats and right-hand side rear
seats can be adjusted separately.
Set cooling and dehumidifi-
cation function
If “A/C” switch is not pressed, the
system will blow ambient tempera-
ture air or heated air.
Set eco air conditioning
mode
The air conditioning is controlled
with low fuel con
sumption priori-
tized such as reducing fan speed,
etc.
1 Press the “AUTO” switch on
the air conditioning operation
panel or select the “AUTO”
switch on the control screen.
The dehumidification function
begins to operate. Air outlets and
fan speed are automatically
adjusted according to the tempera-
ture setting and humidity.
2 Adjust the temperature set-
ting.
3 To stop the operation, press
the “OFF” switch on the air
conditioning operation panel
or select the “OFF” switch on
the control screen.
If the fan speed setting or air
flow modes are operated, the
automatic mode indicator goes
off. However, automatic mode
I
J
A
Using automatic mode
B
C
Page 356 of 600

3565-1. Using the air conditioning system and defogger
seats temperature. (The “SYNC”
of “REAR SYNC” display on the
front air conditioning operation
panel disappears)
To adjust the temperature for the
right-hand side rear seats sepa-
rately from the left-hand side rear
seats, operate the passenger’s
side temperature control switch.
(The “SYNC” of “RIGHT SYNC”
display on the rear air condition-
ing operation panel disappears)
• To adjust the temperature for the driver’s seat and passenger’s
seat separately from the rear
seats: when the synchronous
mode is on, operate the passen-
ger’s side temperature control
switch to adjust t he front passen-
ger’s seat temperature. Then
operate the “REAR” switch, and
operate the driver’s side tempera-
ture control switch to adjust the
rear seats temperature. (The
“SYNC” of “REAR SYNC” display
and the “SYNC” of “PASSSYNC”
display on the front air condition-
ing operation panel disappear)
To adjust the temp erature for the
driver’s seat, operate the “REAR”
switch again and operate driver’s
side temperature switch.
Operate the “REAR” switch.
The modes between the rear air
conditioning system and the front
air conditioning system switches
each time the “REAR” switch is
operated.
The air conditioning system switches between
individual and
synchronous modes each time the
“SYNC” switch is operated.
( P.355)
If the system is left untouched for
approximately 6 seconds after
changing to the rear air condition-
ing system, the control mode in the
front control pane l returns to the
front.
Adjusting the temperature
setting
Vehicles with “3-ZONE” mode
Operate the driver’s or passen-
ger’s side temperature control
switch upwards to increase the
temperature and operate the
switch downwards to decrease
the temperature.
Vehicles with “4-ZONE” mode
Operate the passenger’s side
temperature control switch to
adjust the right-hand rear seats
temperature, and operate the
driver’s side temperature control
switch to adjust the left-hand
side rear seats temperature.
Operate the temperature con-
trol switch upwards to increase
the temperature and operate the
switch downwards to decrease
the temperature.
Fan speed setting
Operate the fan speed control
switch upwards to i ncrease the fan
speed and downwards to decrease
the fan speed.
Touch the “OFF” swit ch to turn the
fan off.
Changing the rear seat
settings (if equipped)
Page 362 of 600
3625-1. Using the air conditioning system and defogger
lit) Off
The level indicato r lights up during
operation.
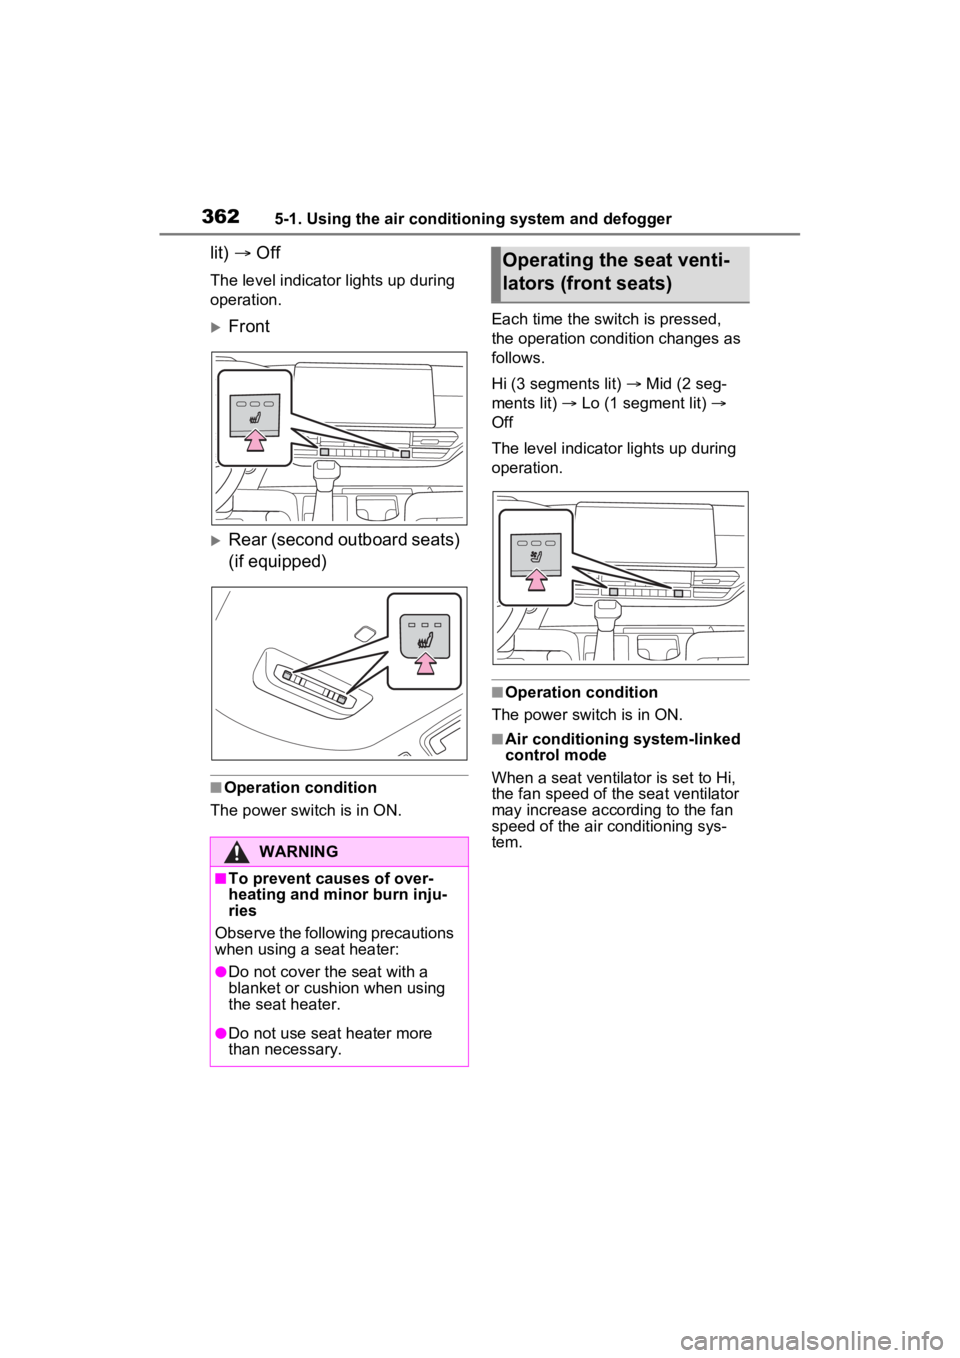
Front
Rear (second outboard seats)
(if equipped)
■Operation condition
The power swit ch is in ON. Each time the switch is pressed,
the operation condition changes as
follows.
Hi (3 segments lit)
Mid (2 seg-
ments lit) Lo (1 segment lit)
Off
The level indicato r lights up during
operation.
■Operation condition
The power switch is in ON.
■Air conditioning system-linked
control mode
When a seat ventilator is set to Hi,
the fan speed of the seat ventilator
may increase according to the fan
speed of the air conditioning sys-
tem.
WARNING
■To prevent causes of over-
heating and minor burn inju-
ries
Observe the following precautions
when using a seat heater:
●Do not cover the seat with a
blanket or cushion when using
the seat heater.
●Do not use seat heater more
than necessary.
Operating the seat venti-
lators (front seats)
Page 368 of 600
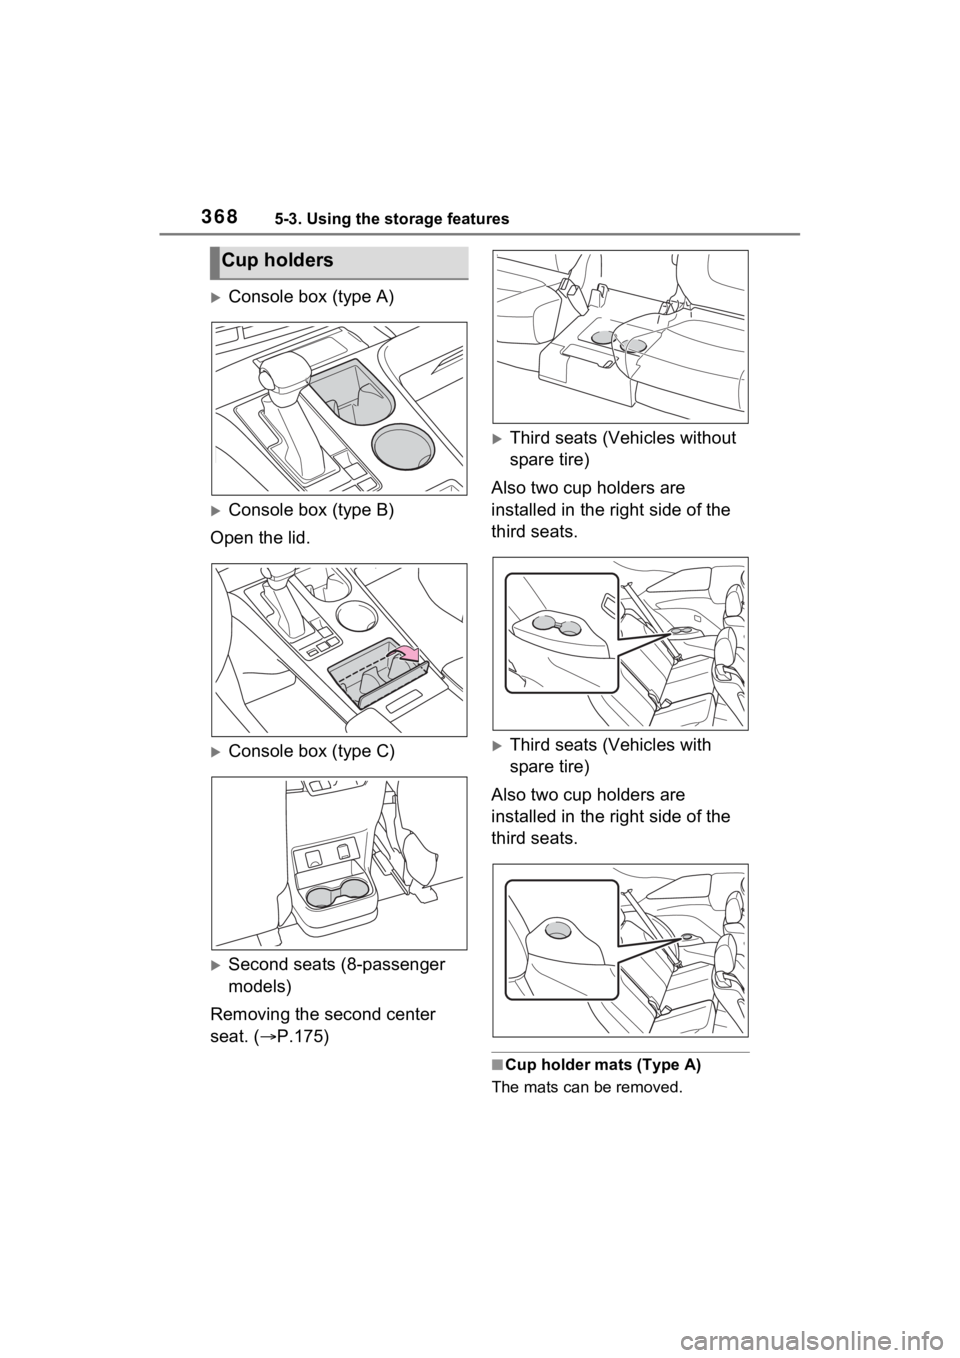
3685-3. Using the storage features
Console box (type A)
Console box (type B)
Open the lid.
Console box (type C)
Second seats (8-passenger
models)
Removing the second center
seat. ( P.175)
Third seats (Vehicles without
spare tire)
Also two cup holders are
installed in the right side of the
third seats.
Third seats (Vehicles with
spare tire)
Also two cup holders are
installed in the right side of the
third seats.
■Cup holder mats (Type A)
The mats can be removed.
Cup holders
Page 396 of 600
3966-1. Maintenance and care
6-1.Maintenance and care
Working from top to bottom,
liberally apply water to the
vehicle body, wheel wells and
underside of the vehicle to
remove any dirt and dust.
Wash the vehicle body using
a sponge or soft cloth, such
as a chamois.
For hard-to-remove marks,
use car wash soap and rinse
thoroughly with water.
Wipe away any water.
Wax the vehicle when the
waterproof coating deterio-
rates.
If water does not bead on a clean
surface, apply wax when the vehi-
cle body is cool.
■Automatic car washes
●Before washing the vehicle:
• Fold the mirrors
• Disable the powe r sliding door
system
• Disable the power back door sys- tem (if equipped)
Start washing from the front of the
vehicle. Make sure to extend the
mirrors before driving.
●Brushes used in automatic car
washes may scratch the vehicle
surface, parts (wheel, etc.) and
harm your vehicle’s paint.
●Rear spoiler may not be washable
in some automatic car washes.
There may also be an increased
risk of damage to vehicle.
■High pressure car washes
As water may enter the cabin, do
not bring the nozzle tip near the
gaps around the doors or perimeter
of the windows, or spray these
areas continuously.
■Note for a smart key system
If the door handle becomes wet
while the electronic key is within the
effective range, t he door may lock
and unlock repeatedly. In that case,
follow the following correction pro-
cedures to wash the vehicle:
●Place the key in a position 6 ft. (2
m) or more separate from the
vehicle while the vehicle is being
washed. (Take care to ensure that
the key is not stolen.)
●Set the electronic key to battery-
saving mode to disable the smart
key system. ( P.166)
●If the electronic key is inside the
vehicle and a door handle
becomes wet during a car wash, a
buzzer may sound outside the
vehicle and “Key Detected in
Vehicle” may be shown on the
multi-information d isplay. To turn
off the alarm, lock all the doors.
■Wheels and wheel ornaments
●Remove any dirt immediately by
using a neutral detergent.
●Wash detergent off with water
immediately after use.
●To protect the paint from damage,
make sure to obs erve the follow-
ing precautions.
• Do not use acidic, alkaline or
abrasive detergent
• Do not use hard brushes
• Do not use detergent on the
Cleaning a nd protect-
ing the vehicle exte-
rior
Perform the following to
protect the vehicle and
maintain it in prime condi-
tion:
Cleaning instructions