2022 TOYOTA SIENNA HYBRID change time
[x] Cancel search: change timePage 116 of 600

1162-1. Instrument cluster
Select to change the tire pressure
warning system sensor ID code set.
To enable this function, a second
set of tire pressure warning system
sensor ID codes must be registered
by a Toyota dealer. For information
regarding changing the registered
ID code set, contact your Toyota
dealer.
• “Setting UNIT”
Select to change the units of the
tire pressure displayed.
“Scheduled Maintenance”
( P.403)
Select to reset the scheduled main-
tenance information (message indi-
cating maintenance is required and
distance until the next mainte-
nance) after all maintenance is per-
formed.
“Oil Maintenance” ( P.415)
Select to reset the Oil maintenance.
■ Meter Settings
“Language”
Select to change the language on
the multi-inform ation display.
“Units”
Select to change t he units of mea-
sure displayed.
Digital Speed (7-inch display)
Select to enable/disable the speed-
ometer display.
EV indicator ( P.80)
Select to enable/disable the EV
indicator.
Driving information display
settings
Select to set up t he following items.
• “Hybrid System”
Select to enable/disable the ECO
Accelerator Guidance (P.108).
• “Fuel Economy”
Select to change the average fuel
economy display ( P.106).
Audio settings
Select to enable/disable the audio
system-linked display.
Vehicle information dis-
play settings
• “Display Contents”
Select to displa y the following
items.
“Energy monitor”
Select to enable/disable the Energy
monitor ( P.122)
“AWD” (AWD models)
Select to enable /disable the AWD
system display ( P.112).
• “Drive Info Type” (4.2-inch dis- play)
Select to change the drive informa-
tion type between trip and total
( P.111).
• “Drive Info Items” (4.2-inch dis- play)
Select to set the items on the upper
and lower side of the drive informa-
tion screen. from th ree items, aver-
age speed, distance and total time.
“Trip Summary” (4.2-inch dis-
play)
Select to set the items displayed
when the power switch is turned off.
“Pop-Up Display”
Page 120 of 600

1202-1. Instrument cluster
■Enabling/disabling the
head-up display
Select on the multi-informa-
tion display, select “Vehicle Set-
tings” (4.2-inch) / (7-inch)
and then select “HUD Main”.
“ON” and “OFF” switches each
time when “OK” is pressed.
■Changing settings of the
head-up display
The following settings can be
changed on “HUD Main” of the
multi-information display.
( P.112)
Press and hold “OK” to display
the following settings:
“HUD Brightness/Position”
Select to adjust t he brightness or
vertical position of the head-up dis-
play.
“HUD Driving Support”
• Tachometer Settings
Blank/Hybrid System/Tachometer
Select to change the display to
blank (no display)/Hybrid System Indicator/tachometer.
Select to enable/d
isable the follow-
ing items:
• Navigation (if equipped)
• Driving Assist
• Compass (if equipped)
•Audio
“HUD Rotation”
Select to adjus t the angle of the
head-up display.
P r e s s t h e o r s w i t c h t o a d j u s t
the angle of the head-up display.
■Enabling/disabling of the head-
up display
If the head-up display is disabled, it
will remain disabled when the power
switch is turned off then back to ON.
■Display brightness
The brightness of the head-up dis-
play can be adjusted on of the
multi-information di splay. Also, it is
automatically adjusted according to
the ambient brightness.
■Head-up display automatic
position adjustment (vehicles
with driving position memory)
If the display position is recorded
into memory, the head-up display
will be automatically adjusted to the
desired position. ( P.179)
■When the 12-volt battery is dis-
connected
The customize settings of the head-
up display will be reset.
●Do not place anything on or put
stickers onto the head-up dis-
play projector.
Doing so could interrupt head-
up display indications.
●Do not touch the inside of the
head-up display projector or
thrust sharp edges or the like
into the projector.
Doing so could cause mechani-
cal malfunctions.
Using the head-up display
Page 134 of 600

1333-2. Opening, closing and locking the doors
3
Before driving
Vehicles without power back
door
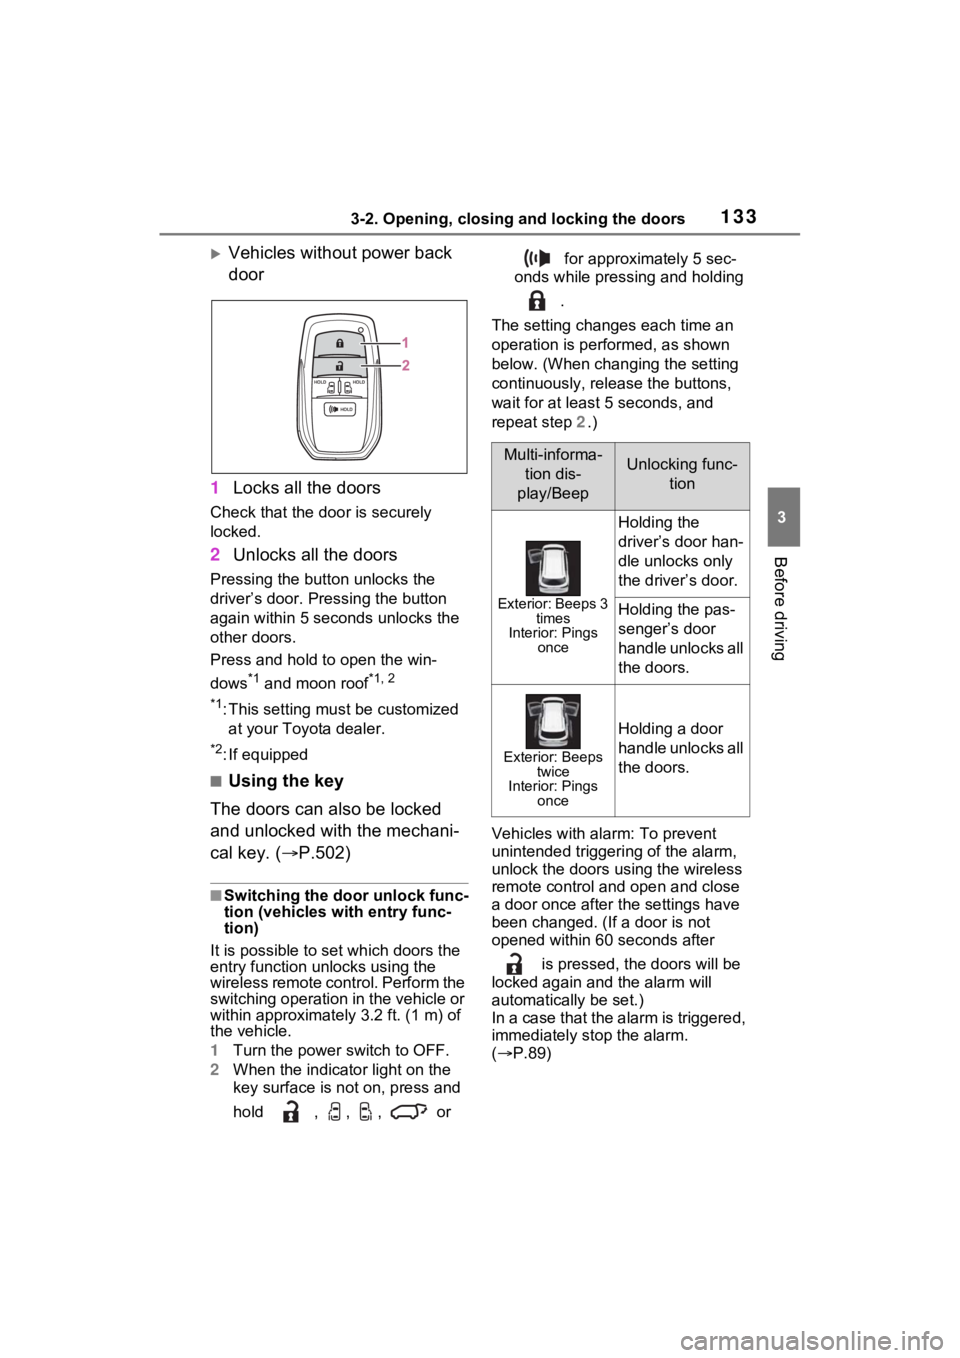
1 Locks all the doors
Check that the door is securely
locked.
2Unlocks all the doors
Pressing the button unlocks the
driver’s door. Pressing the button
again within 5 seconds unlocks the
other doors.
Press and hold to open the win-
dows
*1 and moon roof*1, 2
*1
:This setting mu st be customized
at your Toyota dealer.
*2: If equipped
■Using the key
The doors can also be locked
and unlocked with the mechani-
cal key. ( P.502)
■Switching the door unlock func-
tion (vehicles with entry func-
tion)
It is possible to set which doors the
entry function unlocks using the
wireless remote control. Perform the
switching operation in the vehicle or
within approximately 3.2 ft. (1 m) of
the vehicle.
1 Turn the power switch to OFF.
2 When the indicator light on the
key surface is not on, press and
hold , , , or for approximately 5 sec-
onds while pressing and holding
.
The setting changes each time an
operation is per formed, as shown
below. (When changing the setting
continuously, release the buttons,
wait for at least 5 seconds, and
repeat step 2 .)
Vehicles with alarm: To prevent
unintended triggeri ng of the alarm,
unlock the doors using the wireless
remote control and open and close
a door once after the settings have
been changed. (If a door is not
opened within 60 seconds after
is pressed, the doors will be
locked again and the alarm will
automatically be set.)
In a case that the alarm is triggered,
immediately stop the alarm.
( P.89)
Multi-informa-
tion dis-
play/BeepUnlocking func- tion
Exterior: Beeps 3 times
Interior: Pings once
Holding the
driver’s door han-
dle unlocks only
the driver’s door.
Holding the pas-
senger’s door
handle unlocks all
the doors.
Exterior: Beeps twice
Interior: Pings once
Holding a door
handle unlocks all
the doors.
Page 168 of 600

1673-2. Opening, closing and locking the doors
3
Before driving
●When the electronic key is in con-
tact with, or is covered by the fol-
lowing metallic objects
• Cards to which al uminum foil is
attached
• Cigarette boxes that have alumi-
num foil inside
• Metallic wallets or bags
• Coins
• Hand warmers made of metal
• Media such as CDs and DVDs
●When other wireless key (that
emits radio waves) is being used
nearby
●When carrying the electronic key
together with the following devices
that emit radio waves
• Portable radio, cellular phone, cordless phone or other wireless
communication devices
• Another vehicle’s electronic key or a wireless key that emits radio
waves
• Personal computers or personal digital assistants (PDAs)
• Digital audio players
• Portable game systems
●If window tint with a metallic con-
tent or metallic objects are
attached to the rear window
●When the electronic key is placed
near a battery charger or elec-
tronic devices
●When the vehicle is parked in a
pay parking spot where radio
waves are emitted.
■Note for the entry function
●Even when the electronic key is
within the effective range (detec-
tion areas), the system may not
operate properly in the following
cases:
• The electronic key is too close to the window or outside door han-
dle, near the ground, or in a high
place when the doors are locked
or unlocked.
• The electronic key is on the instru- ment panel or floor, or in the door
pockets or glove box when the
hybrid system is s tarted or power switch modes are changed.
●Do not leave the electronic key on
top of the instrument panel or near
the door pockets when exiting the
vehicle. Depending on the radio
wave reception conditions, it may
be detected by the antenna out-
side the cabin and the door will
become lockable from the outside,
possibly trapping the electronic
key inside the vehicle.
●As long as the electronic key is
within the effective range, the
doors may be locked or unlocked
by anyone. However, only the
doors detecting the electronic key
can be used to unlock the vehicle.
●Even if the electro
nic key is not
inside the vehicle, it may be possi-
ble to start the hybrid system if the
electronic key is near the window.
●The doors may unlock if a large
amount of water splashes on the
door handle, such as in the rain or
in a car wash when the electronic
key is within the effective range.
(The doors will au tomatically be
locked after approximately 60 sec-
onds if the doors are not opened
and closed.)
●If the wireless remote control is
used to lock the doors when the
electronic key is near the vehicle,
there is a possib ility that the door
may not be unlocked by the entry
function. (Use the wireless remote
control to unlock the doors.)
●Touching the door lock sensor
while wearing gloves may delay or
prevent lock operation. Remove
the gloves and touch the lock sen-
sor again.
●When the lock operation is per-
formed using the lock sensor, rec-
ognition signals will be shown up
to two consecutive times. After
this, no recognition signals will be
given.
●If the door handle becomes wet
while the electronic key is within
the effective range, the door may
Page 193 of 600

1923-4. Adjusting the steering wheel and mirrors
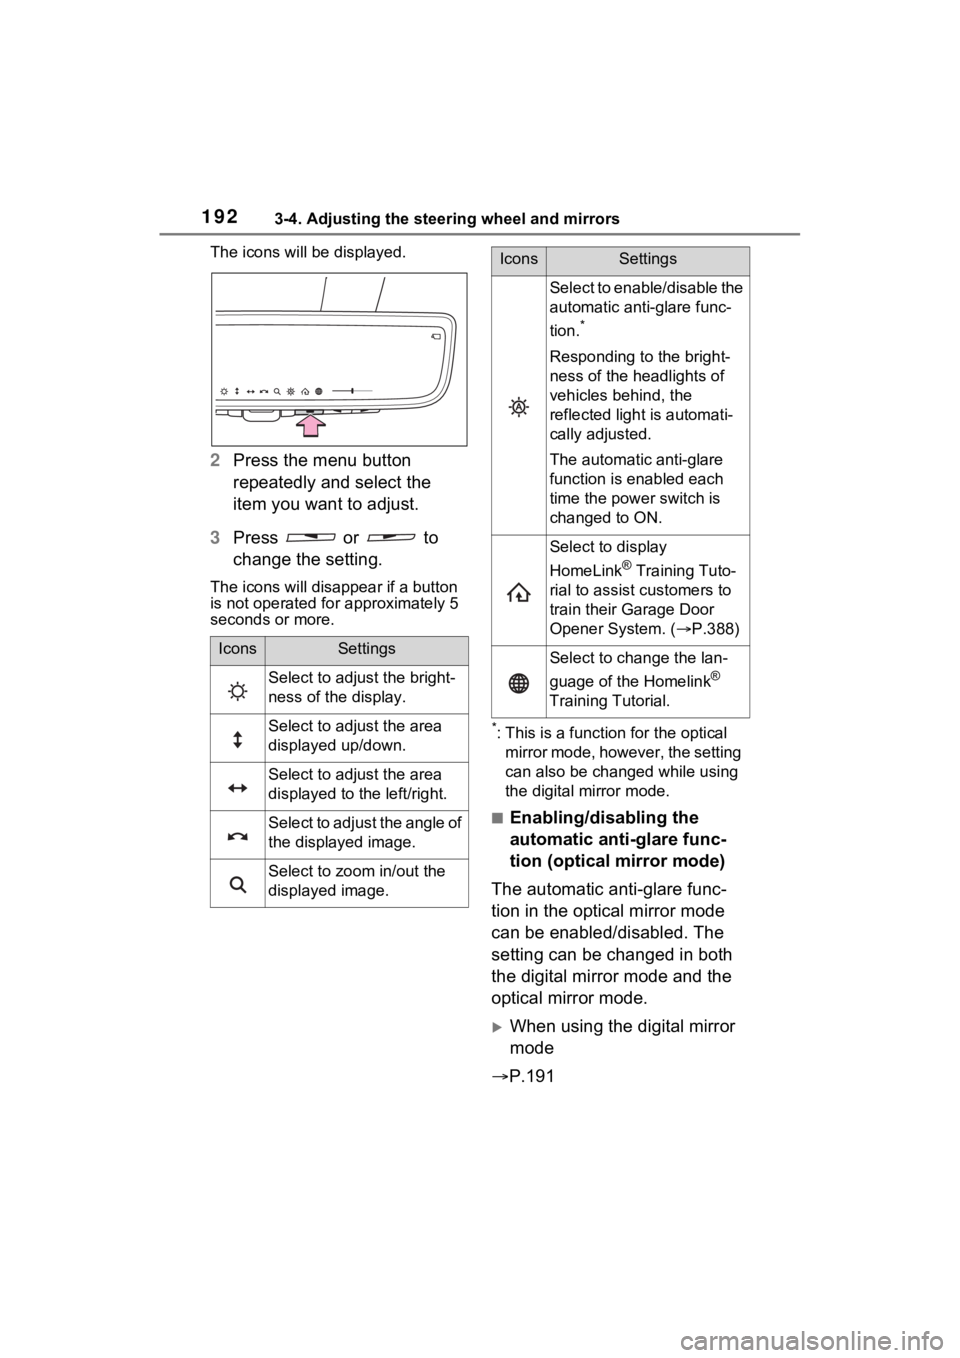
The icons will be displayed.
2Press the menu button
repeatedly and select the
item you want to adjust.
3 Press or to
change the setting.
The icons will disapp ear if a button
is not operated fo r approximately 5
seconds or more.
*: This is a functi on for the optical
mirror mode, however, the setting
can also be changed while using
the digital mirror mode.
■Enabling/disabling the
automatic anti-glare func-
tion (optical mirror mode)
The automatic anti-glare func-
tion in the optical mirror mode
can be enabled/disabled. The
setting can be changed in both
the digital mirror mode and the
optical mirror mode.
When using the digital mirror
mode
P.191
IconsSettings
Select to adjust the bright-
ness of the display.
Select to adjust the area
displayed up/down.
Select to adjust the area
displayed to the left/right.
Select to adjust the angle of
the displayed image.
Select to zoom in/out the
displayed image.
Select to enable/disable the
automatic anti-glare func-
tion.
*
Responding to the bright-
ness of the headlights of
vehicles behind, the
reflected light is automati-
cally adjusted.
The automatic anti-glare
function is enabled each
time the power switch is
changed to ON.
Select to display
HomeLink
® Training Tuto-
rial to assist customers to
train their Garage Door
Opener System. ( P.388)
Select to change the lan-
guage of the Homelink
®
Training Tutorial.
IconsSettings
Page 202 of 600

2013-4. Adjusting the steering wheel and mirrors
3
Before driving
R).
■Adjusting the mirror angle
when the vehicle is revers-
ing
With the shift lever in R, adjust
the mirror angle at a desired
position. The adjusted angle will
be memorized and the mirror
will automatically tilt to the mem-
orized angle whenever the shift
lever is shifted to R from next
time.
The memorized downward tilt
position of the mirror is linked to
the normal position (angle
adjusted with the shift lever in
other than R). Therefore, if the
normal position is changed after
adjustment, the tilt position will
also change.
When the normal position is
changed, readjust the angle in
reversing.
Page 207 of 600

2063-5. Opening, closing the windows and moon roof
■When the moon roof does not
close normally
Perform the following procedure:
1 Stop the vehicle.
2 Press and hold the close switch.
*
The moon roof will close, reopen
and pause for approximately 10
seconds. Then it will close again
and stop at the completely closed
position.
3 Check to make sure that the
moon roof is completely closed
and then release the switch.
*: If the switch is released at the
incorrect time, the procedure will
have to be performed again from
the beginning.
If the moon roof do es not fully close
even after performing the above
procedure correctly, have the vehi-
cle inspected by your Toyota dealer.
■If the moon roof does not move
normally
If the moon roof does not open or
close normally or the automatic
opening function does not operate,
perform the followi ng initialization
procedure.
1 Stop the vehicle.
2 Press and hold the down switch.
*
The moon roof will stop at the tilt-up
position. After that, it will open,
close, tilt up, tilt down, and stop at
the fully closed position.
3Confirm that the moon roof has
completely stopped and release
the switch.
*: If you release the switch while the
moon roof is moving, perform the
procedure again from the begin-
ning.
If, after performing the above proce-
dures correctly, the moon roof still
does not open or close normally or
the automatic opening function does not operate, have the vehicle
inspected by your Toyota dealer.
■Moon roof open reminder func-
tion
The buzzer sounds and a message
is shown on the mu lti-information
display when the power switch is
turned to OFF and the driver’s door
is opened with t he moon roof open.
■Customization
Settings (e.g. linked door lock oper-
ation) can be changed. (Customiz-
able features: P.545)
WARNING
Observe the following precau-
tions.
Failure to do so may cause death
or serious injury.
■Opening the moon roof
●Do not allow any passengers to
put their hands or head outside
the vehicle while it is moving.
●Do not sit on top of the moon
roof.
■Opening and closing the
moon roof
●The driver is responsible for
moon roof opening and closing
operations.
In order to prevent accidental
operation, especially by a child,
do not let a child operate the
moon roof. It is possible for chil-
dren and other passengers to
have body parts caught in the
moon roof.
Page 212 of 600

2114-1. Before driving
4
Driving
pery.
●Drive carefully when it starts to
rain, as the road surface could be
especially slippery.
●Refrain from high speeds when
driving on an expressway in the
rain, because there may be a
layer of water between the tires
and the road surface, preventing
the steering and brakes from
operating properly.
■ECO Accelerator Guidance
( P.108)
It is easier to drive in an Eco-friendly
manner by driving while referring to
the ECO Accelerator Guidance dis-
play. Also, by using the ECO Accel-
erator Guidance it is easier to
increase the “Eco Score” evaluation.
●When starting off:
While staying within the ECO
Accelerator Guidance range,
gradually depress the accelerator
pedal and accelerate to the
desired speed. If excessive accel-
eration is avoid ed, the “Start”
score will increase.
●When driving:
After accelerating to the desired
speed, release the accelerator
pedal and drive at a stable speed
within the ECO Acce lerator Guid-
ance range. By keeping the vehi-
cle within the E CO Accelerator
Guidance range, the “Cruise”
score will increase.
●When stopping:
When stopping the vehicle, early
releasing the accelerator pedal
will cause the “Stop” score to
increase.
■Restraining the hybrid system
output (Brake Override System)
●When the accelerator and brake
pedals are depressed at the same
time, the hybrid system output
may be restrained.
●A warning message is displayed
on the multi-information display
and head-up display (if equipped) while the system is operating.
(
P.469)
■Restraining sudden start (Drive-
Start Control)
●When the following unusual oper-
ation is performed, the hybrid sys-
tem output may b e restrained.
• When the shift lever is shifted from
R to D, D to R, N to R, P to D
*, or
P to R* (D includes S) with the
accelerator pedal depressed, a
warning message appears on the
multi-information display and
head-up display (i f equipped). If a
warning message is shown on the
multi-information display and
head-up display (if equipped),
read the message and follow the
instructions.
• When the accelerator pedal is depressed too much while the
vehicle is in reverse.
*: Depending on the situation, the
shift position may not be changed.
●When the TRAC is turned off
( P.336), sudden start restraint
control also does not operate. If
your vehicle have trouble escap-
ing from the mud or fresh snow
due to the sudden start restraint
control operation, deactivate
TRAC( P.336) so that the vehi-
cle may become able to escape
from the mud o r fresh snow.
■Breaking in your new Toyota
To extend the life of the vehicle,
observing the following precautions
is recommended:
●For the first 200 miles (300 km):
Avoid sudden stops.
●For the first 500 miles (800 km):
Do not tow a trailer.
●For the first 600 miles (1000 km):
• Do not drive at extremely high speeds.
• Avoid sudden acceleration.
• Do not drive continuously in low gears.
• Do not drive at a constant speed