Page 434 of 600

4346-3. Do-it-yourself maintenance
With 7-inch display
2 Press or of the meter
control switches on the steer-
ing wheel and select .
3 Press or of the meter
control switches and select
, and then press and hold
“OK”.
4 Press or of the meter
control switches and select
“TPWS Setting”, and then
press “OK”.
5 Press or of the meter
control switches and select
“Identifying Each Wheel &
Position”. Then press and
hold “OK” until the tire pres-
sure warning light starts
slowly blinking 3 times.
Afterward, the tire pressure warning
light turns on after flashing for 1
minute.
After 2 minutes, registration of a
second wheel set is being per-
formed. The tire pressure warning
light will turn off a nd “--” will be dis-
played for the inflation pressure of
each tire on the multi-information
display.
6 Initialize the tire pressure
warning system. ( P.427)
If the tire inflation pressure settings
for the installed ti res change, initial-
ization operations are required, but
if the tire inflation pressure settings
are the same, initialization is not
required.
7 Drive straight (with occa-
sional left and right turns) at
approximately 25 mph (40km/h) or more for approxi-
mately 10 to 30 minutes.
Registration of a second wheel set
is complete when the tire pressure
warning light turns off and the infla-
tion pressure of each tire is dis-
played on the multi-information
display.
Page 504 of 600

5047-2. Steps to take in an emergency
displayed on the multi-infor-
mation display.
4 Press the power switch
shortly and firmly.
In the event that the hybrid system
still cannot be started, contact your
Toyota dealer.
■Stopping the hybrid system
Shift the shift lever to P, set the
parking brake and press the power
switch as you no rmally do when
stopping the hybrid system.
■Replacing the key battery
As the above proc edure is a tempo-
rary measure, it is recommended
that the electronic key battery be
replaced immediate ly when the bat-
tery is depleted. ( P.444)
■Alarm (if equipped)
Using the mechanical key to lock
the doors will not set the alarm sys-
tem.
If a door is unlocked using the
mechanical key when the alarm sys-
tem is set, the alarm may be trig-
gered.( P.89)
■Changing power switch modes
Release the brake pedal and press
the power switch in step 3 above.
The hybrid system does not start
and modes will be changed each
time the switch is pressed.
( P.236)
If you have a set of jumper (or
booster) cables and a second
vehicle with a 12-volt battery,
you can jump start your vehicle
by following the steps below.
1 Vehicles with alarm: Confirm
that the electronic key is
being carried.
When connecting the jumper (or
booster) cables, depending on the
situation, the alarm may activate
and the doors locked. ( P.90)
2 Open the hood ( P.410) and
fuse box cover.
Push claw , and to com-
pletely release the lock, and then lift
If the 12-volt battery is
discharged
The following procedures
may be used to start the
hybrid system if the vehi-
cle’s 12-volt battery is dis-
charged.
You can also call your
Toyota dealer or a qualified
repair shop.
Restarting the hybrid sys-
tem
ABC
Page 507 of 600

5077-2. Steps to take in an emergency
7
When trouble arises
●The power switch mode is memo-
rized by the vehicle. When the 12-
volt battery is reconnected, the
system will return to the mode it
was in before the 12-volt battery
was discharged. Before discon-
necting the 12-volt battery, turn
the power switch off.
If you are unsure what mode the
power switch was in before the
12-volt battery discharged, be
especially careful when recon-
necting the 12-volt battery.
■When replacing the 12-volt bat-
tery
●Use a 12-volt battery that con-
forms to European regulations.
Use a battery that the case size is
same as the previous one (LN2),
20 hours rate capacity (20HR) is
equivalent (60Ah) or greater, and
performance rating (CCA) is
equivalent (563A) or greater.
• If the sizes differ, the 12-volt bat-
tery cannot be properly secured.
• If the 20 hour rate capacity is low,
even if the time period where the
vehicle is not used is a short time,
the 12-volt battery may discharge
and hybrid system may not be
able to start.
●Use a 12-volt battery with a han-
dle. If a 12-volt b attery without a
handle is used, removal is more
difficult.
●When removing the 12-volt bat-
tery: P.420
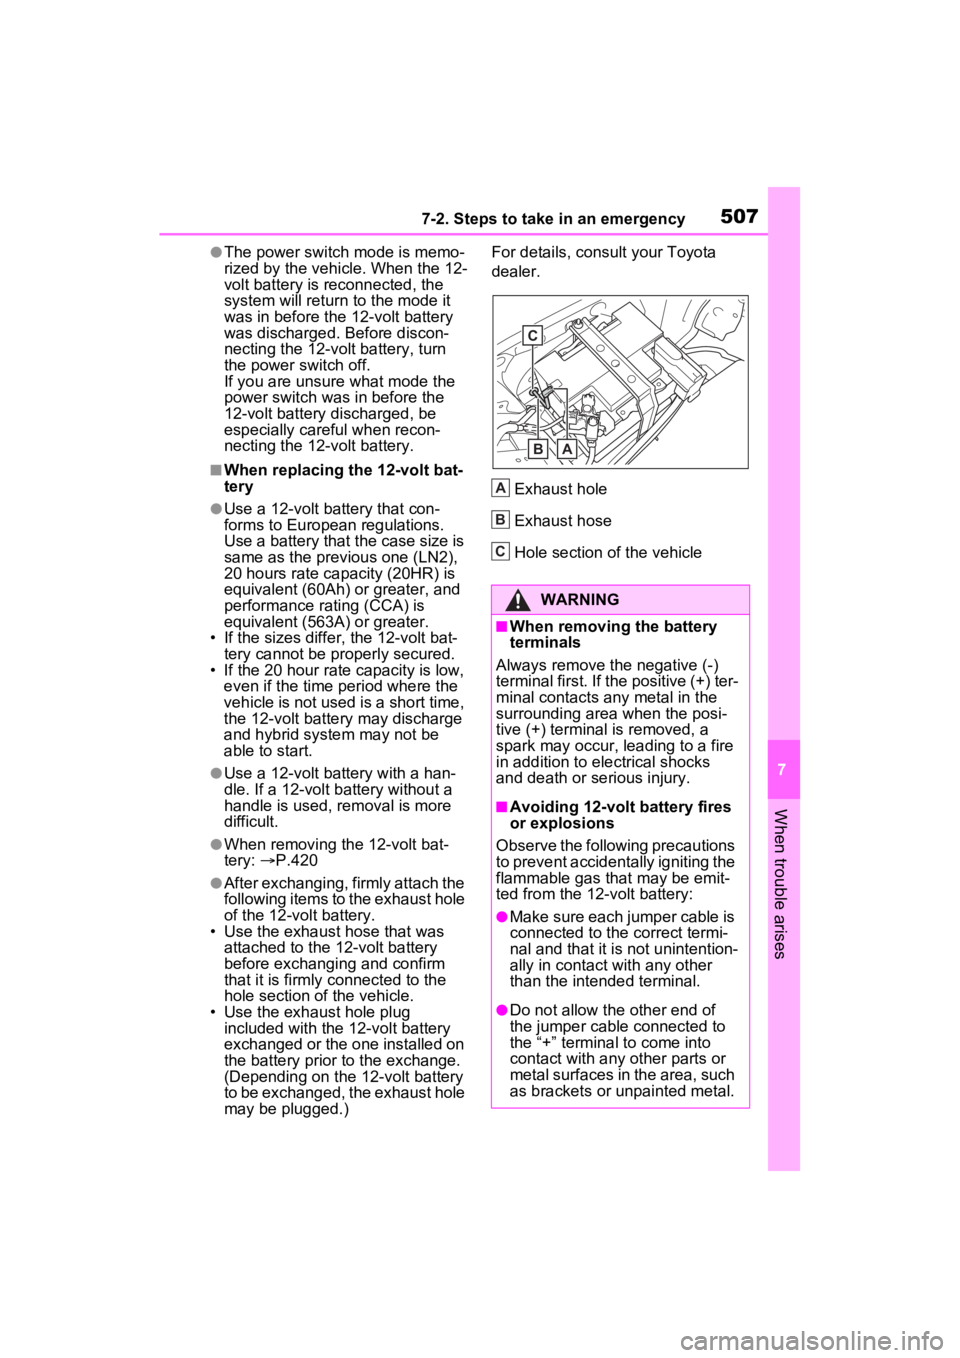
●After exchanging, firmly attach the
following items to the exhaust hole
of the 12-volt battery.
• Use the exhaust hose that was attached to the 12-volt battery
before exchangi ng and confirm
that it is firmly connected to the
hole section of the vehicle.
• Use the exhaust hole plug
included with the 12-volt battery
exchanged or the one installed on
the battery prior to the exchange.
(Depending on the 12-volt battery
to be exchanged, the exhaust hole
may be plugged.) For details, consu
lt your Toyota
dealer.
Exhaust hole
Exhaust hose
Hole section of the vehicle
WARNING
■When removing the battery
terminals
Always remove the negative (-)
terminal first. If the positive (+) ter-
minal contacts any metal in the
surrounding area when the posi-
tive (+) terminal is removed, a
spark may occur, leading to a fire
in addition to ele ctrical shocks
and death or serious injury.
■Avoiding 12-volt battery fires
or explosions
Observe the following precautions
to prevent accidentally igniting the
flammable gas that may be emit-
ted from the 12-volt battery:
●Make sure each jumper cable is
connected to the correct termi-
nal and that it is not unintention-
ally in contact with any other
than the intended terminal.
●Do not allow the other end of
the jumper cable connected to
the “+” terminal to come into
contact with any other parts or
metal surfaces in the area, such
as brackets or unpainted metal.
C
BA
A
B
C
Page 542 of 600

5428-2. Customization
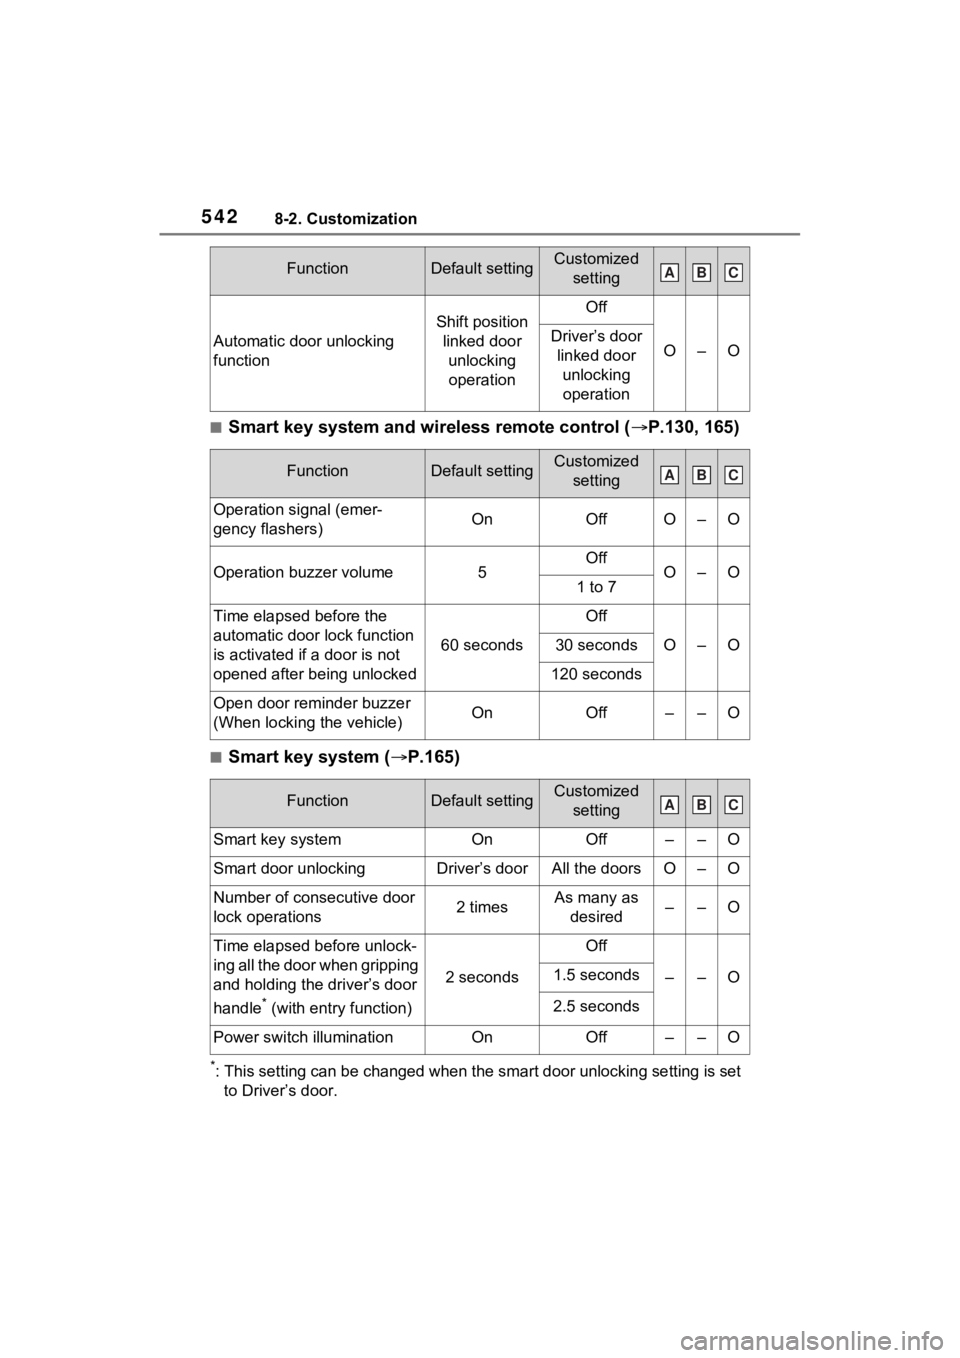
■Smart key system and wireless remote control (P.130, 165)
■Smart key system ( P.165)
*: This setting can be changed when the smart door unlocking sett ing is set
to Driver’s door.
Automatic door unlocking
function
Shift position linked door unlocking operationOff
O–ODriver’s door linked door unlocking operation
FunctionDefault settingCustomized setting
Operation signal (emer-
gency flashers)OnOffO–O
Operation buzzer volume5OffO–O1 to 7
Time elapsed before the
automatic door lock function
is activated if a door is not
opened after being unlocked
60 seconds
Off
O–O30 seconds
120 seconds
Open door reminder buzzer
(When locking the vehicle)OnOff––O
FunctionDefault settingCustomized setting
Smart key systemOnOff––O
Smart door unlockingDriver’s doorAll the doorsO–O
Number of consecutive door
lock operations2 timesAs many as desired––O
Time elapsed before unlock-
ing all the door when gripping
and holding the driver’s door
handle
* (with entry function)
2 seconds
Off
––O1.5 seconds
2.5 seconds
Power switch illuminationOnOff––O
FunctionDefault settingCustomized settingABC
ABC
ABC