2022 TOYOTA RAV4 HYBRID emergency towing
[x] Cancel search: emergency towingPage 620 of 752
6208-2. Steps to take in an emergency
The following may indicate a
problem with your transmission.
Contact your Toyota dealer or
commercial towing service
before towing.
The hybrid system warning
message is shown on the
multi-information display and
the vehicle does not move.
The vehicle makes an abnor-
mal sound.
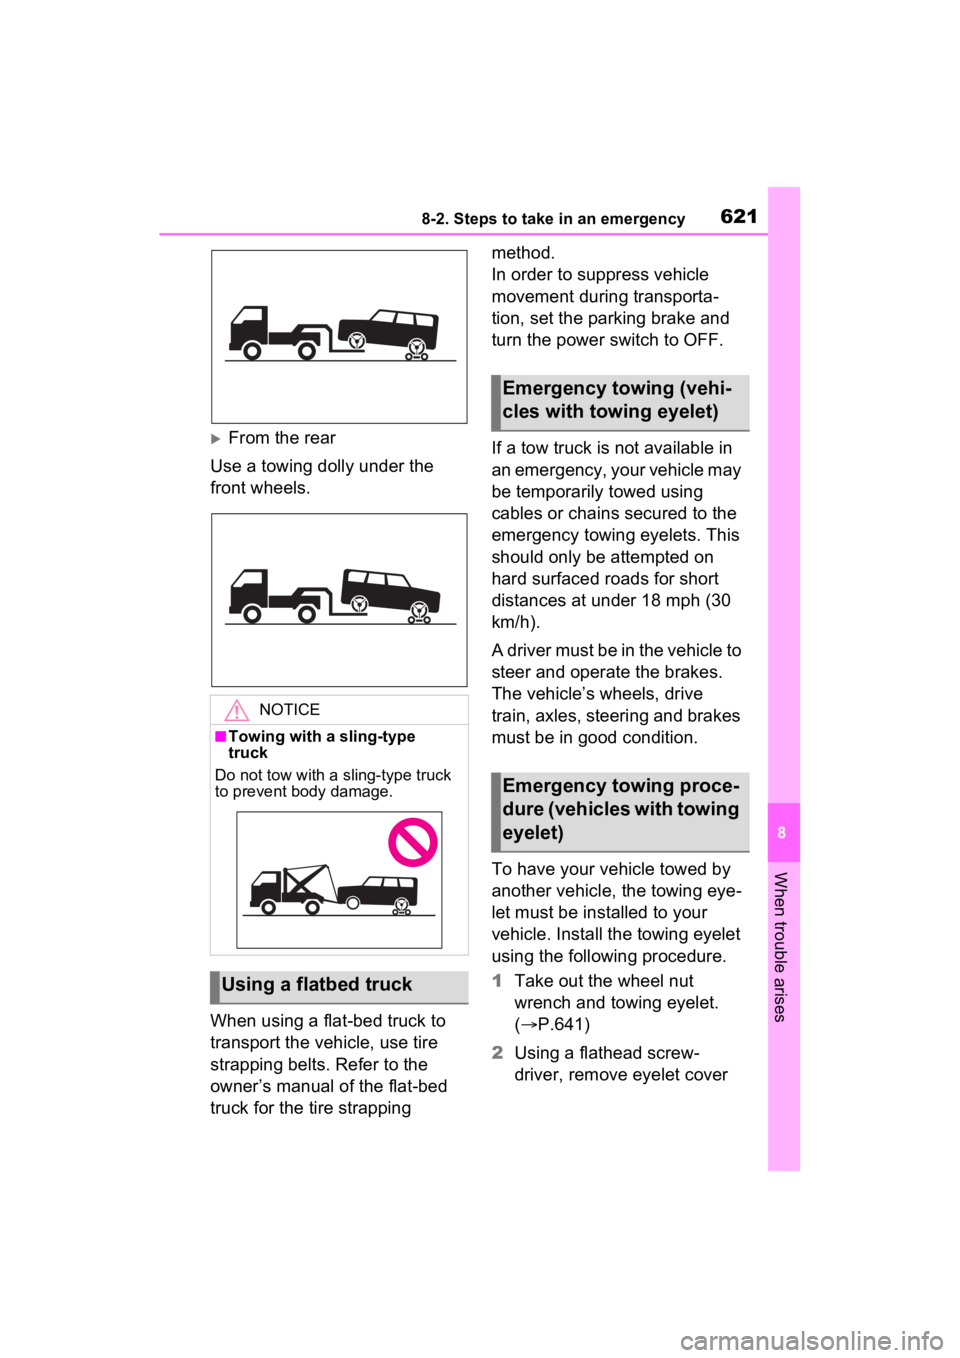
From the front
Use a towing dolly under the
rear wheels.
WARNING
■Installing towi ng eyelets to
the vehicle (vehicles with
towing eyelets)
Make sure that towing eyelets are
installed securely. If not securely
installed, towing eyelets may
come loose during towing.
NOTICE
■To prevent damage to the
vehicle when towing using a
wheel-lift type truck
●Do not tow the vehicle from the
rear when the power switch is
off. The steering lock mecha-
nism (if equipped) is not strong
enough to hold the front wheels
straight.
●When raising the vehicle,
ensure adequate ground clear-
ance for towing at the opposite
end of the raised vehicle. With-
out adequate clearance, the
vehicle could be damaged while
being towed.
■To prevent damage to the
vehicle when towing with a
sling-type truck
Do not tow with a sling-type truck,
either from the front or rear.
■To prevent damage to the
vehicle during emergency
towing (vehicles with towing
eyelet)
Do not secure cables or chains to
the suspension components.
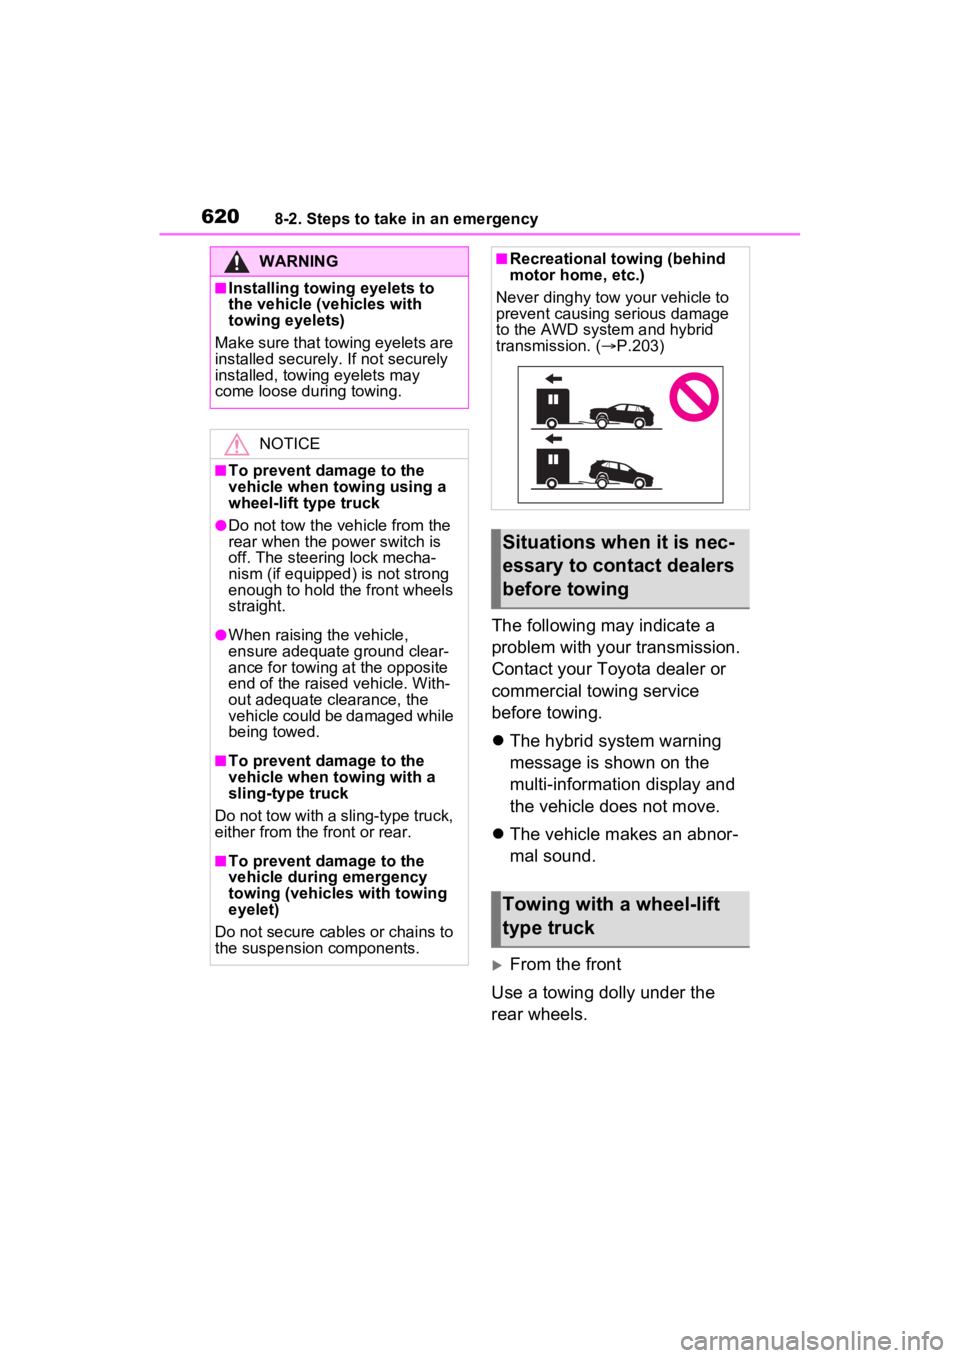
■Recreational towing (behind
motor home, etc.)
Never dinghy tow your vehicle to
prevent causing serious damage
to the AWD system and hybrid
transmission. ( P.203)
Situations when it is nec-
essary to contact dealers
before towing
Towing with a wheel-lift
type truck
Page 621 of 752
6218-2. Steps to take in an emergency
8
When trouble arises
From the rear
Use a towing dolly under the
front wheels.
When using a flat-bed truck to
transport the vehicle, use tire
strapping belts. Refer to the
owner’s manual of the flat-bed
truck for the tire strapping method.
In order to suppress vehicle
movement during transporta-
tion, set the parking brake and
turn the power switch to OFF.
If a tow truck is not available in
an emergency, your vehicle may
be temporarily towed using
cables or chains secured to the
emergency towing eyelets. This
should only be attempted on
hard surfaced roads for short
distances at under 18 mph (30
km/h).
A driver must be in the vehicle to
steer and operate the brakes.
The vehicle’s wheels, drive
train, axles, steering and brakes
must be in good condition.
To have your vehicle towed by
another vehicle, the towing eye-
let must be installed to your
vehicle. Install the towing eyelet
using the following procedure.
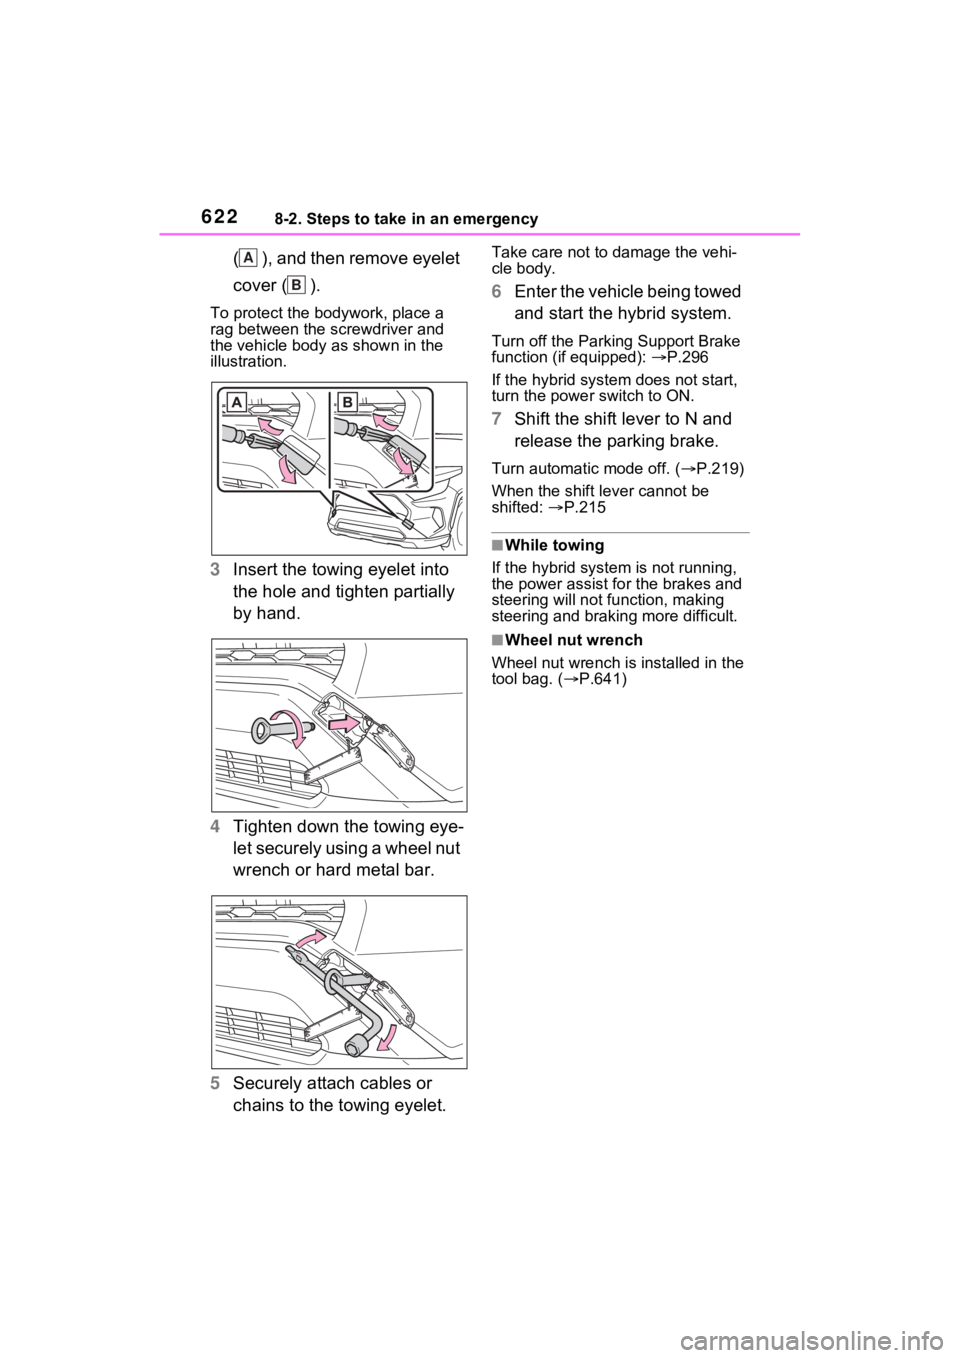
1
Take out the wheel nut
wrench and towing eyelet.
( P.641)
2 Using a flathead screw-
driver, remove eyelet cover
NOTICE
■Towing with a sling-type
truck
Do not tow with a sling-type truck
to prevent body damage.
Using a flatbed truck
Emergency towing (vehi-
cles with towing eyelet)
Emergency towing proce-
dure (vehicles with towing
eyelet)
Page 622 of 752
6228-2. Steps to take in an emergency
( ), and then remove eyelet
cover ( ).
To protect the bodywork, place a
rag between the screwdriver and
the vehicle body as shown in the
illustration.
3Insert the towing eyelet into
the hole and tighten partially
by hand.
4 Tighten down the towing eye-
let securely using a wheel nut
wrench or hard metal bar.
5 Securely attach cables or
chains to the towing eyelet.
Take care not to damage the vehi-
cle body.
6Enter the vehicle being towed
and start the hybrid system.
Turn off the Parking Support Brake
function (if equipped): P.296
If the hybrid system does not start,
turn the power switch to ON.
7 Shift the shift lever to N and
release the parking brake.
Turn automatic mode off. ( P.219)
When the shift lever cannot be
shifted: P.215
■While towing
If the hybrid system is not running,
the power assist for the brakes and
steering will not function, making
steering and braking more difficult.
■Wheel nut wrench
Wheel nut wrench is installed in the
tool bag. ( P.641)
A
B
Page 641 of 752
6418-2. Steps to take in an emergency
8
When trouble arises
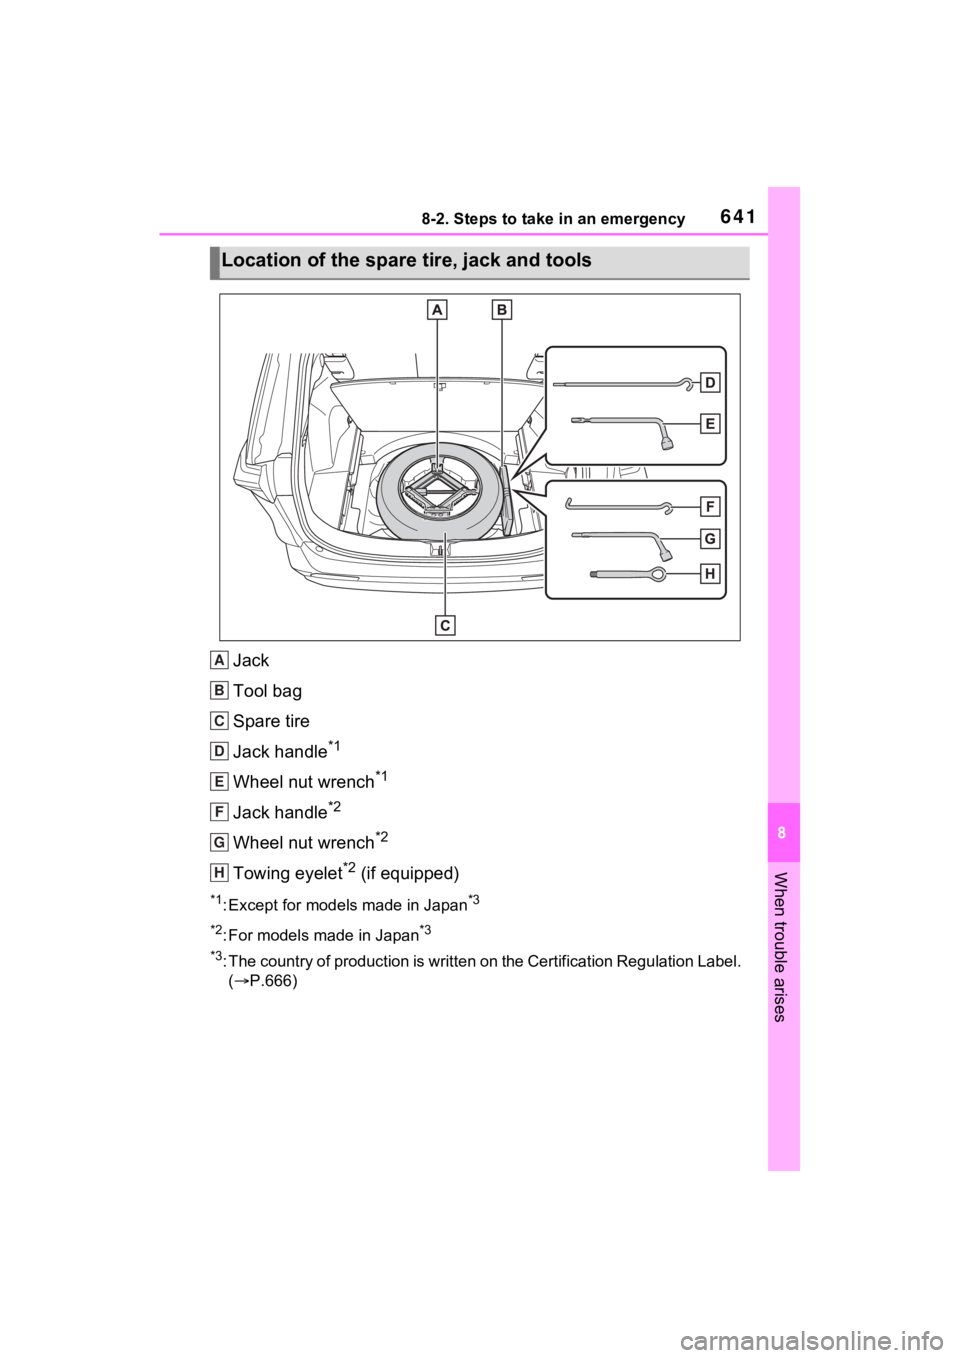
Jack
Tool bag
Spare tire
Jack handle
*1
Wheel nut wrench*1
Jack handle*2
Wheel nut wrench*2
Towing eyelet*2 (if equipped)
*1: Except for models made in Japan*3
*2
: For models made in Japan*3
*3
: The country of production is wri tten on the Certification Regulation Label.
( P.666)
Location of the spare t ire, jack and tools
A
B
C
D
E
F
G
H
Page 646 of 752

6468-2. Steps to take in an emergency
wheel ( ).
3Lower the vehicle.
4 Firmly tighten each wheel nut
two or three times in the
order shown in the illustra-
tion.
Tightening torque:
76 ft•lbf (103 N•m, 10.5 kgf•m)
5Stow the flat tire, tire jack and
all tools.
■The compact spare tire
●The compact spare tire is identi-
fied by the label “TEMPORARY USE ONLY” on the tire sidewall.
Use the compact spare tire tem-
porarily, and only in an emer-
gency.
●Make sure to check the tire infla-
tion pressure of the compact
spare tire. (
P.672)
■When using the compact spare
tire
As the compact spare tire is not
equipped with a tire pressure warn-
ing valve and transmitter (if
equipped), low inflation pressure of
the spare tire will not be indicated by
the tire pressure warning system.
Also, if you replace the compact
spare tire after the tire pressure
warning light com es on, the light
remains on.
■When the compact spare tire is
attached
The vehicle height may become
lower when driving with the compact
spare tire compared to when driving
with standard tires.
■If you have a flat front tire on a
road covered with snow or ice
Install the compact spare tire on one
of the rear wheels of the vehicle.
Perform the following steps and fit
tire chains to the front tires:
1 Replace a rear tire with the com-
pact spare tire.
2 Replace the flat front tire with the
tire removed from the rear of the
vehicle.
3 Fit tire chains to the front tires.
■When stowing the jack
Before storing the jack, adjust the
height of the ja ck to match the
shape of the jack holder.
The storage direction of the jack dif-
fers depending on the type, so make
sure to store the ja ck in the correct
direction.
Except for models made in Japan
*:
B
Page 663 of 752
6638-2. Steps to take in an emergency
8
When trouble arises
WARNING
■When attempting to free a
stuck vehicle
If you choose to push the vehicle
back and forth to free it, make
sure the surrounding area is clear
to avoid striking other vehicles,
objects or people. The vehicle
may also lunge forward or lunge
back suddenly as it becomes free.
Use extreme caution.
■When shifting the shift lever
Be careful not to shift the shift
lever with the ac celerator pedal
depressed.
This may lead to unexpected
rapid acceleration of the vehicle
that may cause an accident
resulting in dea th or serious
injury.
NOTICE
■To avoid damaging the trans-
mission and other compo-
nents
●Avoid spinning the wheels and
depressing the accelerator
pedal more than necessary.
●If the vehicle remains stuck
even after these procedures are
performed, the vehicle may
require towing to be freed.
Page 733 of 752

Alphabetical Index733
Total load capacity ......... 190, 193
Touch screen .......................... 384
Touch screen gestures......... 384
Touch screen operation ....... 385
Towing Dinghy towing....................... 203
Emergency towing................ 621
Towing eyelet ............... 621, 641
Trailer sway control .............. 361
Trailer towing........................ 194
Toyota Apps ........................... 508 Entering keyword ................. 510
Toyota Apps button (Setup screen) .................................. 382
Toyota Apps settings ............. 512
Toyota parking assist monitor ............................................... 313Distance guide line display mode ........................................... 318
Driving precautions .............. 313
Estimated course line display mode .................................. 316
Parking assist gui de line display
mode .................................. 317
Screen display...................... 314
Things you should know....... 323
Toyota parking assist monitor precautions......................... 319
Using the system.................. 315
Toyota Safety Sen se 2.0 ........ 239
Automatic High Beam .......... 227
Dynamic radar cruise control with full-speed range .......... 265
LTA (Lane Tracing Assist).... 252
PCS (Pre-Collision System) . 244
RSA (Road Sign Assist) ....... 262
TRAC (Traction Control) ........ 361
Traction battery (Hybrid battery) ................................................. 76Hybrid battery (traction battery) air intake and discharge vents............................................. 79 Location ..................................76
Specification .........................668
Warning messages .................80
Traction Control (TRAC) ........361
Traction motor (electric motor)72
Trailer sway contro l................361
Trailer towing ..........................194
Trail Mode................................359
Transmission Driving mode select switch ...358
Hybrid transmission ..............213
Trip meters ..........................92, 96
Troubleshooting In other situations .................497
When making/receiving a call ...........................................496
When registering/connecting a cellular phone .....................495
When using the Bluetooth
® mes-
sage function ......................497
When using the hands-free sys-
tem with a Bluetooth
® device
...........................................495
When using the phonebook..496
Turn signal lights Replacing light bulbs ............607
Turn signal lever . ..................217
Wattage ................................674
U
USB charging ports ................537
USB memory ...........................434
USB port ..................................424
Utility vehicle pre cautions .....372
V
Vanity lights
Vanity lights ..........................536
Vanity mirrors .........................536
Vehicle button (Setup screen)