2022 TOYOTA PROACE CITY VERSO lamp
[x] Cancel search: lampPage 182 of 320
182
Reversing camera
WARNI NG
For more information, refer to the General recommendations on the use of driving and manoeuvring aids.
With the ignition on, this system uses a camera located near the third brake lamp to display a view of the rear of your vehicle on the reproduction screen (if it is a panel van or has a solid partition).The reversing camera is activated automatically when reverse gear is engaged. The image is displayed on the reproduction screen. The reproduction screen switches off when the gearbox is in neutral or in a forward gear.
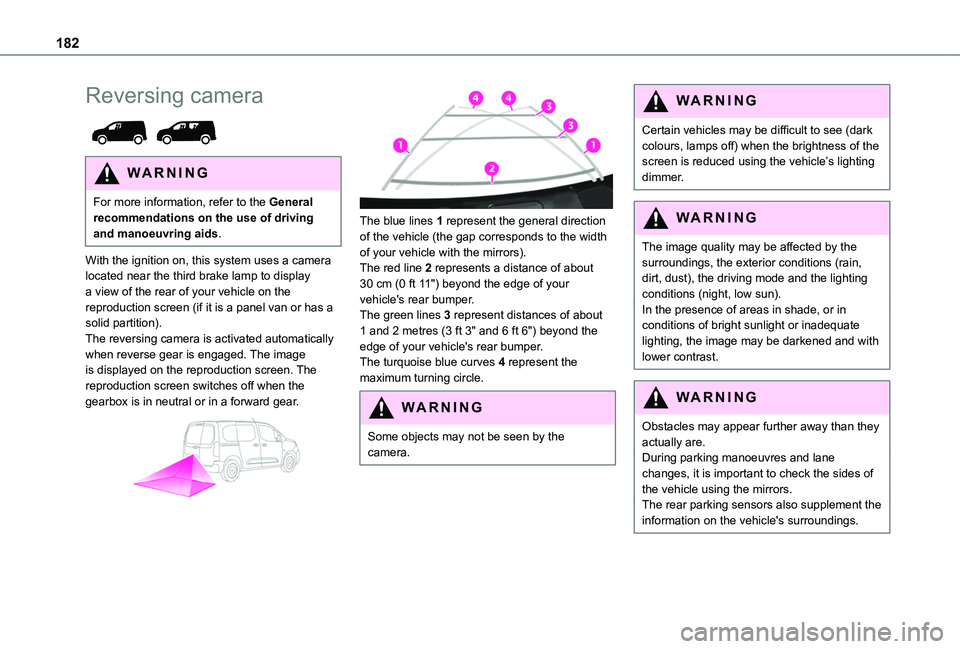
The blue lines 1 represent the general direction of the vehicle (the gap corresponds to the width of your vehicle with the mirrors).The red line 2 represents a distance of about 30 cm (0 ft 11") beyond the edge of your vehicle's rear bumper.The green lines 3 represent distances of about 1 and 2 metres (3 ft 3" and 6 ft 6") beyond the edge of your vehicle's rear bumper.The turquoise blue curves 4 represent the maximum turning circle.
WARNI NG
Some objects may not be seen by the camera.
WARNI NG
Certain vehicles may be difficult to see (dark colours, lamps off) when the brightness of the screen is reduced using the vehicle’s lighting dimmer.
WARNI NG
The image quality may be affected by the surroundings, the exterior conditions (rain, dirt, dust), the driving mode and the lighting conditions (night, low sun).In the presence of areas in shade, or in conditions of bright sunlight or inadequate lighting, the image may be darkened and with lower contrast.
WARNI NG
Obstacles may appear further away than they actually are.During parking manoeuvres and lane changes, it is important to check the sides of the vehicle using the mirrors.The rear parking sensors also supplement the information on the vehicle's surroundings.
Page 184 of 320
184
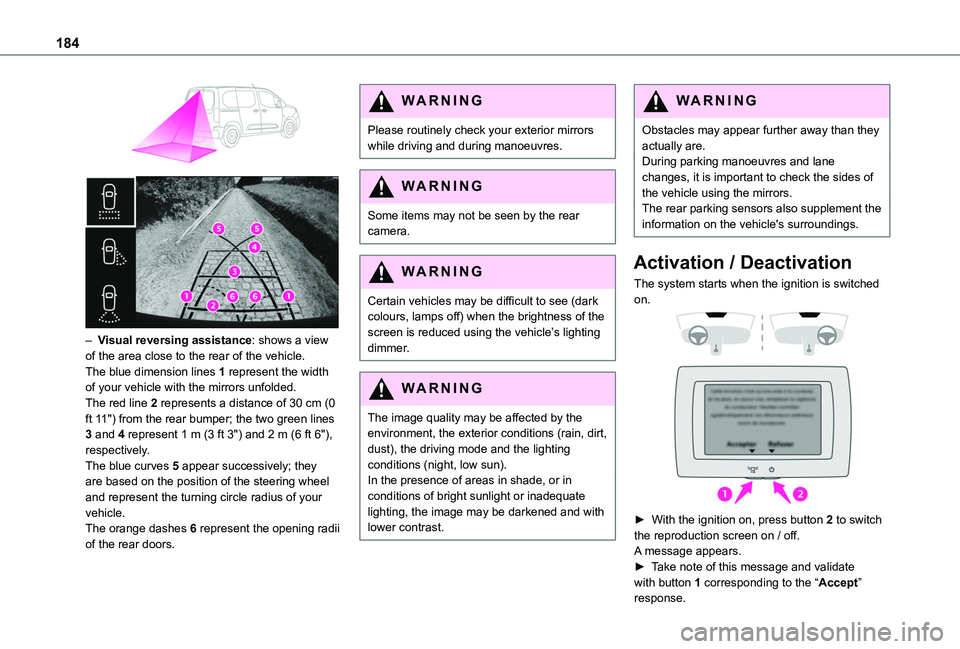
– Visual reversing assistance: shows a view of the area close to the rear of the vehicle.The blue dimension lines 1 represent the width of your vehicle with the mirrors unfolded.The red line 2 represents a distance of 30 cm (0 ft 11") from the rear bumper; the two green lines 3 and 4 represent 1 m (3 ft 3") and 2 m (6 ft 6"), respectively.The blue curves 5 appear successively; they are based on the position of the steering wheel and represent the turning circle radius of your vehicle.The orange dashes 6 represent the opening radii of the rear doors.
WARNI NG
Please routinely check your exterior mirrors while driving and during manoeuvres.
WARNI NG
Some items may not be seen by the rear camera.
WARNI NG
Certain vehicles may be difficult to see (dark colours, lamps off) when the brightness of the screen is reduced using the vehicle’s lighting dimmer.
WARNI NG
The image quality may be affected by the environment, the exterior conditions (rain, dirt, dust), the driving mode and the lighting conditions (night, low sun).In the presence of areas in shade, or in conditions of bright sunlight or inadequate lighting, the image may be darkened and with lower contrast.
WARNI NG
Obstacles may appear further away than they actually are.During parking manoeuvres and lane changes, it is important to check the sides of the vehicle using the mirrors.The rear parking sensors also supplement the information on the vehicle's surroundings.
Activation / Deactivation
The system starts when the ignition is switched on.
► With the ignition on, press button 2 to switch the reproduction screen on / off.
A message appears.► Take note of this message and validate with button 1 corresponding to the “Accept” response.
Page 188 of 320
188
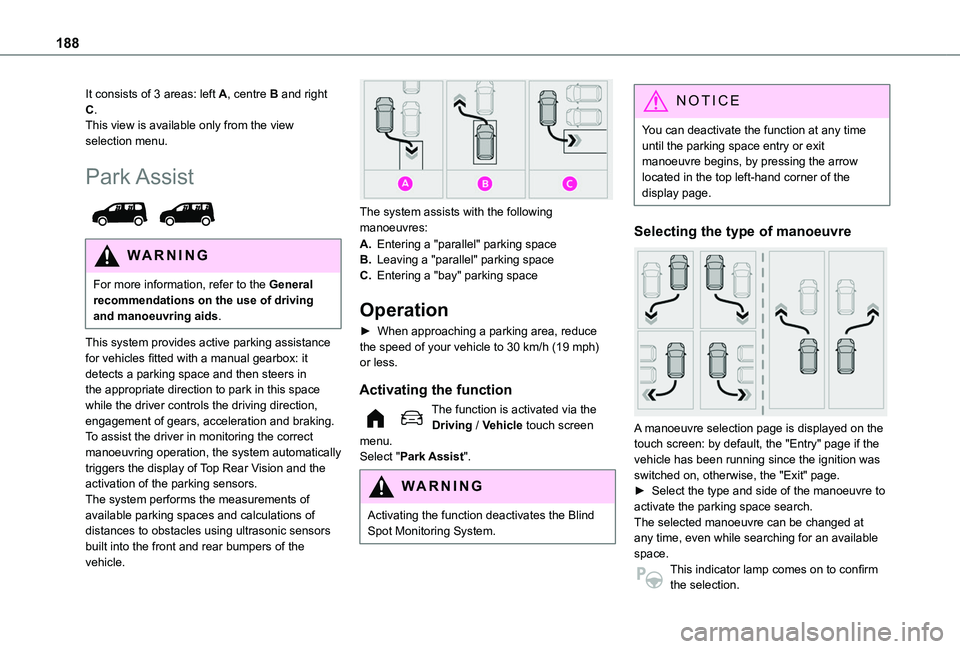
It consists of 3 areas: left A, centre B and right C.This view is available only from the view selection menu.
Park Assist
WARNI NG
For more information, refer to the General recommendations on the use of driving and manoeuvring aids.
This system provides active parking assistance for vehicles fitted with a manual gearbox: it detects a parking space and then steers in the appropriate direction to park in this space while the driver controls the driving direction, engagement of gears, acceleration and braking.To assist the driver in monitoring the correct manoeuvring operation, the system automatically triggers the display of Top Rear Vision and the activation of the parking sensors.The system performs the measurements of available parking spaces and calculations of distances to obstacles using ultrasonic sensors built into the front and rear bumpers of the vehicle.
The system assists with the following manoeuvres:
A.Entering a "parallel" parking space
B.Leaving a "parallel" parking space
C.Entering a "bay" parking space
Operation
► When approaching a parking area, reduce the speed of your vehicle to 30 km/h (19 mph) or less.
Activating the function
The function is activated via the Driving / Vehicle touch screen menu.
Select "Park Assist".
WARNI NG
Activating the function deactivates the Blind Spot Monitoring System.
NOTIC E
You can deactivate the function at any time until the parking space entry or exit manoeuvre begins, by pressing the arrow located in the top left-hand corner of the display page.
Selecting the type of manoeuvre
A manoeuvre selection page is displayed on the touch screen: by default, the "Entry" page if the
vehicle has been running since the ignition was switched on, otherwise, the "Exit" page.► Select the type and side of the manoeuvre to activate the parking space search.The selected manoeuvre can be changed at any time, even while searching for an available space.This indicator lamp comes on to confirm the selection.
Page 190 of 320
190
WARNI NG
During manoeuvring phases, the steering wheel performs rapid turns: do not hold the steering wheel or put your hands between the spokes of the steering wheel. Watch out for any objects that could interfere with the manoeuvre (loose clothing, scarf, tie, etc.). Risk of injury!It is the driver's responsibility to constantly monitor the traffic, especially vehicles coming towards you.The driver should check that no objects or people are obstructing the vehicle’s path.
NOTIC E
The images from the camera(s) displayed on the touch screen may be distorted by the terrain.In shady areas, or in inadequate sunlight or lighting conditions, the image may be darkened and with lower contrast
The manoeuvre can be permanently interrupted at any time, either by the driver or automatically by the system.Interruption by the driver:– taking over control of the steering.
– activating the direction indicator lamps on the opposite side to that of the manoeuvre.– unfastening the driver's seat belt.– switching off the ignition.Interruption by the system:– vehicle exceeding the speed limit of 7 km/h (5 mph) during parking space entry manoeuvres, or 5 km/h (3 mph) during parking space exit manoeuvres.– activation of anti-slip regulation on a slippery road.– opening of a door or the boot.– engine stall.– system malfunction.– after 10 manoeuvres to enter or exit a parallel parking space and after 7 manoeuvres to enter a parking bay.Interrupting the manoeuvre automatically deactivates the function.The manoeuvre symbol is displayed in red, accompanied by the "Manoeuvre cancelled" message on the touch screen.A message prompts the driver to take back
control of the vehicle.The function is deactivated after a few seconds; this warning lamp goes off and the function returns to the initial display.
End of the parking space entry or exit
manoeuvre
The vehicle stops as soon as the manoeuvre is completed.The manoeuvre symbol is displayed in red, accompanied by the message “Manoeuvre completed” on the touch screen.When the function is deactivated, this indicator lamp goes off, accompanied by an audible signal.When entering a parking space, the driver may be required to complete the manoeuvre.
Page 191 of 320
191
Driving
6
Operating limits
– The system may suggest an inappropriate parking space (parking prohibited, work in progress with damaged road surface, location alongside a ditch, etc.).– The system may indicate that a space has been found but not offer it because of a fixed obstacle on the opposite side of the manoeuvre, which would not allow the vehicle to follow the necessary trajectory required for parking.– The system may indicate that a space has been found but the manoeuvre will not be triggered, because the width of the lane is insufficient.– The system is not designed to perform the parking manoeuvre on a sharp bend.– The system does not detect spaces that are much larger than the vehicle itself or that are delimited by obstacles that are too low (pavements, studs, etc.) or too thin (trees, posts, wire fences, etc.).– If the boot is heavily loaded, the tilt of the
vehicle towards the rear may interfere with the distance measurements.
WARNI NG
Do not use the function under the following exterior conditions:– Alongside a soft shoulder (e.g. ditch) or quay or on the edge of a drop.– When the road surface is slippery (e.g. ice).
WARNI NG
If any of the following malfunctions occurs, do not use the system:– If a tyre is under-inflated.– If one of the bumpers is damaged.– If one of the cameras is faulty.
WARNI NG
If the vehicle has undergone any of the following modifications, do not use the function:– When carrying an object extending beyond the dimensions of the vehicle (ladder on the roof bars, bicycle carrier on the tailgate, etc.).– With a non-approved towball in place.– With snow chains fitted.– When driving on a small-diameter or "space-saver" type spare wheel.– When the wheels fitted are a different size from the original ones.
– After modifying one or both bumpers (added protection).– If the sensors have been repainted other than by the TOYOTA dealer network.– With sensors not approved for the vehicle.
Malfunctions
When the function is not activated, this indicator lamp will flash briefly and an audible signal will be emitted to indicate a system malfunction.If the malfunction occurs while the system is in use, the warning lamp goes off.If the parking sensor malfunction occurs during use, indicated by this warning lamp coming on, it causes the function to deactivate.In the event of a malfunction, have the system checked by a TOYOTA dealer or a qualified workshop.In the event of a power steering malfunction, this warning lamp is displayed on the instrument panel, accompanied by a warning message.
WARNI NG
You must stop the vehicle.Stop as soon as it is safe to do so and switch off the ignition.Contact a TOYOTA dealer or a qualified workshop.
Page 192 of 320
192
Compatibility of fuels
Petrol fuels conforming to the EN228 standard containing up to 5% and 10% ethanol respectively.
Diesel fuels conforming to the EN590, EN16734 and EN16709 standards and containing up to 7%, 10%, 20% and 30% fatty acid methyl ester respectively. The use of B20 or B30 fuels, even occasionally, imposes special maintenance conditions referred to as "Arduous conditions".
Paraffinic Diesel fuel conforming to the EN15940 standard.
WARNI NG
The use of any other type of (bio) fuel (vegetable or animal oils, pure or diluted, domestic fuel, etc.) is strictly prohibited (risk of damage to the engine and fuel system).
NOTIC E
The only fuel additives authorised for use are those that meet the B715001 (petrol) or B715000 (Diesel) standards.
Diesel at low temperature
At temperatures below 0 °C (+32 °F), the formation of paraffins in summer-type Diesel fuels could prevent the engine from operating correctly. In these temperature conditions, use winter-type Diesel fuel and keep the fuel tank more than 50 % full.At temperatures below -15 °C (+5 °F) to avoid problems starting, it is best to park the vehicle under shelter (heated garage).
Travelling abroad
Certain fuels could damage your vehicle’s engine.In certain countries, the use of a particular fuel may be required (specific octane rating, specific trade name, etc.) to ensure correct operation of the engine.For all additional information, consult a dealer.
Refuelling
Fuel tank capacity: approximately 61 litres (petrol) or 50 litres (Diesel).Reserve level: approximately 6 litres.
Low fuel level
/2
1 1When the low fuel level is reached, this warning lamp comes on on the instrument panel, accompanied by an onscreen message and an audible signal. When it first comes on, about 6 litres of fuel remain in the tank.Until sufficient fuel is added, this warning lamp appears every time the ignition is switched on, accompanied by an onscreen message and an audible signal. When driving, this message and audible signal are repeated with increasing frequency as the fuel level drops towards 0.You must refuel as soon as possible to avoid running out of fuel.For more information on Running out of fuel (Diesel), refer to the corresponding section.
N
OTIC E
A small arrow by the warning lamp indicates which side of the vehicle the fuel filler flap is located on.
Page 196 of 320
196
WARNI NG
High-pressure washingTo avoid damaging the electrical components, it is expressly prohibited to use high-pressure washing in the engine compartment or under the body.Do not use a pressure greater than 80 bar when washing the bodywork.
WARNI NG
Never allow water or dust to enter the connector or charging nozzle - risk of electrocution or fire!Never connect / disconnect the charging nozzle or cable with wet hands - risk of electrocution!
Traction battery
This battery stores the energy that powers
the electric motor and the thermal comfort equipment in the passenger compartment. It is discharged during use, and must therefore be regularly recharged. There is no need to wait for the traction battery to fall to its reserve level before recharging.Battery life may vary according to the type of driving, the route, thermal comfort equipment usage and battery component ageing.
NOTIC E
The traction battery ageing process is influenced by multiple factors, including climate conditions, the distance travelled and how often it has been fast-charged.
WARNI NG
In the event of damage to the traction batteryIt is strictly prohibited to work on the vehicle yourself.Do not touch liquids coming from the battery, and in the event of skin contact with these products, wash abundantly with water and contact a doctor as soon as possible.Contact any authorized Toyota retailer or Toyota authorized repairer, or any reliable repairer to have the system checked.
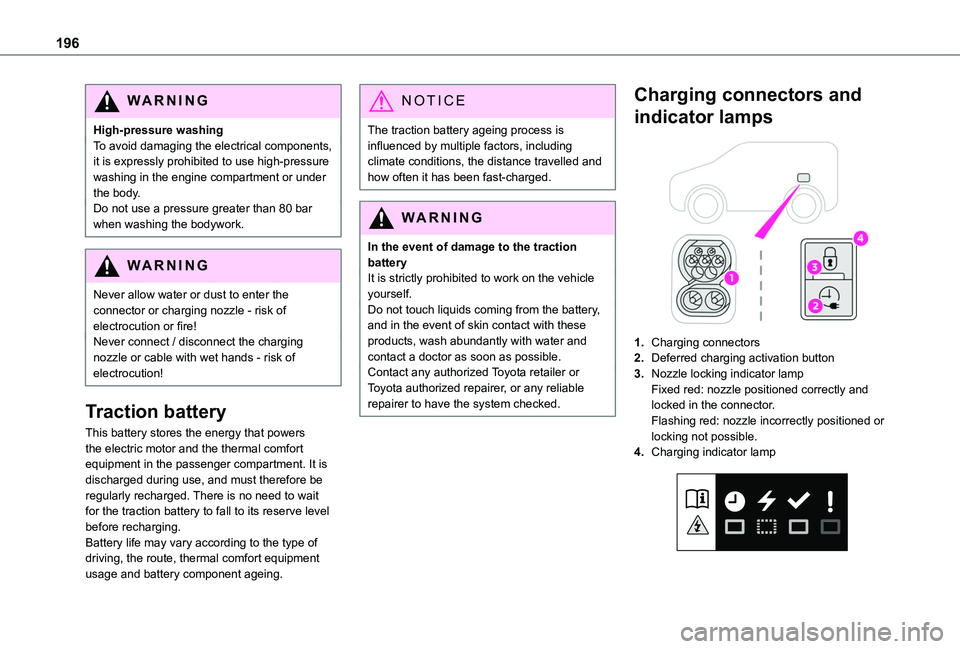
Charging connectors and
indicator lamps
1.Charging connectors
2.Deferred charging activation button
3.Nozzle locking indicator lampFixed red: nozzle positioned correctly and locked in the connector.Flashing red: nozzle incorrectly positioned or locking not possible.
4.Charging indicator lamp
Page 197 of 320
197
Practical information
7
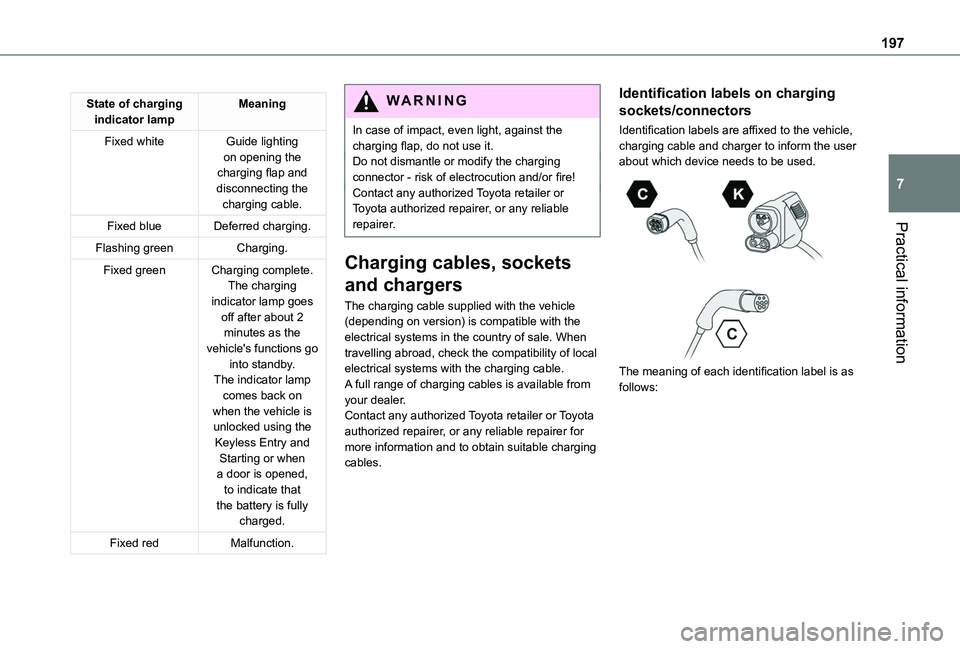
State of charging indicator lampMeaning
Fixed whiteGuide lighting on opening the charging flap and disconnecting the charging cable.
Fixed blueDeferred charging.
Flashing greenCharging.
Fixed greenCharging complete.The charging indicator lamp goes off after about 2 minutes as the vehicle's functions go into standby.The indicator lamp comes back on when the vehicle is unlocked using the Keyless Entry and Starting or when a door is opened, to indicate that the battery is fully charged.
Fixed redMalfunction.
WARNI NG
In case of impact, even light, against the charging flap, do not use it.Do not dismantle or modify the charging connector - risk of electrocution and/or fire!Contact any authorized Toyota retailer or Toyota authorized repairer, or any reliable repairer.
Charging cables, sockets
and chargers
The charging cable supplied with the vehicle (depending on version) is compatible with the electrical systems in the country of sale. When travelling abroad, check the compatibility of local electrical systems with the charging cable.A full range of charging cables is available from your dealer.Contact any authorized Toyota retailer or Toyota authorized repairer, or any reliable repairer for
more information and to obtain suitable charging cables.
Identification labels on charging
sockets/connectors
Identification labels are affixed to the vehicle, charging cable and charger to inform the user about which device needs to be used.
The meaning of each identification label is as follows: