Page 232 of 320
232
Direction indicator side repeater
Type A, WY5W-5W (amber)
– Push the repeater towards the rear and release it.– When refitting, engage the repeater towards the front and then bring it back towards the rear.Amber-coloured bulbs (direction indicators and side repeaters) must be replaced with bulbs of identical specification and colour.
Dipped beam headlamps
Type C, H7
► Remove the protective cover by pulling on the tab. ► Turn the unit in relation to the support.► Pull the bulb connector.► Remove the bulb and replace it.
NOTIC E
Take care to reposition the protective cover while keeping the tab accessible.
Page 233 of 320
233
In the event of a breakdown
8
Sidelamps / Daytime running lamps
Type A, W21/5W
► Turn the connector a quarter turn clockwise.► Pull the bulb connector.► Remove the bulb and replace it.
Main beam headlamps
Type C, H1
► Remove the protective cover by pulling on the tab.► Unclip the unit in relation to the support.► Pull the bulb connector.► Remove the bulb and replace it.
NOTIC E
Take care to reposition the protective cover while keeping the tab accessible.
Page 234 of 320
234
Direction indicators
Type B, PY21W
NOTIC E
Rapid flashing of a direction indicator lamp (left or right) indicates that one of the bulbs on the corresponding side has failed.
► Turn the connector a quarter turn anti-clockwise.► Pull the unit in relation to the support.
► Remove the bulb and replace it.
Front foglamps
Type D, H11
► Insert a flat screwdriver between the lamp and the cover.► Pull and lever to unclip the cover.
► Remove the two fastening screws of the module.► Remove the module from its housing.
► Press the locking clip and disconnect the connector.► Turn the bulb holder a quarter turn anti-clockwise.► Remove the bulb holder.► Replace the faulty bulb.
NOTIC E
To replace these bulbs, it is possible to contact a TOYOTA dealer or a qualified workshop.
Page 235 of 320
235
In the event of a breakdown
8
Rear lamps
For more information on Changing a bulb and, in particular, the types of bulb, refer to the corresponding section.
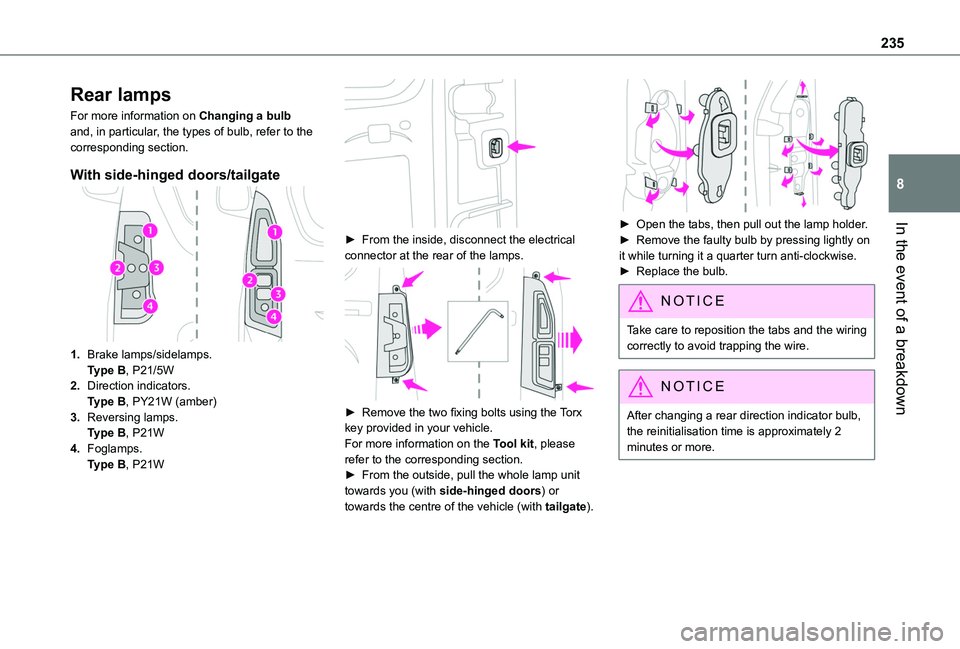
With side-hinged doors/tailgate
1.Brake lamps/sidelamps.Type B, P21/5W
2.Direction indicators.Type B, PY21W (amber)
3.Reversing lamps.Type B, P21W
4.Foglamps.Type B, P21W
► From the inside, disconnect the electrical connector at the rear of the lamps.
► Remove the two fixing bolts using the Torx key provided in your vehicle.For more information on the Tool kit, please refer to the corresponding section.► From the outside, pull the whole lamp unit towards you (with side-hinged doors) or towards the centre of the vehicle (with tailgate).
► Open the tabs, then pull out the lamp holder.► Remove the faulty bulb by pressing lightly on it while turning it a quarter turn anti-clockwise.► Replace the bulb.
NOTIC E
Take care to reposition the tabs and the wiring correctly to avoid trapping the wire.
NOTIC E
After changing a rear direction indicator bulb, the reinitialisation time is approximately 2
minutes or more.
Page 236 of 320
236
Number plate lamps
Type A, W5W - 5W
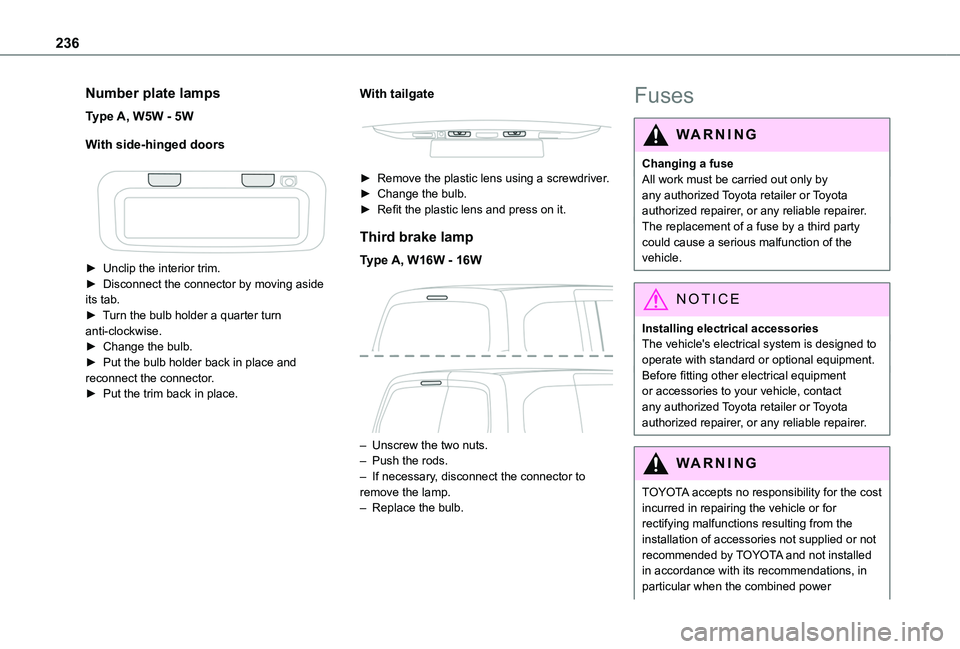
With side-hinged doors
► Unclip the interior trim.► Disconnect the connector by moving aside its tab.► Turn the bulb holder a quarter turn anti-clockwise.► Change the bulb.► Put the bulb holder back in place and reconnect the connector.► Put the trim back in place.
With tailgate
► Remove the plastic lens using a screwdriver.► Change the bulb.► Refit the plastic lens and press on it.
Third brake lamp
Type A, W16W - 16W
– Unscrew the two nuts.– Push the rods.– If necessary, disconnect the connector to remove the lamp.– Replace the bulb.
Fuses
WARNI NG
Changing a fuseAll work must be carried out only by any authorized Toyota retailer or Toyota authorized repairer, or any reliable repairer.The replacement of a fuse by a third party could cause a serious malfunction of the
vehicle.
NOTIC E
Installing electrical accessoriesThe vehicle's electrical system is designed to operate with standard or optional equipment.Before fitting other electrical equipment or accessories to your vehicle, contact any authorized Toyota retailer or Toyota authorized repairer, or any reliable repairer.
WARNI NG
TOYOTA accepts no responsibility for the cost incurred in repairing the vehicle or for rectifying malfunctions resulting from the installation of accessories not supplied or not
recommended by TOYOTA and not installed in accordance with its recommendations, in particular when the combined power
Page 240 of 320
240
Disconnecting/reconnecting
the battery
In order to maintain an adequate state of charge for starting the engine, we recommend disconnecting the battery if the vehicle is to be unused for an extended period.Before disconnecting the battery:► Close all openings (doors, boot, windows, roof).► Switch off all electricity-consuming devices (audio system, wipers, lamps, etc.).► Switch off the ignition and wait for 4 minutes.After accessing the battery, it is only necessary to disconnect the (+) terminal.
Quick-release terminal clamp
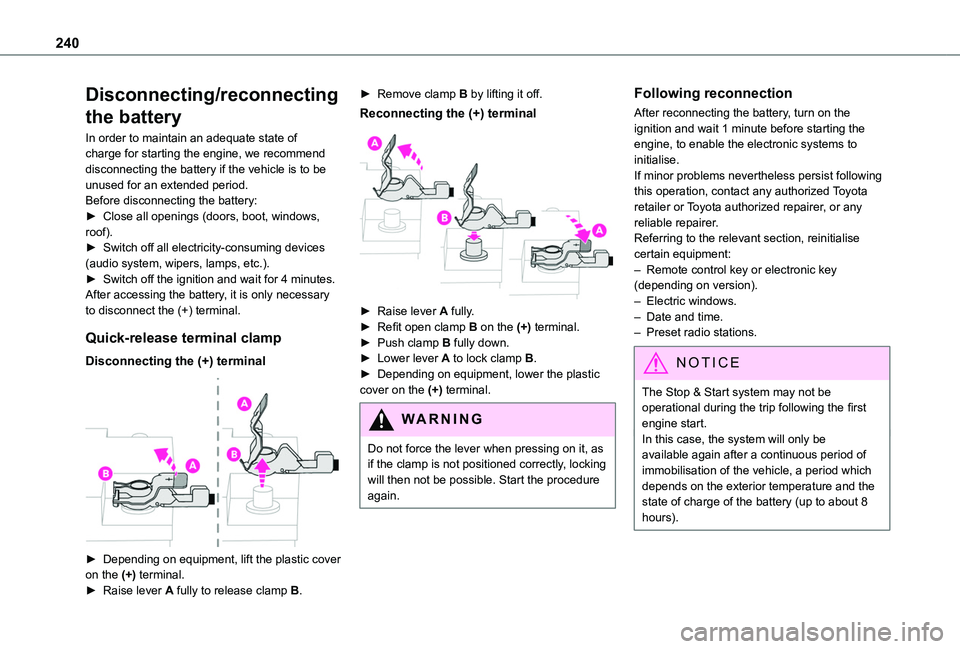
Disconnecting the (+) terminal
► Depending on equipment, lift the plastic cover on the (+) terminal.► Raise lever A fully to release clamp B.
► Remove clamp B by lifting it off.
Reconnecting the (+) terminal
► Raise lever A fully.► Refit open clamp B on the (+) terminal.► Push clamp B fully down.► Lower lever A to lock clamp B.► Depending on equipment, lower the plastic cover on the (+) terminal.
WARNI NG
Do not force the lever when pressing on it, as if the clamp is not positioned correctly, locking will then not be possible. Start the procedure again.
Following reconnection
After reconnecting the battery, turn on the ignition and wait 1 minute before starting the engine, to enable the electronic systems to initialise.If minor problems nevertheless persist following this operation, contact any authorized Toyota retailer or Toyota authorized repairer, or any reliable repairer.Referring to the relevant section, reinitialise certain equipment:– Remote control key or electronic key (depending on version).– Electric windows.– Date and time.– Preset radio stations.
NOTIC E
The Stop & Start system may not be operational during the trip following the first engine start.In this case, the system will only be
available again after a continuous period of immobilisation of the vehicle, a period which depends on the exterior temperature and the state of charge of the battery (up to about 8 hours).
Page 242 of 320
242
NOTIC E
In case of battery or electric parking brake failure, it is essential to call a professional using flatbed recovery vehicles (excluding manual gearbox).
Accessing the eye
NOTIC E
For more information on the Tool kit, refer to the corresponding section.
WARNI NG
With a manual gearbox, move the gear lever into neutral.With an automatic gearbox, place the gear selector into position N.Failure to adhere to this instruction may lead to damage to braking system components and the lack of braking assistance on restarting the engine.
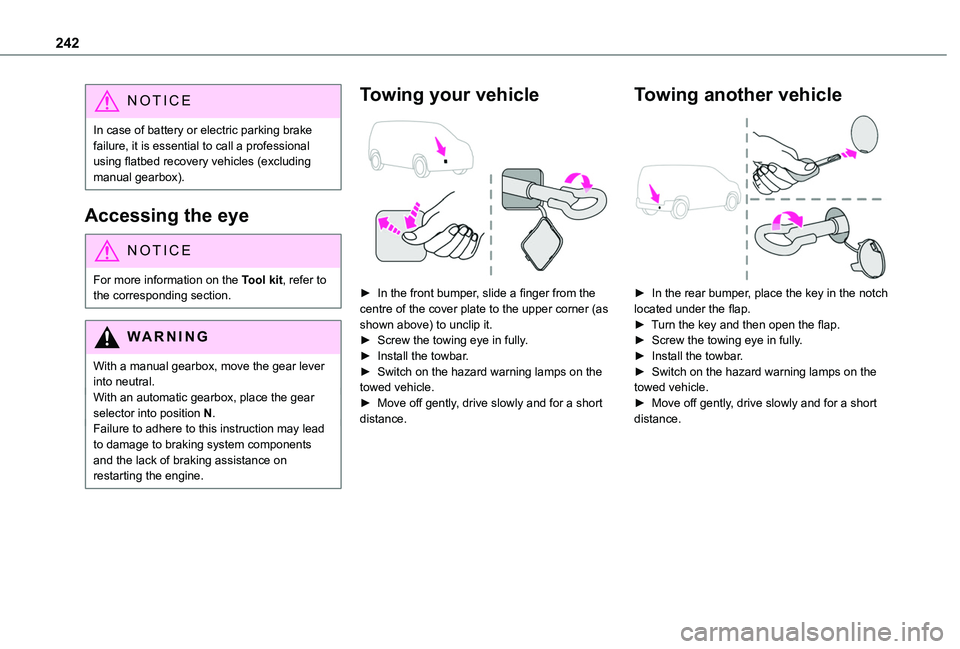
Towing your vehicle
► In the front bumper, slide a finger from the centre of the cover plate to the upper corner (as shown above) to unclip it.► Screw the towing eye in fully.► Install the towbar.► Switch on the hazard warning lamps on the towed vehicle.► Move off gently, drive slowly and for a short distance.
Towing another vehicle
► In the rear bumper, place the key in the notch located under the flap.► Turn the key and then open the flap.► Screw the towing eye in fully.► Install the towbar.► Switch on the hazard warning lamps on the towed vehicle.► Move off gently, drive slowly and for a short distance.
Page 306 of 320
306
A
ABS 103Accelerated charging unit (Wallbox) 195Accessories 99Access to the 3rd row 61Access to the spare wheel 225Active Safety Brake 167–170AdBlue® 215AdBlue® tank 217Additive, Diesel 213–214Adjusting headlamps 95Adjusting head restraints 62Adjusting seat 53, 61Adjusting the air distribution 81Adjusting the air flow 81Adjusting the date 275, 300Adjusting the height and reach of the steering wheel 55Adjusting the lumbar support 53Adjusting the temperature 81Adjusting the time 261, 274, 300
Advice on care and maintenance 193, 219Advice on driving 6, 127–128Airbags 11 2, 11 4–11 5, 11 7Airbags, curtain 11 3–11 5Airbags, front 11 2–11 4, 11 8Airbags, lateral 11 3–11 4Air conditioning 78, 82, 85Air conditioning, digital 83Air conditioning, dual-zone automatic 81
Air conditioning, electronic (with display screen) 85Air conditioning, manual 79–80Air intake 81Air vents 78Alarm 47–48Alarm, volumetric 47Android Auto connection 271, 289Anti-lock braking system (ABS) 103Antitheft / Immobiliser 33Apple CarPlay connection 270, 289Applications 290Area, loading 33–34, 43, 71Armrest 53Armrest, front 63Assistance call 100Assistance, emergency braking 169Audible warning 102Audio streaming (Bluetooth) 257–258, 269, 294
B
Battery 235Battery, 12 V 204, 213, 235–238Battery, ancillaries 235Battery, charging 237Battery, remote control 40–41, 87Bench seat, one-piece, fixed 61Blind spot sensors 174
Bluetooth (hands-free) 259, 271–272, 295–296Bluetooth (telephone) 259–260, 271–272, 295–296Bodywork 220Bonnet 209–210Boot lid 37–38, 40Bottle holder 63Brake discs 214–215Brake lamps 233Brakes 214–215Braking 146Braking assistance system 103Braking, automatic emergency 167–170Braking, dynamic emergency 135–137Brightness 260, 273Bulbs 229Bulbs (changing) 228–229Bulbs (changing, type) 229
C
Cable, audio 294Cable, Jack 294Capacity, fuel tank 190–192Cap, fuel filler 191–192Care of the bodywork 220CD 257CD, MP3 257Central locking 31, 37–38Changing a bulb 228–229