2022 TOYOTA PROACE CITY light
[x] Cancel search: lightPage 182 of 320
182
Reversing camera
WARNI NG
For more information, refer to the General recommendations on the use of driving and manoeuvring aids.
With the ignition on, this system uses a camera located near the third brake lamp to display a view of the rear of your vehicle on the reproduction screen (if it is a panel van or has a solid partition).The reversing camera is activated automatically when reverse gear is engaged. The image is displayed on the reproduction screen. The reproduction screen switches off when the gearbox is in neutral or in a forward gear.
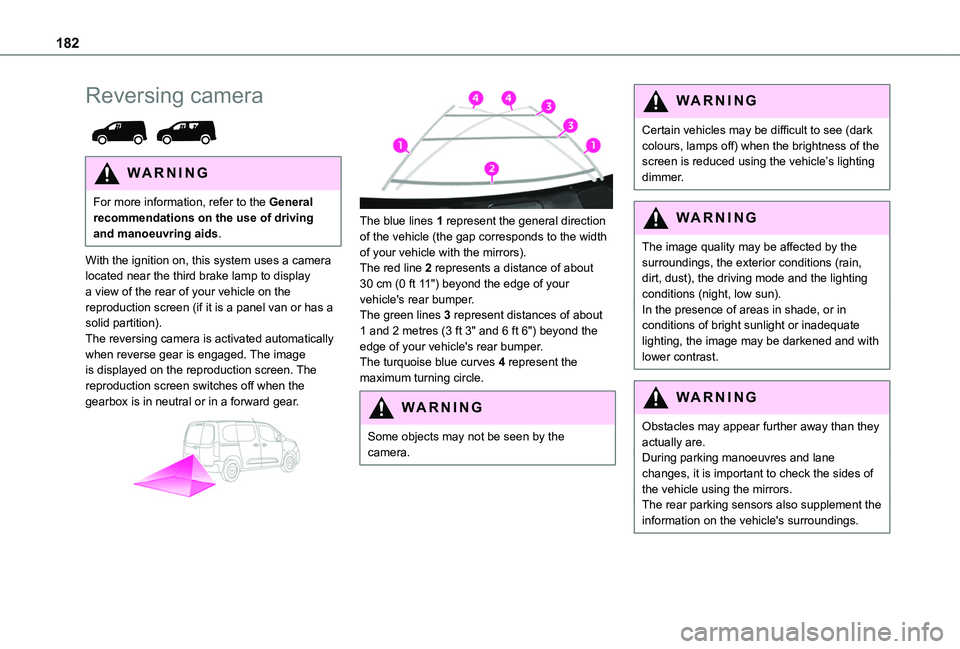
The blue lines 1 represent the general direction of the vehicle (the gap corresponds to the width of your vehicle with the mirrors).The red line 2 represents a distance of about 30 cm (0 ft 11") beyond the edge of your vehicle's rear bumper.The green lines 3 represent distances of about 1 and 2 metres (3 ft 3" and 6 ft 6") beyond the edge of your vehicle's rear bumper.The turquoise blue curves 4 represent the maximum turning circle.
WARNI NG
Some objects may not be seen by the camera.
WARNI NG
Certain vehicles may be difficult to see (dark colours, lamps off) when the brightness of the screen is reduced using the vehicle’s lighting dimmer.
WARNI NG
The image quality may be affected by the surroundings, the exterior conditions (rain, dirt, dust), the driving mode and the lighting conditions (night, low sun).In the presence of areas in shade, or in conditions of bright sunlight or inadequate lighting, the image may be darkened and with lower contrast.
WARNI NG
Obstacles may appear further away than they actually are.During parking manoeuvres and lane changes, it is important to check the sides of the vehicle using the mirrors.The rear parking sensors also supplement the information on the vehicle's surroundings.
Page 184 of 320
184
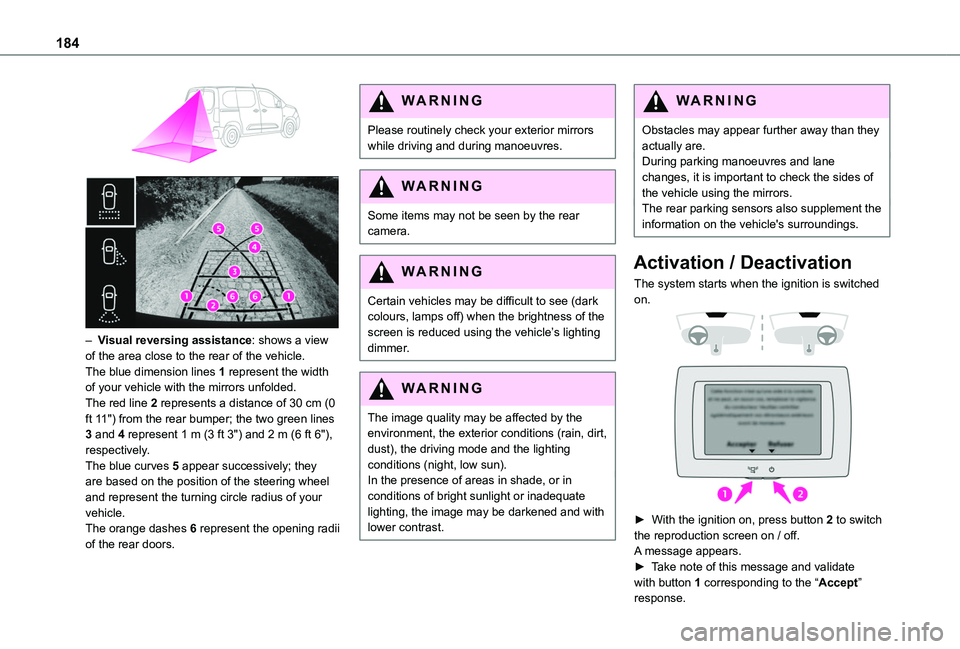
– Visual reversing assistance: shows a view of the area close to the rear of the vehicle.The blue dimension lines 1 represent the width of your vehicle with the mirrors unfolded.The red line 2 represents a distance of 30 cm (0 ft 11") from the rear bumper; the two green lines 3 and 4 represent 1 m (3 ft 3") and 2 m (6 ft 6"), respectively.The blue curves 5 appear successively; they are based on the position of the steering wheel and represent the turning circle radius of your vehicle.The orange dashes 6 represent the opening radii of the rear doors.
WARNI NG
Please routinely check your exterior mirrors while driving and during manoeuvres.
WARNI NG
Some items may not be seen by the rear camera.
WARNI NG
Certain vehicles may be difficult to see (dark colours, lamps off) when the brightness of the screen is reduced using the vehicle’s lighting dimmer.
WARNI NG
The image quality may be affected by the environment, the exterior conditions (rain, dirt, dust), the driving mode and the lighting conditions (night, low sun).In the presence of areas in shade, or in conditions of bright sunlight or inadequate lighting, the image may be darkened and with lower contrast.
WARNI NG
Obstacles may appear further away than they actually are.During parking manoeuvres and lane changes, it is important to check the sides of the vehicle using the mirrors.The rear parking sensors also supplement the information on the vehicle's surroundings.
Activation / Deactivation
The system starts when the ignition is switched on.
► With the ignition on, press button 2 to switch the reproduction screen on / off.
A message appears.► Take note of this message and validate with button 1 corresponding to the “Accept” response.
Page 185 of 320
185
Driving
6
The reproduction screen comes on.► With the engine running, press button 2 to switch the reproduction screen off.
NOTIC E
The function is automatically paused (the reproduction screen becomes grey) in reverse, above 15 km/h (9 mph).The function restarts when the vehicle is
once more travelling at a speed below this threshold.
Operation
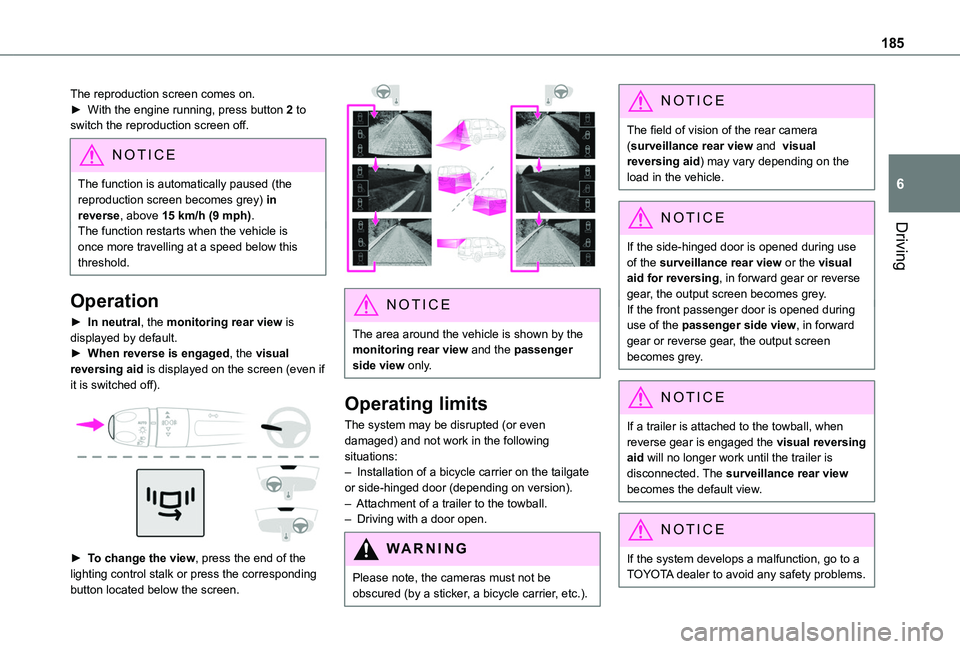
► In neutral, the monitoring rear view is displayed by default.► When reverse is engaged, the visual reversing aid is displayed on the screen (even if it is switched off).
► To change the view, press the end of the lighting control stalk or press the corresponding button located below the screen.
NOTIC E
The area around the vehicle is shown by the monitoring rear view and the passenger side view only.
Operating limits
The system may be disrupted (or even damaged) and not work in the following situations:– Installation of a bicycle carrier on the tailgate or side-hinged door (depending on version).– Attachment of a trailer to the towball.– Driving with a door open.
WARNI NG
Please note, the cameras must not be obscured (by a sticker, a bicycle carrier, etc.).
NOTIC E
The field of vision of the rear camera (surveillance rear view and visual reversing aid) may vary depending on the load in the vehicle.
NOTIC E
If the side-hinged door is opened during use of the surveillance rear view or the visual aid for reversing, in forward gear or reverse gear, the output screen becomes grey.If the front passenger door is opened during use of the passenger side view, in forward gear or reverse gear, the output screen becomes grey.
NOTIC E
If a trailer is attached to the towball, when reverse gear is engaged the visual reversing aid will no longer work until the trailer is disconnected. The surveillance rear view becomes the default view.
NOTIC E
If the system develops a malfunction, go to a TOYOTA dealer to avoid any safety problems.
Page 190 of 320
190
WARNI NG
During manoeuvring phases, the steering wheel performs rapid turns: do not hold the steering wheel or put your hands between the spokes of the steering wheel. Watch out for any objects that could interfere with the manoeuvre (loose clothing, scarf, tie, etc.). Risk of injury!It is the driver's responsibility to constantly monitor the traffic, especially vehicles coming towards you.The driver should check that no objects or people are obstructing the vehicle’s path.
NOTIC E
The images from the camera(s) displayed on the touch screen may be distorted by the terrain.In shady areas, or in inadequate sunlight or lighting conditions, the image may be darkened and with lower contrast
The manoeuvre can be permanently interrupted at any time, either by the driver or automatically by the system.Interruption by the driver:– taking over control of the steering.
– activating the direction indicator lamps on the opposite side to that of the manoeuvre.– unfastening the driver's seat belt.– switching off the ignition.Interruption by the system:– vehicle exceeding the speed limit of 7 km/h (5 mph) during parking space entry manoeuvres, or 5 km/h (3 mph) during parking space exit manoeuvres.– activation of anti-slip regulation on a slippery road.– opening of a door or the boot.– engine stall.– system malfunction.– after 10 manoeuvres to enter or exit a parallel parking space and after 7 manoeuvres to enter a parking bay.Interrupting the manoeuvre automatically deactivates the function.The manoeuvre symbol is displayed in red, accompanied by the "Manoeuvre cancelled" message on the touch screen.A message prompts the driver to take back
control of the vehicle.The function is deactivated after a few seconds; this warning lamp goes off and the function returns to the initial display.
End of the parking space entry or exit
manoeuvre
The vehicle stops as soon as the manoeuvre is completed.The manoeuvre symbol is displayed in red, accompanied by the message “Manoeuvre completed” on the touch screen.When the function is deactivated, this indicator lamp goes off, accompanied by an audible signal.When entering a parking space, the driver may be required to complete the manoeuvre.
Page 197 of 320
197
Practical information
7
State of charging indicator lampMeaning
Fixed whiteGuide lighting on opening the charging flap and disconnecting the charging cable.
Fixed blueDeferred charging.
Flashing greenCharging.
Fixed greenCharging complete.The charging indicator lamp goes off after about 2 minutes as the vehicle's functions go into standby.The indicator lamp comes back on when the vehicle is unlocked using the Keyless Entry and Starting or when a door is opened, to indicate that the battery is fully charged.
Fixed redMalfunction.
WARNI NG
In case of impact, even light, against the charging flap, do not use it.Do not dismantle or modify the charging connector - risk of electrocution and/or fire!Contact any authorized Toyota retailer or Toyota authorized repairer, or any reliable repairer.
Charging cables, sockets
and chargers
The charging cable supplied with the vehicle (depending on version) is compatible with the electrical systems in the country of sale. When travelling abroad, check the compatibility of local electrical systems with the charging cable.A full range of charging cables is available from your dealer.Contact any authorized Toyota retailer or Toyota authorized repairer, or any reliable repairer for
more information and to obtain suitable charging cables.
Identification labels on charging
sockets/connectors
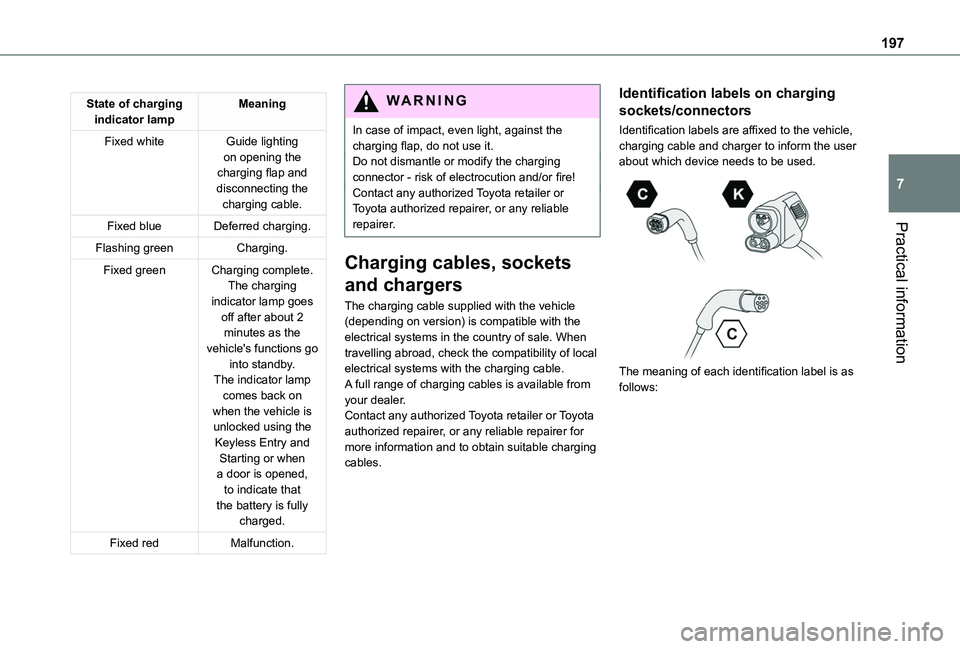
Identification labels are affixed to the vehicle, charging cable and charger to inform the user about which device needs to be used.
The meaning of each identification label is as follows:
Page 203 of 320
203
Practical information
7
For domestic or accelerated charging
WARNI NG
Before chargingDepending on the context:► Have a professional check that the electrical system to be used complies with applicable standards and is compatible with the vehicle.► Have a professional electrician install a dedicated domestic power socket or accelerated charging unit (Wallbox) compatible with the vehicle.You should preferably use the charging cable available as an accessory.For more information, contact a any authorized Toyota retailer or Toyota authorized repairer, or any reliable repairer.
WARNI NG
During chargingWhile charging is in progress, unlocking the vehicle will cause the charging to stop.If no action is taken on one of the openings (door or boot) or on the charging nozzle, the vehicle will lock again after 30 seconds and charging will resume automatically.Never work under the bonnet:
– Some areas remain very hot, even an hour after charging ends - risk of burns!– The fan may start at any time - risk of cuts or strangulation!
WARNI NG
After chargingCheck that the charging flap is closed.Do not leave the cable connected to the domestic power socket - risk of short-circuit or electrocution in the event of contact with or immersion in water!
For superfast charging
NOTIC E
Before chargingCheck that the fast public charging station and its charging cable are compatible with the vehicle.
If the exterior temperature is below:– 0°C, charging times may be extended.– -20°C, charging is still possible, but charging times may be extended even further (the battery has to be heated first).
WARNI NG
After chargingCheck that the charging flap is closed.
Connection
► Before charging, check that the drive selector is in mode P, otherwise charging is not possible.► Open the charging flap by pressing the push-button, and check that there are no foreign bodies on the charging connector.
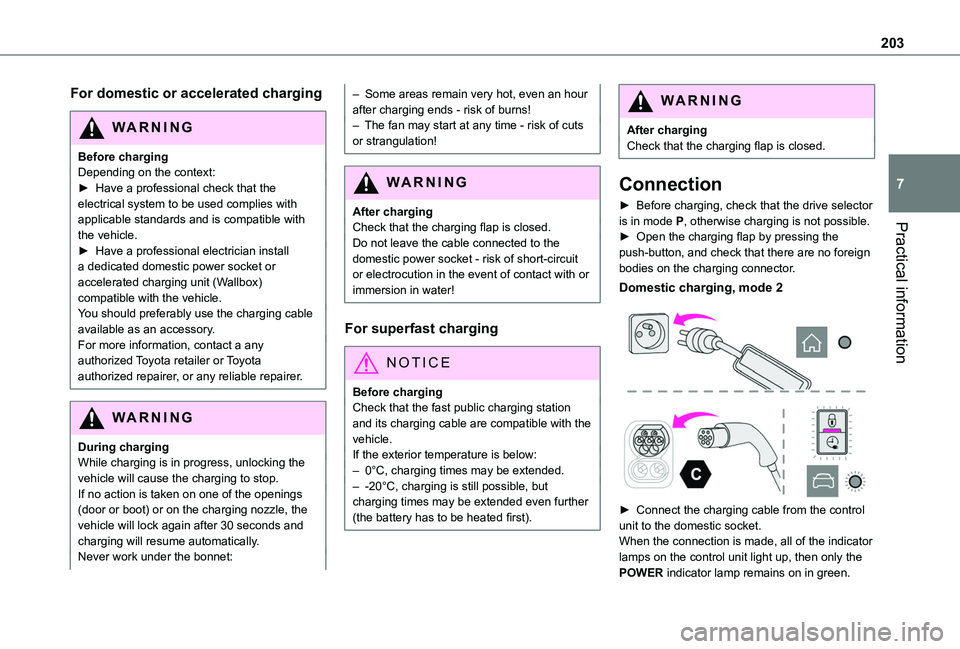
Domestic charging, mode 2
► Connect the charging cable from the control unit to the domestic socket.When the connection is made, all of the indicator
lamps on the control unit light up, then only the POWER indicator lamp remains on in green.
Page 205 of 320
205
Practical information
7
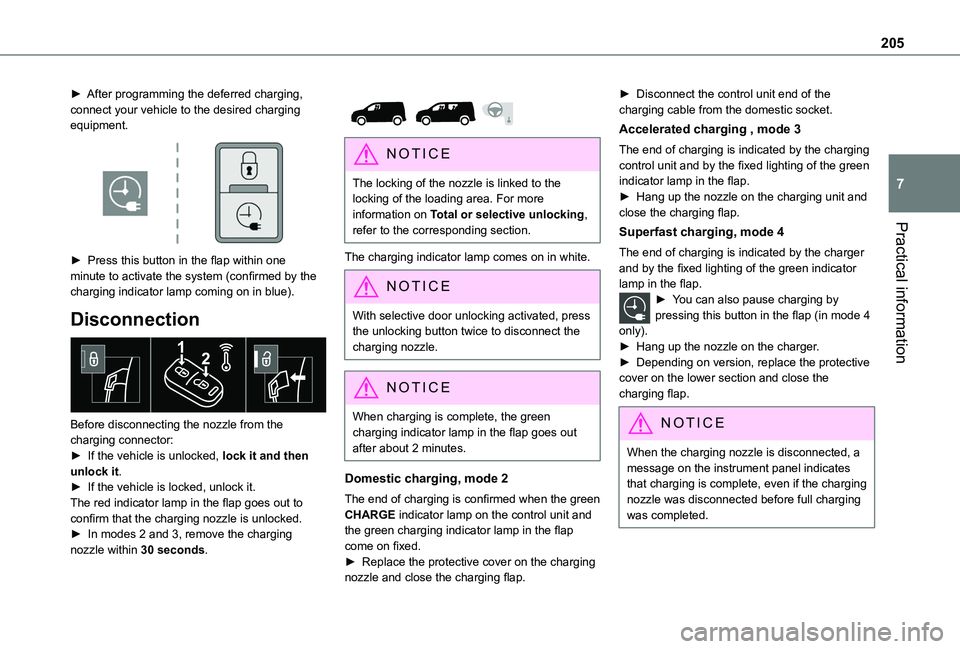
► After programming the deferred charging, connect your vehicle to the desired charging equipment.
► Press this button in the flap within one minute to activate the system (confirmed by the charging indicator lamp coming on in blue).
Disconnection
Before disconnecting the nozzle from the charging connector:► If the vehicle is unlocked, lock it and then unlock it.► If the vehicle is locked, unlock it.The red indicator lamp in the flap goes out to confirm that the charging nozzle is unlocked.► In modes 2 and 3, remove the charging nozzle within 30 seconds.
NOTIC E
The locking of the nozzle is linked to the locking of the loading area. For more information on Total or selective unlocking, refer to the corresponding section.
The charging indicator lamp comes on in white.
NOTIC E
With selective door unlocking activated, press the unlocking button twice to disconnect the charging nozzle.
NOTIC E
When charging is complete, the green charging indicator lamp in the flap goes out after about 2 minutes.
Domestic charging, mode 2
The end of charging is confirmed when the green CHARGE indicator lamp on the control unit and the green charging indicator lamp in the flap come on fixed.► Replace the protective cover on the charging nozzle and close the charging flap.
► Disconnect the control unit end of the charging cable from the domestic socket.
Accelerated charging , mode 3
The end of charging is indicated by the charging control unit and by the fixed lighting of the green indicator lamp in the flap.► Hang up the nozzle on the charging unit and close the charging flap.
Superfast charging, mode 4
The end of charging is indicated by the charger and by the fixed lighting of the green indicator lamp in the flap.► You can also pause charging by pressing this button in the flap (in mode 4 only).► Hang up the nozzle on the charger.► Depending on version, replace the protective cover on the lower section and close the charging flap.
NOTIC E
When the charging nozzle is disconnected, a message on the instrument panel indicates that charging is complete, even if the charging nozzle was disconnected before full charging was completed.
Page 216 of 320
216
Air filter
Depending on the environment and the use of the vehicle (e.g. dusty atmosphere, city driving), change it twice as often, if necessary.
Oil filter
Change the oil filter each time the engine oil is changed.
Particle filter (Diesel)
The start of clogging of the particle filter is indicated by the temporary lighting of this warning lamp, accompanied by an alert message.As soon as the traffic conditions permit, regenerate the filter by driving at a speed of at least 37 mph (60 km/h), with an engine speed above 2,500 rpm, for about 15 minutes (until the warning lamp goes off).If it is not possible to reach 37 mph (60 km/h), leave the engine running at idle for about
15 minutes, then drive with an engine speed above 2,500 rpm for 15 minutes.
NOTIC E
Do not switch off the engine until the filter is fully regenerated; repeated intervals can degrade the engine oil prematurely.Regenerating the filter while the vehicle is stationary is not recommended.
NOTIC E
If the warning lamp stays on, this indicates a low Diesel additive level.For more information on Checking levels, refer to the corresponding section.
NOTIC E
Following prolonged operation of the vehicle at very low speed or at idle, you may, in exceptional circumstances, notice water vapour coming from the exhaust while accelerating. These emissions have no impact on the vehicle’s behaviour and the environment.
NOTIC E
New vehicleDuring the first few particle filter regeneration operations, you may notice a "burning" smell. This is perfectly normal.
Manual gearbox
The gearbox does not require any maintenance (no oil change).
Automatic gearbox
The gearbox does not require any maintenance (no oil change).
Drive selector
The drive selector does not require any maintenance.
Brake pads
Brake wear depends on the style of driving, particularly in the case of vehicles used in town, over short distances. It may be necessary to have the condition of the brakes checked, even between vehicle services.Unless there is a leak in the circuit, a drop in the brake fluid level indicates that the brake pads are worn.
NOTIC E
After washing the vehicle, moisture, or in wintry conditions, ice can form on the brake discs and pads: braking efficiency may be reduced. Gently dab the brakes to dry and defrost them.