2022 TOYOTA PROACE CITY weight
[x] Cancel search: weightPage 117 of 320
 on the front doors or their inter")
11 7
Safety
5
The vehicle's front door panels include side impact sensors.A damaged door or any unauthorised or incorrectly executed work (modification or repair) on the front doors or their interior trim could compromise the operation of these sensors - risk of malfunction of the lateral airbags!All work must be carried out only by any authorized Toyota retailer or Toyota authorized repairer, or any reliable repairer.
WARNI NG
Curtain airbagsDo not fix or attach anything to the roof, as this could cause head injuries when the curtain airbag is deployed.Do not remove the grab handles installed on the roof, as these help to secure the curtain airbags.
Child seats
NOTIC E
The regulations on carrying children are specific to each country. Refer to the legislation in force in your country.
For maximum safety, please observe the following recommendations:
– In accordance with European regulations, all children under the age of 12 or less than 150 cm (4 ft 11”) tall must travel in approved child seats suited to their weight, on seats fitted with a seat belt or ISOFIX mountings.– Statistically, the safest seats in your vehicle for carrying children are the rear seats.– Children weighing less than 9 kg (20 lb) must travel in the "rear facing" position, whether in the front or rear of the vehicle.
NOTIC E
It is recommended that children travel on the rear seats of the vehicle:– ‘rear facing’ up to the age of 3,– ‘forward facing’ over the age of 3.
WARNI NG
Make sure that the seat belt is correctly positioned and tightened.For child seats with a support leg, ensure that the support leg is in firm and steady contact with the floor.
WARNI NG
An incorrectly installed child seat compromises the child's safety in the event of an accident.Ensure that there is no seat belt or seat belt buckle under the child seat, as this could destabilise it.Remember to fasten the seat belts or the harness of child seats, keeping the slack relative to the child's body to a minimum, even for short journeys.When installing a child seat using the seat belt, ensure that the seat belt is tightened correctly on the child seat and that it secures the child seat firmly on the seat of the vehicle. If the passenger seat is adjustable, move it forwards if necessary.Remove the head restraint before installing a child seat with a backrest on a passenger seat.Ensure that the head restraint is stored or attached securely to prevent it from being thrown around the vehicle in the event of sharp braking. Refit the head restraint once the child seat has been removed.
Page 122 of 320

122
Locations for child seats secured using the seat belt
In accordance with European regulations, the table indicates the options\
for installing child seats secured using a seat belt and universally ap\
proved (c) according to the weight of the child and the seating position in the veh\
icle.
Child weight and age guide
SeatsUnder 13 kg (28 lb)
(groups 0 (b) and 0+)Up to about 1 year old
From 9 to 18 kg (from 20 to 39 lb)
(group 1)From about 1 to 3 years old
15-25 kg (34-56 lb)
(group 2)From about 3 to 6 years old
22-36 kg (49-79 lb)
(group 3)From about 6 to 10 years old
Cab/Row 1 (a)With individual seat, passenger seat
/
With bench seat, outer or central passenger seat
With passenger airbag deactivated "OFF"
U
With passenger airbag activated "ON"
XUF
Page 123 of 320
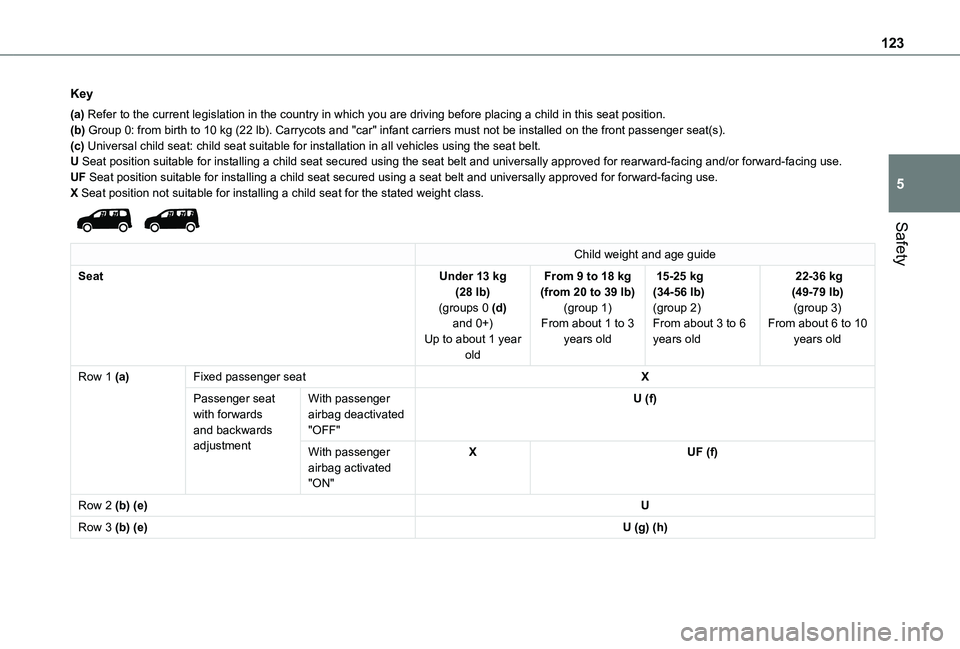
123
Safety
5
Key
(a) Refer to the current legislation in the country in which you are drivin\
g before placing a child in this seat position.(b) Group 0: from birth to 10 kg (22 lb). Carrycots and "car" infant carriers must not be installed on the f\
ront passenger seat(s).(c) Universal child seat: child seat suitable for installation in all vehic\
les using the seat belt.U Seat position suitable for installing a child seat secured using the se\
at belt and universally approved for rearward-facing and/or forward-faci\
ng use.UF Seat position suitable for installing a child seat secured using a seat\
belt and universally approved for forward-facing use.X Seat position not suitable for installing a child seat for the stated w\
eight class.
Child weight and age guide
SeatUnder 13 kg (28 lb)(groups 0 (d) and 0+)Up to about 1 year old
From 9 to 18 kg (from 20 to 39 lb)(group 1)From about 1 to 3 years old
15-25 kg (34-56 lb)(group 2)From about 3 to 6 years old
22-36 kg (49-79 lb)(group 3)From about 6 to 10 years old
Row 1 (a)Fixed passenger seatX
Passenger seat with forwards and backwards adjustment
With passenger airbag deactivated "OFF"
U (f)
With passenger airbag activated "ON"
XUF (f)
Row 2 (b) (e)U
Row 3 (b) (e)U (g) (h)
Page 124 of 320
 Refer to the current legislation in the country in which you are driving before placing a child in this seat position.(b) To install a rearward-facing or forward-facing child seat on a rea")
124
Key
(a) Refer to the current legislation in the country in which you are driving before placing a child in this seat position.(b) To install a rearward-facing or forward-facing child seat on a rear seat, adjust the rear seat to the fully back position with the backrest straightened.(c) Universal child seat: child seat suitable for installation in all vehicles using the seat belt.(d) Group 0: from birth to 10 kg (22 lb). Carrycots and "car" infant carriers must not be installed on the front passenger seat(s) or the seats in row 3.(e) To install a rearward-facing or forward-facing child seat on a rear seat, move the seats in front of it forward, then straighten their backrests to allow sufficient room for the child seat and the child's legs.(f) With the fixed passenger seat (which cannot be placed in the folded position), adjust the backrest angle to 0°.For more information on the Front seats and, in particular, the folded position for the backrest,
refer to the corresponding section.(g) On the L1 version, fold down the backrests in row 2.(h) Installing child seats with a support leg is prohibited in the third row.U Seat position suitable for installing a child seat secured using the seat belt and universally approved for rearward-facing and/or forward-facing use.
UF Seat position suitable for installing a child seat secured using a seat belt and universally approved for forward-facing use.X Seat position not suitable for installing a child seat for the stated weight class.
"ISOFIX" mountings
Row 2
* On some versions, the central seat is not equipped with ISOFIX mountings.
The vehicle has been approved in accordance with the latest ISOFIX regulation.If fitted on the vehicle, the regulation ISOFIX mountings are identified by labels.The mountings comprise three rings for each seat:– Two front rings A, located between the vehicle seat backrest and cushion, indicated by an "ISOFIX" marking,– If fitted to your vehicle, a rear ring B, located behind the vehicle's seat, called Top Tether, for securing the upper strap, indicated by a "Top Tether" marking.The Top Tether secures the upper strap of child seats that have them. In case of frontal impact, this device limits the tilting of the child seat forward.This ISOFIX mounting system provides fast, reliable and safe fitting of the child seat in the vehicle.
Page 126 of 320

126
Locations for ISOFIX child seats
In accordance with European regulations, this table indicates the options for installing ISOFIX child seats on vehicle seats fitted with ISOFIX mountings.In the case of universal and semi-universal ISOFIX child seats, the ISOF\
IX size category, determined by a letter from A to G, is indicated on the child seat next to the ISOFIX logo.
Child weight and age guide
Under 10 kg (22 lb)(group 0)Up to about 6
months old
Under 10 kg (22 lb)(group 0)Under 13 kg (29 lb)(group 0+)
Up to about 1 year old
From 9 to 18 kg (from 20 to 39 lb)(group 1)From about 1 to 3 years old
Type of ISOFIX child seatCotrearward-facingrearward-facingforward-facing
ISOFIX size categoryFGCDECDABB1B2B3
Row 1 (a)Not ISOFIX
Row 2 (b)Rear seat behind the driver's seatIL (c)ILIUF/IL
Centre rear seat (f) and passenger’s side rear seat
IL (d)
Row 3 (b) (e)Not ISOFIX
Key
(a) Refer to the current legislation in the country in which you are driving before placi\
ng a child in this seat position.(b) To install a rearward-facing or forward-facing child seat on a rear seat,\
adjust the rear seat to the fully back position with the backrest strai\
ghtened.(c) Installing a carrycot on this seat may prevent the use of one or more o\
f the other seats in this row.(d) Adjust the front passenger seat without height adjuster to the fully bac\
k position.(e) Installing child seats with a support leg is prohibited in the third ro\
w.(f) On some versions, the central seat is not equipped with ISOFIX mounting\
s.IUF Seat suitable for installing a forward-facing ISOFIX Universal seat sec\
ured using the upper strap.IL Seat suitable for an ISOFIX Semi-Universal child seat, which may be eit\
her:
Page 130 of 320

130
► Check that the depth of the water does not exceed 15 cm, taking account of waves that might be generated by other users.► Deactivate the Stop & Start function.► Drive as slowly as possible without stalling. In all cases, do not exceed 6 mph (10 km/h).► Do not stop and do not switch off the motor.On leaving the flooded road, as soon as safety conditions allow, make several light brake applications to dry the brake discs and pads.If in doubt about the state of your vehicle, contact any authorized Toyota retailer or Toyota authorized repairer, or any reliable repairer.
Noise (Electric)
On the outside
Due to the vehicle’s quiet operation when driving, the driver must pay particular attention.When manoeuvring, the driver must always check the vehicle's immediate surroundings.At speeds of up to 19 mph (30 km/h), the pedestrian horn warns other road users of the
vehicle’s presence.
NOTIC E
Cooling the traction batteryThe cooling fan comes on during charging to cool the on-board charger and the traction battery.
On the inside
During use, you may hear certain perfectly normal noises specific to electric vehicles, such as:– Traction battery relay when starting.– Vacuum pump when braking.– Vehicle tyres or aerodynamics when driving.– Jolting and knocking noise during hill starts.
In case of towing
WARNI NG
Driving with a trailer places greater demands on the towing vehicle and requires extra care from the driver.
NOTIC E
Respect the maximum towable weights.At altitude: reduce the maximum load by 10% per 1,000 metres (3,280 ft) of altitude; the density of the air decreases with altitude and the performance of the engine reduces.
WARNI NG
New vehicle: do not pull a trailer before having driven at least 1,000 kilometres (620 miles).
NOTIC E
If the outside temperature is high, let the engine idle for 1 to 2 minutes after the vehicle comes to a stop, to help it to cool.
Before setting off
Nose weight
► Distribute the load in the trailer so that the heaviest items are as close as possible to the axle and the nose weight (at the point where it joins your vehicle) approaches the maximum permitted without exceeding it.
Tyres
► Check the tyre pressures of the towing vehicle and of the trailer, observing the recommended pressures.
Lighting
► Check the electrical signalling on the trailer and the headlamp beam height of your vehicle.
NOTIC E
If a genuine TOYOTA towing device is used, the rear parking sensors will be deactivated automatically to avoid the audible signal.
Page 157 of 320

157
Driving
6
Qualifier plate detectedDisplay of the speed associated with the qualifier plate
Speed limit in rainExamples:
If the wiper control lever is in the "intermittent wipe" or "automatic wipe" position (in order
to activate the rain sensor):110 km/h (68 mph) (for example)
Speed limit if towing
If an approved towing device is fixed to the vehicle:90 km/h (56 mph) (for example)
Speed limit applicable over a certain distanceExample:
70 km/h (43 mph) (for example)
Qualifier plate detectedDisplay of the speed associated with the qualifier plate
Speed limit for vehicles whose gross vehicle weight or gross train weight is less
than 3.5 tonnes
90 km/h (56 mph) (for example)
Speed limit in snowExample:
If the exterior temperature is below 3°C:30 km/h (19 mph) (for example)with a "snowflake" symbol
Speed limit at certain timesExample:
30 km/h (19 mph) (for example)with a "clock" symbol
WARNI NG
Navigation mapping should be regularly updated in order to receive accurate speed limit information from the system.
WARNI NG
The units for the speed limit (km/h or mph) depend on the country you are driving in.This should be taken into account so that you observe the speed limit.For the system to work correctly when changing country, the speed unit in the instrument panel must correspond to that of the country you are driving in.
WARNI NG
The automatic reading of road signs is a driving aid system and does not always display speed limits correctly.The speed limit signs present on the road always take priority over the display by the system. The system is designed to detect signs that conform to the Vienna Convention on road signs.
NOTIC E
Specific speed limits, such as those for heavy goods vehicles, are not displayed.The display of the speed limit in the
instrument panel is updated when passing a speed limit sign intended for cars (light vehicles).
Page 199 of 320

199
Practical information
7
Red: fault; charging not permitted or must be stopped immediately. Check that everything is connected correctly and that the electrical system is not faulty.If the indicator lamp does not go off, contact any authorized Toyota retailer or Toyota authorized repairer, or any reliable repairer.Upon plugging the charging cable into a domestic socket, all of the indicator lamps come on briefly.If no indicator lamps come on, check the domestic socket's circuit-breaker:– If the circuit-breaker has tripped, contact a professional to check that the electrical system is compatible and/or carry out any necessary repairs.– If the circuit-breaker has not tripped, stop using the charging cable and contact any authorized Toyota retailer or Toyota authorized repairer, or any reliable repairer.
Control unit label - Recommendations
Refer to the handbook before use.
1.Incorrect use of this charging cable may result in fire, property damage and serious injury or death by electrocution!
2.Always use a correctly earthed power socket, protected by a 30 mA residual current device.
3.Always use an electrical socket protected by a circuit-breaker appropriate for the electrical circuit’s current rating.
4.The weight of the control unit must not be borne by the electrical socket, plug and cables.
5.Never use this charging cable if it is defective or in any way damaged.
6.Never attempt to repair or open this charging cable. It contains no repairable parts - replace the charging cable if it is damaged.
7.Never immerse this charging cable in water.
8.Never use this charging cable with an extension cable, a multi-plug socket, a conversion adaptor or on a damaged electrical socket.
9.Do not unplug the plug from the wall as a means of stopping charging.
10.Immediately stop charging, by locking and then unlocking the vehicle using the remote control key, if the charging cable or wall socket feel burning hot to the touch.
11 .This charging cable includes components liable to cause electrical arcing or sparks. Do not expose to flammable vapours.
12.Only use this charging cable with TOYOTA vehicles.
13.Never plug the cable into the wall socket (or unplug it) with wet hands.
14.Do not force the connector if it is locked into the vehicle.
Control unit label - State of indicator lamps
State of the indicator lamp
Off
On
Flashing