2022 TOYOTA MIRAI belt
[x] Cancel search: beltPage 62 of 556
621-2. Child safety
Owners Manual_USA_M62084_en
behind the rear center seat.
However, the inboard LATCH
anchors of the outboard seats,
which are 18.1 in. (460 mm)
apart, can be used if the child
restraint system manufacturer’s
instructions permit use of those
anchors with the anchor spacing
stated.
Child restraint systems with rigid
lower attachments cannot be
installed in the center seat. This
type of child restraint system
can only be installed in the out-
board seat.
■Laws and regulations pertain-
ing to anchors
The LATCH system conforms to
FMVSS225 or CMVSS210.2.
Child restraint systems conforming
to FMVSS213 or CMVSS213 speci-
fications can be used.
This vehicle is designed to conform
to SAE J1819.
■Anchor brackets (for top
tether strap)
Anchor brackets are provided
for each rear seat.
Use anchor brackets when fix-
ing the top tether strap.
WARNING
■When installing a child
restraint system
Observe the following precau-
tions.
Failure to do so m ay result in
death or serious injury.
●When using the LATCH
anchors, be sure that there are
no foreign objects around the
anchors and that the seat belt is
not caught behind the child
restraint system.
●Follow all installation instruc-
tions provided by the child
restraint system manufacturer.
●Never attach two c hild restraint
system attachments to the
same anchor. In a collision, one
anchor may not be strong
enough to hold two child
restraint system attachments
and may break.
If the LATCH anchors are
already in use, use the seat belt
to install a child restraint system
in the center seat.
●When securing some types of
child restraint systems in rear
seats, it may not be possible to
properly use the seat belts in
positions next to the child
restraint without interfering with
it or affecting seat belt effective-
ness. Be sure your seat belt fits
snugly across your shoulder
and low on your hips. If it does
not, or if it interferes with the
child restraint, move to a differ-
ent position. Fa ilure to do so
may result in death or serious
injury.
●If the seat is adjusted, reconfirm
the security of the child restraint
system.
Using an anchor bracket
(for top tether strap)
Page 64 of 556
641-2. Child safety
Owners Manual_USA_M62084_en
WARNING
■When installing a child
restraint system
Observe the following precau-
tions.
Failure to do so m ay result in
death or serious injury.
●Firmly attach t he top tether
strap and make sure that the
belt is not twisted.
●Do not attach the top tether
strap to anything other than the
anchor bracket.
●Follow all installation instruc-
tions provided by the child
restraint system manufacturer.
●Be sure to have the top tether
strap pass over the top of the
head restraint. If the belt passes
below the head restraint, it is
possible that the child restraint
system may no t be securely
fixed.
●If the seat is adjusted, reconfirm
the security of the child restraint
system.
NOTICE
■Anchor brackets (for top
tether strap)
When not in use, make certain to
close the lid. If it remains open,
the lid may be damaged.
Page 94 of 556

943-1. Instrument cluster
Owners Manual_USA_M62084_en
*1: These lights turn on when the power switch is turned to ON to
indicate that a system check is
being performed. They will turn
off after the fuel cell system is
on, or after a few seconds. There
may be a malfunction in a sys-
tem if the light does not come on,
or turn off. Have the vehicle
inspected by your Toyota dealer.
*2: This light illuminates on the multi-information display.
*3: This light illuminates on the multi-informatio n display with a
message.
*4: Intuitive parking assist OFF indi- cator turns on when the power
switch is turned to ON while the
Intuitive parking assist function is
on. It will turn off after a few sec-
onds.
The indicators inform the driver
of the operating state of the
vehicle’s various systems.
Low fuel level warn-
ing light
*2 ( P.447)
Driver’s and front pas-
senger’s seat belt
reminder light
( P.448)
Rear passengers’ seat
belt reminder lights
*2
( P.448)
WARNING
■If a safety system warning
light does not come on
Should a safety system light such
as the ABS and SRS warning light
not come on when you start the
fuel cell system, this could mean
that these systems are not avail-
able to help protect you in an acci-
dent, which could result in death
or serious injury. Have the vehicle
inspected by your Toyota dealer
immediately if this occurs.
Indicators
Turn signal indicator
( P.182)
(U.S.A.)
Headlight indicator
( P.191)
(Canada)
Tail light indicator
( P.191)
Headlight high beam indi-
cator ( P.193)
Automatic High Beam
indicator ( P.193)
(Blue)
Low coolant temperature
indicator
*1, 2
Smart key system indica-
tor
*3 ( P.172)
Cruise control indicator
*2
( P.237)
Dynamic radar cruise
control indicator
*2
( P.237)
Cruise control “SET” indi-
cator
*2 ( P.237)
(*4)
LTA indicator*2 ( P.213,
229)
Intuitive parking assist
OFF indicator
*5, 6 (if
equipped) ( P.255)
PKSB OFF indicator
*5, 7
(if equipped) ( P.274)
Page 135 of 556
1354-3. Adjusting the seats
Owners Manual_USA_M62084_en
4
Before driving
4-3.Adjusting the seats
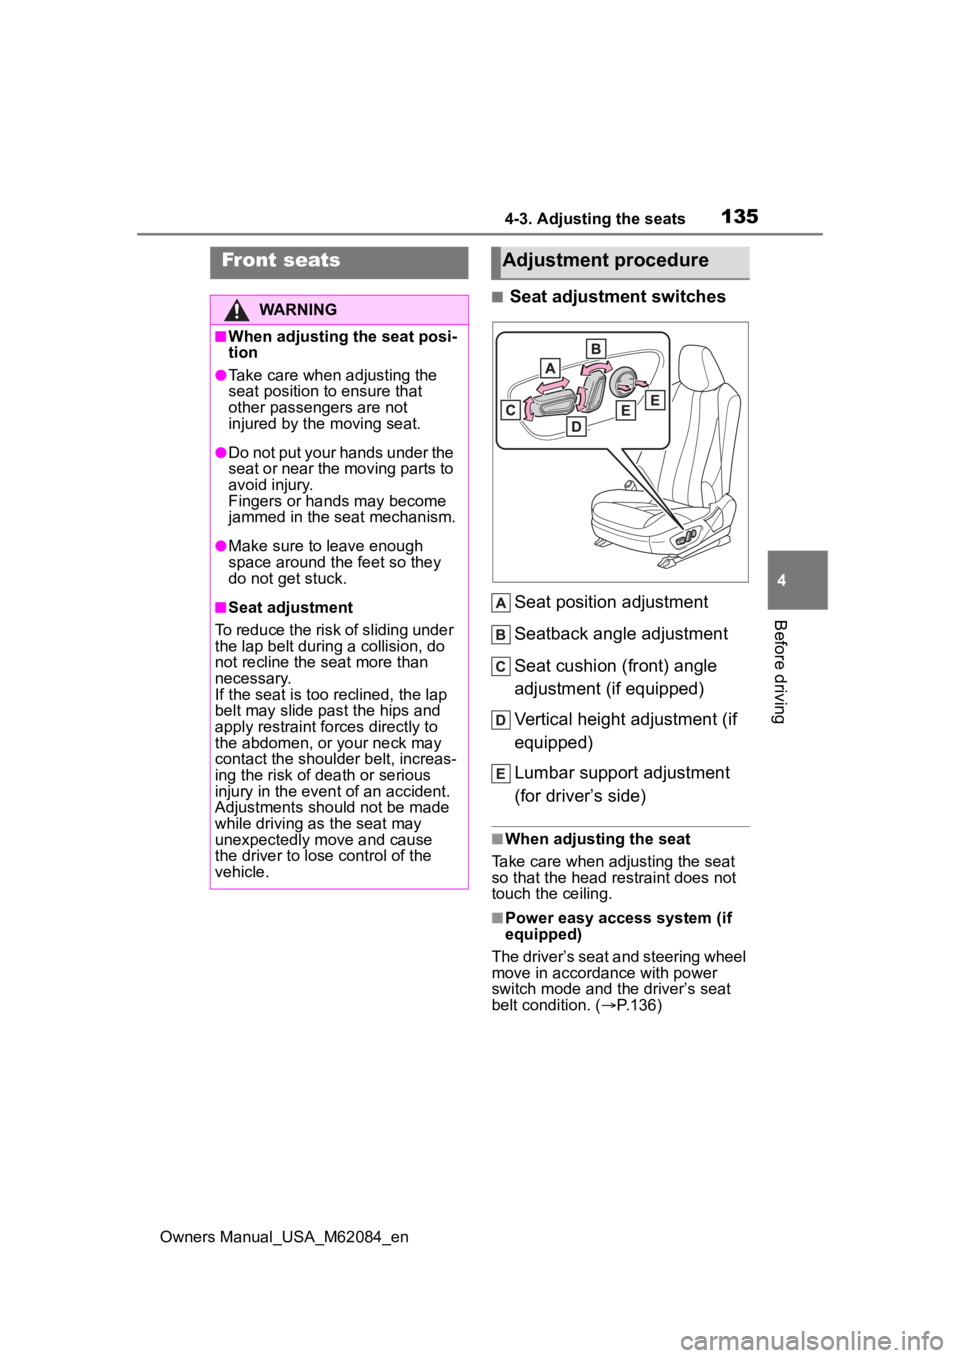
■Seat adjustment switches Seat position adjustment
Seatback angle adjustment
Seat cushion (front) angle
adjustment (if equipped)
Vertical height adjustment (if
equipped)
Lumbar support adjustment
(for driver’s side)
■When adjusting the seat
Take care when adjusting the seat
so that the head restraint does not
touch the ceiling.
■Power easy access system (if
equipped)
The driver’s seat and steering wheel
move in accordance with power
switch mode and th e driver’s seat
belt condition. ( P.136)
Front seats
WARNING
■When adjusting the seat posi-
tion
●Take care when adjusting the
seat position to ensure that
other passengers are not
injured by the moving seat.
●Do not put your hands under the
seat or near the moving parts to
avoid injury.
Fingers or hands may become
jammed in the seat mechanism.
●Make sure to leave enough
space around the feet so they
do not get stuck.
■Seat adjustment
To reduce the risk of sliding under
the lap belt during a collision, do
not recline the seat more than
necessary.
If the seat is too reclined, the lap
belt may slide past the hips and
apply restraint forces directly to
the abdomen, or your neck may
contact the shoulder belt, increas-
ing the risk of death or serious
injury in the event of an accident.
Adjustments should not be made
while driving as the seat may
unexpectedly move and cause
the driver to lose control of the
vehicle.
Adjustment procedure
Page 136 of 556
1364-3. Adjusting the seats
Owners Manual_USA_M62084_en
*: If equipped
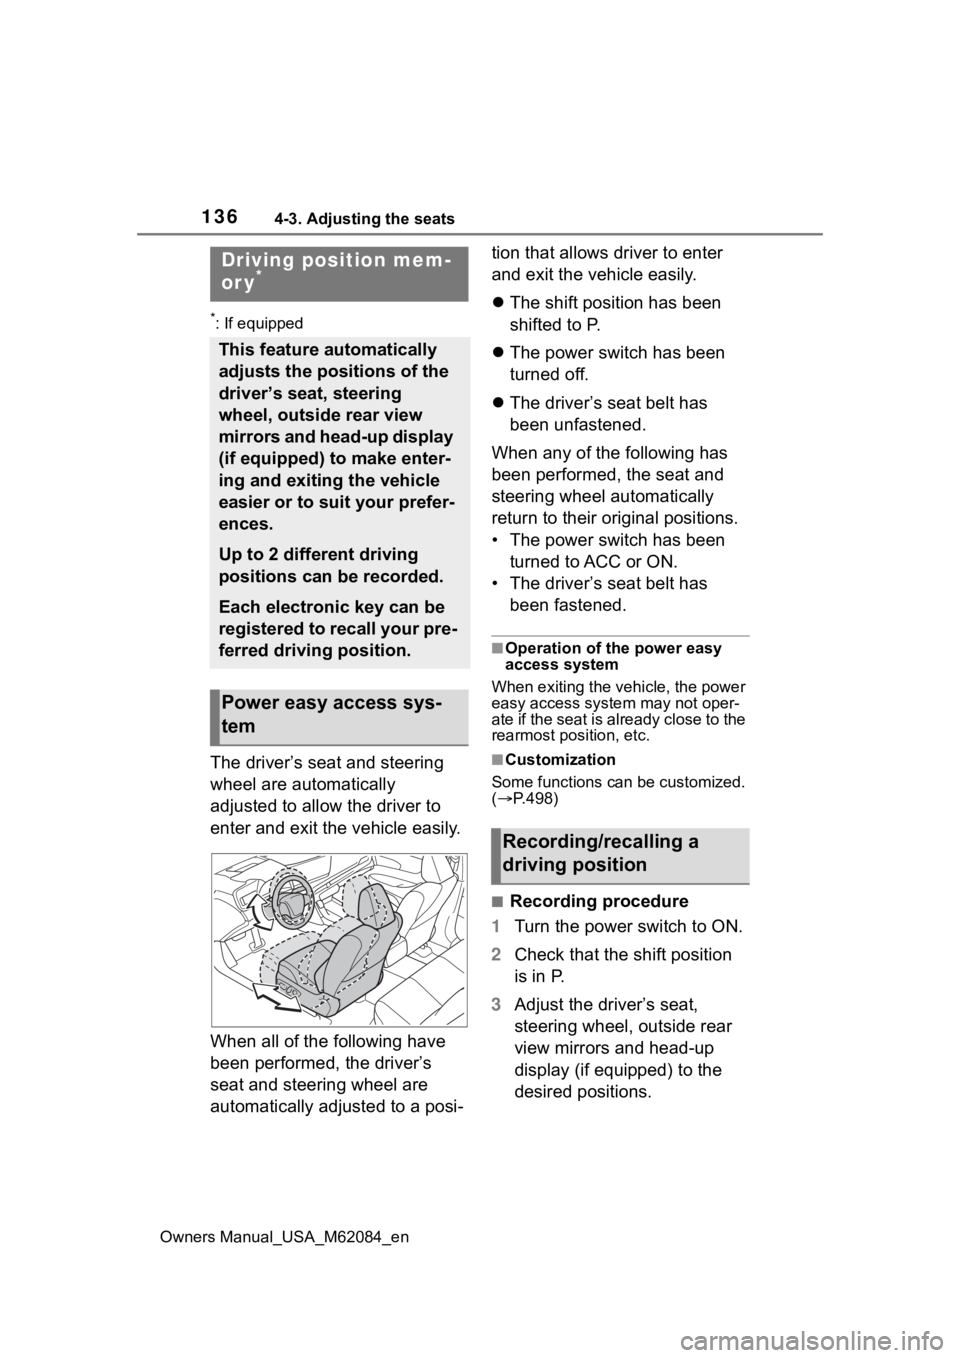
The driver’s seat and steering
wheel are automatically
adjusted to allow the driver to
enter and exit the vehicle easily.
When all of the following have
been performed, the driver’s
seat and steering wheel are
automatically adjusted to a posi-tion that allows driver to enter
and exit the vehicle easily.
The shift position has been
shifted to P.
The power switch has been
turned off.
The driver’s seat belt has
been unfastened.
When any of the following has
been performed, the seat and
steering wheel automatically
return to their original positions.
• The power switch has been turned to ACC or ON.
• The driver’s seat belt has been fastened.
■Operation of the power easy
access system
When exiting the vehicle, the power
easy access syste m may not oper-
ate if the seat is already close to the
rearmost position, etc.
■Customization
Some functions can be customized.
( P.498)
■Recording procedure
1 Turn the power switch to ON.
2 Check that the shift position
is in P.
3 Adjust the driver’s seat,
steering wheel, outside rear
view mirrors and head-up
display (if equipped) to the
desired positions.
Driving position mem-
or y*
This feature automatically
adjusts the positions of the
driver’s seat, steering
wheel, outside rear view
mirrors and head-up display
(if equipped) to make enter-
ing and exiting the vehicle
easier or to suit your prefer-
ences.
Up to 2 different driving
positions can be recorded.
Each electronic key can be
registered to recall your pre-
ferred driving position.
Power easy access sys-
tem
Recording/recalling a
driving position
Page 138 of 556
1384-3. Adjusting the seats
Owners Manual_USA_M62084_en
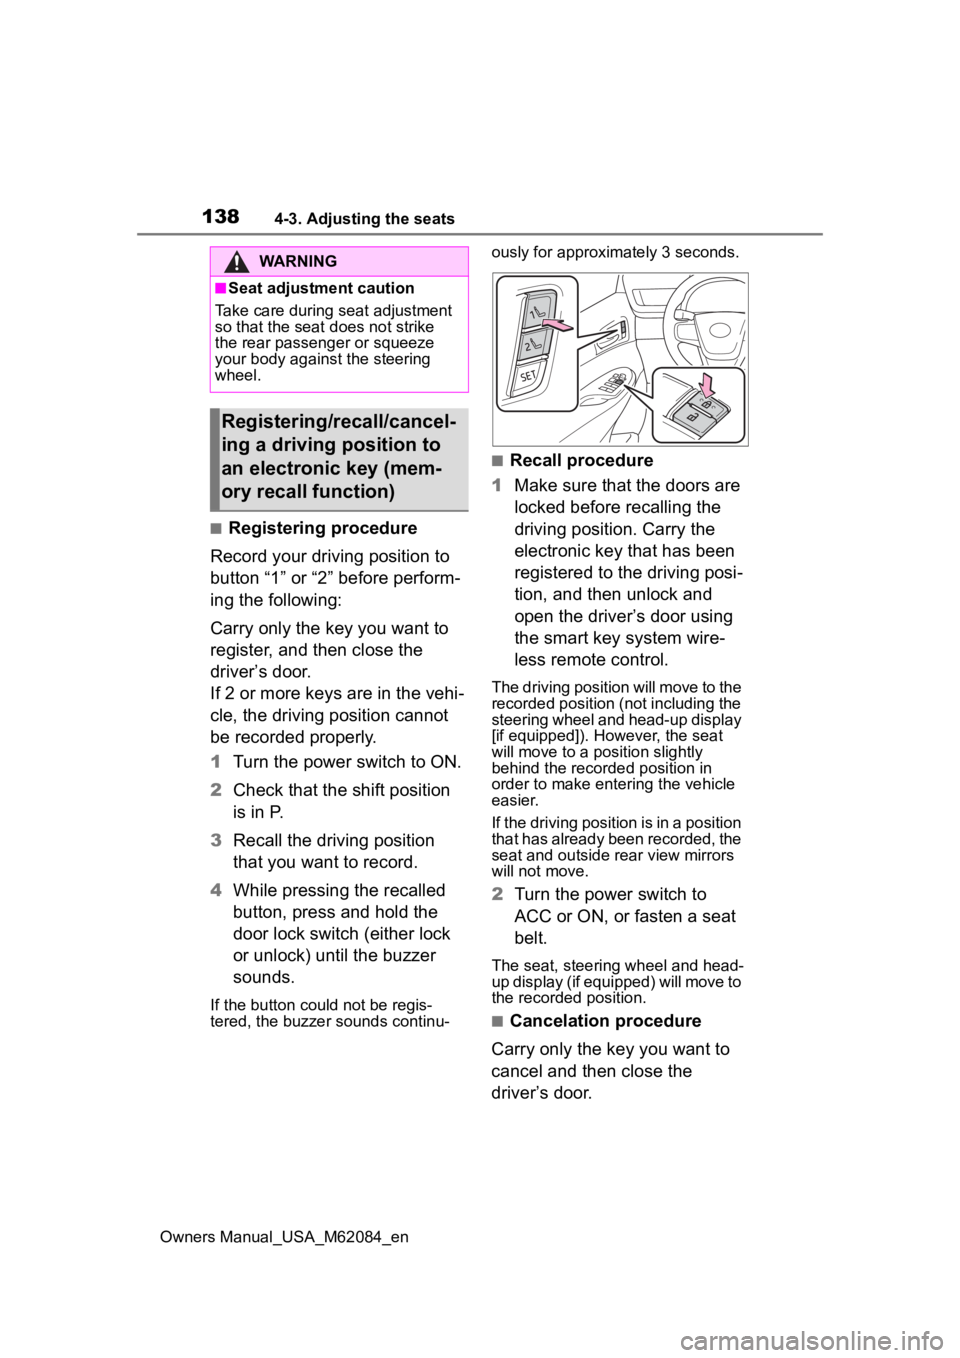
■Registering procedure
Record your driving position to
button “1” or “2” before perform-
ing the following:
Carry only the key you want to
register, and then close the
driver’s door.
If 2 or more keys are in the vehi-
cle, the driving position cannot
be recorded properly.
1 Turn the power switch to ON.
2 Check that the shift position
is in P.
3 Recall the driving position
that you want to record.
4 While pressing the recalled
button, press and hold the
door lock switch (either lock
or unlock) until the buzzer
sounds.
If the button could not be regis-
tered, the buzzer sounds continu- ously for approxim
ately 3 seconds.
■Recall procedure
1 Make sure that the doors are
locked before recalling the
driving position. Carry the
electronic key that has been
registered to the driving posi-
tion, and then unlock and
open the driver’s door using
the smart key system wire-
less remote control.
The driving position will move to the
recorded position (not including the
steering wheel and head-up display
[if equipped]). However, the seat
will move to a position slightly
behind the recorded position in
order to make entering the vehicle
easier.
If the driving position is in a position
that has already been recorded, the
seat and outside rear view mirrors
will not move.
2Turn the power switch to
ACC or ON, or fasten a seat
belt.
The seat, steering wheel and head-
up display (if equipped) will move to
the recorded position.
■Cancelation procedure
Carry only the key you want to
cancel and then close the
driver’s door.
WARNING
■Seat adjustment caution
Take care during seat adjustment
so that the seat d oes not strike
the rear passenger or squeeze
your body again st the steering
wheel.
Registering/recall/cancel-
ing a driving position to
an electronic key (mem-
ory recall function)
Page 141 of 556
1414-4. Adjusting the steering wheel and mirrors
Owners Manual_USA_M62084_en
4
Before driving
4-4.Adjusting the steering wheel and mirrors
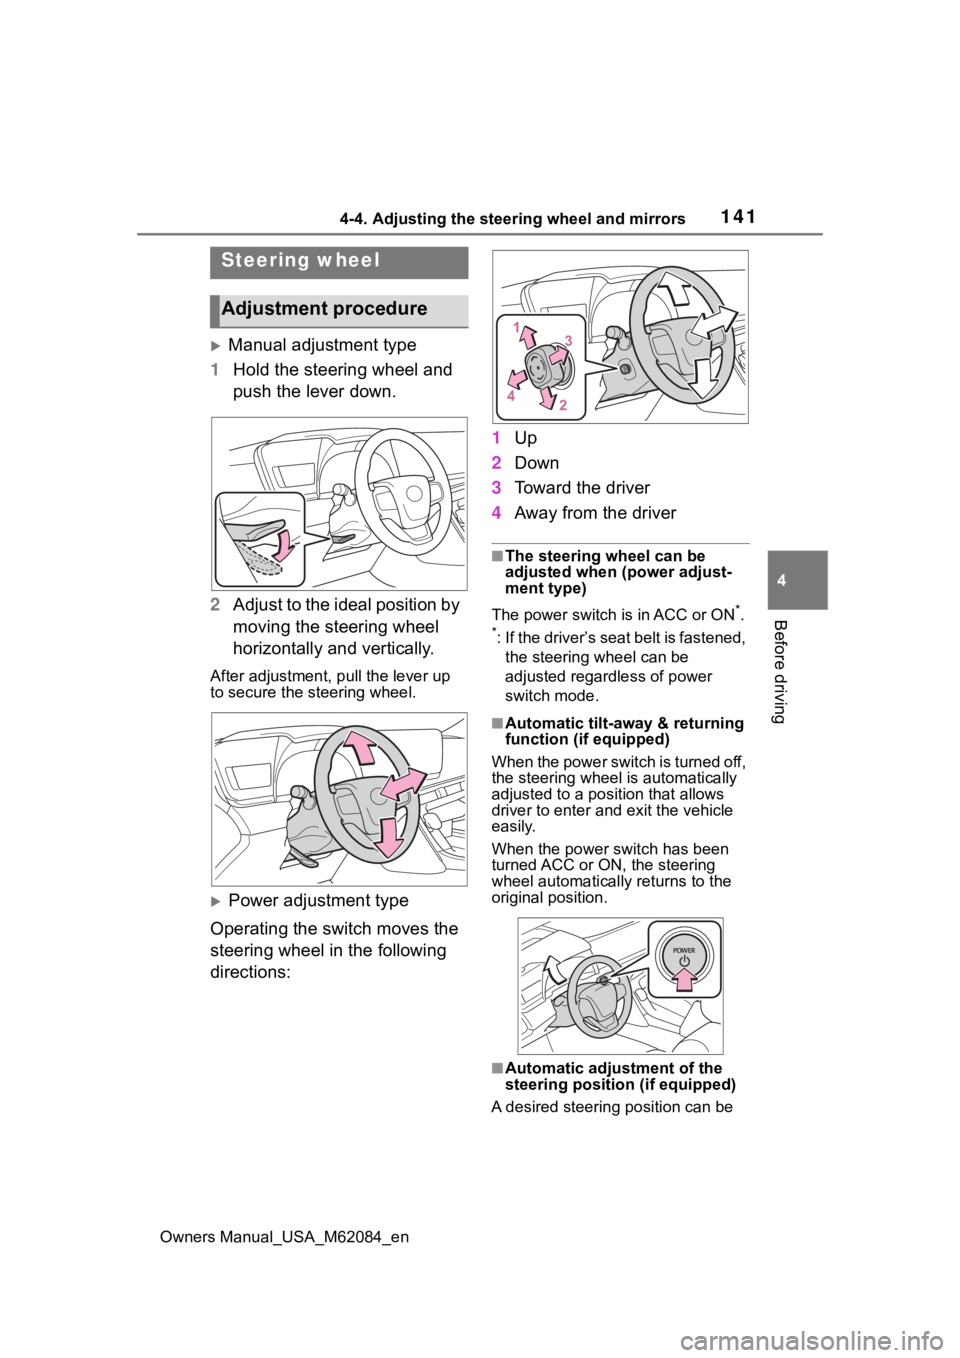
Manual adjustment type
1 Hold the steering wheel and
push the lever down.
2 Adjust to the ideal position by
moving the steering wheel
horizontally and vertically.
After adjustment, pull the lever up
to secure the steering wheel.
Power adjustment type
Operating the switch moves the
steering wheel in the following
directions: 1
Up
2 Down
3 Toward the driver
4 Away from the driver
■The steering wheel can be
adjusted when (power adjust-
ment type)
The power switch is in ACC or ON
*.
*: If the driver’s seat belt is fastened, the steering wheel can be
adjusted regardless of power
switch mode.
■Automatic tilt-away & returning
function (if equipped)
When the power switch is turned off,
the steering wheel is automatically
adjusted to a posit ion that allows
driver to enter and exit the vehicle
easily.
When the power switch has been
turned ACC or ON, the steering
wheel automatically returns to the
original position.
■Automatic adjustment of the
steering positi on (if equipped)
A desired steering position can be
Steering wheel
Adjustment procedure
Page 142 of 556
1424-4. Adjusting the steering wheel and mirrors
Owners Manual_USA_M62084_enentered to memory and recalled
automatically by the driving position
memory system. (
P.136)
■Power easy access system (if
equipped)
The steering wheel and driver’s seat
move in accordance with power
switch mode and the driver’s seat
belt condition. ( P.136)
■After adjusting the steering
wheel (manual adjustment type)
Make sure that the steering wheel is
securely locked.
The horn may not sound if the steer-
ing wheel is not securely locked.
■Customization
Some functions can be customized.
( P.498)
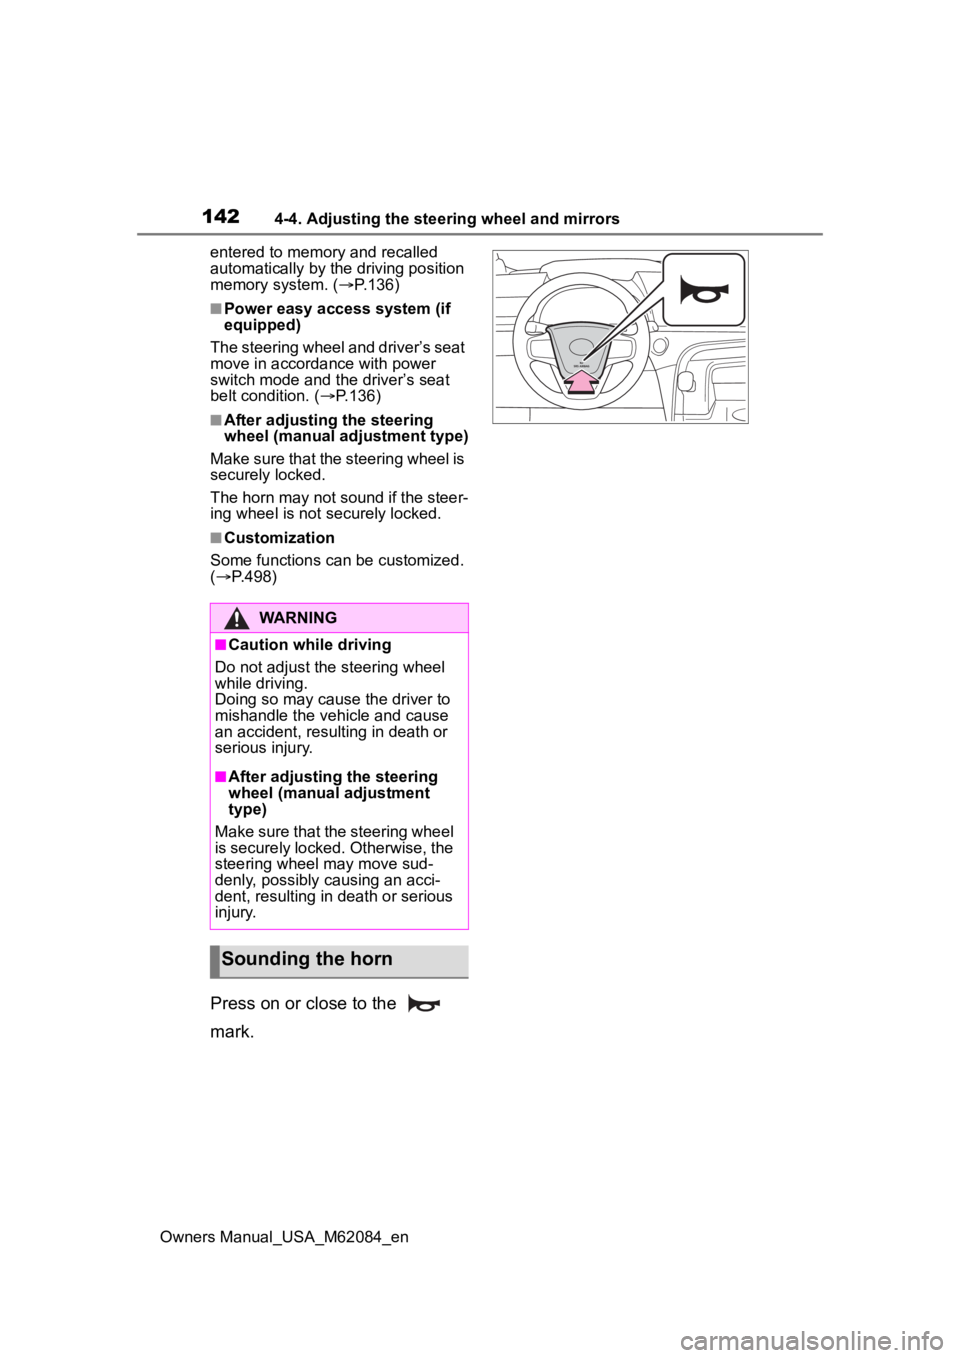
Press on or close to the
mark.
WARNING
■Caution while driving
Do not adjust the steering wheel
while driving.
Doing so may cause the driver to
mishandle the vehicle and cause
an accident, resul ting in death or
serious injury.
■After adjusting the steering
wheel (manual adjustment
type)
Make sure that the steering wheel
is securely locked. Otherwise, the
steering wheel may move sud-
denly, possibly causing an acci-
dent, resulting in death or serious
injury.
Sounding the horn