2022 TOYOTA HIGHLANDER warning light
[x] Cancel search: warning lightPage 466 of 568

4667-2. Steps to take in an emergency
Your vehicle has also been
equipped with a TPMS (tire pres-
sure warning system) malfunc-
tion indicator to indicate when the
system is not opera ting properly.
The TPMS (tire pressure warning
system) malfunction indicator is
combined with the low tire pres-
sure telltale (tire pressure warning
light). When the system detects a
malfunction, the telltale will flash
for approximately one minute and
then remain continuously illumi-
nated. This sequence will con-
tinue upon subsequent vehicle
start-ups as long as the malfunc-
tion exists. When the malfunction
indicator is illuminated, the sys-
tem may not be able to detect or
signal low tire pressure as
intended.
TPMS (tire pressure warning sys-
tem) malfunctions may occur for a
variety of reasons, including the
installation of replacement or
alternate tires or wheels on the
vehicle that prevent the TPMS
(tire pressure warning system)
from functioning properly. Always
check the TPMS (tire pressure
warning system) malfunction tell-
tale after replacing one or more
tires or wheels on your vehicle to
ensure that the r eplacement or
alternate tires and wheels allow
the TPMS (tire pressure warning
system) to continue to function
properly.
NOTICE
■To ensure the tire pressure
warning system operates
properly
Do not install tires with different
specifications or makers, as the
tire pressure warning system may
not operate properly.
If a war ning message
is displayed
The multi-information dis-
play shows warnings of sys-
tem malfunctions,
incorrectly performed oper-
ations, and messages that
indicate a need for mainte-
nance. When a message is
shown, perform the correc-
tion procedure appropriate
to the message.
Additionally, if a warning
light comes on or flashes at
the same time that a warn-
ing message is displayed,
take the appropriate correc-
tive action for the warning
light. ( P.456)
If a warning message is dis-
played again after the
appropriate actions have
been performed, contact
your Toyota dealer.
Page 467 of 568

4677-2. Steps to take in an emergency
7
When trouble arises
The warning lights and warning buzzers operate as follows depend-
ing on the content of the message. If a message indicates the need
for inspection by a dealer, have the vehicle inspected by your To y o t a
dealer immediately.
*: A buzzer sounds the first time a message is shown on the multi-informa-
tion display.
■Warning messages
The warning messages explained
below may differ from the actual
messages according to operation
conditions and vehicle specifica-
tions.
■Warning buzzer
In some cases, the buzzer may not
be heard due to being in a noisy
location or audio sound.
■If “Engine Oil Level Low Add or
Replace” is displayed
The engine oil level is low. Check
the level of the engine oil, and add if
necessary.
This message may appear if the
vehicle is stopped on a slope. Move
the vehicle to a l evel surface and
check to see if the message disap-
pears.
Messages and warnings
Warning lightWarning
buzzer
*Warning
-Sounds
Indicates an important situation, such as
when a system relate d to driving is mal-
functioning or that danger may result if
the correction procedure is not per-
formed
Indicates a situation, such as when dam-
age to the vehicle or danger may result
Comes on or
flashesSounds
Indicates an importan t situation, such as
when the systems shown on the
multi-information display may be malfunc-
tioning
-Does not sound
Indicates a condition, such as malfunc-
tion of electrical components, their condi-
tion, or indicates the need for
maintenance
Indicates a situatio n, such as when an
operation has been performed incor-
rectly, or indicates how to perform an
operation correctly
Page 476 of 568

4767-2. Steps to take in an emergency
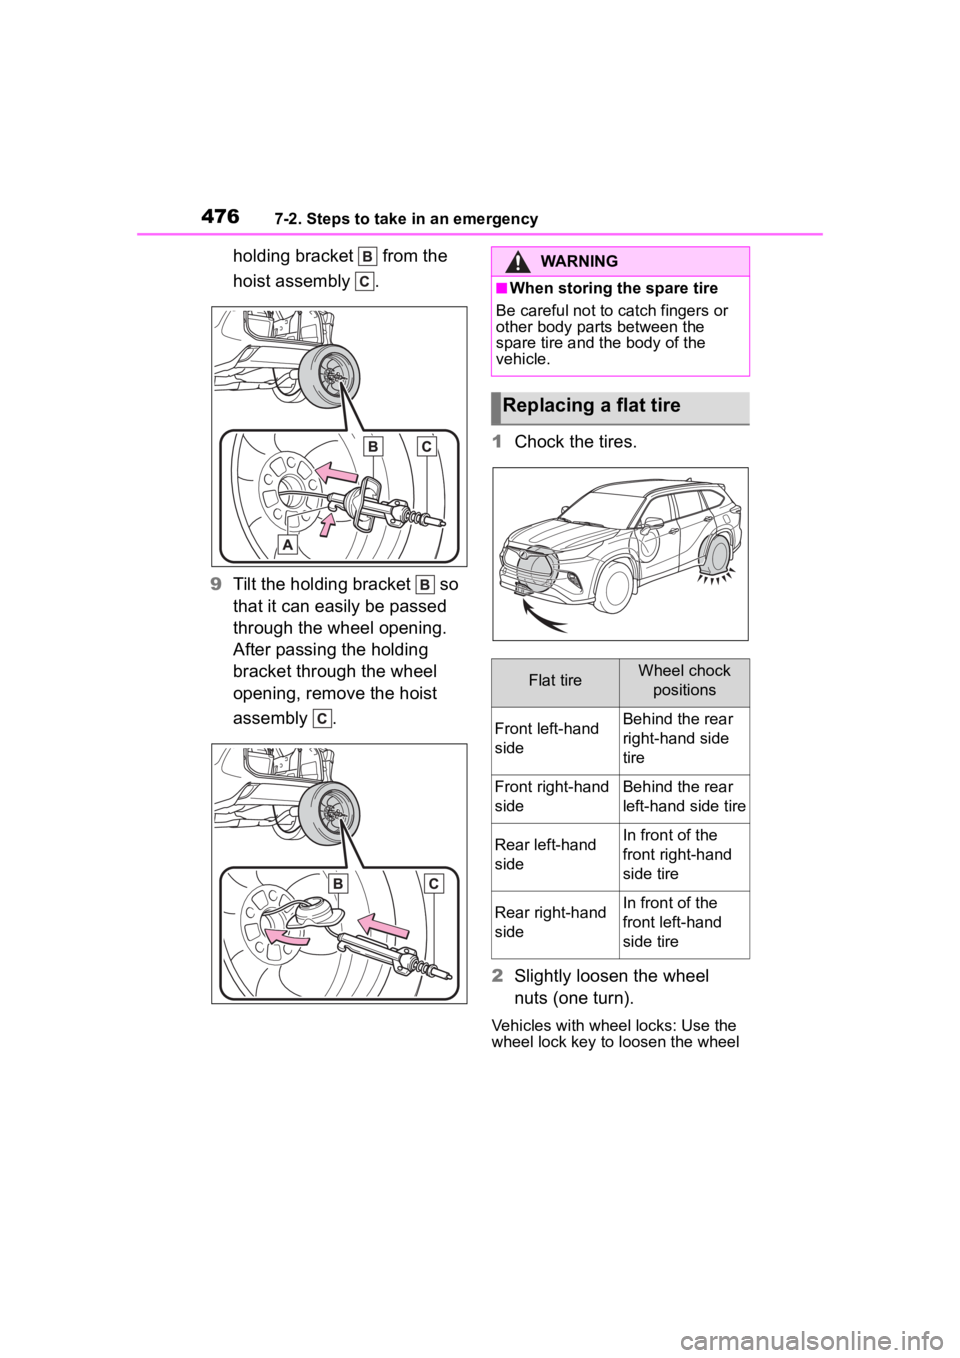
holding bracket from the
hoist assembly .
9 Tilt the holding bracket so
that it can easily be passed
through the wheel opening.
After passing the holding
bracket through the wheel
opening, remove the hoist
assembly . 1
Chock the tires.
2 Slightly loosen the wheel
nuts (one turn).
Vehicles with wheel locks: Use the
wheel lock key to loosen the wheel
WARNING
■When storing the spare tire
Be careful not to catch fingers or
other body parts between the
spare tire and the body of the
vehicle.
Replacing a flat tire
Flat tireWheel chock
positions
Front left-hand
sideBehind the rear
right-hand side
tire
Front right-hand
sideBehind the rear
left-hand side tire
Rear left-hand
sideIn front of the
front right-hand
side tire
Rear right-hand
sideIn front of the
front left-hand
side tire
Page 481 of 568

4817-2. Steps to take in an emergency
7
When trouble arises
near where the wire cable is
hanging from.)
Valve stem
6 Using the jack handle and
adapter socket, tighten the
tire clamp bolt by turning it
clockwise until the tire is in
the correct position and two
clicks are heard as the jack
handle skips.
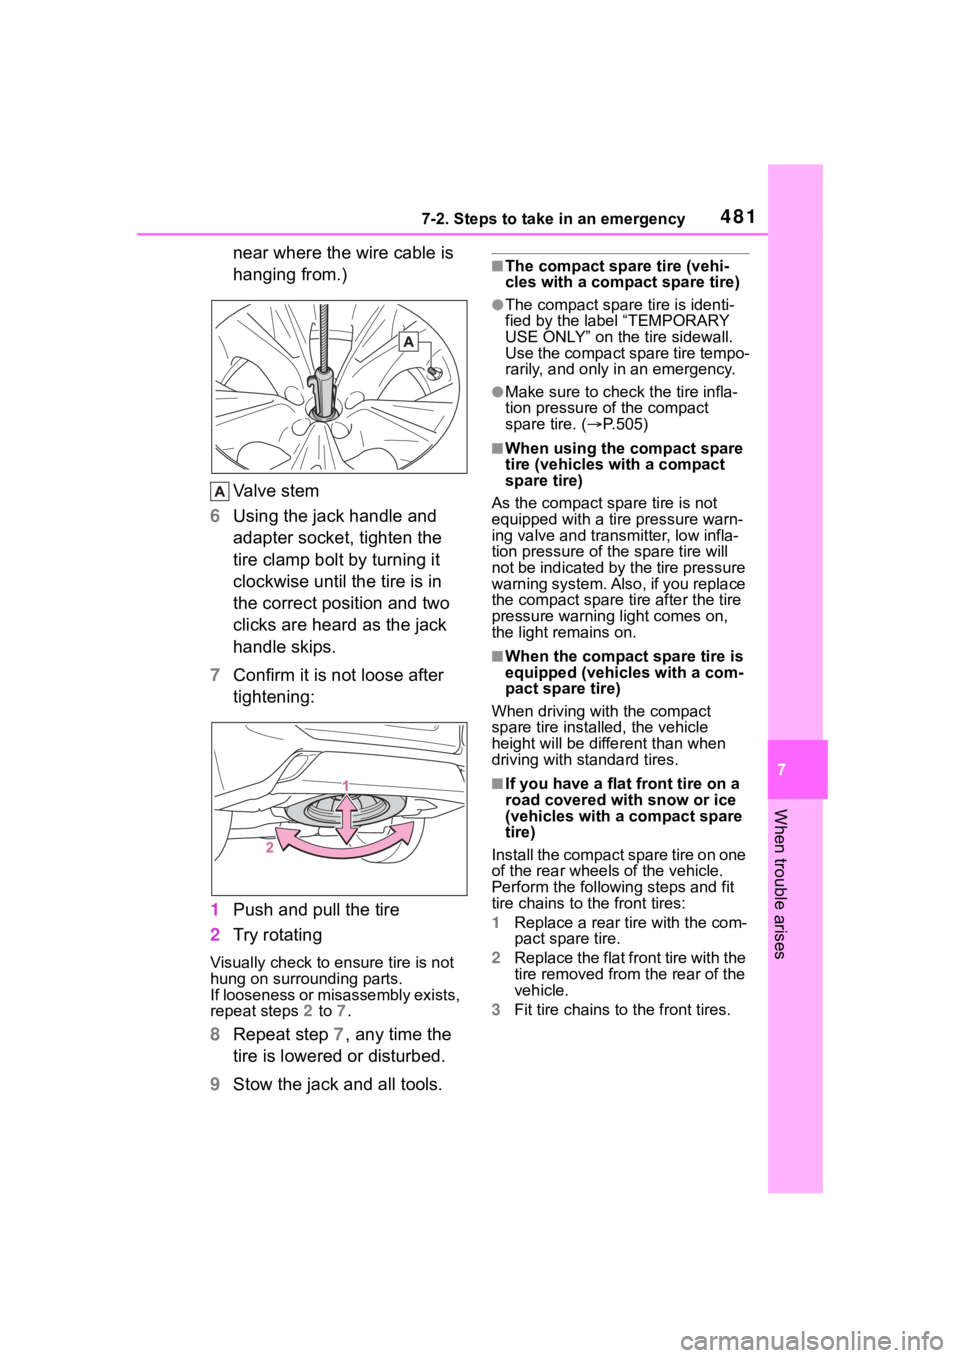
7 Confirm it is not loose after
tightening:
1 Push and pull the tire
2 Try rotating
Visually check to ensure tire is not
hung on surrounding parts.
If looseness or misassembly exists,
repeat steps 2 to 7.
8 Repeat step 7, any time the
tire is lowered or disturbed.
9 Stow the jack and all tools.
■The compact spare tire (vehi-
cles with a compact spare tire)
●The compact spare tire is identi-
fied by the label “TEMPORARY
USE ONLY” on the tire sidewall.
Use the compact spare tire tempo-
rarily, and only in an emergency.
●Make sure to check the tire infla-
tion pressure of the compact
spare tire. ( P.505)
■When using the compact spare
tire (vehicles with a compact
spare tire)
As the compact spare tire is not
equipped with a tire pressure warn-
ing valve and transm itter, low infla-
tion pressure of t he spare tire will
not be indicated by the tire pressure
warning system. Also , if you replace
the compact spare ti re after the tire
pressure warning light comes on,
the light remains on.
■When the compact spare tire is
equipped (vehicles with a com-
pact spare tire)
When driving with the compact
spare tire installed, the vehicle
height will be diffe rent than when
driving with standard tires.
■If you have a flat front tire on a
road covered wit h snow or ice
(vehicles with a compact spare
tire)
Install the compact spare tire on one
of the rear wheels of the vehicle.
Perform the following steps and fit
tire chains to the front tires:
1 Replace a rear tire with the com-
pact spare tire.
2 Replace the flat front tire with the
tire removed from the rear of the
vehicle.
3 Fit tire chains to the front tires.
Page 482 of 568

4827-2. Steps to take in an emergency
WARNING
■When using the compact
spare tire (vehicles with a
compact spare tire)
●Remember that the compact
spare tire provided is specifi-
cally designed for use with your
vehicle. Do not use your com-
pact spare tire on another vehi-
cle.
●Do not use more than one com-
pact spare tire simultaneously.
●Replace the compact spare tire
with a standard tire as soon as
possible.
●Avoid sudden acceleration,
abrupt steering, sudden brak-
ing and shifting operations that
cause sudden engine braking.
■When the compact spare tire
is attached (vehicles with a
compact spare tire)
The vehicle speed may not be
correctly detecte d, and the follow-
ing systems may not operate cor-
rectly:
• ABS & Brake assist
• VSC
• TRAC
• EPS
• Dynamic radar cruise control with full-speed range
• PCS (Pre-Collision System)
• LTA (Lane Tracing Assist)
• RSA (Road Sign Assist) (if equipped)
• Automatic High Beam
• AFS (Adaptive Front-lighting System) (if equipped)
• Tire pressure warning system
• Intuitive parking assist (if equipped)
• PKSB (Parking Support Brake) (if equipped)
• Toyota parking assist monitor (if equipped)
• Panoramic view monitor (if equipped)
• BSM (Blind Spot Monitor) (if equipped)
• Navigation system (if equipped)
Also, not only c an the following
system not be utilized fully, but it
may even negatively affect the
drive-train components:
• AWD system (AWD models)
■Speed limit when using the
compact spare tire (vehicles
with a compact spare tire)
Do not drive at speeds in excess
of 50 mph (80 km /h) when a com-
pact spare tire is installed on the
vehicle.
The compact spare tire is not
designed for driving at high
speeds. Failure to observe this
precaution may lead to an acci-
dent causing death or serious
injury.
■After using the tools and jack
Before driving, ma ke sure all the
tools and jack are securely in
place in their storage location to
reduce the possibility of personal
injury during a collision or sudden
braking.
Page 492 of 568

4927-2. Steps to take in an emergency
• If the 20 hour rate capacity is low,
even if the time period where the
vehicle is not used is a short time,
the battery may discharge and the
engine may not be able to start.
For details, consult your Toyota
dealer.
WARNING
■When removing the battery
terminals
Always remove the negative (-)
terminal first. If the positive (+) ter-
minal contacts any metal in the
surrounding area when the posi-
tive (+) terminal is removed, a
spark may occur, l eading to a fire
in addition to electrical shocks
and death or serious injury.
■When disconnecting the bat-
tery
Do not disconnect the negative (-)
terminal on the body side. The
disconnected negative (-) terminal
may touch the positive (+) termi-
nal, which may cause a short and
result in death or serious injury.
■Avoiding battery fires or
explosions
Observe the following precautions
to prevent accidentally igniting the
flammable gas that may be emit-
ted from the battery:
●Make sure each jumper cable is
connected to the correct termi-
nal and that it is not unintention-
ally in contact with any other
than the intended terminal.
●Do not allow the other end of
the jumper cable connected to
the “+” terminal to come into
contact with any other parts or
metal surfaces in the area, such
as brackets or unpainted metal.
●Do not allow the + and - clamps
of the jumper cables to come
into contact with each other.
●Do not smoke, use matches,
cigarette lighter s or allow open
flame near the battery.
■Battery precautions
The battery contains poisonous
and corrosive acidic electrolyte,
while related parts contain lead
and lead compounds. Observe
the following precautions when
handling the battery:
●When working with the battery,
always wear safety glasses and
take care not to allow any bat-
tery fluids (acid) to come into
contact with skin, clothing or the
vehicle body.
●Do not lean over the battery.
●In the event that battery fluid
comes into contact with the skin
or eyes, immediately wash the
affected area with water and
seek medical attention. Place a
wet sponge or cloth over the
affected area until medical
attention can be received.
●Always wash your hands after
handling the battery support,
terminals, and other bat-
tery-related parts.
●Do not allow children near the
battery.
■When replacing the battery
●When the vent plug and indica-
tor are close to the hold down
clamp, the battery fluid (sulfuric
acid) may leak.
●For information regarding bat-
tery replacement, contact your
Toyota dealer.
Page 549 of 568

549What to do if... (Troubleshooting)
Is the engine switch in ON?
If you cannot release the shift lever
by depressing the brake pedal with
the engine switch in ON ( P.207)
Is the window lock switch
pressed?
The power window except for the
one at the driver’s seat cannot be
operated if the win dow lock switch
is pressed. ( P.169)
The auto power off function
will be operated if the vehicle
is left in ACC or ON (the
engine is not running) for a
period of time. ( P.205)
The seat belt reminder light is
flashing
Are the driver and the passengers
wearing the seat belts? ( P.459)
The parking brake indicator is
on
Is the parking brake released?
( P.210)
Depending on the situation,
other types of warning buzzer
may also sound. ( P.456, 467)
Did anyone inside the vehicle
open a door during setting the
alarm?
The sensor detects it and the alarm
sounds. ( P. 7 3 )
Do one of the following to stop
the alarms:
Unlock the doors.
Turn the engine switch to
ACC or ON, or start the
engine.
Is the message displayed on
the multi-information display?
Check the message on the
multi-informat ion display. (P.467)
When a warning light turns on
or a warning message is dis-
played, refer to P.456, 467.
The shift lever cannot be
shifted from P even if you
depress the brake pedal
The windows do not open
or close by operating the
power window switches
The engine switch is
turned off automatically
A warning buzzer sounds
during driving
An alarm is activated and
the horn sounds (vehicles
with an alarm)
A warning buzzer sounds
when leaving the vehicle
A warning light turns on
or a warning message is
displayed
Page 551 of 568

551Alphabetical Index
Alphabetical Index
A
A/C ................................... 334, 339Air conditioning filter ............. 432
Automatic air conditioning sys-tem ..................................... 339
Eco air conditioning mode .... 346
Front seat concentrated airflow mode (S-FLOW) ................. 348
Manual air conditioning system ........................................... 334
Rear automatic air conditioning system ................................ 354
Rear manual air conditioning system ................................ 352
ABS (Anti-lock Brake System) ............................................... 318Warning light ........................ 458
ACA (Active Cornering Assist) ............................................... 318
Active Cornering Assist (ACA) ............................................... 318
Adaptive Front-lighting System (AFS)...................................... 218
AFS (Adaptive Front-lighting System) ................................. 218
AHB (Automatic High Beam) . 219
Air conditioning filter ............. 432
Air conditioning system 334, 339 Air conditioning filter ............. 432
Automatic air conditioning sys-tem ..................................... 339
Eco air conditioning mode .... 346
Front seat concentrated airflow mode (S-FLOW) ................. 348
Manual air conditioning system ........................................... 334
Rear automatic air conditioning system ................................ 354
Rearmanual air conditioning sys- tem ..................................... 352 Airbags
Airbag operating conditions ....36
Airbag precautions for your child.............................................39
Correct driving posture ...........25
Curtain shield airbag operating conditions .............................37
Curtain shield air bag precautions
.............................................39
Front passenger occupant clas- sification system ...................43
General airbag precautions ....39
Locations of airbags ...............34
Modification and disposal of air- bags......................................42
Side airbag operating conditions .............................................37
Side airbag precautions..........39
Side and curtain shield airbags operating conditions .............37
Side and curtain shield airbags precautions ...........................39
SRS airbags ...........................34
SRS warning light .................457
Alarm .........................................73 Warning buzzer ....................456
Anchor brackets ... ..............52, 62
Antennas (smart key system)133
Anti-lock Brake System (ABS) ...............................................318Warning light.........................458
Approach warning ..................264
Armrest ......... ......................... ..381
Assist grips .............................381
Audio system-linked display .88, 97
Automatic air conditioning sys- tem .........................................339Eco air conditioning mode ....346
Automatic headlight leveling system ...................................217
Automatic High Beam ............219