Page 329 of 678
327
5
5-1. Basic Operations
Audio system
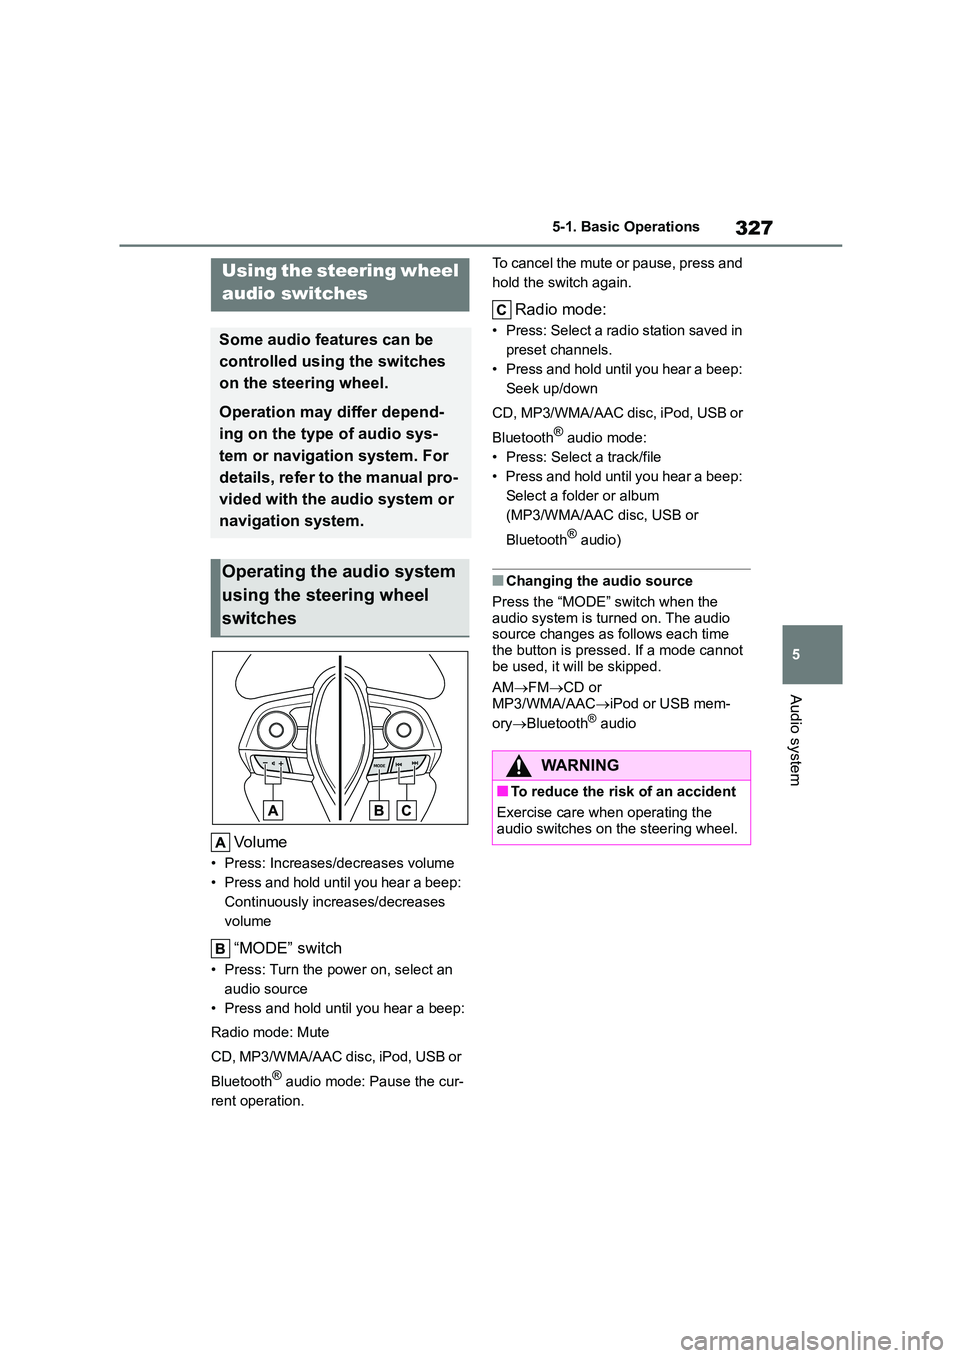
Volume
• Press: Increases/decreases volume
• Press and hold until you hear a beep:
Continuously increases/decreases
volume
“MODE” switch
• Press: Turn the power on, select an
audio source
• Press and hold until you hear a beep:
Radio mode: Mute
CD, MP3/WMA/AAC disc, iPod, USB or
Bluetooth® audio mode: Pause the cur-
rent operation.
To cancel the mute or pause, press and
hold the switch again.
Radio mode:
• Press: Select a radi o station saved in
preset channels.
• Press and hold until you hear a beep:
Seek up/down
CD, MP3/WMA/AAC disc, iPod, USB or
Bluetooth® audio mode:
• Press: Select a track/file
• Press and hold until you hear a beep:
Select a folder or album
(MP3/WMA/AAC disc, USB or
Bluetooth® audio)
■Changing the audio source
Press the “MODE” switch when the
audio system is turned on. The audio source changes as follows each time
the button is pressed. If a mode cannot
be used, it will be skipped.
AM FMCD or
MP3/WMA/AAC iPod or USB mem-
ory Bluetooth® audio
Using the steering wheel
audio switches
Some audio features can be
controlled using the switches
on the steering wheel.
Operation may differ depend-
ing on the type of audio sys-
tem or navigation system. For
details, refer to the manual pro-
vided with the audio system or
navigation system.
Operating the audio system
using the steering wheel
switches
WA R N I N G
■To reduce the risk of an accident
Exercise care when operating the
audio switches on the steering wheel.
Page 331 of 678
329
5
5-2. Using the audio system
Audio system
5-2.Using the audio system
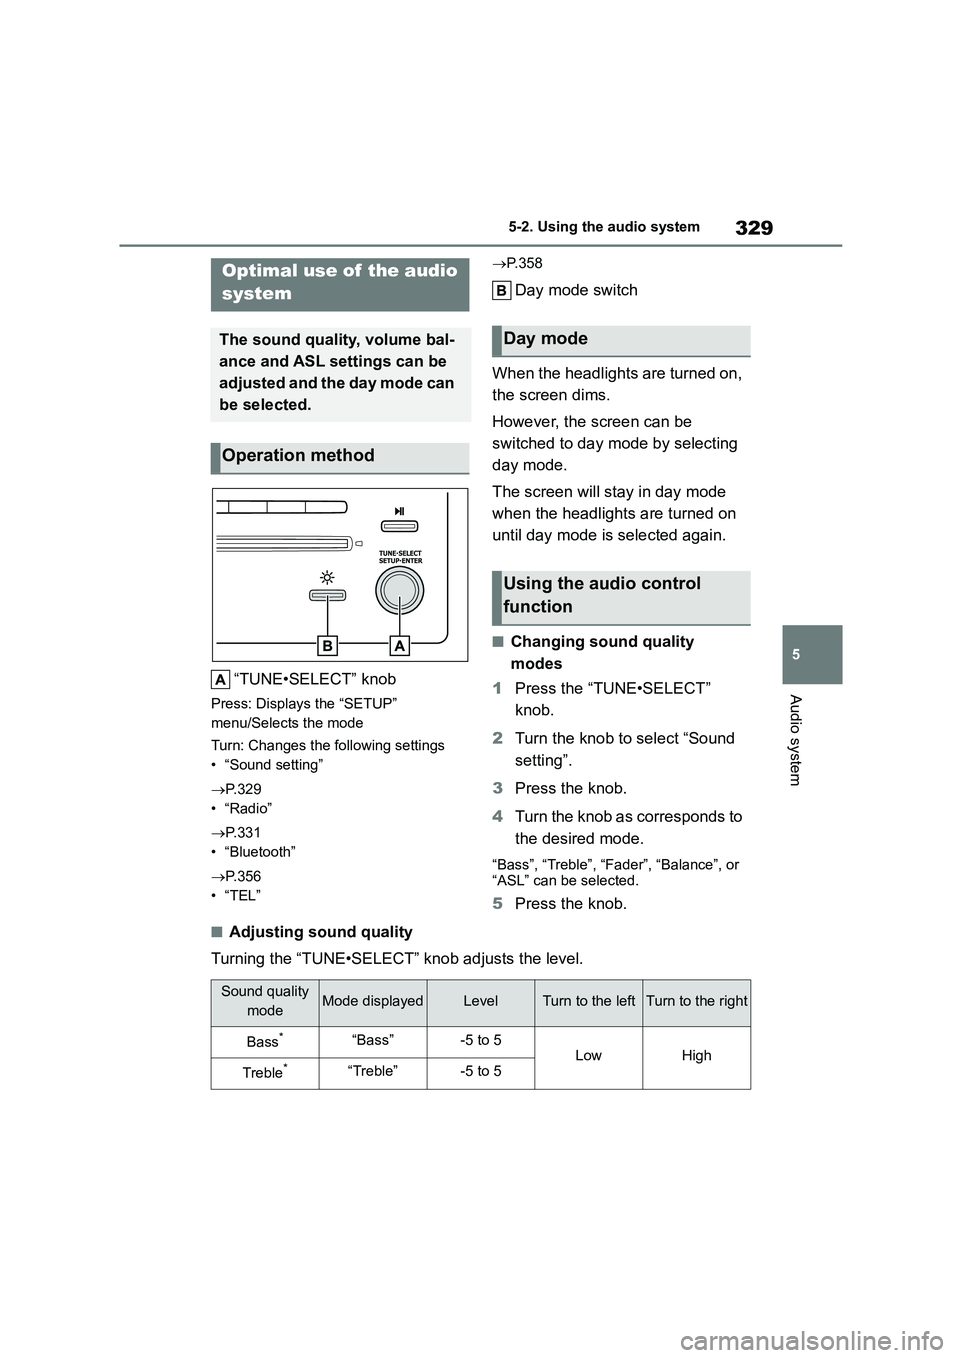
“TUNE•SELECT” knob
Press: Displays the “SETUP”
menu/Selects the mode
Turn: Changes the following settings
• “Sound setting”
P.329
•“Radio”
P.331
• “Bluetooth”
P.356
•“TEL”
P. 3 5 8
Day mode switch
When the headlights are turned on,
the screen dims.
However, the screen can be
switched to day mode by selecting
day mode.
The screen will stay in day mode
when the headlights are turned on
until day mode is selected again.
■Changing sound quality
modes
1 Press the “TUNE•SELECT”
knob.
2 Turn the knob to select “Sound
setting”.
3 Press the knob.
4 Turn the knob as corresponds to
the desired mode.
“Bass”, “Treble”, “Fader”, “Balance”, or
“ASL” can be selected.
5 Press the knob.
■Adjusting sound quality
Turning the “TUNE•SELECT” knob adjusts the level.
Optimal use of the audio
system
The sound quality, volume bal-
ance and ASL settings can be
adjusted and the day mode can
be selected.
Operation method
Day mode
Using the audio control
function
Sound quality
modeMode displayedLevelTurn to the leftTurn to the right
Bass*“Bass”-5 to 5LowHigh
Treble*“Treble”-5 to 5
Page 333 of 678
331
5
5-3. Using the radio
Audio system
5-3.Using the radio
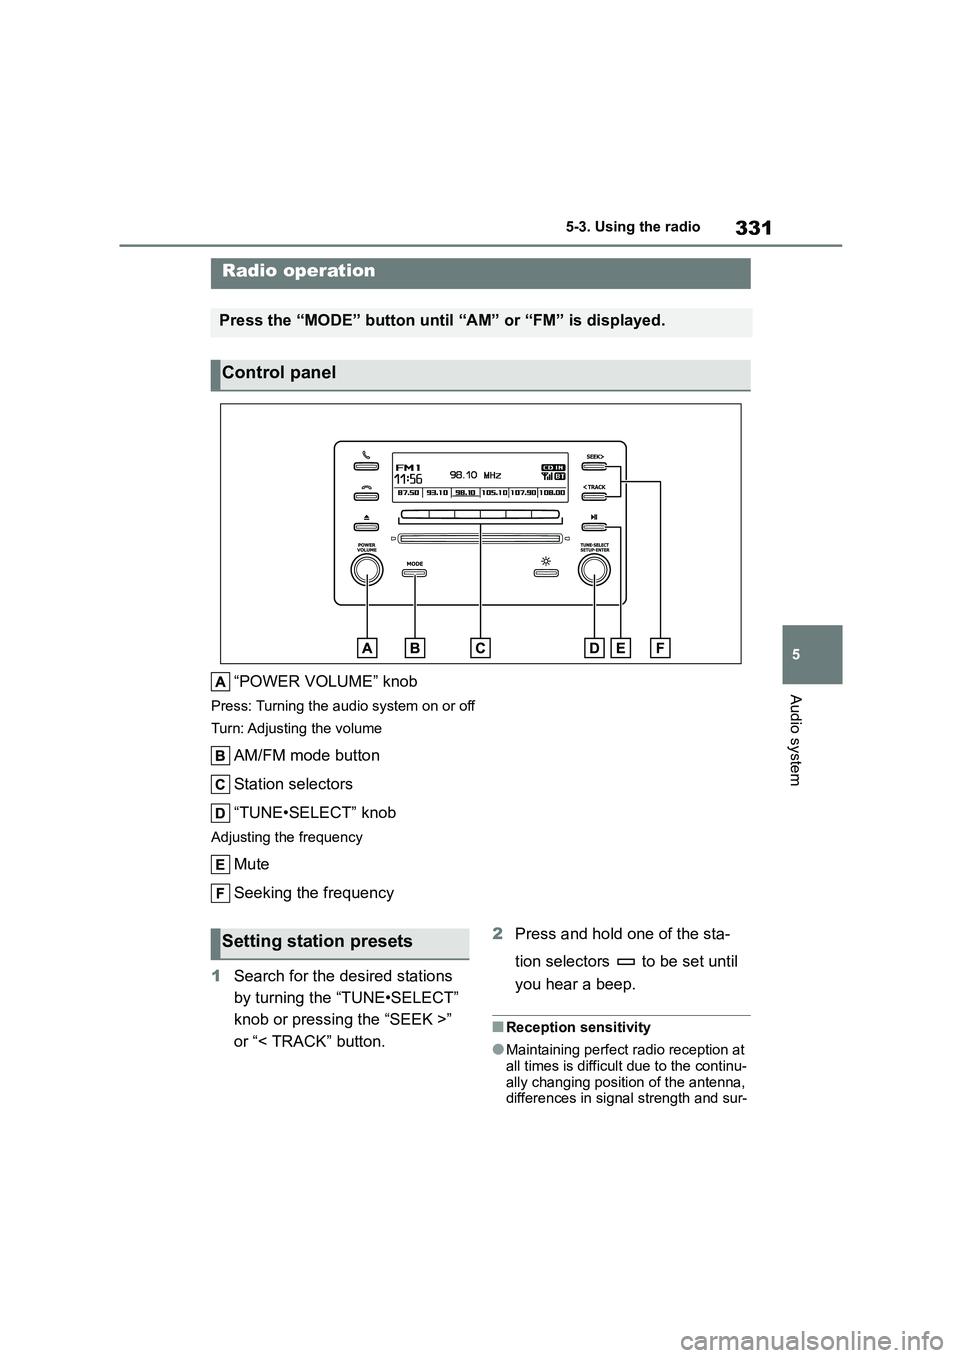
“POWER VOLUME” knob
Press: Turning the audio system on or off
Turn: Adjusting the volume
AM/FM mode button
Station selectors
“TUNE•SELECT” knob
Adjusting the frequency
Mute
Seeking the frequency
1 Search for the desired stations
by turning the “TUNE•SELECT”
knob or pressing the “SEEK >”
or “< TRACK” button.
2 Press and hold one of the sta-
tion selectors to be set until
you hear a beep.
■Reception sensitivity
●Maintaining perfect radio reception at
all times is difficult due to the continu-
ally changing position of the antenna, differences in signal strength and sur-
Radio operation
Press the “MODE” button until “AM” or “FM” is displayed.
Control panel
Setting station presets
Page 334 of 678
3325-3. Using the radio
rounding objects, such as trains,
transmitters, etc.
●The radio antenna is mounted inside
the rear window.
Page 342 of 678
3405-5. Using an external device
Pause/playback
Selecting a song, fast-forwarding or rewinding
1 Press (Browse) to select
iPod play mode.
2 Turning the “TUNE•SELECT”
knob clockwise changes the
play mode in the following order:
“Playlists” “Art-
ists” “Albums”“Songs”“Ge
nres” “Compos-
ers” “Radio”“Audiobooks”“
Podcasts” “iTunes U”
3 Press the knob to select the
desired play mode.
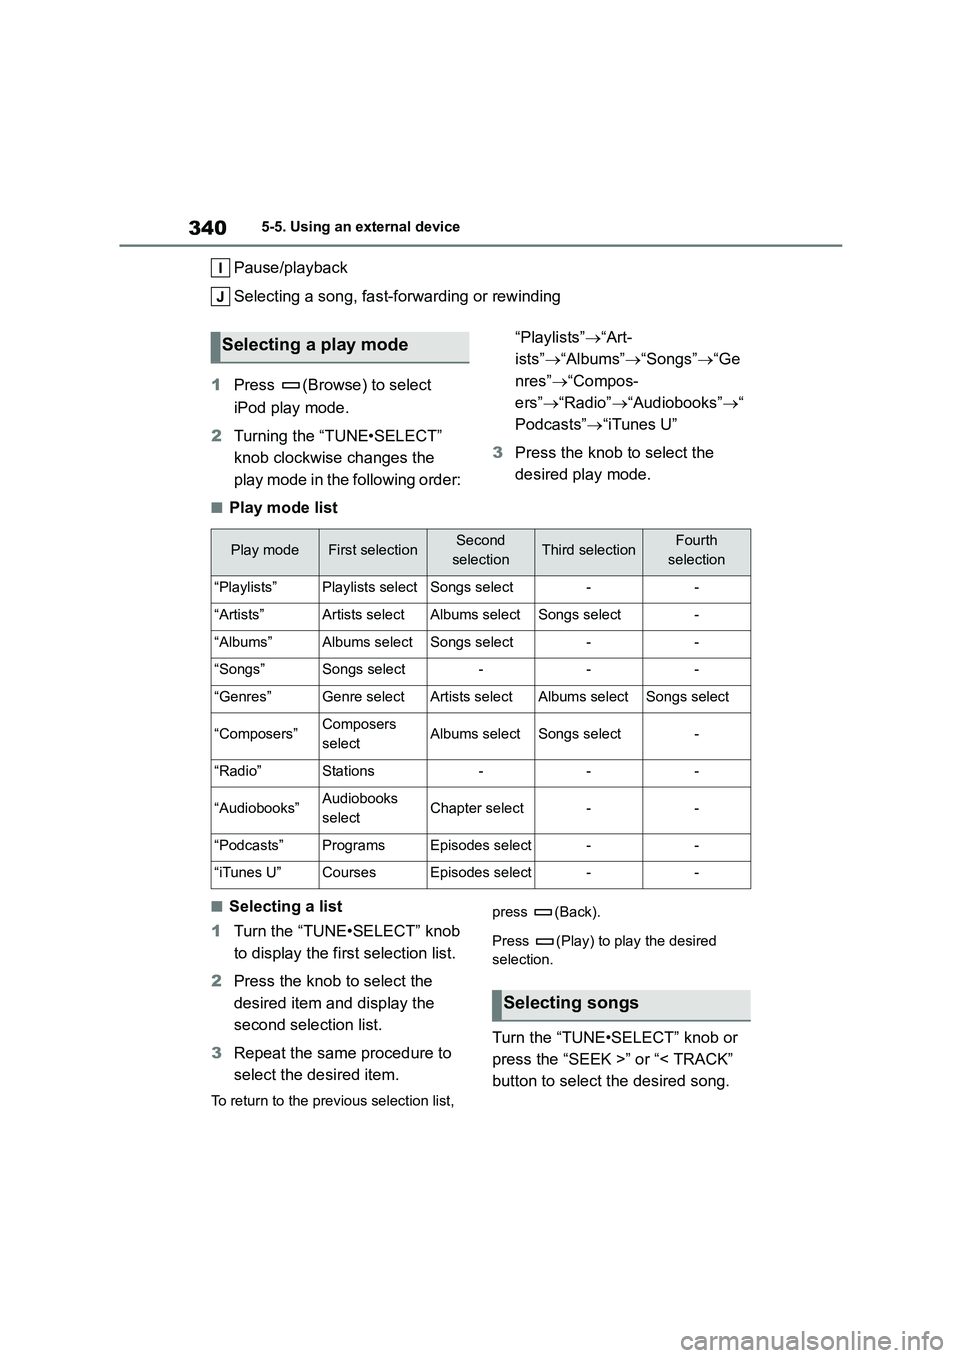
■Play mode list
■Selecting a list
1 Turn the “TUNE•SELECT” knob
to display the fi rst selection list.
2 Press the knob to select the
desired item and display the
second selection list.
3 Repeat the same procedure to
select the desired item.
To return to the previous selection list,
press (Back).
Press (Play) to play the desired
selection.
Turn the “TUNE•SELECT” knob or
press the “SEEK >” or “< TRACK”
button to select the desired song.
Selecting a play mode
Play modeFirst selectionSecond
selectionThird selectionFourth
selection
“Playlists”Playlists selectSongs select--
“Artists”Artists selectAlbums selectSongs select-
“Albums”Albums selectSongs select--
“Songs”Songs select---
“Genres”Genre selectArtists selectAlbums selectSongs select
“Composers”Composers
selectAlbums selectSongs select-
“Radio”Stations---
“Audiobooks”Audiobooks
selectChapter select--
“Podcasts”ProgramsEpisodes select--
“iTunes U”CoursesEpisodes select--
Selecting songs
Page 379 of 678
377
5
5-10. Bluetooth®
Audio system
WA R N I N G
■While driving
Do not operate the portable audio
player, cellular phone or connect a
device to the Bluetooth® system.
■Caution regarding interference with electronic devices
●Your audio unit is fitted with
Bluetooth® antennas. People with
implantable cardiac pacemakers, cardiac resynchronization ther-
apy-pacemakers or implantable
cardioverter defibrillators should
maintain a reasonable distance between themselves and the
Bluetooth® antennas. The radio
waves may affect the operation of such devices.
Page 380 of 678
3785-10. Bluetooth®
WA R N I N G
●Before using Bluetooth® devices,
users of any electrical medical
device other than implantable car- diac pacemakers, cardiac
resynchronization therapy-pace-
makers or implantable cardioverter defibrillators should consult the
manufacturer of the device for infor-
mation about its operation under the influence of radio waves. Radio
waves could have unexpected
effects on the operation of such medical devices.
NOTICE
■When leaving the vehicle
Do not leave your portable audio
player or cellular phone in the vehicle. The inside of the vehicle may become
hot, causing damage to the portable
audio player or cellular phone.
Page 406 of 678
4046-4. Other interior features
■The wireless charger can be oper-
ated when
The engine switch is in ACC or ON.
■Portable devices that can be
charged
●Portable devices compatible with the
Qi wireless charging standard can be
charged by the wireless charger. How- ever, compatibility with all devices
which meet the Qi wireless charging
standard is not guaranteed.
●The wireless charger is designed to
supply low power electricity (5 W or
less) to a cellular phone, smartphone, or other portable device.
■If a cover or accessory is attached
to the portable device
Do not charge a portable device if a cover or accessory which is not Qi com-
patible is attached. Depending on the
type of cover and/or accessory attached, it may not be possible to
charge the portable device. If the porta-
ble device is placed on the charging area and does not charge, remove the
cover and/or accessories.
■If interference is heard in AM radio
broadcasts while charging
Turn off the wireless charger and check
if the noise is reduced. If noise is
reduced, press and hold the power sup-
ply switch of the wireless charger for 2 seconds. The frequency of the wireless
charger is changed and noise may be
reduced. When the frequency is changed, the operation indicator light
will blink (orange) 2 times.
■Charging precautions
●If the electronic key cannot be
detected in the cabin, charging cannot
be performed. When a door is opened and closed, charging may be tempo-
rarily suspended.
●While charging, the wireless charger
and the portable device will become
warm. This is not a malfunction.If a portable
device becomes warm while charging
and charging stops due to the protec- tion function of the portable device,
wait until the portable device cools
down and charge it again.
■Sound generated during operation
When the power supply switch is turned on or while a portable device is being
identified, operation sounds may be
heard. This is not a malfunction.
■Cleaning the wireless charger
P. 4 1 3
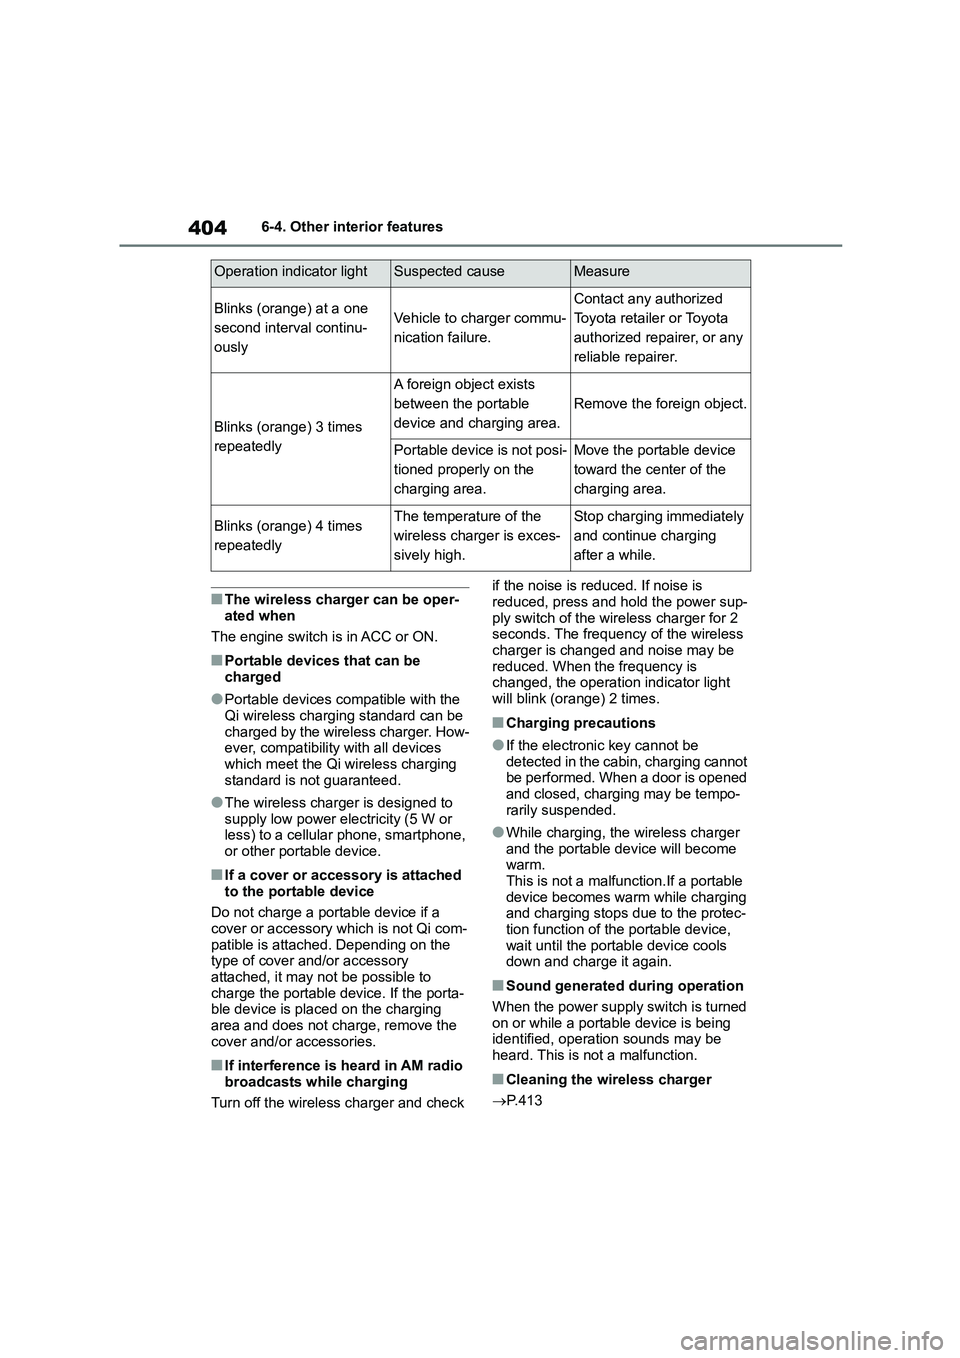
Operation indicator lightSuspected causeMeasure
Blinks (orange) at a one
second interval continu-
ously
Vehicle to charger commu-
nication failure.
Contact any authorized
Toyota retailer or Toyota
authorized repairer, or any
reliable repairer.
Blinks (orange) 3 times
repeatedly
A foreign object exists
between the portable
device and charging area.
Remove the foreign object.
Portable device is not posi-
tioned properly on the
charging area.
Move the portable device
toward the center of the
charging area.
Blinks (orange) 4 times
repeatedly
The temperature of the
wireless charger is exces-
sively high.
Stop charging immediately
and continue charging
after a while.