2022 TOYOTA COROLLA CROSS warning lights
[x] Cancel search: warning lightsPage 205 of 612
2054-5. Using the driving support systems
4
Driving
WARNING
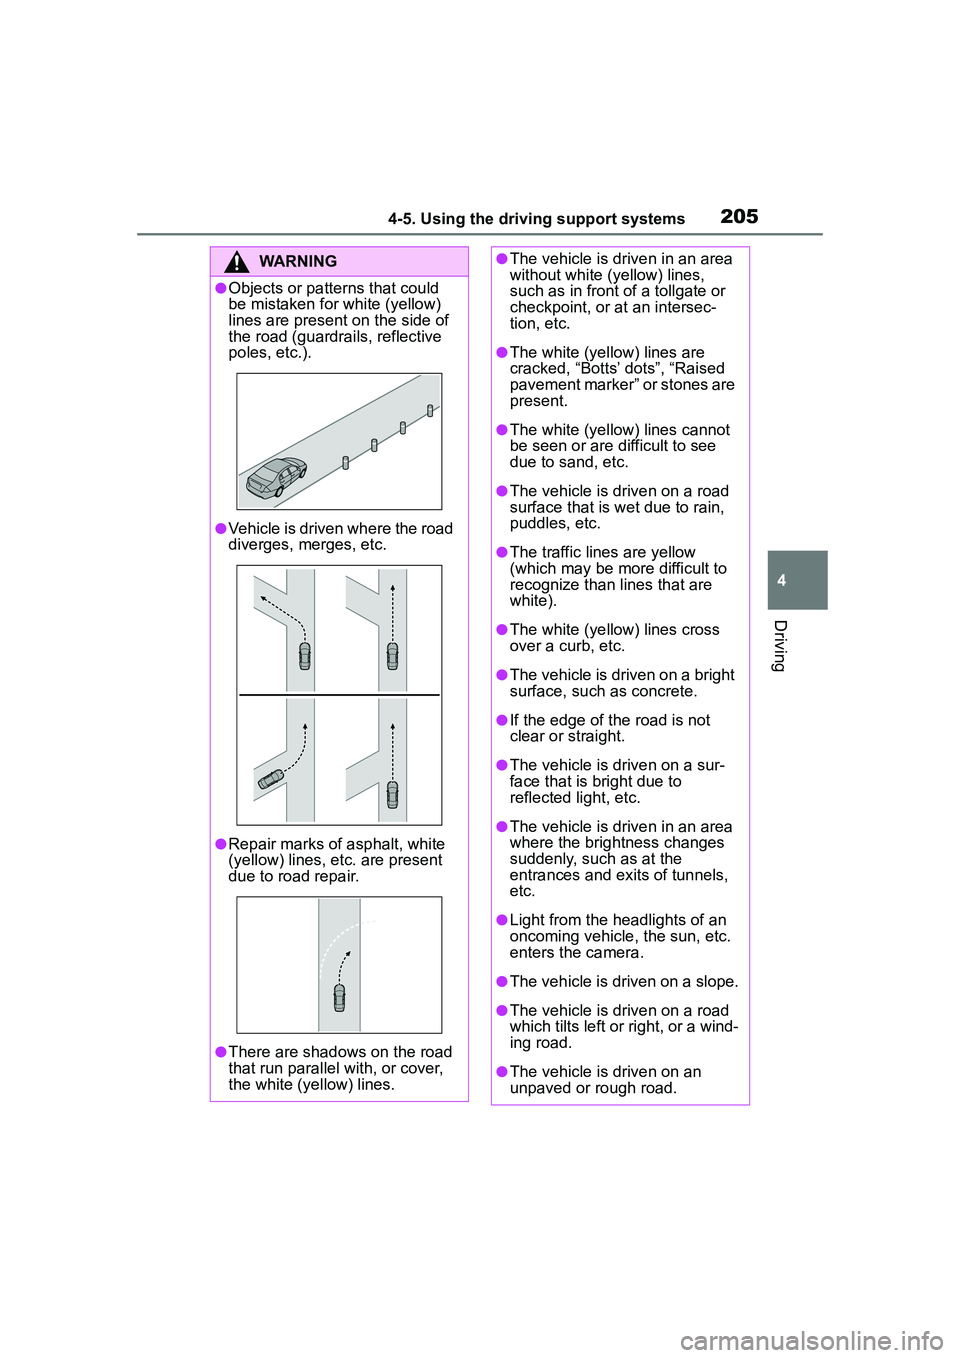
●Objects or patterns that could
be mistaken for white (yellow)
lines are present on the side of
the road (guardrails, reflective
poles, etc.).
●Vehicle is driven where the road
diverges, merges, etc.
●Repair marks of asphalt, white
(yellow) lines, etc. are present
due to road repair.
●There are shadows on the road
that run parallel with, or cover,
the white (yellow) lines.
●The vehicle is driven in an area
without white (yellow) lines,
such as in front of a tollgate or
checkpoint, or at an intersec-
tion, etc.
●The white (yellow) lines are
cracked, “Botts’ dots”, “Raised
pavement marker” or stones are
present.
●The white (yellow) lines cannot
be seen or are difficult to see
due to sand, etc.
●The vehicle is driven on a road
surface that is wet due to rain,
puddles, etc.
●The traffic lines are yellow
(which may be more difficult to
recognize than lines that are
white).
●The white (yellow) lines cross
over a curb, etc.
●The vehicle is driven on a bright
surface, such as concrete.
●If the edge of the road is not
clear or straight.
●The vehicle is driven on a sur-
face that is bright due to
reflected light, etc.
●The vehicle is driven in an area
where the brightness changes
suddenly, such as at the
entrances and exits of tunnels,
etc.
●Light from the headlights of an
oncoming vehicle, the sun, etc.
enters the camera.
●The vehicle is driven on a slope.
●The vehicle is driven on a road
which tilts left or right, or a wind-
ing road.
●The vehicle is driven on an
unpaved or rough road.
Page 206 of 612

2064-5. Using the driving support systems
■Lane departure alert func-
tion
When the system determines that the vehicle might depart
from its lane or course
*, a warn-
ing is displayed on the
multi-information display, and a
warning buzzer will sound to
alert the driver.
When the warning buzzer sounds,
check the area around your vehicle
and carefully operate the steering
wheel to move the vehicle back to
the center of the lane.
Vehicle with BSM: When the sys-
tem determines that the vehicle
might depart from its lane and that
the possibility of a collision with an
overtaking vehicle in the adjacent
lane is high, the lane departure
alert will operate even if the turn
signals are operating.
*: Boundary between asphalt and the side of the road, such as
grass, soil, or a curb
■Steering assist function
When the system determines
WARNING
●The traffic lane is excessively
narrow or wide.
●The vehicle is extremely tilted
due to carrying heavy luggage
or having improper tire pres-
sure.
●The distance to the preceding
vehicle is extremely short.
●The vehicle is moving up and
down a large amount due to
road conditions during driving
(poor roads or road seams).
●When driving in a tunnel or at
night with the headlights off or
when a headlight is dim due to
its lens being dirty or it being
misaligned.
●The vehicle is struck by a cross-
wind.
●The vehicle is affected by wind
from a vehicle driven in a
nearby lane.
●The vehicle has just changed
lanes or crossed an intersec-
tion.
●Tires which differ by structure,
manufacturer, brand or tread
pattern are used.
●When tires of a size other than
specified are installed.
●Snow tires, etc. are equipped.
●The vehicle is being driven at
extremely high speeds.
Functions included in LTA
system
Page 219 of 612

2194-5. Using the driving support systems
4
Driving
This mode employs a radar to detect the presence of vehicles up to
approximately 328 ft. (100 m) ahead, determines the current vehi-
cle-to-vehicle following distance, and operates to maintain a suitable
following distance from the vehicle ahead. The desired vehi-
cle-to-vehicle distance can also be set by operating the vehi-
cle-to-vehicle distance switch.
When driving on downhill slopes, the vehicle-to-vehicle distance may
become shorter.
Example of const ant speed cruising
When there are no vehicles ahead
The vehicle travels at the speed set by the driver.
Example of deceleration cruising and follow-up cruising
When a preceding vehicle driving slower than the set speed
appears
When a vehicle is detected running ahea d of you, the system automatically
decelerates your vehicle. When a greater reduction in vehicle speed is nec-
essary, the system applies the brakes (the stop lights will come on at this
time). The system will respond to ch anges in the speed of the vehicle
ahead in order to maintain the vehicle-to-vehicle distance set by the driver.
Approach warning warns you when the system cannot decelerate suffi-
ciently to prevent your vehicle from closing in on the vehicle ahead.
When the vehicle ahead of you stops, yo ur vehicle will also stop (vehicle is
stopped by system control). After the vehicle ahead starts off, pressing the
“+RES” switch or depressing the acce lerator pedal (start-off operation) will
resume follow-up cruising. If the start-of f operation is not performed, system
control continues to keep your vehicle stopped.
Driving in vehicle-to-vehicle distance control mode
Page 253 of 612

2534-5. Using the driving support systems
4
Driving
■The system can be operated
when
●The engine switch is in ON.
●Intuitive parking assist function is
on.
●The vehicle speed is less than
about 6 mph (10 km/h).
●A shift position other than P is
selected.
■Setting the buzzer volume
The buzzer volume can be adjusted
on the multi-info rmation display.
( P. 9 4 )
■If “Clean Parking Assist Sen-
sor” is displayed on the
multi-information display
A sensor may be covered with water
drops, ice, snow, dirt, etc. Remove
the water drops, ice, snow, dirt, etc.,
from the sensor to return the system
to normal.
If a sensor is dirty, the position of the
dirty sensor will be shown on the
display.
Due to ice forming on a sensor at
low temperatures, a warning mes-
sage may be displayed or the sen-
sor may not be able to detect an
object. Once the ice melts, the sys-
tem will return to normal.
If a warning message is displayed
even if the sensor is clean, there
may be a sensor malfunction. Have
the vehicle inspect ed by your Toyota
dealer.
■If “Parking Assist Unavailable”
is displayed on the multi-infor-
mation display
Water may be continuously flowing
over the sensor surf ace, such as in
a heavy rain. When the system
WARNING
●Do not attach a sticker or install
an electronic component, such
as a backlit license plate (espe-
cially fluorescent type), fog
lights, fender pole or wireless
antenna near a radar sensor.
●Do not subject the surrounding
area of the sensor to a strong
impact. If subjected to an
impact, have the vehicle
inspected by Toyota dealer. If
the front or rear bumper needs
to be emoved/installed or
replaced, contact a Toyota
dealer.
●Do not modify, disassemble or
paint the sensors.
●Do not attach a license plate
cover.
●Keep your tires properly
inflated.
■When to disable the function
In the following situations, disable
the function as it may operate
even though there is no possibility
of a collision.
●Failing to observe the warnings
above.
●A non-genuine Toyota suspen-
sion (lowered suspension, etc.)
is installed.
■Notes when washing the vehi-
cle
Do not apply intensive bursts of
water or steam to the sensor
area.
Doing so may result in the sensor
malfunctioning.
●When using a high pressure
washer to wash the vehicle, do
not spray the sensors directly,
as doing so may cause a sensor
to malfunction.
●When using steam to clean the
vehicle, do not direct steam too
close to the sensors as doing so
may cause a sensor to malfunc-
tion.
Page 270 of 612

2704-5. Using the driving support systems
conditions including normal driv-
ing, during cornering, on a
uphill, when starting off, during
acceleration, on a slippery roads
due to snow or rain, thus con-
tributing to stable operability and
driving stability.
■The Secondary Collision
Brake
When the SRS airbag sensor
detects a collision and the sys-
tem operates, the brakes and
brake lights are automatically
controlled to reduce the vehicle
speed and help reduce the pos-
sibility of further damage due to
a secondary collision.
■When the TRAC/VSC systems
are operating
The slip indicator light will flash
while the TRAC/VSC systems are
operating.
■Disabling the TRAC system
If the vehicle gets stuck in mud, dirt
or snow, the TRAC system may
reduce power from the engine to the
wheels. Pressing to turn the
system off may make it easier for
you to rock the vehicle in order to
free it.
To turn the TRAC system off, quickly
press and release .
The “Traction Control Turned OFF” will be shown on the multi-informa-
tion display.
Press again to turn the system
back on.
■Turning off both TRAC and VSC
systems
To turn the TRAC and VSC systems
off, press and hold for more
than 3 seconds while the vehicle is
stopped.
The VSC OFF indicator light will
come on and the “Traction Control
Turned OFF” will be shown on the
multi-information display.
*
Press again to turn the system
back on.
*: PCS will also be disabled (only Pre-Collision warning is avail-
able). The PCS warning light will
come on and a message will be
displayed on the multi-information
display. ( P.202)
■When the message is dis-
played on the mu lti-information
display showing that TRAC has
been disabled even if has
not been pressed
TRAC is temporary deactivated. If
the information continues to show,
contact your Toyota dealer.
■Operating conditions of
hill-start assist control
When the following four conditions
are met, the hill-start assist control
Page 429 of 612
4296-3. Using the storage features
6
Interior features
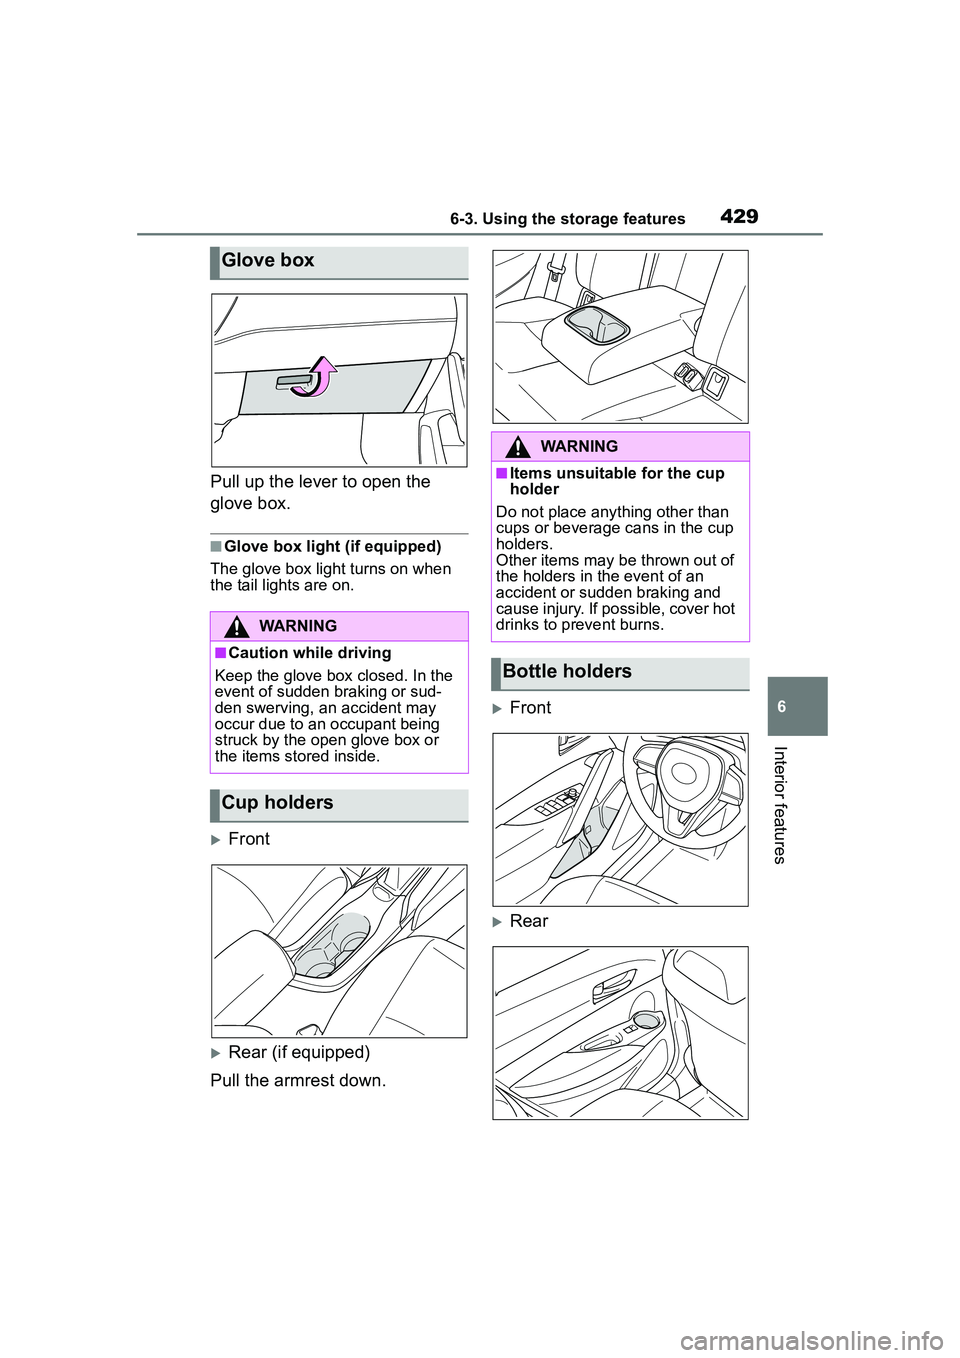
Pull up the lever to open the
glove box.
■Glove box light (if equipped)
The glove box light turns on when
the tail lights are on.
Front
Rear (if equipped)
Pull the armrest down.
Front
Rear
Glove box
WARNING
■Caution while driving
Keep the glove box closed. In the
event of sudden braking or sud-
den swerving, an accident may
occur due to an occupant being
struck by the open glove box or
the items stored inside.
Cup holders
WARNING
■Items unsuitable for the cup
holder
Do not place anything other than
cups or beverage cans in the cup
holders.
Other items may be thrown out of
the holders in the event of an
accident or sudden braking and
cause injury. If possible, cover hot
drinks to prevent burns.
Bottle holders
Page 447 of 612
4477-1. Maintenance and care
7
Maintenance and care
brakes several times to dry the
parts.
■Bumpers and side moldings (if
equipped)
Do not scrub with abrasive cleaners.
■Plated portions
If dirt cannot be removed, clean the
parts as follows:
●Use a soft cloth dampened with an
approximately 5% solution of neu-
tral detergent and water to clean
the dirt off.
●Wipe the surface with a dry, soft
cloth to remove any remaining
moisture.
●To remove oily deposits, use alco-
hol wet wipes or a similar product.
WARNING
■When washing the vehicle
Do not apply water to the inside of
the engine compartment. Doing
so may cause the electrical com-
ponents, etc. to catch fire.
■Precautions regarding the
exhaust pipe
Exhaust gasses cause the
exhaust pipe to become quite hot.
When washing the vehicle, be
careful not to touch the pipe until it
has cooled sufficiently, as touch-
ing a hot exhaust pipe can cause
burns.
■Precaution regarding the rear
bumper
If the paint of the rear bumper is
chipped or scratched, the follow-
ing systems may not function cor-
rectly. If this occurs, consult your
Toyota dealer.
●BSM (if equipped)
●RCTA (if equipped)
●PKSB (if equipped)
NOTICE
■To prevent paint deteriora-
tion and corrosion on the
body and components (alumi-
num wheels, etc.)
●Wash the vehicle immediately in
the following cases:
• After driving near the sea coast
• After driving on salted roads
• If coal tar or tree sap is present on the paint surface
• If dead insects, insect droppings or bird droppings are present on
the paint surface
• After driving in an area contami- nated with soot, oily smoke,
mine dust, iron powder or chem-
ical substances
• If the vehicle becomes heavily soiled with dust or mud
• If liquids such as benzene and gasoline are spilled on the paint
surface
●If the paint is chipped or
scratched, have it repaired
immediately.
●To prevent the wheels from cor-
roding, remove any dirt and
store in a place with low humid-
ity when storing the wheels.
■Cleaning the exterior lights
●Wash carefully. Do not use
organic substances or scrub
with a hard brush.
This may damage the surfaces
of the lights.
●Do not apply wax to the sur-
faces of the lights.
Wax may cause damage to the
lenses.
Page 494 of 612

4947-3. Do-it-yourself maintenance
2Remove the light bulb.
3 Install a new light bulb.
4 Install the lens.
Hooks
1 Fit the lens into either the right or left hooks.
2 Push the lens into place.
After installation, confirm that the
lens is properly in stalled by gently
pulling it.
WARNING
■To prevent injury
Before performing any light bulb
replacement procedure, be sure
to turn the engine switch off. Fail-
ure to do so may result in burns
from hot components or a part of
your body may get caught on an
operating component, possibly
causing serious injury.
■Replacing light bulbs
●Turn off the lights. Do not
attempt to replace the bulb
immediately after turning off the
lights. The bulbs become very
hot and may cause burns.
●Do not touch the glass portion
of the light bulb with bare
hands. When it is unavoidable
to hold the glass portion, use
and hold with a clean dry cloth
to avoid getting moisture and
oils on the bulb. Al so, if the bulb
is scratched or dropped, it may
blow out or crack.
●Fully install light bulbs and any
parts used to secure them. Fail-
ure to do so may result in heat
damage, fire, or water entering
the light unit. This may damage
the lights or cause condensa-
tion to build up on the lens.
■To prevent damage or fire
●Make sure bulbs are fully
seated and locked.
●Check the wattage of the bulb
before installing to prevent heat
damage.