2022 TESLA MODEL X change time
[x] Cancel search: change timePage 61 of 212
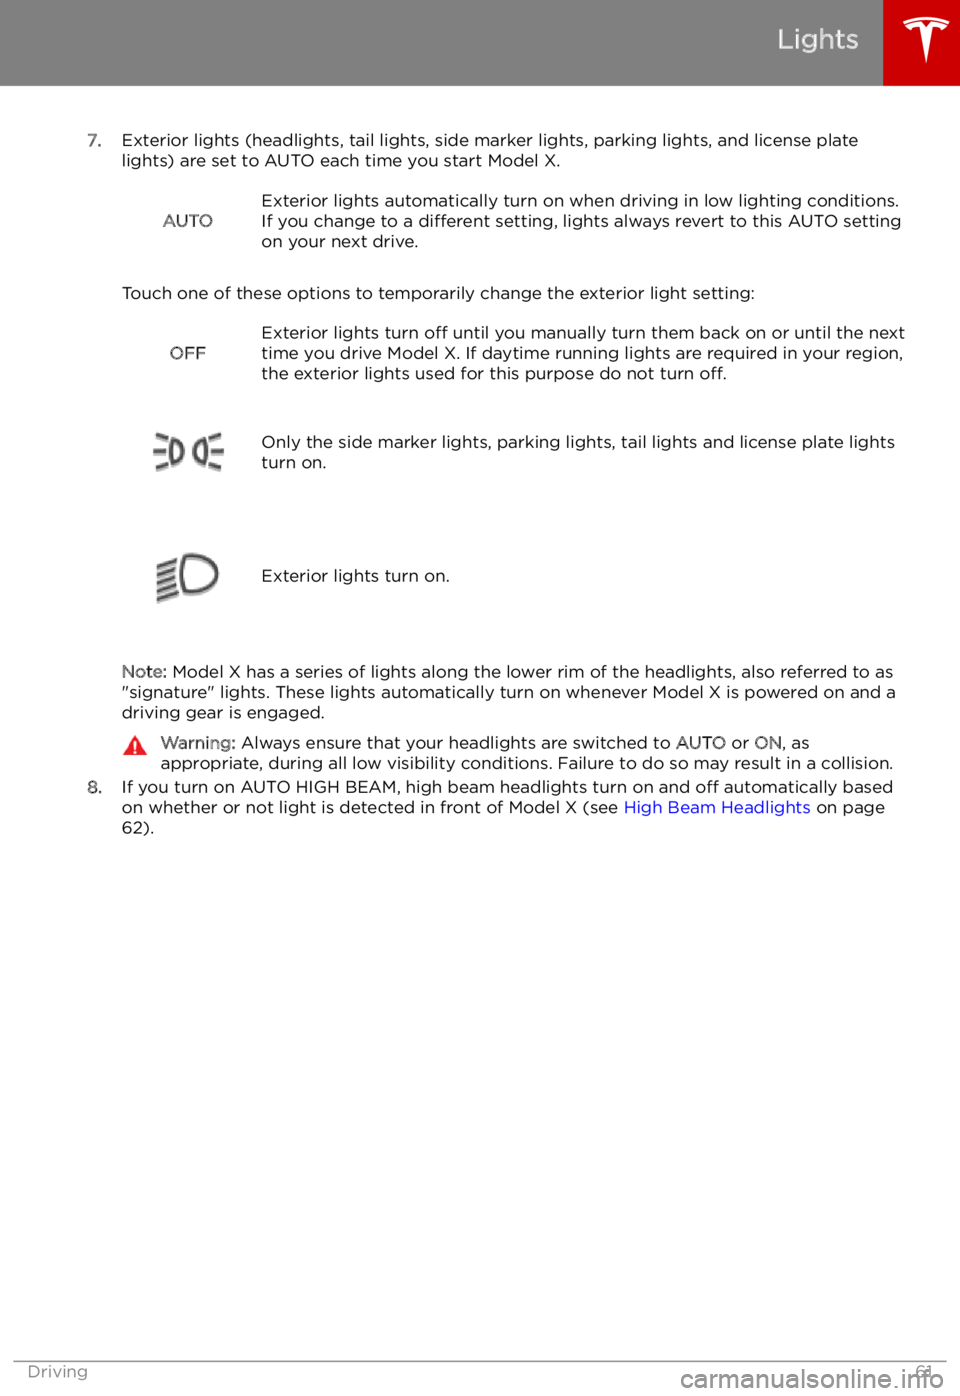
7.Exterior lights (headlights, tail lights, side marker lights, parking lights, and license plate
lights) are set to AUTO each time you start Model X.
AUTOExterior lights automatically turn on when driving in low lighting conditions.
If you change to a different setting, lights always revert to this AUTO setting
on your next drive.
Touch one of these options to temporarily change the exterior light setting:
OFFExterior lights turn off until you manually turn them back on or until the next
time you drive Model X. If daytime running lights are required in your region,
the exterior lights used for this purpose do not turn off.
Only the side marker lights, parking lights, tail lights and license plate lights
turn on.Exterior lights turn on.
Note: Model X has a series of lights along the lower rim of the headlights, also referred to as
"signature" lights. These lights automatically turn on whenever Model X is powered on and a driving gear is engaged.
Warning: Always ensure that your headlights are switched to AUTO or ON, as
appropriate, during all low visibility conditions. Failure to do so may result in a collision.
8. If you turn on AUTO HIGH BEAM, high beam headlights turn on and off automatically based
on whether or not light is detected in front of Model X (see High Beam Headlights on page
62).
Lights
Driving61
Page 66 of 212
Warning: In snowy or icy conditions
Model X may experience traction loss
during regenerative braking, particularly
when in the Standard setting and/or not
using winter tires. Tesla recommends
using the Low setting (see To Set the
Regenerative Braking Level on page 66)
in snowy or icy conditions to help maintain vehicle stability.
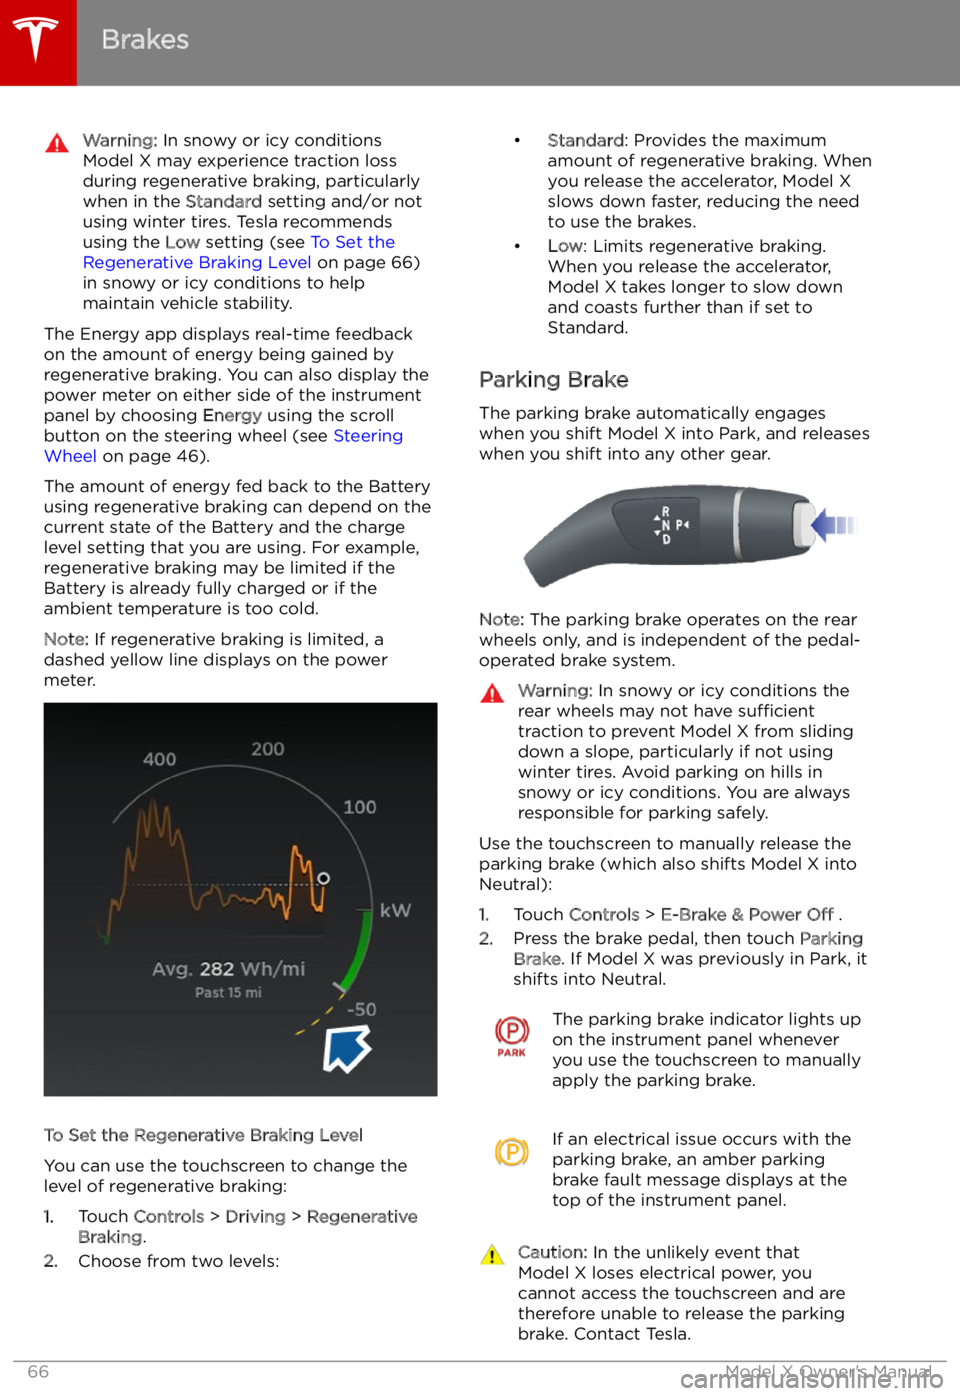
The Energy app displays real-time feedbackon the amount of energy being gained by
regenerative braking. You can also display the
power meter on either side of the instrument
panel by choosing Energy using the scroll
button on the steering wheel (see Steering
Wheel on page 46).
The amount of energy fed back to the Battery using regenerative braking can depend on the
current state of the Battery and the charge
level setting that you are using. For example,
regenerative braking may be limited if the Battery is already fully charged or if the
ambient temperature is too cold.
Note: If regenerative braking is limited, a
dashed yellow line displays on the power
meter.
To Set the Regenerative Braking Level
You can use the touchscreen to change the
level of regenerative braking:
1. Touch Controls > Driving > Regenerative
Braking .
2. Choose from two levels:
Page 99 of 212
Note: Auto Lane Change assists in moving
Model X one lane at a time. Moving into an
additional lane requires you to engage the
turn signal a second time after the first lane
change is complete.Warning: If Auto Lane Change aborts
during a lane change (for example, Auto
Lane Change cannot detect the outside
of the target lane midway through the
lane change), Model X returns to its
original driving lane.
When Auto Lane Change is active, it is
important to monitor its performance by
watching the driving path in front of you and
the surrounding area. Stay prepared to take
over steering at any time. As you are crossing
over into the adjacent lane, the instrument
panel displays the lane marking as a dashed
blue line. Once in your new lane, lane markings
are displayed as solid blue lines again.
In situations where Auto Lane Change is
unable to operate at optimal performance, or
cannot operate due to inadequate data, the
instrument panel displays a series of warnings.
Therefore, when using Auto Lane Change,
always pay attention to the instrument panel
and be prepared to manually steer Model X.
Warning: When Auto Lane Change is
actively assisting in steering Model X, the steering wheel moves accordingly.
Although you must have your hands on
the steering wheel, any significant
restriction of or force on the steering wheel
Page 128 of 212
Customizing Climate ControlThe climate control system is designed to automatically provide optimum comfort in most
situations. All you need to do is set the desired temperature, and the air conditioning, air
recirculation, air distribution, and fan speed automatically maintain your selected temperature. You can even keep the climate control system on while you are away from the vehicle so that the
selected temperature is maintained.
To override the automatic setting, touch FRONT or REAR to customize individual settings for the
front or rear seating areas. Then touch the setting you want to change. Touch RESET AUTO to
change all settings on the panel back to their defaults. Or, you can touch AUTO associated with
any individual setting to change it back to its default.
Note: Rear climate controls are available only if Model X is equipped with six or seven seating
positions.
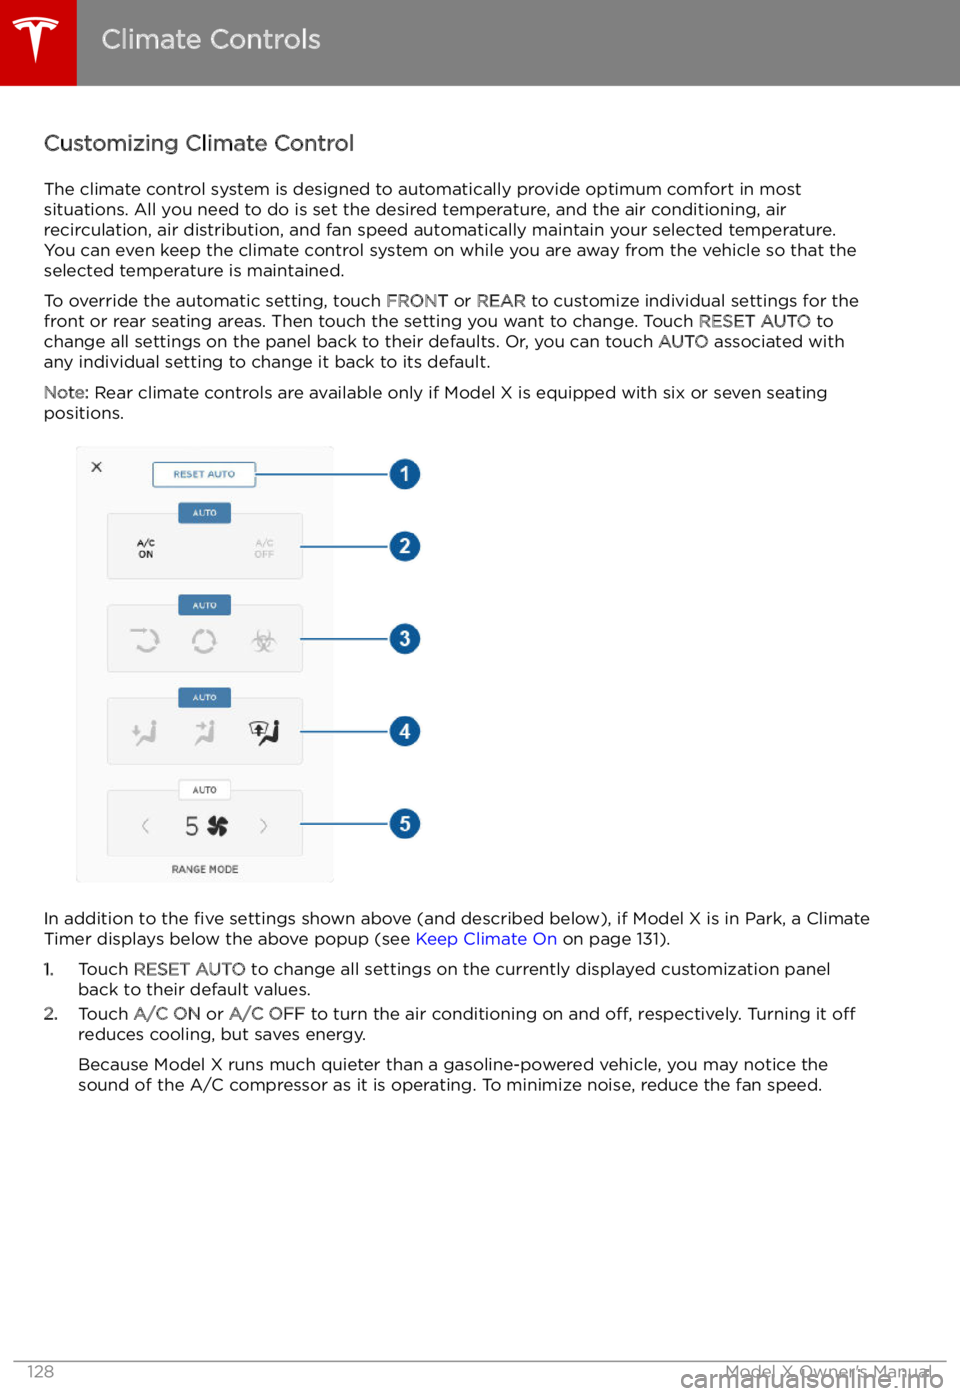
In addition to the five settings shown above (and described below), if Model X is in Park, a Climate
Timer displays below the above popup (see Keep Climate On on page 131).
1. Touch RESET AUTO to change all settings on the currently displayed customization panel
back to their default values.
2. Touch A/C ON or A/C OFF to turn the air conditioning on and off, respectively. Turning it off
reduces cooling, but saves energy.
Because Model X runs much quieter than a gasoline-powered vehicle, you may notice the
sound of the A/C compressor as it is operating. To minimize noise, reduce the fan speed.
Climate Controls
128Model X Owner
Page 130 of 212
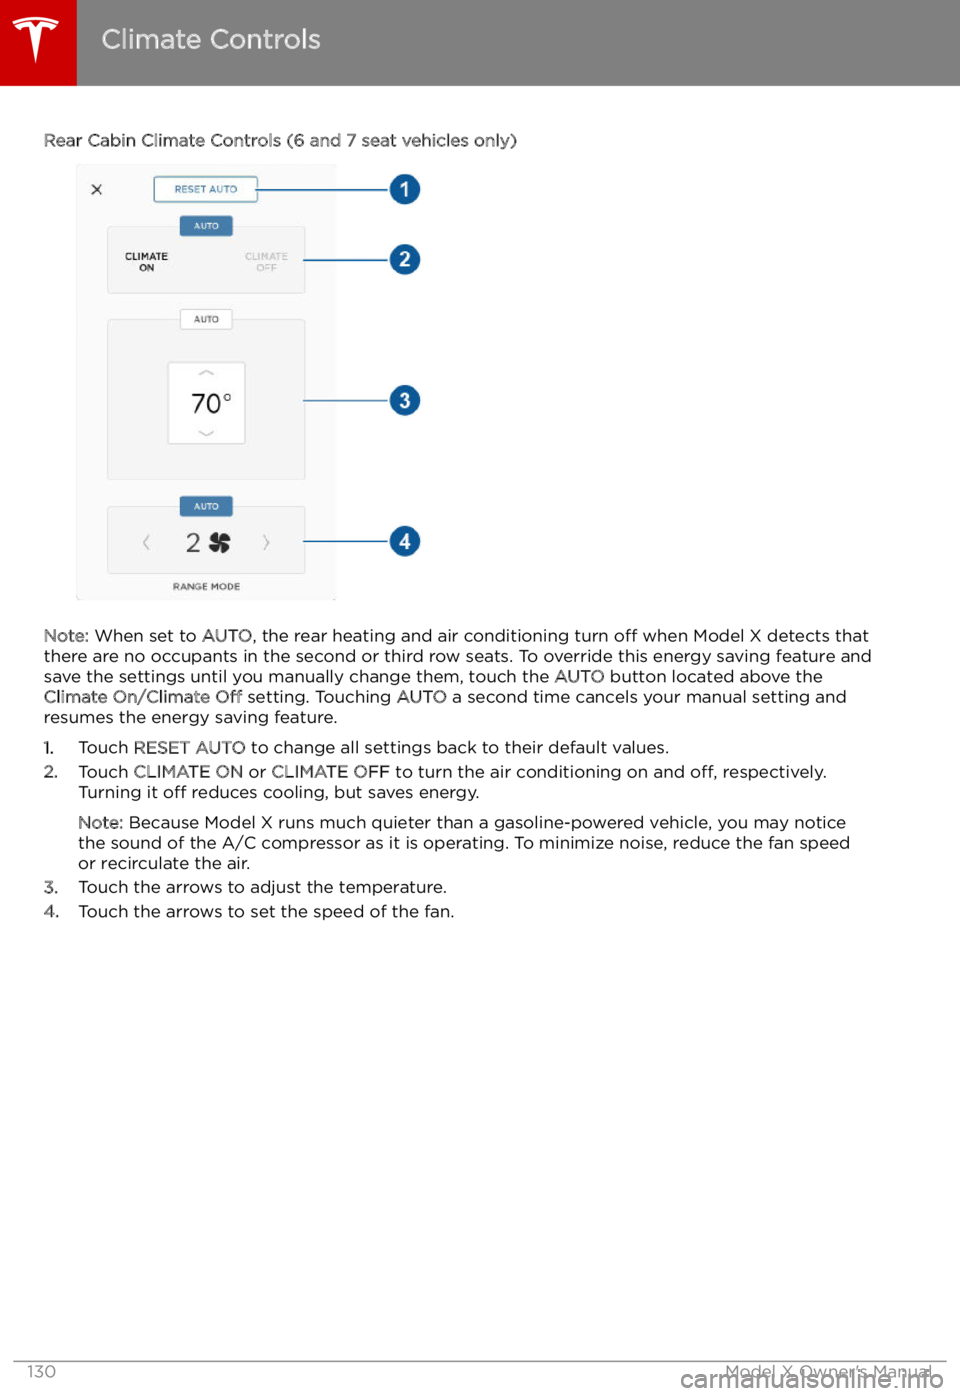
Rear Cabin Climate Controls (6 and 7 seat vehicles only)
Note: When set to AUTO, the rear heating and air conditioning turn off when Model X detects that
there are no occupants in the second or third row seats. To override this energy saving feature and
save the settings until you manually change them, touch the AUTO button located above the
Climate On/Climate Off setting. Touching AUTO a second time cancels your manual setting and
resumes the energy saving feature.
1. Touch RESET AUTO to change all settings back to their default values.
2. Touch CLIMATE ON or CLIMATE OFF to turn the air conditioning on and off, respectively.
Turning it off reduces cooling, but saves energy.
Note: Because Model X runs much quieter than a gasoline-powered vehicle, you may notice
the sound of the A/C compressor as it is operating. To minimize noise, reduce the fan speed
or recirculate the air.
3. Touch the arrows to adjust the temperature.
4. Touch the arrows to set the speed of the fan.
Climate Controls
130Model X Owner
Page 160 of 212
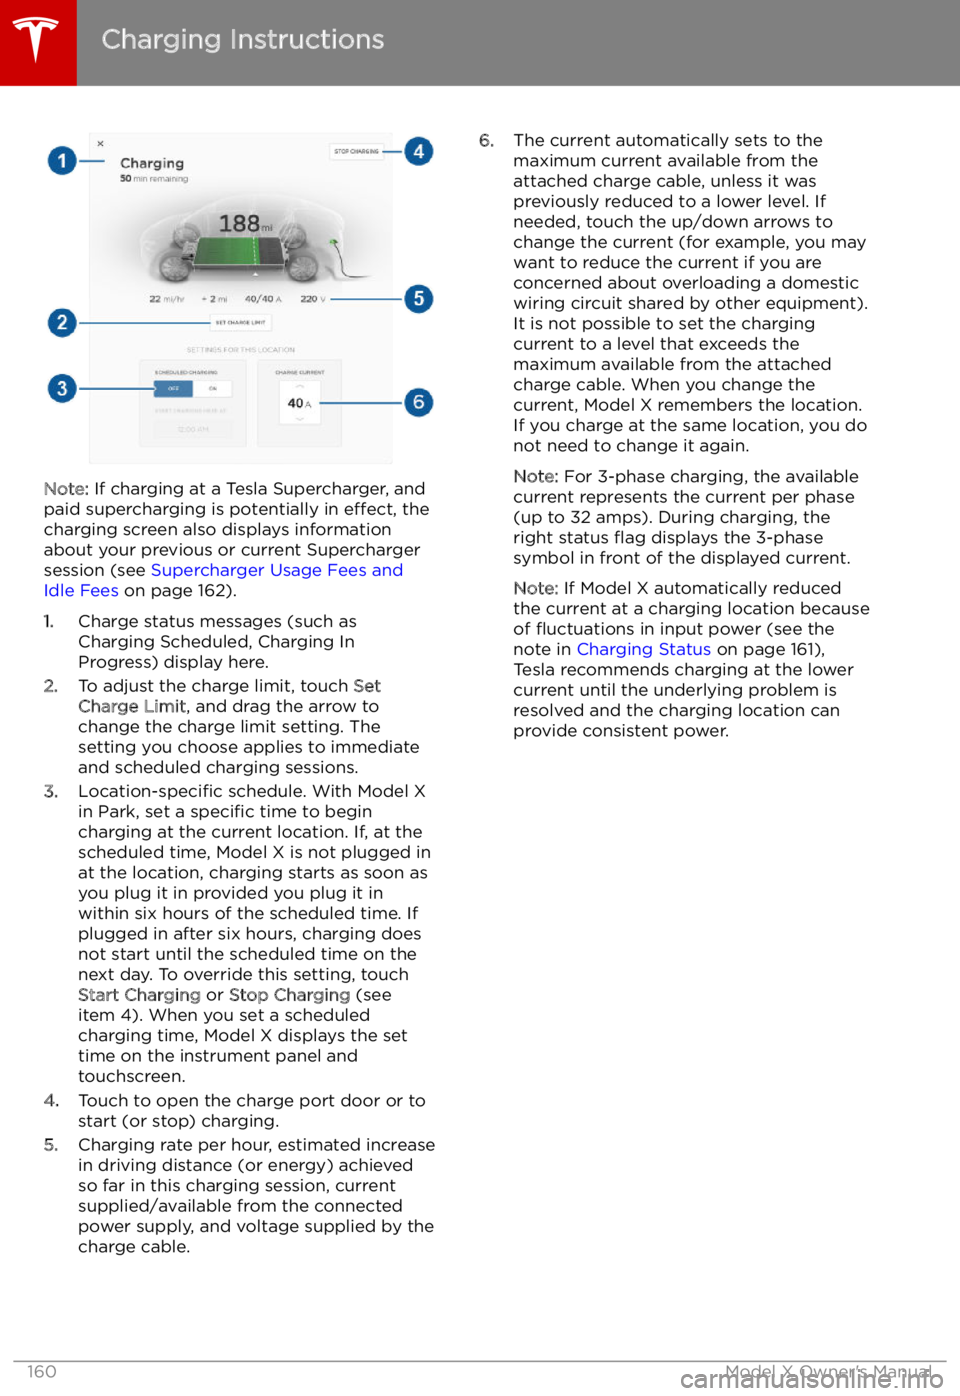
Note: If charging at a Tesla Supercharger, and
paid supercharging is potentially in effect, the
charging screen also displays information
about your previous or current Supercharger
session (see Supercharger Usage Fees and
Idle Fees on page 162).
1. Charge status messages (such as
Charging Scheduled, Charging In
Progress) display here.
2. To adjust the charge limit, touch Set
Charge Limit , and drag the arrow to
change the charge limit setting. The
setting you choose applies to immediate
and scheduled charging sessions.
3. Location-specific schedule. With Model X
in Park, set a specific time to begin
charging at the current location. If, at the
scheduled time, Model X is not plugged in
at the location, charging starts as soon as
you plug it in provided you plug it in
within six hours of the scheduled time. If
plugged in after six hours, charging does
not start until the scheduled time on the
next day. To override this setting, touch Start Charging or Stop Charging (see
item 4). When you set a scheduled
charging time, Model X displays the set
time on the instrument panel and
touchscreen.
4. Touch to open the charge port door or to
start (or stop) charging.
5. Charging rate per hour, estimated increase
in driving distance (or energy) achieved
so far in this charging session, current
supplied/available from the connected
power supply, and voltage supplied by the
charge cable.
6. The current automatically sets to the
maximum current available from the
attached charge cable, unless it was
previously reduced to a lower level. If
needed, touch the up/down arrows to
change the current (for example, you may
want to reduce the current if you are
concerned about overloading a domestic
wiring circuit shared by other equipment).
It is not possible to set the charging
current to a level that exceeds the
maximum available from the attached charge cable. When you change the
current, Model X remembers the location.
If you charge at the same location, you do
not need to change it again.
Note: For 3-phase charging, the available
current represents the current per phase
(up to 32 amps). During charging, the
right status