2022 TESLA MODEL S light
[x] Cancel search: lightPage 110 of 281

WARNING: At crosswalks, Model S may slow down and may stop, depending on whether the crosswalk is controlled by a traffic light and whether the cameras detect pedestrians, bicyclists, etc. in the crosswalk. Pay particular attention at crosswalks and be prepared to take over at any time. Failure to do so can result in injury or death.
Limitations
Depending on many different circumstances and environmental conditions, Traffic Light and
Stop Sign Control may or may not stop at:
Page 154 of 281

Overview
NOTE: The entertainment options available vary depending on market region. Some entertainment features described may not be available in your market region.
The touchscreen displays the Entertainment window when you choose any of the
following apps:
Arcade: Want to game?
Depending on the game,
you may need to use the
steering yoke buttons or a
USB controller to play
arcade games.Theater: Play various video
streaming services (such as
Netflix, YouTube, Hulu, etc.)
while parked.
Toybox: Play in the Toybox
(see Toybox on page 152).Browser: Access the web
browser.WARNING: Use entertainment features only when Model S is parked. Always pay attention to road and traffic conditions when driving. Using these features while driving is illegal and very dangerous.
Toybox
Select This...To Do This...BoomboxJoy to the world! If Model S is equipped with a Pedestrian Warning System,
delight pedestrians with a variety of sounds from your vehicle
Page 163 of 281

About the Security System
If Model S does not detect a key nearby and a
locked door or trunk is opened, an alarm
sounds and the headlights and turn signals
flash. To deactivate the alarm, press any
button on the key.
To manually enable or disable the alarm
system, touch Controls > Safety > Security Alarm. When enabled, Model S activates its
alarm one minute after you exit, the doors
lock, and a recognized key is no longer
detected.
A battery-backed siren sounds in situations where a locked door or trunk is opened and
Model S does not detect a key nearby (if
equipped). If you also want this siren to sound
in situations where
Model S detects motion
inside the cabin, or is moved or tilted (for
example, with a tow truck or jack), turn on the
Tilt/Intrusion setting (touch Controls > Safety > Tilt/Intrusion) (if equipped).
NOTE: If you plan to leave something that
moves inside your locked Model S, remember
to turn off Tilt/Intrusion. If this setting is on,
any motion detected inside Model S activates
the intrusion alarm.
NOTE: If Model S is in Sentry Mode (see Sentry Mode on page 162), you must disable
Sentry Mode before you can disable the
Security alarm or the Tilt/Intrusion alarm.
NOTE: The Security Alarm must be on to
enable Tilt/Intrusion.
NOTE: The Intrusion Sensor automatically
disables in situations where the climate
control system is operating when you have
left your vehicle (see
Keep Climate On, Dog Mode, and Camp Mode on page 139). To
override, you can manually turn the Intrusion
Sensor on again after choosing Keep Climate On, Dog, or Camp Mode (touch
Controls > Safety > Tilt/Intrusion).
If your Model S is equipped with the
Enhanced Anti-Theft upgrade, the horn
sounds in situations where a locked door or trunk is opened and
Model S does not detect
a key nearby. If the Tilt/Intrusion setting is on,
the horn also sounds if Model S detects
motion inside the cabin, or if the vehicle is moved or tilted (for example, with a tow truck
or jack). To turn the Tilt/Intrusion detection system on or
off, touch Controls > Safety > Tilt/Intrusion.
PIN to Drive
To increase security, you can prevent Model S from being driven until a 4-digit PIN (Personal Identification Number) is entered. To enable
this setting, touch Controls > Safety > PIN to Drive and follow the on-screen prompts to
create a driving PIN.
NOTE: When enabled, in addition to entering
the 4-digit driving PIN to drive, you must also
use it to enter Valet mode for the
first time
and create the 4-digit valet PIN that you can
use to enter and exit Valet mode. When in
Valet mode,
Model S can be driven without
the need for the valet to enter a driving PIN.
In addition, the
PIN to Drive setting is
disabled whenever Valet mode is active.
If you forget your driving PIN, or to disable PIN to Drive, return to this setting, touch the
link to enter your Tesla login credentials, then
follow the on-screen prompts.
NOTE: In the unlikely event that your
touchscreen is unresponsive, you may be
unable to enter the PIN. In this case,
first try
to restart the touchscreen (see Restarting the Touchscreen on page 52). If the touchscreen
is still unresponsive, you can still bypass PIN
to Drive by turning on Keyless Driving in the
Tesla mobile app.
Glovebox PIN
For additional security, you can protect the contents in your glovebox with a 4-digit PIN. To enable this setting, touch
Controls > Safety > Glovebox PIN and follow the on-
screen prompts. When enabled, you are
prompted to enter the PIN to open the
glovebox. To disable this setting, select the
toggle to disable and then enter the PIN.
If you forget your glovebox PIN, reset it by
entering your Tesla login credentials, then
follow the on-screen prompts.
NOTE: When you open the glovebox with
both Glovebox PIN and Valet mode enabled,
you are prompted for the glovebox PIN and taken out of Valet mode after the glovebox
opens.
Security Settings
161Using the Touchscreen
Page 170 of 281

Model S has learned the remote control and
you can touch Continue on the touchscreen.
If the headlights do not flash:
Page 181 of 281

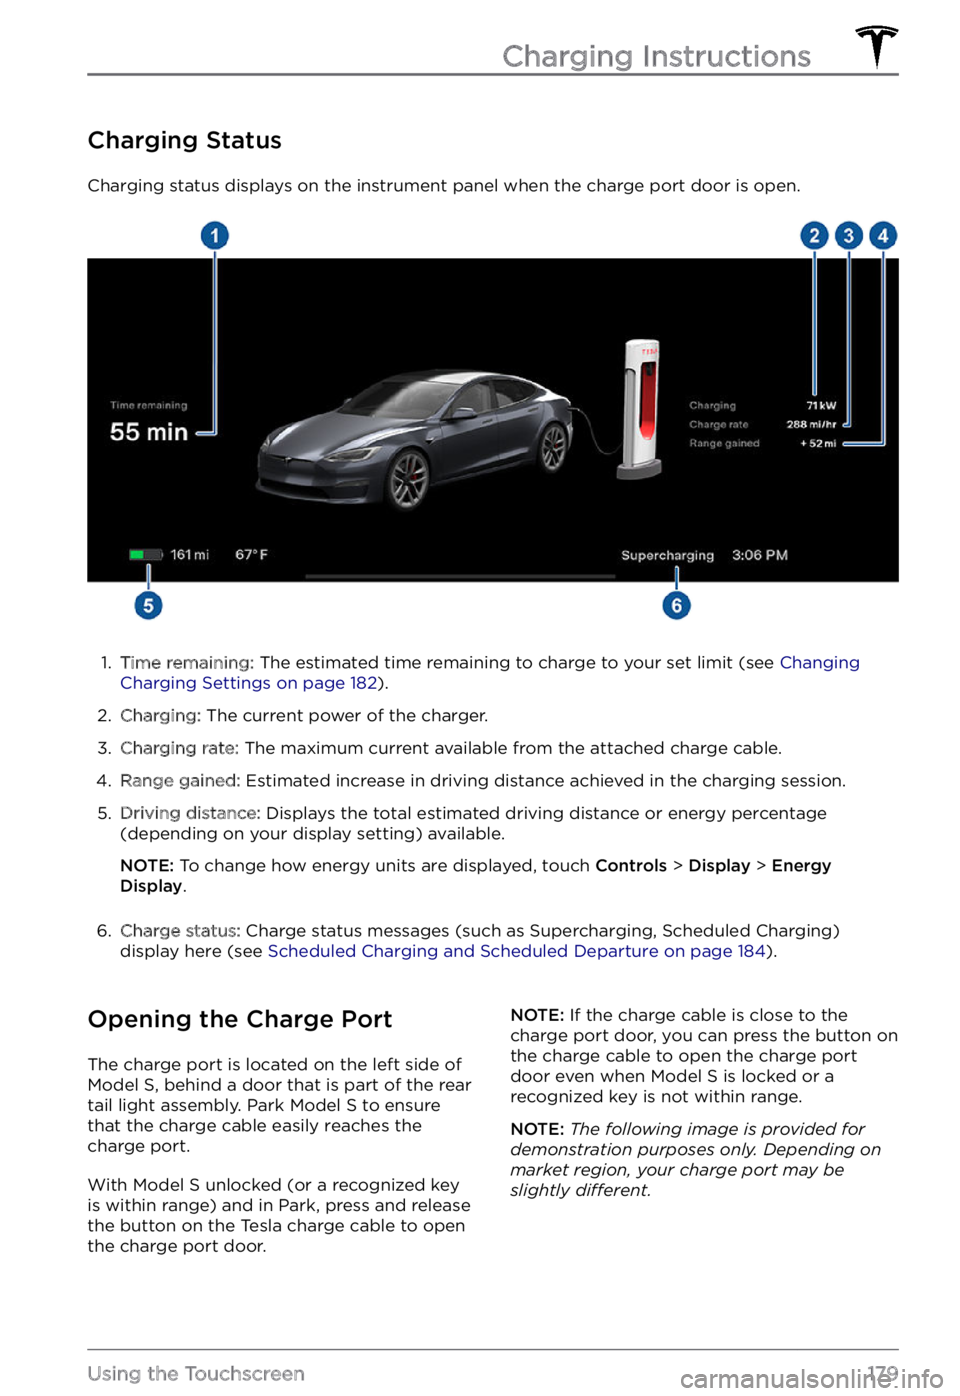
Charging Status
Charging status displays on the instrument panel when the charge port door is open.
1.
Time remaining: The estimated time remaining to charge to your set limit (see Changing Charging Settings on page 182).
2.
Charging: The current power of the charger.
3.
Charging rate: The maximum current available from the attached charge cable.
4.
Range gained: Estimated increase in driving distance achieved in the charging session.
5.
Driving distance: Displays the total estimated driving distance or energy percentage
(depending on your display setting) available.
NOTE: To change how energy units are displayed, touch Controls > Display > Energy Display.
6.
Charge status: Charge status messages (such as Supercharging, Scheduled Charging)
display here (see Scheduled Charging and Scheduled Departure on page 184).
Opening the Charge Port
The charge port is located on the left side of Model S, behind a door that is part of the rear
tail light assembly. Park Model S to ensure
that the charge cable easily reaches the
charge port.
With Model S unlocked (or a recognized key is within range) and in Park, press and release
the button on the Tesla charge cable to open the charge port door.
NOTE: If the charge cable is close to the
charge port door, you can press the button on
the charge cable to open the charge port
door even when Model S is locked or a recognized key is not within range.
NOTE: The following image is provided for demonstration purposes only. Depending on market region, your charge port may be slightly di
Page 183 of 281

CAUTION: The connector end of the charge cable can damage the paint if dropped onto the vehicle.
Charge Port Light
Page 190 of 281

Maintaining Tire Pressures
Keep tires inflated to the pressures shown on
the Tire and Loading Information label, even if
it
differs from the pressure printed on the tire
itself. The Tire and Loading Information label is located on the center door pillar and is
visible when the front door is open.
The Tire Pressure indicator
light on the instrument panel alerts you if one or
more tires is under- or over-inflated.
The Tire Pressure indicator light does not immediately turn off when you adjust tire pressure. After inflating the tire to the
recommended pressure, you must drive over
15 mph (25 km/h) for more than 10 minutes to
activate the Tire Pressure Monitoring System
(TPMS), which turns
off the Tire Pressure
indicator light.
If the indicator light flashes for one minute
whenever you power on Model S, a fault with
the TPMS is detected (see TPMS Malfunction on page 192).
You can display tire pressures on the touchscreen by opening Controls > Service.
You can also choose whether you want to
display tire pressures using Bar or PSI by opening
Controls > Display > Tire Pressure.
WARNING: Under-inflation is the most common cause of tire failures and can cause a tire to overheat, resulting in severe tire cracking, tread separation, or blowout, which causes unexpected loss of vehicle control and increased risk of injury. Under-inflation also reduces the vehicle
Page 194 of 281

Replacing a Tire Sensor
If the Tire Pressure warning indicator displays
frequently, contact Tesla to determine if a tire
sensor needs to be replaced. If a non-Tesla
Service Center repairs or replaces a tire, the
tire sensor may not work until Tesla performs
the setup procedure.
TPMS Malfunction
Model S has also been equipped with a TPMS
malfunction indicator to indicate when the system is not operating properly.
The TPMS malfunction
indicator is combined with
the tire pressure indicator
light. When the system
detects a malfunction, the
indicator
flashes for
approximately one minute,
then remains continuously
lit. This sequence continues
upon subsequent vehicle
start-ups as long as the
malfunction exists. When
the TPMS malfunction
indicator is on, the system
might not be able to detect
or signal under-
or over-inflated tires as intended.
TPMS malfunctions can occur for a variety of reasons, including installing replacement or
alternate tires or wheels that prevent the
TPMS from functioning properly. Always
check the TPMS malfunction indicator light
after replacing one or more tires or wheels on
your vehicle to ensure that the replacement tires or wheels allow the TPMS to continue to
function properly.
NOTE: If a tire has been replaced or repaired
using a different tire sealant than the one
available from Tesla, and a low tire pressure is
detected, it is possible that the tire sensor has
been damaged. Contact Tesla to have the
fault repaired as soon as possible.
Seasonal Tire Types
Summer Tires
Your vehicle may be originally equipped with
high performance summer tires or all season
tires. Tesla recommends using winter tires if
driving in cold temperatures or on roads
where snow or ice may be present. Contact
Tesla for winter tire recommendations.
WARNING: In cold temperatures or on snow or ice, summer tires do not provide adequate traction. Selecting and installing the appropriate tires for winter conditions is important to ensure the safety and optimum performance of your Model S.
All-Season Tires
Your Model S may be originally equipped with
all-season tires. These tires are designed to
provide adequate traction in most conditions year-round, but may not provide the same level of traction as winter tires in snowy or icy
conditions. All-season tires can be
identified
by “ALL SEASON" and/or "M+S” (mud and
snow) on the tire sidewall.
Winter Tires
Use winter tires to increase traction in snowy
or icy conditions. When installing winter tires,
always install a complete set of four tires at
the same time. Winter tires must be the same
diameter, brand, construction and tread
pattern on all four wheels. Contact Tesla for
winter tire recommendations.
Winter tires can be identified by a mountain/snowflake symbol on the
tire