Page 122 of 281
NOTE: Lane Departure Avoidance does not
warn you of lane departures, or provide steering interventions, if the associated turn signal is on, which indicates an intentional
lane change.WARNING: Lane Departure Avoidance is intended to help keep you safe, but it does not work in every situation and does not replace the need to remain attentive and in control.
WARNING: Keep your hands on the steering yoke and drive attentively at all times.
WARNING: Steering interventions are minimal and are not designed to move Model S out of its driving lane. Do not rely on steering interventions to avoid side collisions.
Emergency Lane Departure
Avoidance
Emergency Lane Departure Avoidance automatically applies steering to avoid a potential collision in situations where:
Page 125 of 281
WARNING: The camera(s) and sensors associated with Forward Collision Warning are designed to monitor an approximate area of up to 525 feet (160 meters) in your driving path. The area being monitored by Forward Collision Warning can be adversely affected by road and weather conditions. Use appropriate caution when driving.
WARNING: Forward Collision Warning is designed only to provide visual and audible alerts. It does not attempt to apply the brakes or decelerate Model S. When seeing and/or hearing a warning, it is the driver
Page 128 of 281
How Speed Assist Works
Model S displays a speed limit on the instrument panel and you can choose if and
how you are warned when you exceed the speed limit. Also, instead of using the detected speed limit, you can base warnings on an arbitrary speed limit that you enter
manually.
In situations where Model S is unable to
determine a speed limit, or if Speed Assist is
uncertain that an acquired speed limit is
accurate, the
instrument panel may not
display a speed limit sign and warnings do
not take
effect.
NOTE: Speed limit warnings go away after ten
seconds, or when Model S slows down below
the specified limit.
WARNING: Do not rely on Speed Assist to determine the appropriate speed limit or driving speed. Always drive at a safe speed based on traffic and road conditions.
Controlling Speed Assist
To adjust the Speed Limit Warning setting,
touch Controls > Autopilot > Speed Limit Warning, then choose one of these options:
Page 130 of 281

Controls - OverviewTouch Controls on the
bottom corner of the
touchscreen to control
features and customize
Model S to suit your
preferences. The Controls
window appears over the
map. Touch an option on the
Controls screen to display
the various settings and
options associated with the
chosen option. Swipe to
close.
NOTE: You can also access
Controls by touching
anywhere on the side of the
touchscreen closest to the
driver and swiping to the
right.
When an information icon
displays beside a specific
setting, touch it to display a
popup that provides helpful
details about the associated
setting.
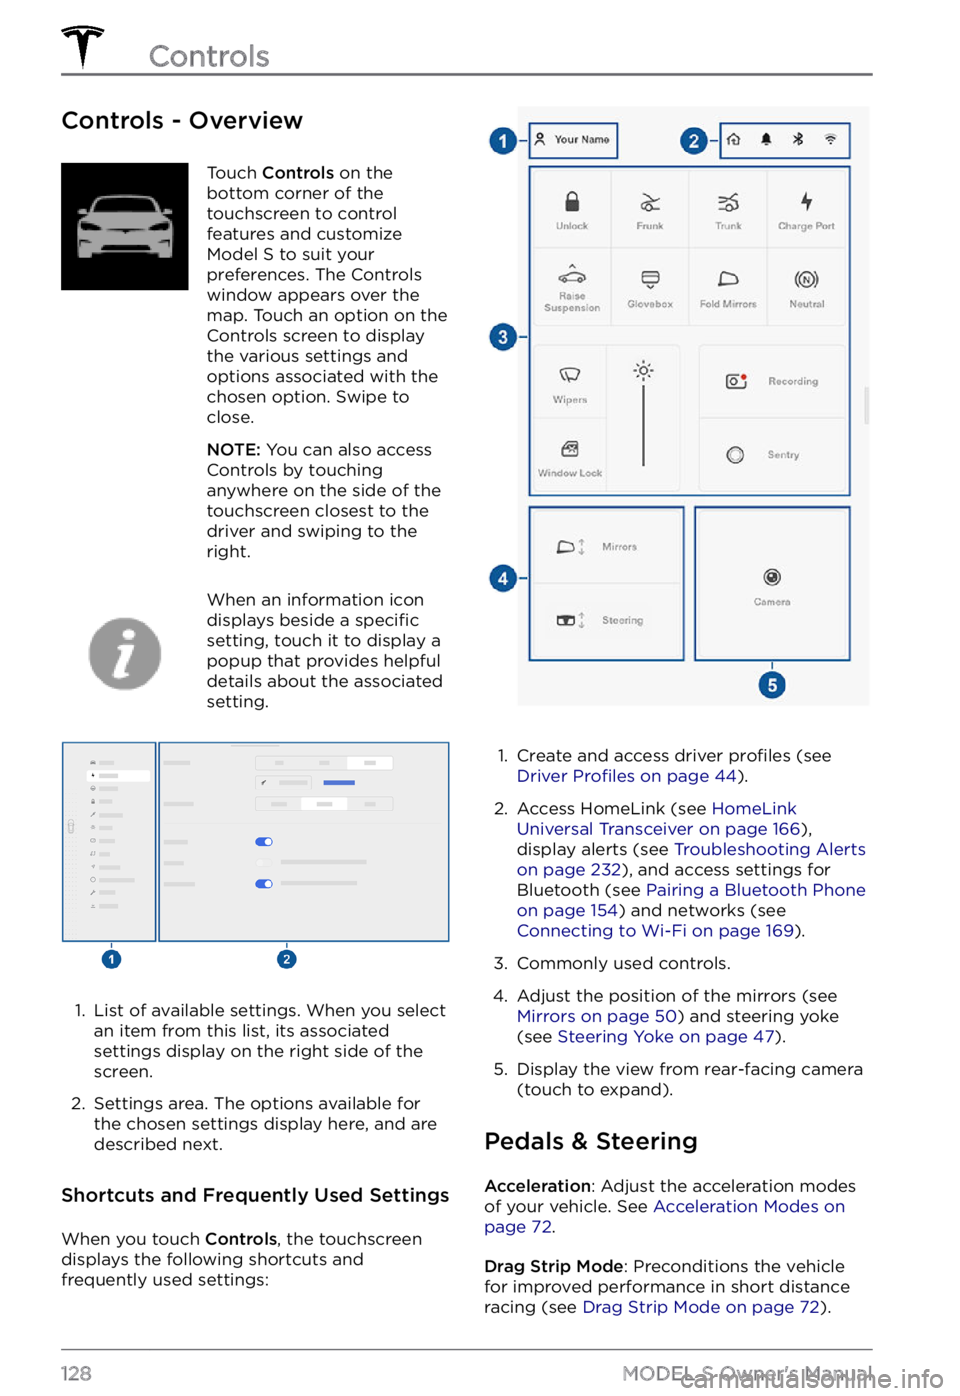
1.
List of available settings. When you select
an item from this list, its associated settings display on the right side of the
screen.
2.
Settings area. The options available for
the chosen settings display here, and are
described next.
Shortcuts and Frequently Used Settings
When you touch Controls, the touchscreen
displays the following shortcuts and
frequently used settings:
1.
Create and access driver profiles (see Driver Profiles on page 44).
2.
Access HomeLink (see HomeLink Universal Transceiver on page 166),
display alerts (see Troubleshooting Alerts on page 232), and access settings for
Bluetooth (see Pairing a Bluetooth Phone on page 154) and networks (see Connecting to Wi-Fi on page 169).
3.
Commonly used controls.
4.
Adjust the position of the mirrors (see Mirrors on page 50) and steering yoke
(see Steering Yoke on page 47).
5.
Display the view from rear-facing camera
(touch to expand).
Pedals & Steering
Acceleration: Adjust the acceleration modes
of your vehicle. See Acceleration Modes on page 72.
Drag Strip Mode: Preconditions the vehicle
for improved performance in short distance racing (see
Drag Strip Mode on page 72).
Controls
128MODEL S Owner
Page 131 of 281

Steering Mode: Adjust the amount of effort
required to turn the steering yoke (see Adjusting Steering Effort on page 47).
Auto Shift out of Park: Turn on if you want Model S to automatically choose the initial
driving gear (Drive or Reverse). See Gears on page 53.
Slip Start: Turn on to allow wheels to spin
(see Traction Control on page 69).
Suspension
Adjust the settings associated with the air suspension system. You can adjust the Ride Height and you can optimize ride and
handling by adjusting settings for Adaptive Suspension Damping. You can also save
locations at which you want the ride height to
automatically raise (helpful for increasing
ground clearance on steep driveways, etc.). See
Air Suspension on page 158.
Charging
View charging status and adjust settings
related to charging Model S (see Charging Instructions on page 179).
Autopilot
NOTE: Depending on market region, vehicle configuration, options purchased, and software version, your vehicle may not be equipped with all Autopilot features described below.
Customize how some of the Autopilot features operate to provide a safer and more
convenient driving experience. See
About Autopilot on page 84 for an overview of
Autopilot components and features.
Page 140 of 281
Adjusting the Front and Rear Vents
Model S has a unique horizontal face-level vent that spans the width of the dashboard. It also
has vents at the top and bottom of the rear console.
1.
Driver vents
2.
Driver controls
3.
Passenger controls
4.
Passenger vents
5.
Rear vents
6.
Rear controls
Using the touchscreens, you can pinpoint exactly where you want to direct the air flowing from
this vent when heating or cooling the cabin. When the face-level vent is on you can adjust the
direction of the air
flow from each vent. To adjust the direction of the air flow, touch the
radiating air waves from the corresponding vent on the touchscreen. The air flows in a single
stream when centered or splits into mirrored air streams when air is directed outward or inward
from the center of the vent.
Climate Controls
138MODEL S Owner
Page 163 of 281

About the Security System
If Model S does not detect a key nearby and a
locked door or trunk is opened, an alarm
sounds and the headlights and turn signals
flash. To deactivate the alarm, press any
button on the key.
To manually enable or disable the alarm
system, touch Controls > Safety > Security Alarm. When enabled, Model S activates its
alarm one minute after you exit, the doors
lock, and a recognized key is no longer
detected.
A battery-backed siren sounds in situations where a locked door or trunk is opened and
Model S does not detect a key nearby (if
equipped). If you also want this siren to sound
in situations where
Model S detects motion
inside the cabin, or is moved or tilted (for
example, with a tow truck or jack), turn on the
Tilt/Intrusion setting (touch Controls > Safety > Tilt/Intrusion) (if equipped).
NOTE: If you plan to leave something that
moves inside your locked Model S, remember
to turn off Tilt/Intrusion. If this setting is on,
any motion detected inside Model S activates
the intrusion alarm.
NOTE: If Model S is in Sentry Mode (see Sentry Mode on page 162), you must disable
Sentry Mode before you can disable the
Security alarm or the Tilt/Intrusion alarm.
NOTE: The Security Alarm must be on to
enable Tilt/Intrusion.
NOTE: The Intrusion Sensor automatically
disables in situations where the climate
control system is operating when you have
left your vehicle (see
Keep Climate On, Dog Mode, and Camp Mode on page 139). To
override, you can manually turn the Intrusion
Sensor on again after choosing Keep Climate On, Dog, or Camp Mode (touch
Controls > Safety > Tilt/Intrusion).
If your Model S is equipped with the
Enhanced Anti-Theft upgrade, the horn
sounds in situations where a locked door or trunk is opened and
Model S does not detect
a key nearby. If the Tilt/Intrusion setting is on,
the horn also sounds if Model S detects
motion inside the cabin, or if the vehicle is moved or tilted (for example, with a tow truck
or jack). To turn the Tilt/Intrusion detection system on or
off, touch Controls > Safety > Tilt/Intrusion.
PIN to Drive
To increase security, you can prevent Model S from being driven until a 4-digit PIN (Personal Identification Number) is entered. To enable
this setting, touch Controls > Safety > PIN to Drive and follow the on-screen prompts to
create a driving PIN.
NOTE: When enabled, in addition to entering
the 4-digit driving PIN to drive, you must also
use it to enter Valet mode for the
first time
and create the 4-digit valet PIN that you can
use to enter and exit Valet mode. When in
Valet mode,
Model S can be driven without
the need for the valet to enter a driving PIN.
In addition, the
PIN to Drive setting is
disabled whenever Valet mode is active.
If you forget your driving PIN, or to disable PIN to Drive, return to this setting, touch the
link to enter your Tesla login credentials, then
follow the on-screen prompts.
NOTE: In the unlikely event that your
touchscreen is unresponsive, you may be
unable to enter the PIN. In this case,
first try
to restart the touchscreen (see Restarting the Touchscreen on page 52). If the touchscreen
is still unresponsive, you can still bypass PIN
to Drive by turning on Keyless Driving in the
Tesla mobile app.
Glovebox PIN
For additional security, you can protect the contents in your glovebox with a 4-digit PIN. To enable this setting, touch
Controls > Safety > Glovebox PIN and follow the on-
screen prompts. When enabled, you are
prompted to enter the PIN to open the
glovebox. To disable this setting, select the
toggle to disable and then enter the PIN.
If you forget your glovebox PIN, reset it by
entering your Tesla login credentials, then
follow the on-screen prompts.
NOTE: When you open the glovebox with
both Glovebox PIN and Valet mode enabled,
you are prompted for the glovebox PIN and taken out of Valet mode after the glovebox
opens.
Security Settings
161Using the Touchscreen
Page 167 of 281
4. In the pop-up menu, under the File
System section, select a support format
(such as exFAT, FAT 32, etc.).
NOTE: You can also name your USB flash
drive (under Volume Label).
5.
Check the Quick format box and click Start.
6.
Go back to File Explorer, click on your flash drive, and right-click to create a
folder, or select New Folder in the top
menu.
7.
Name the folder “TeslaCam” (without
quotation marks) and click Save. This
folder contains all recent and saved clips
from Sentry Mode and Dashcam.
8.
Properly eject the USB flash drive.
Once you have formatted the USB flash drive
and created the TeslaCam folder, insert it into
a USB port in Model S. Do not use the rear
USB ports