Page 105 of 124
2. Once setup is complete, select the AndroidAuto™ icon on the vehicle screen if the app
has not already launched.
3. You will then be taken to the Home screen of the Android Auto™ app.
4. If Android Auto won’t launch, open the Android Auto app™ on the phone, then
select the top left menu button. Select
“Settings”, then “Connected Cars”, and
finally select the top right menu icon and
choose “Forget all cars”. If this does not
work, uninstall the Android Auto app from
the phone and reinstall from the Play Store.
Compatible Models
Android Auto is available on Android phones.
To see if your phone is compatible, please refer
to the Android Auto website:
https://www.android.com/phones/
HOW TO APPENDIX
103
Page 106 of 124
APPLE CARPLAY®
Cables
Apple CarPlay requires compatible iPhones to be connected via
your Subaru’s USB port. Cables must be an 8-Pin Lightning MFi
Certified cable (made for iPod/iPhone). Look for the Works with
Apple CarPlay or Made for iPod, iPhone, iPad icons when selecting
a cable.
For more information, visit:www.apple.com/ios/carplay/
Connecting an iPhone
1. To set up Apple CarPlay, you will need to
plug the iOS/Apple phone into the USB port
of the vehicle. Make sure to use an MFi
certified cable.
2. Select “Allow” on the iOS/Apple phone when prompted.
3. Select Apple CarPlay on the vehicle screen. This will bring you to the home screen of
Apple CarPlay.
Ensure the iOS/Apple phone is fully up to
date. Also ensure all apps that work on
Apple CarPlay are up to date. Apple
CarPlay might not function correctly if one
of the apps is outdated or having an issue.
Apps can be updated in the App Store.
HOW TO APPENDIX
104
Page 107 of 124
Compatible Models
For a list of all the Apple phones that are compatible with Apple
CarPlay, visit:www.apple.com/ios/carplay/
HOW TO APPENDIX
105
Page 108 of 124
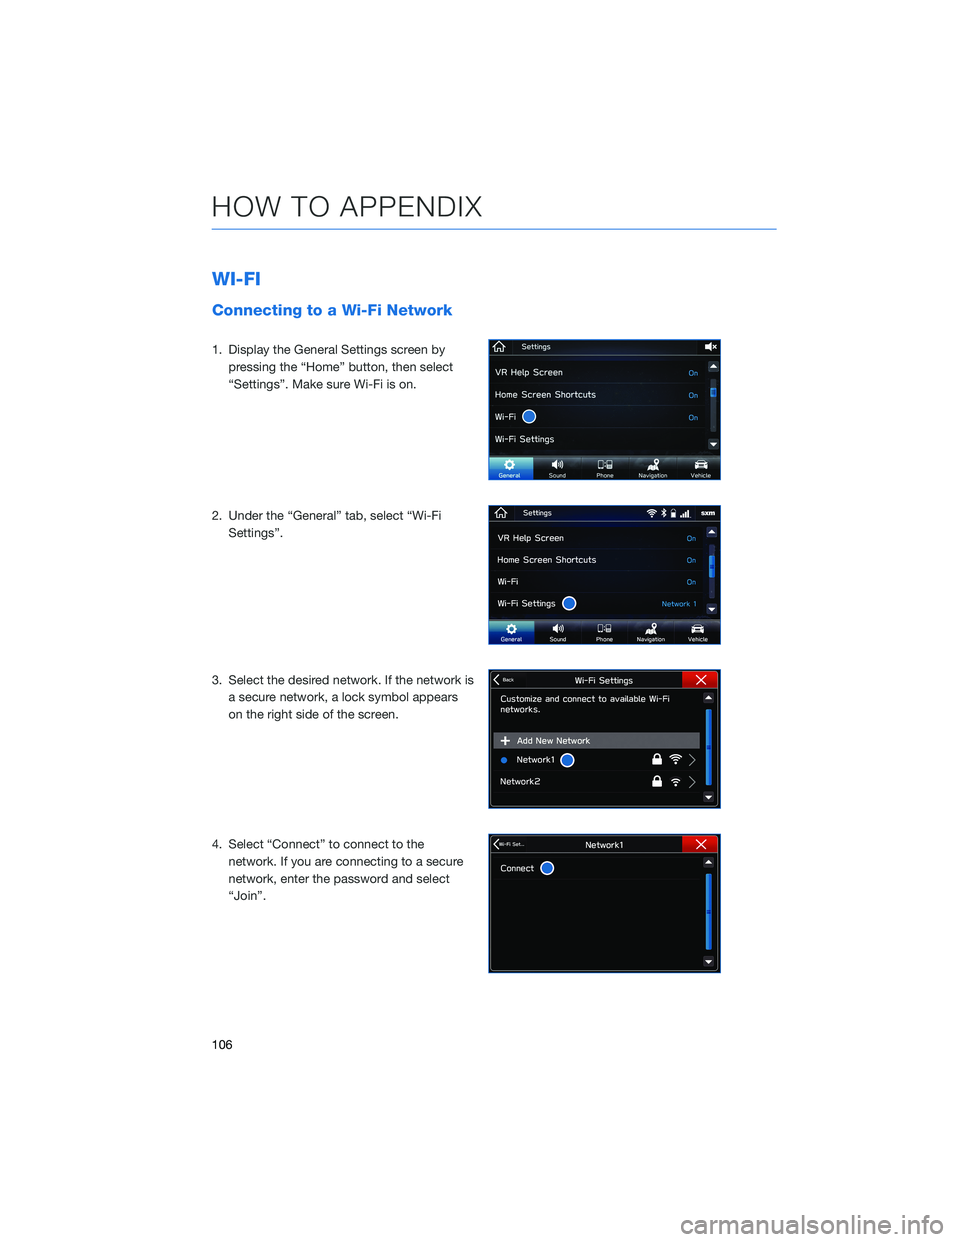
WI-FI
Connecting to a Wi-Fi Network
1. Display the General Settings screen bypressing the “Home” button, then select
“Settings”. Make sure Wi-Fi is on.
2. Under the “General” tab, select “Wi-Fi Settings”.
3. Select the desired network. If the network is a secure network, a lock symbol appears
on the right side of the screen.
4. Select “Connect” to connect to the network. If you are connecting to a secure
network, enter the password and select
“Join”.
HOW TO APPENDIX
106
Page 109 of 124

5. Check that a confirmation messageappears when the connection is complete.
If an error message appears, follow the
guidance on the screen to try again.
Wi-Fi Hotspot Subscription
Internet access is purchased separately through AT&T with monthly,
per gigabyte, and unlimited data options available. Existing AT&T
customers have the option to add an additional line to their AT&T
Mobile Share plan. Available on select models.
Shortly after you take delivery of your new Subaru, you will receive
an email from AT&T for a one month free trial and how to activate
your free trial. To set up and enroll:
1. Select “Settings” on the Home screen.
2. Select “Wi-Fi Hotspot” to turn it on (if the Wi-Fi Hotpot is alreadyon then proceed to the next step).
3. Select Wi-Fi Hotspot Settings to view or update the following settings: • Wi-Fi Network Name (SSID)
• SSID Broadcast (Network ON / OFF)
• Security Type (WPA / WPA2)
• Password
• Connected Devices (Maximum of 8 devices)
• Broadcast Frequency
How to enroll:
1. Connect your tablet, smartphone or laptop to the SUBARU STARLINK
®Wi-Fi Hotspot
network listed in the settings menu and open your preferred web browser on the device
connected.
2. Once the SUBARU STARLINK
®Wi-Fi Hotspot homepage loads, follow the on-screen
instructions to create a new account or to add your vehicle to an already existing AT&T
Wireless account. You can also subscribe to the Wi-Fi Hotspot from the MySubaru
website or Mobile App.
You can also visit an AT&T store or their website for more information at:
https://www.att.com/plans/connected-car/subaru.html
HOW TO APPENDIX
107
Page 110 of 124
MAPS(if equipped)
Finding a Destination by Address
Start by selecting the “Map” button to display the map screen. To search by address:
1. Select the “Menu” button, then select
“Search for Destination Enter Address.”
2. The keypad screen displays. Enter the address or a keyword (e.g. pizza) and select
“Search.” As you type the address or name
of the destination, suggestions will display.
The route calculation screen is displayed if
a suggested is selected.
3. Select the desired item from the list, then select “GO” for the route calculation
screen.
4. The route calculation screen displays three recommended routes at the bottom left of
the screen. Select the desired route, then
select “GO”.
HOW TO APPENDIX
108
Page 111 of 124
Finding a Destination by POI
To search by Points Of Interest (POI):
1. Push the “Map” button to display the mapscreen. Then, select “Menu”, followed by
“Nearby Places List of POI”.
2. Categories are listed alphabetically. Use the scroll bar on the right, if needed, to display
more categories, then make your selection.
3. Select the desired item from the list, then select “GO” for the route calculation
screen.
4. The route calculation screen displays three recommended routes at the bottom left of
the screen. Select the desired route, then
select “GO”.
HOW TO APPENDIX
109
Page 112 of 124
Route Options
You can set the navigation system to avoid
various types of routes:
1. Select “Route Options” on the routecalculation screen.
2. Select the desired item to avoid.
3. Select the check mark in the upper right corner.
NOTE: The avoidance criteria for the route
calculation can also be set from the navigation
settings screen.
Shortest/Fastest/Economic
You can set the route preferences to search for
the shortest, fastest, or most economic route.
To do this:
1. Select “Settings” on the home screen.
2. Select “Navigation”.
3. Select “Route Settings”.
4. Select the preference you would like to use: Shortest, Fastest, or Most Economic.
Saving Destination as a Favorite
Registered points can be set as a destination.
To save a location as a favorite once you have
arrived:
1. Select the current street name.
2. Select “Save”.
3. Select to save as Home, Work, or Favorite.
HOW TO APPENDIX
110