Page 41 of 156
: Provides power to the audio system and accessory power outlets.
ON")
IGNITION SWITCH
The ignition switch has four positions:
LOCK:You can only insert or remove the key in this position.
ACC (Accessory): Provides power to the audio system and accessory power outlets.
ON: All electrical systems are available. The key returns to this position after starting the
engine.
START: Turn the key to this position to start the engine.
PUSH-BUTTON IGNITION SWITCH (if equipped)
Each time you press the ignition switch without
depressing the brake pedal, the ignition position will
change as follows: ACC, ON, OFF.
ACC (Accessory):Provides power to the audio
system and accessory power outlets. Orange indicator
illuminates.
ON: All electrical systems are available. Orange
indicator illuminates.
OFF: Power off and indicator off.
STARTING THE VEHICLE
Without Push-button Ignition
To start the engine:
1. Make sure the select lever is in the “P” position.
2. Using the key, turn the ignition switch to “START”.
NOTE: Do not depress the accelerator pedal. Release the key as soon as the engine
starts.
With Push-button Ignition
To start the engine:
1. Sit in the driver’s seat with the access key fob.
2. Make sure the select lever is in the “P” position.
3. Depress the brake pedal.
4. When the Engine START/STOP button indicator turns green, briefly press and release
the Engine START/STOP button.
OPERATING THE VEHICLE
39
Page 42 of 156

is electronically controlled and provides two
different driving mode combinations: normal
and manual")
DRIVING THE VEHICLE
Automatic Transmission Shift Mode
The Continuously Variable Transmission (CVT)
is electronically controlled and provides two
different driving mode combinations: normal
and manual or normal and low.
Normal Mode
When the select lever is in the “D” (Drive)
position, the transmission is in normal shift
mode. The select lever position indicator in the
Combination Meter Display (CMD) shows “D”
and the transmission automatically shifts into a
suitable forward gear.
Low Mode(if equipped)
Low Mode is for using engine braking when
going downhill, etc. Moving the select lever left into the “L” position from the “D” (Drive)
position causes the transmission to change into Low Mode. The shift position indicator
shows “L” as the selected gear.
Manual Mode (if equipped)
In manual mode, you select the desired gear position to obtain necessary acceleration and
engine braking. Move the select lever left from the “D” position into the “M” position to
select manual mode. The gear position indicator in the Combination Meter Display (CMD)
shows the currently selected gear. Arrow-shaped indicators show when upshifting or
downshifting is available. To shift, use the paddle shift control switches behind the steering
wheel.
Manual Mode gear positions are available in the following ranges:
• Forester (Vehicles Equipped Except Wilderness): 7-Speed Manual Mode
• Forester (Wilderness): 8-Speed Manual Mode
CVT Select Lever
OPERATING THE VEHICLE
40
Page 43 of 156

You can shift gears using the
paddle shift control switches.
To upshift to the next higher gear,
pull the “+” paddle on the right
toward you. To downshif")
Paddle Shift Control Switches(if equipped)
You can shift gears using the
paddle shift control switches.
To upshift to the next higher gear,
pull the “+” paddle on the right
toward you. To downshift to the
next lower gear, pull the “–”
paddle on the left toward you.
You can temporarily shift gears
even when the select lever is in
the “D” position by pulling either
the “+” or “–” paddle toward you.
Once vehicle speed stabilizes, the
transmission will switch back to
normal mode.
SI-DRIVE
Subaru Intelligent Drive (SI-Drive) has
2 possible mode combinations: Intelligent (I)
and Sport (S) or Intelligent (I) and Sport Sharp
(S#). Each mode is designed for different types
of driving:
Intelligent:
The Intelligent (I) mode provides well balanced performance with greater fuel efficiency and
smooth driveability without stress. Power delivery is moderate during acceleration for
maximum fuel efficiency.
Sport:
The Sport (S) mode provides the engine power desired by those who want to make the
driving experience their own personal adventure.
Sport Sharp:
The Sport Sharp (S#) mode offers an exhilarating level of engine performance and control.
The throttle becomes more responsive regardless of the engine speed. Delivering
maximum driving enjoyment, this mode is ideal for driving on twisting roads and for
merging or overtaking other vehicles on the freeway with confidence.
SI-Drive Switches
OPERATING THE VEHICLE
41
Page 44 of 156

AUTO START–STOP
The Auto Start-Stop system is designed to automatically stop and
restart the engine when the vehicle is stationary for a short period of
time after the engine has warmed up (while waiting for a traffic light
or in a traffic jam, for example). The system operates in order to
reduce fuel consumption, exhaust emissions, and undesired idling
noise. You can learn more about using the Auto Start-Stop system
from the how-to video linked in the QR code and from the sections
below.
Auto Start-Stop System
ON/OFF
If the Auto Start-Stop OFF switch
is pressed, operation of the Auto
Start-Stop system will be
disabled.
NOTE: The system will default to
ON once the vehicle has been
shut off.
The Auto Start-Stop indicator light on the combination meter illuminates in
yellow when the system is disabled. If the switch is pressed once more, the
Auto Start-Stop system will reactivate, and the Auto Start-Stop indicator light
will turn off.
Auto Start-Stop Switch
OPERATING THE VEHICLE
42
Page 45 of 156

System Operation
So that it can be used safely and comfortably, the Auto Start-Stop system is designed to
constantly monitor vehicle conditions, the environment inside and outside the vehicle, as
well as driver operations, in order to control stopping and restarting the engine.
After the vehicle has been completely stopped by depressing the brake pedal
with the select lever in the “D” position, the engine will be automatically
stopped and the green indicator will illuminate in the combination meter.
If you release the brake pedal with the select lever kept in the “D” position, the
engine will be automatically restarted. The indicator light will turn off when the system
restarts the engine.
There are several operating conditions for this system to operate as intended.
For more information, please refer to “Starting and Operating” in your Owner’s
Manual.
Auto Start-Stop Screen
You can use the “i/Set” and arrow switches to
display the Auto Start-Stop Screen in the
Combination Meter Display (CMD), showing
how much time the engine was off in the top
line and the amount of fuel saved in the
bottom line. Displayed are the total stop time
and fuel saved since the trip meter was reset.
No Activity Detected Indicator Light
If the operational conditions are not met when the vehicle is stopped, the
engine will not stop and the white Auto Start-Stop No Activity Detected
indicator light will illuminate. It will turn off when the brake pedal is released.
OPERATING THE VEHICLE
43
Page 46 of 156

Auto Start-Stop Warning Light
The Auto Start-Stop warning light will illuminate in yellow when initially turning
the ignition switch to the “ON” position. The light will turn off after the engine
has started.
NOTE: If the Auto Start-Stop warning light does not turn off after the engine
has started or is flashing, the Auto Start-Stop system may be malfunctioning. We
recommend that you contact your authorized SUBARU retailer for an inspection.
INDICATOR PATTERN CONDITION
Solid green This indicator light illuminates when the engine has beentemporarily stopped by the Auto Start-Stop system.
It will turn off when the engine is restarted.
Solid White Operational conditions have not been met, the enginewill not stop and this light will illuminate. The light turns
off once the brake pedal is released.
Solid Yellow This light indicates that the system has been turned off.The light will turn off once the system is turned back on.
Flashing
Yellow A fault has been detected with the Start-Stop system.
Please contact your authorized Subaru Retailer.
ELECTRONIC PARKING BRAKE (EPB)
To apply the parking brake,
depress the brake pedal and pull
the parking brake switch up. The
indicator light on the parking
brake switch will illuminate and
“PARK” will appear in the
Combination Meter.
To release the parking brake
manually, depress the brake pedal
and push the parking brake
switch down with the ignition in
the “ON” position. To
automatically release the parking
brake, gently press the
accelerator pedal with the select lever in the “D” or “R” position.
NOTE: Automatic parking brake release will not work unless all the doors are closed and
your seatbelt is fastened.
OPERATING THE VEHICLE
44
Page 47 of 156

Auto Vehicle Hold gives your feet
a break by automatically holding
your Subaru in place when at a
complete stop, such as a traffic
signal, even after you release the
brake peda")
Auto Vehicle Hold (AVH)
Auto Vehicle Hold gives your feet
a break by automatically holding
your Subaru in place when at a
complete stop, such as a traffic
signal, even after you release the
brake pedal. Press the Auto
Vehicle Hold switch on the center
console to turn on the function.
The AVH indicator in the
combination meter will illuminate.
While your Subaru is being held
by this function, the operation
indicator in the combination meter
will illuminate. The function is
canceled when you depress the
accelerator pedal or the brake
pedal.
Press the switch again to turn it
off. The function works when the
select lever is in a position other
than the “P” position.
NOTE:
• For this system to work yourseatbelt must be fastened.
• Make sure to turn off this function before entering an
automatic car wash.
X-MODE®(if equipped)
X-MODE®is the integrated control system of the
engine, All Wheel Drive, and Vehicle Dynamics Control
(VDC) systems for driving with bad road conditions.
Using X-MODE
®, you can drive more comfortably
even in slippery road conditions, such as mud or
snow, including uphill and downhill. You can activate
the system when the vehicle speed is less than 12 mph. If the vehicle speed reaches
25 mph or more with X-MODE
®active, the system is automatically deactivated. X-MODE®,
and Hill Descent Control, will automatically reactivate when the vehicle speed drops below
22 mph.
ICON MODE
Auto Vehicle Hold ON
Auto Vehicle Hold IN
OPERATION
X-MODE®Multi-Function
Display
OPERATING THE VEHICLE
45
Page 48 of 156
X-MODE®Standard System
To activate the X-MODE®system, press the X-MODE®switch.
While the system is active, the X-MODE®indicator appears, and the
Multi-Function Display shows vehicle posture and function
operation status. To deactivate X-MODE
®, press the X-MODE®
switch again.
In certain situations, such as navigating a vehicle
stuck in mud or snow, it may be helpful to allow more
wheel spin by turning off the Vehicle Dynamics Control
(VDC) system. To turn off the VDC system, turn the
Vehicle Dynamics Control OFF switch to the left. Turn
the Vehicle Dynamics Control OFF Switch back to
“Normal” to reactivate the VDC system.
X-Mode®Indicator
Standard
OPERATING THE VEHICLE
46
 1
1 2
2 3
3 4
4 5
5 6
6 7
7 8
8 9
9 10
10 11
11 12
12 13
13 14
14 15
15 16
16 17
17 18
18 19
19 20
20 21
21 22
22 23
23 24
24 25
25 26
26 27
27 28
28 29
29 30
30 31
31 32
32 33
33 34
34 35
35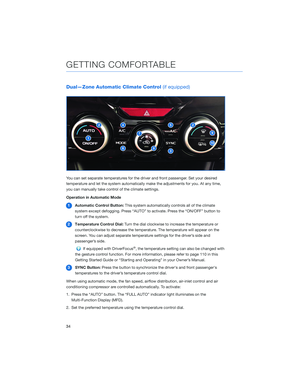 36
36 37
37 38
38 39
39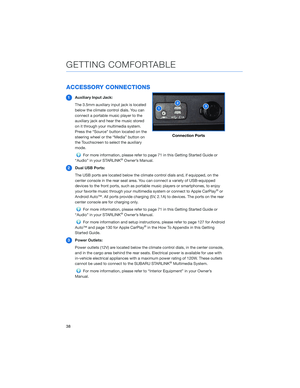 40
40 41
41 42
42 43
43 44
44 45
45 46
46 47
47 48
48 49
49 50
50 51
51 52
52 53
53 54
54 55
55 56
56 57
57 58
58 59
59 60
60 61
61 62
62 63
63 64
64 65
65 66
66 67
67 68
68 69
69 70
70 71
71 72
72 73
73 74
74 75
75 76
76 77
77 78
78 79
79 80
80 81
81 82
82 83
83 84
84 85
85 86
86 87
87 88
88 89
89 90
90 91
91 92
92 93
93 94
94 95
95 96
96 97
97 98
98 99
99 100
100 101
101 102
102 103
103 104
104 105
105 106
106 107
107 108
108 109
109 110
110 111
111 112
112 113
113 114
114 115
115 116
116 117
117 118
118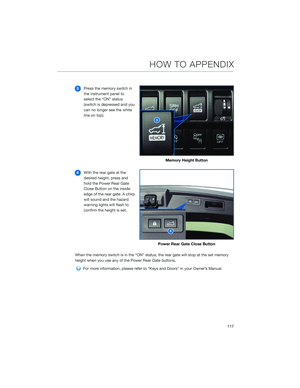 119
119 120
120 121
121 122
122 123
123 124
124 125
125 126
126 127
127 128
128 129
129 130
130 131
131 132
132 133
133 134
134 135
135 136
136 137
137 138
138 139
139 140
140 141
141 142
142 143
143 144
144 145
145 146
146 147
147 148
148 149
149 150
150 151
151 152
152 153
153 154
154 155
155