Page 28 of 156
If equipped, your Subaru can
be programmed to automatically
recall your preferred Power
Driver’s Seat and side mirror
positions each time you enter
your vehicle. For step by step
instructions on setting the Power
Memory Seat, please refer to
page 118.
Head Restraint Adjustment
Pull the head restraint up to raise
it to the first position. To raise it
farther, press the release button
on top of the seatback while
raising the head restraint. To lower
the head restraint, push it down
while pressing the release button.
Each head restraint should be
adjusted so that the center of the
head restraint is closest to the top
of the occupant’s ears.
The angle of the front head
restraints can be adjusted by
tilting them forward. You will hear
a click when the restraint locks in
place. Pulling the head restraint as far forward as it will go allows it to return to the fully
upright position.
Memory Seat Buttons
Release Button and Head Restraint Adjustment
GETTING COMFORTABLE
26
Page 36 of 156
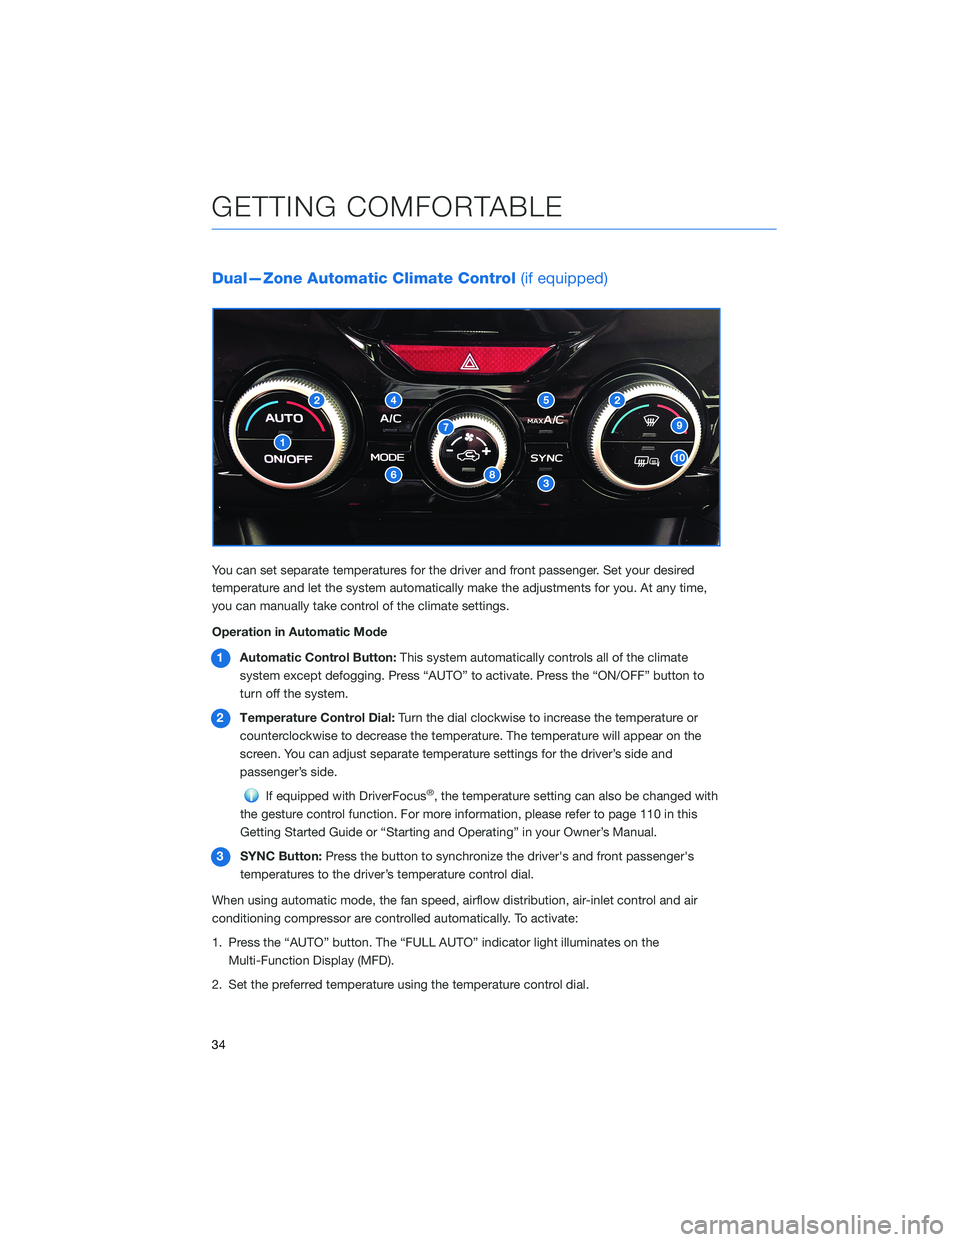
Dual—Zone Automatic Climate Control(if equipped)
You can set separate temperatures for the driver and front passenger. Set your desired
temperature and let the system automatically make the adjustments for you. At any time,
you can manually take control of the climate settings.
Operation in Automatic Mode
1 Automatic Control Button: This system automatically controls all of the climate
system except defogging. Press “AUTO” to activate. Press the “ON/OFF” button to
turn off the system.
2 Temperature Control Dial: Turn the dial clockwise to increase the temperature or
counterclockwise to decrease the temperature. The temperature will appear on the
screen. You can adjust separate temperature settings for the driver’s side and
passenger’s side.
If equipped with DriverFocus®, the temperature setting can also be changed with
the gesture control function. For more information, please refer to page 110 in this
Getting Started Guide or “Starting and Operating” in your Owner’s Manual.
3 SYNC Button: Press the button to synchronize the driver's and front passenger's
temperatures to the driver’s temperature control dial.
When using automatic mode, the fan speed, airflow distribution, air-inlet control and air
conditioning compressor are controlled automatically. To activate:
1. Press the “AUTO” button. The “FULL AUTO” indicator light illuminates on the Multi-Function Display (MFD).
2. Set the preferred temperature using the temperature control dial.
GETTING COMFORTABLE
34
Page 40 of 156
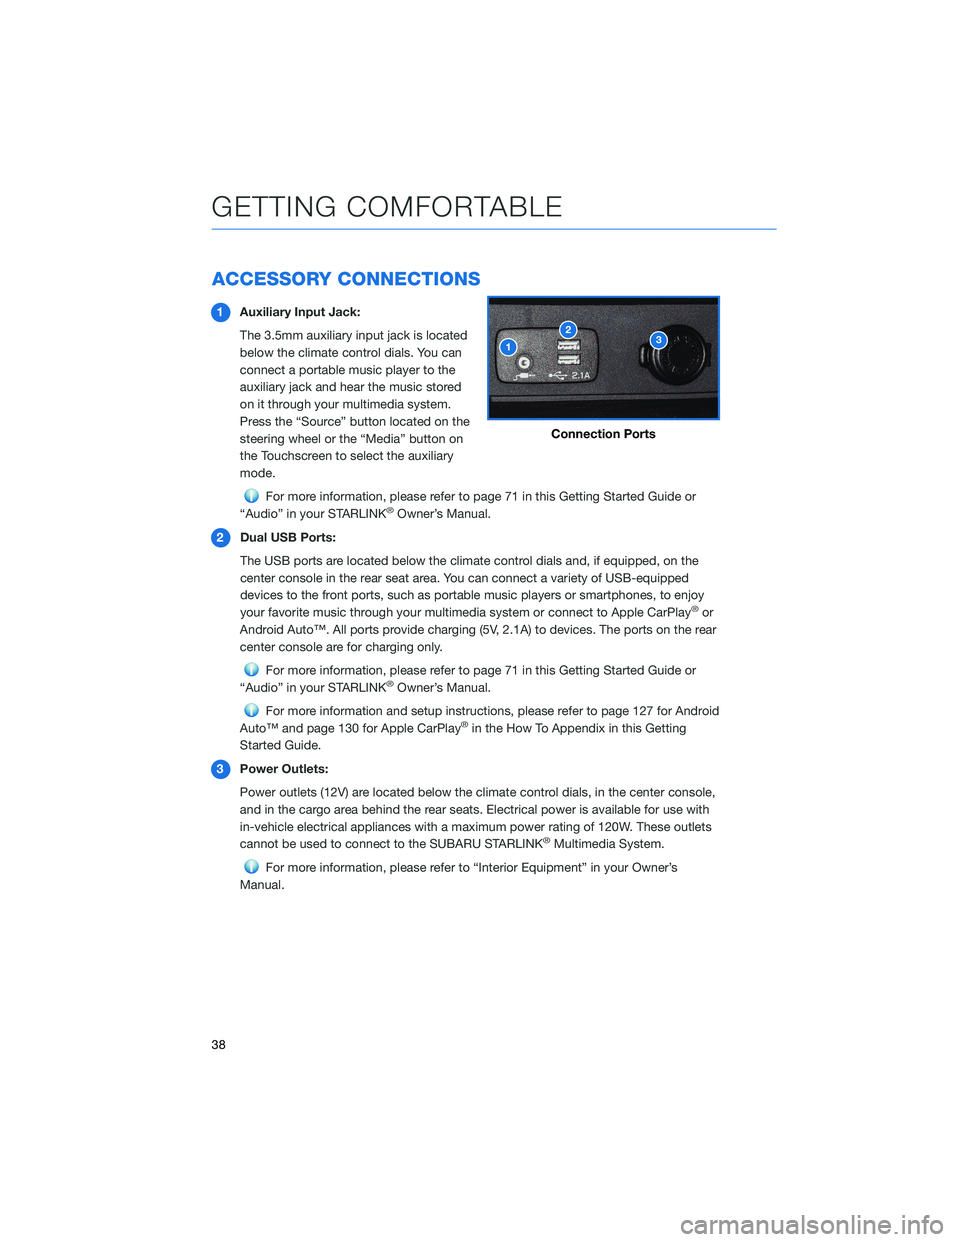
ACCESSORY CONNECTIONS
1Auxiliary Input Jack:
The 3.5mm auxiliary input jack is located
below the climate control dials. You can
connect a portable music player to the
auxiliary jack and hear the music stored
on it through your multimedia system.
Press the “Source” button located on the
steering wheel or the “Media” button on
the Touchscreen to select the auxiliary
mode.
For more information, please refer to page 71 in this Getting Started Guide or
“Audio” in your STARLINK®Owner’s Manual.
2 Dual USB Ports:
The USB ports are located below the climate control dials and, if equipped, on the
center console in the rear seat area. You can connect a variety of USB-equipped
devices to the front ports, such as portable music players or smartphones, to enjoy
your favorite music through your multimedia system or connect to Apple CarPlay
®or
Android Auto™. All ports provide charging (5V, 2.1A) to devices. The ports on the rear
center console are for charging only.
For more information, please refer to page 71 in this Getting Started Guide or
“Audio” in your STARLINK®Owner’s Manual.
For more information and setup instructions, please refer to page 127 for Android
Auto™ and page 130 for Apple CarPlay®in the How To Appendix in this Getting
Started Guide.
3 Power Outlets:
Power outlets (12V) are located below the climate control dials, in the center console,
and in the cargo area behind the rear seats. Electrical power is available for use with
in-vehicle electrical appliances with a maximum power rating of 120W. These outlets
cannot be used to connect to the SUBARU STARLINK
®Multimedia System.
For more information, please refer to “Interior Equipment” in your Owner’s
Manual.
Connection Ports
GETTING COMFORTABLE
38
Page 58 of 156
NEW VEHICLE BREAK-IN
The performance and long life of your Subaru are dependent on how you handle and care
for your Subaru while it is new.
Follow these instructions during the first 1,000 miles:
• Do not race the engine.
• Do not allow the engine speed to exceed 4,000 rpm except in an emergency.
• Do not drive at one consistent engine or vehicle speed for a long time, either fast orslow.
• Avoid starting suddenly and rapid acceleration, except in an emergency.
• Avoid hard braking, except in an emergency.
ENGINE OIL
Use 0W-20 synthetic, with one of the following specifications:
• API classification SN with the words “RESOURCE CONSERVING”, SN PLUS with the words “RESOURCE CONSERVING”, or SP with the words “RESOURCE CONSERVING”.
• ILSAC GF-5 or GF-6A, which can be identified with the ILSAC certification mark (Starburst mark).
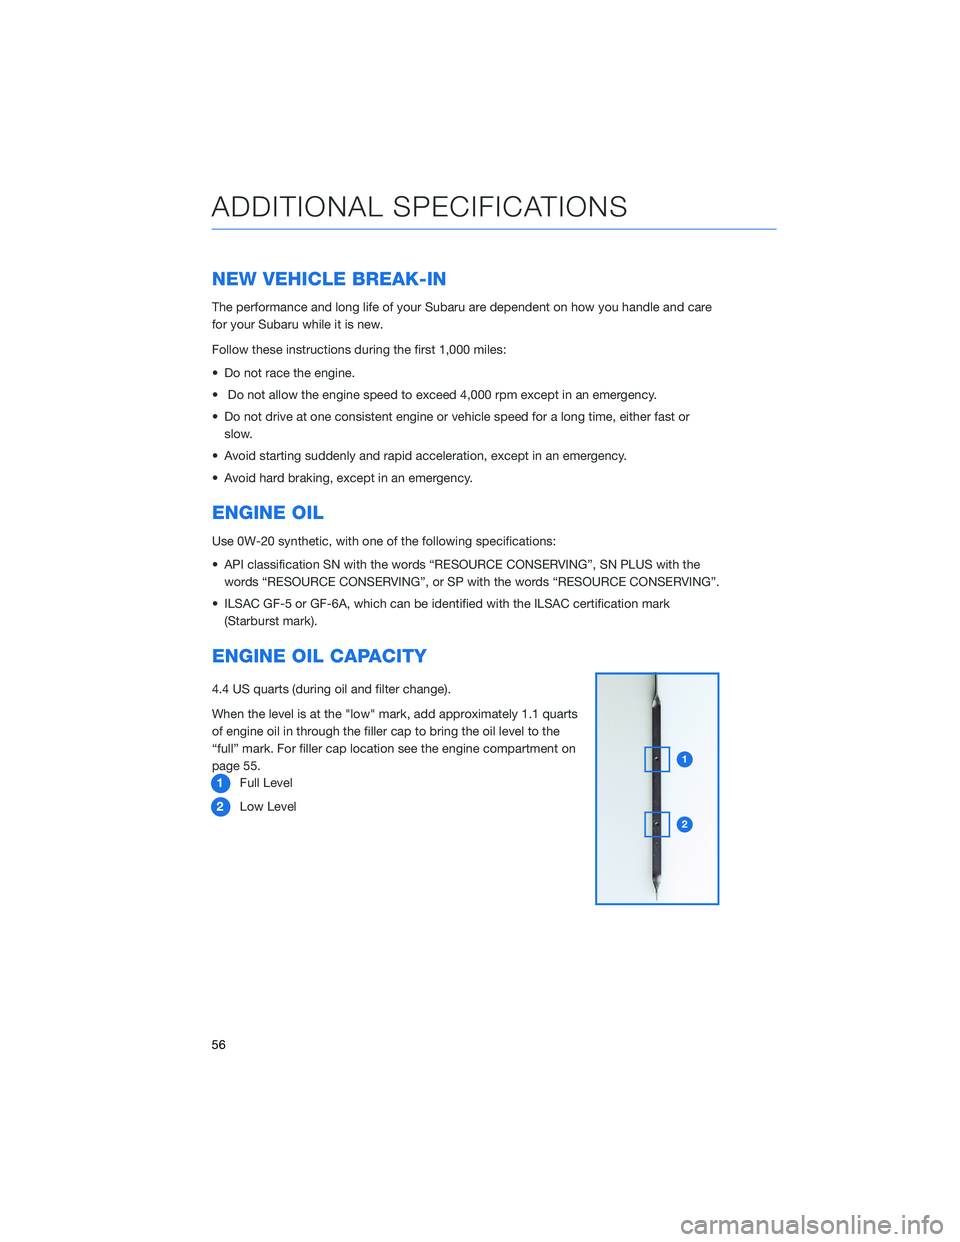
ENGINE OIL CAPACITY
4.4 US quarts (during oil and filter change).
When the level is at the "low" mark, add approximately 1.1 quarts
of engine oil in through the filler cap to bring the oil level to the
“full” mark. For filler cap location see the engine compartment on
page 55.1 Full Level
2 Low Level
ADDITIONAL SPECIFICATIONS
56
Page 59 of 156
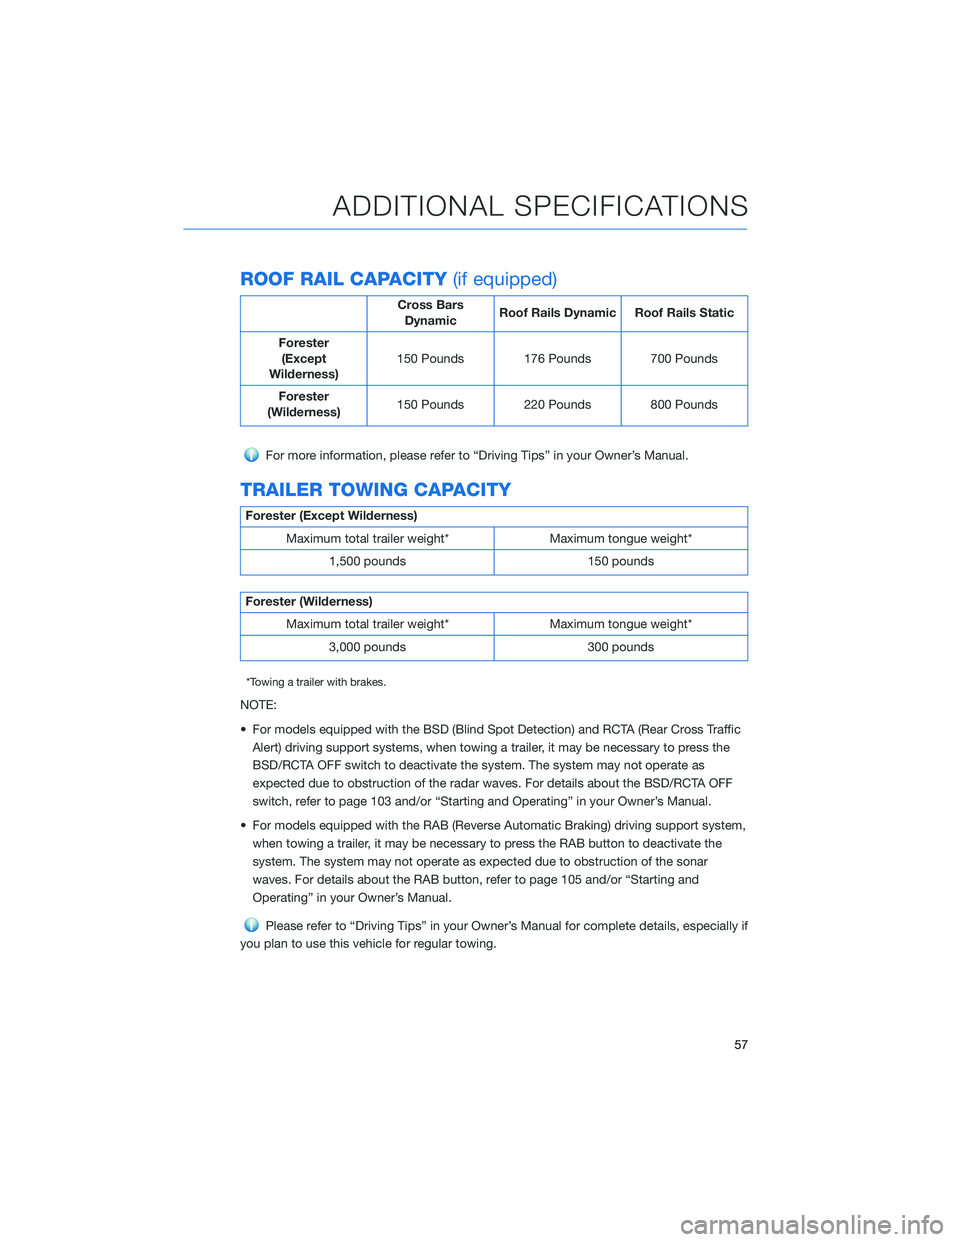
ROOF RAIL CAPACITY(if equipped)
Cross Bars
Dynamic Roof Rails Dynamic Roof Rails Static
Forester (Except
Wilderness) 150 Pounds 176 Pounds 700 Pounds
Forester
(Wilderness) 150 Pounds 220 Pounds 800 Pounds
For more information, please refer to “Driving Tips” in your Owner’s Manual.
TRAILER TOWING CAPACITY
Forester (Except Wilderness)
Maximum total trailer weight* Maximum tongue weight* 1,500 pounds 150 pounds
Forester (Wilderness)Maximum total trailer weight* Maximum tongue weight* 3,000 pounds 300 pounds
*Towing a trailer with brakes.
NOTE:
• For models equipped with the BSD (Blind Spot Detection) and RCTA (Rear Cross TrafficAlert) driving support systems, when towing a trailer, it may be necessary to press the
BSD/RCTA OFF switch to deactivate the system. The system may not operate as
expected due to obstruction of the radar waves. For details about the BSD/RCTA OFF
switch, refer to page 103 and/or “Starting and Operating” in your Owner’s Manual.
• For models equipped with the RAB (Reverse Automatic Braking) driving support system, when towing a trailer, it may be necessary to press the RAB button to deactivate the
system. The system may not operate as expected due to obstruction of the sonar
waves. For details about the RAB button, refer to page 105 and/or “Starting and
Operating” in your Owner’s Manual.
Please refer to “Driving Tips” in your Owner’s Manual for complete details, especially if
you plan to use this vehicle for regular towing.
ADDITIONAL SPECIFICATIONS
57
Page 71 of 156
4. Select a paired phone or pair a new phone(see page 119 and page 123 in the How To
Appendix). Then select “Next”.
5. Enter a Home Address and Work Address (if equipped with navigation). Then select
“Next”.
6. Select a wallpaper, and then select “Next”.
7. Select “Finish”.
Retrieving a Driver Profile
The system automatically retrieves the profile once you are in your Subaru with the
STARLINK®multimedia system on and your phone’s Bluetooth®active. You can also
manually retrieve or change the profile by following these steps:
1. Press the “Home” button and then select “Settings”.
2. In the General menu, select “Driver Profile”.
3. Select the profile you want to use, and then select “Activate”.
DRIVER PROFILE
69
Page 73 of 156
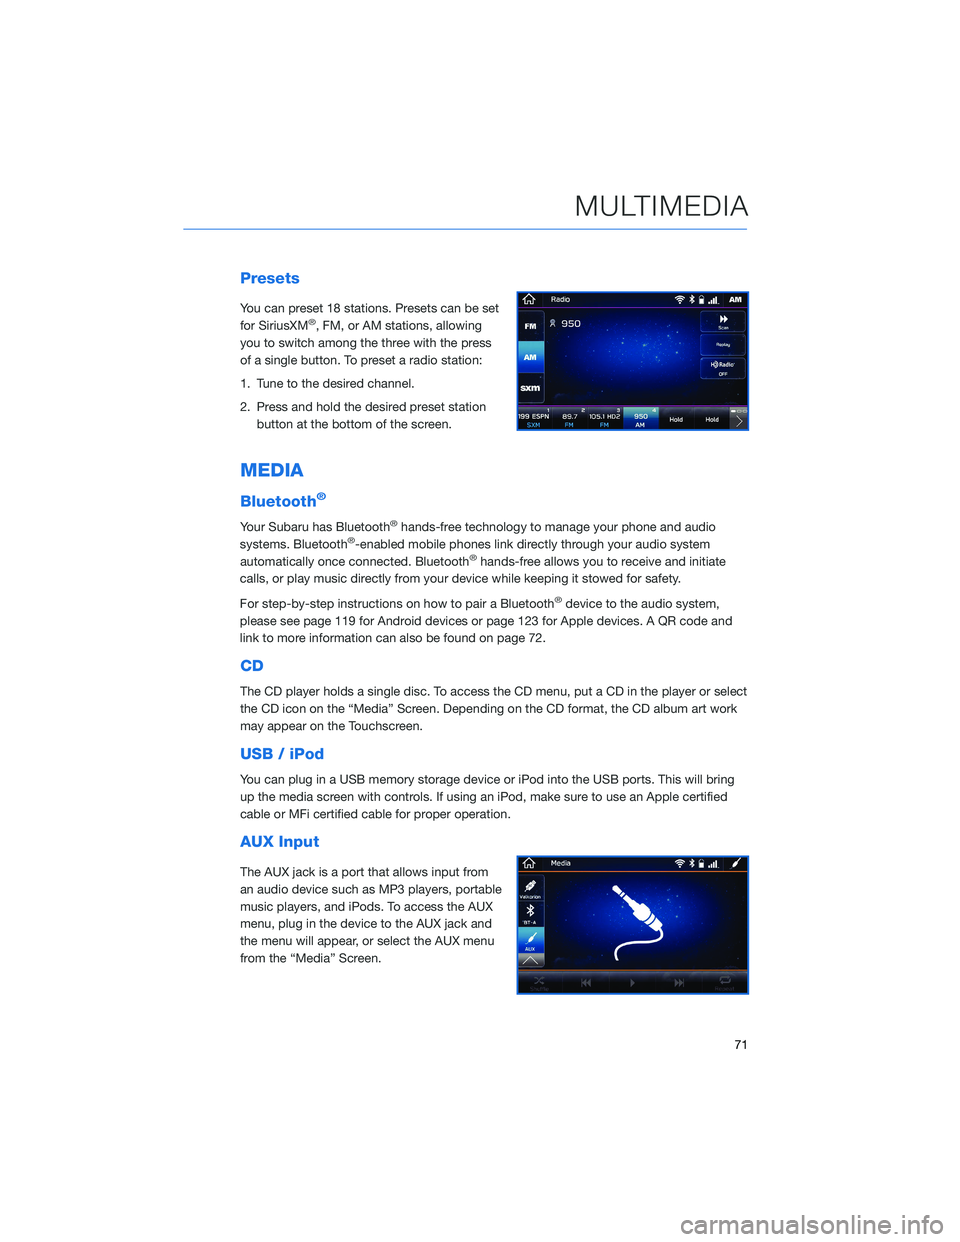
Presets
You can preset 18 stations. Presets can be set
for SiriusXM®, FM, or AM stations, allowing
you to switch among the three with the press
of a single button. To preset a radio station:
1. Tune to the desired channel.
2. Press and hold the desired preset station button at the bottom of the screen.
MEDIA
Bluetooth®
Your Subaru has Bluetooth®hands-free technology to manage your phone and audio
systems. Bluetooth®-enabled mobile phones link directly through your audio system
automatically once connected. Bluetooth®hands-free allows you to receive and initiate
calls, or play music directly from your device while keeping it stowed for safety.
For step-by-step instructions on how to pair a Bluetooth
®device to the audio system,
please see page 119 for Android devices or page 123 for Apple devices. A QR code and
link to more information can also be found on page 72.
CD
The CD player holds a single disc. To access the CD menu, put a CD in the player or select
the CD icon on the “Media” Screen. Depending on the CD format, the CD album art work
may appear on the Touchscreen.
USB / iPod
You can plug in a USB memory storage device or iPod into the USB ports. This will bring
up the media screen with controls. If using an iPod, make sure to use an Apple certified
cable or MFi certified cable for proper operation.
AUX Input
The AUX jack is a port that allows input from
an audio device such as MP3 players, portable
music players, and iPods. To access the AUX
menu, plug in the device to the AUX jack and
the menu will appear, or select the AUX menu
from the “Media” Screen.
MULTIMEDIA
71
Page 74 of 156
PAIRING A PHONE
To begin using your Bluetooth®hands-free device you must first
pair your phone with the system. Phone pairing provides access to
the contact list on your phone and allows you to use the voice
recognition system to make and receive calls. The system can also
read incoming text messages, as well as allowing you to reply to
texts or send short messages. The system automatically reconnects
to your Bluetooth
®device and will remember your driver profile.
Visit www.subaru.com/engineering/starlink/multimedia.html for
more information on what is available by connecting a phone to the
Touchscreen.
For instructions on how to pair your phone to the Touchscreen, see page 119 for
Android devices or page 123 for Apple devices.
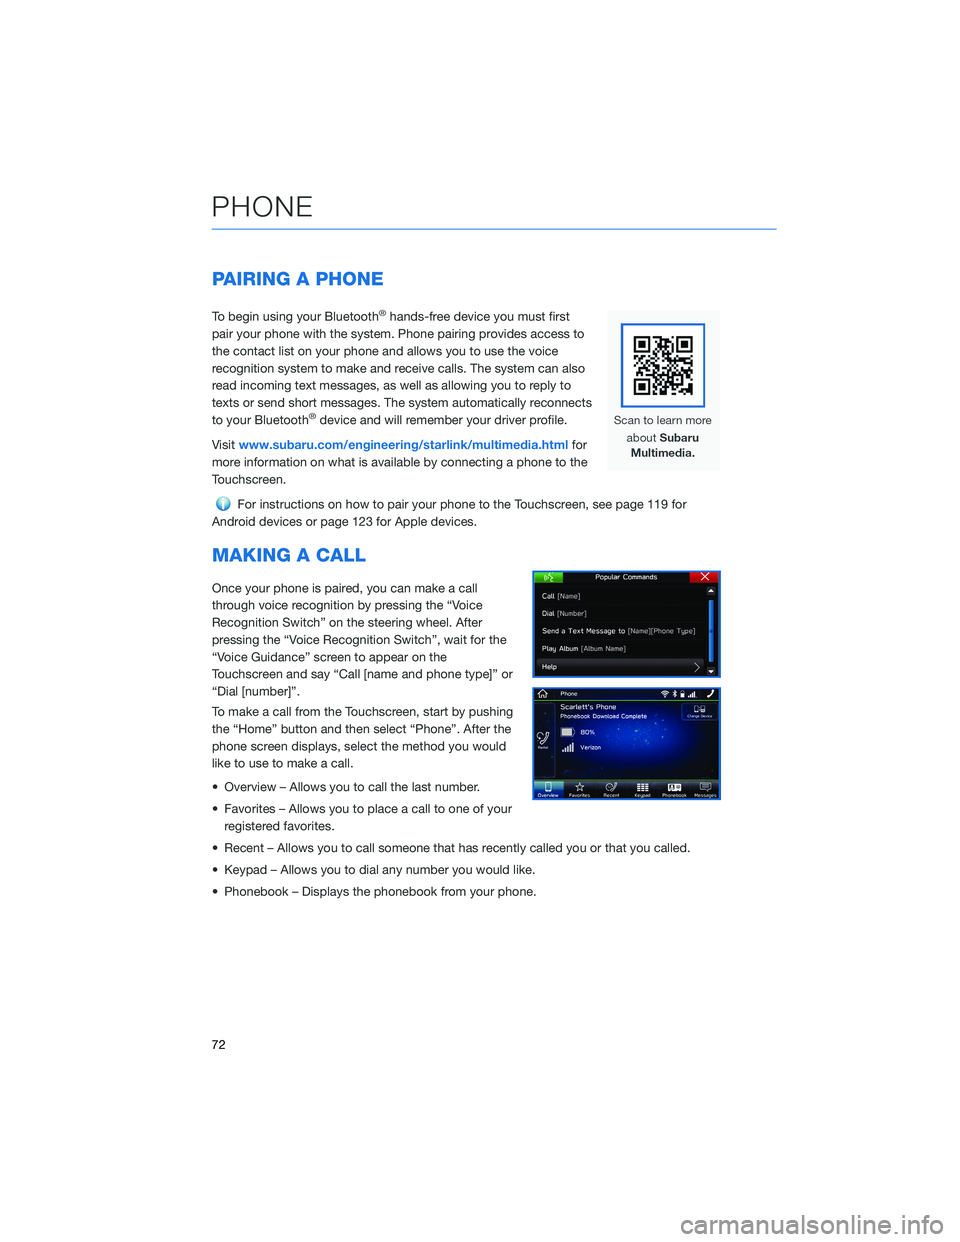
MAKING A CALL
Once your phone is paired, you can make a call
through voice recognition by pressing the “Voice
Recognition Switch” on the steering wheel. After
pressing the “Voice Recognition Switch”, wait for the
“Voice Guidance” screen to appear on the
Touchscreen and say “Call [name and phone type]” or
“Dial [number]”.
To make a call from the Touchscreen, start by pushing
the “Home” button and then select “Phone”. After the
phone screen displays, select the method you would
like to use to make a call.
• Overview – Allows you to call the last number.
• Favorites – Allows you to place a call to one of your registered favorites.
• Recent – Allows you to call someone that has recently called you or that you called.
• Keypad – Allows you to dial any number you would like.
• Phonebook – Displays the phonebook from your phone.
PHONE
72