2022 SUBARU FORESTER turn signal
[x] Cancel search: turn signalPage 3 of 156
PURPOSE OF THIS GUIDE
WELCOME................. 4
IMPORTANT SAFETY
INFORMATION .............. 4
OWNER’S RESOURCES ....... 4
IN CASE OF EMERGENCY ..... 5
TOWING YOUR ALL-WHEEL
DRIVE SUBARU ............. 6
ENTRY AND EXIT
KEYLESS ENTRY ............ 7
KEYLESS ACCESS WITH PUSH
BUTTON START ............. 9
POWER REAR GATE (PRG) ....11
INSTRUMENT PANEL........14
GAUGES AND WARNING
LIGHTS
COMBINATION METER .......16
WARNING AND INDICATOR
LIGHTS ....................17
CONTROLS
INSTRUMENT PANEL SWITCHES
(LOWER LEFT) ..............18
AUDIO CONTROLS ...........18
ADVANCED ADAPTIVE CRUISE
CONTROL .................19
i/SET SWITCH ...............19
INFO SWITCH ...............20
LIGHT CONTROLS ...........20
TURN SIGNALS .............21
WINDSHIELD WIPERS ........22
REAR WINDOW WIPER .......22
OVERHEAD CONSOLE ........23
GETTING COMFORTABLE
SEATING...................25
TILT AND TELESCOPIC
STEERING COLUMN .........27
POWER EXTERIOR MIRRORS . . 28
REAR VIEW MIRROR .........29
POWER WINDOWS ..........30
POWER MOONROOF ........30
CLIMATE CONTROL ..........31
ACCESSORY CONNECTIONS . . 38
TABLE OF CONTENTS
Page 23 of 156
Illumination Brightness
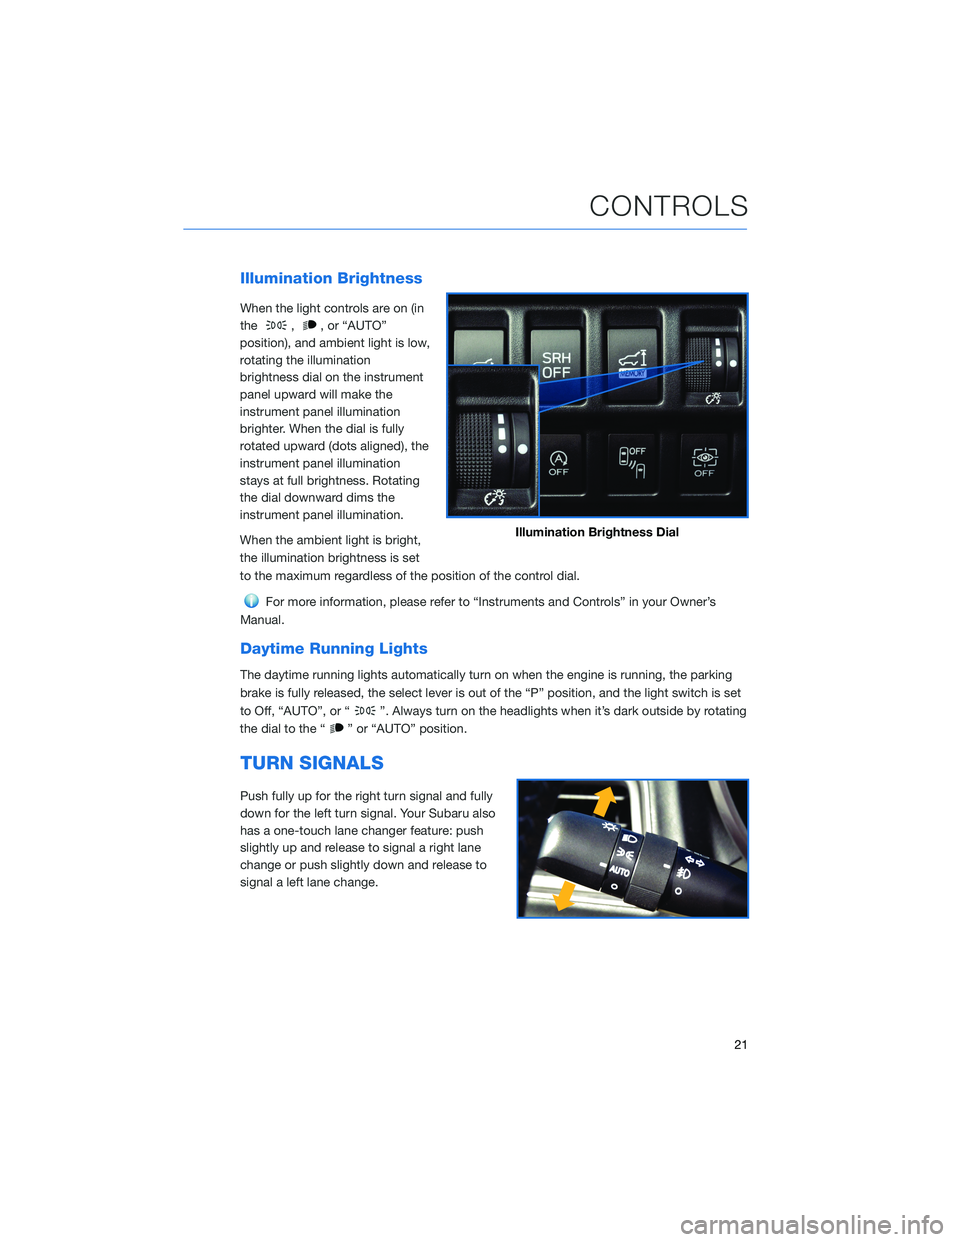
When the light controls are on (in
the
,, or “AUTO”
position), and ambient light is low,
rotating the illumination
brightness dial on the instrument
panel upward will make the
instrument panel illumination
brighter. When the dial is fully
rotated upward (dots aligned), the
instrument panel illumination
stays at full brightness. Rotating
the dial downward dims the
instrument panel illumination.
When the ambient light is bright,
the illumination brightness is set
to the maximum regardless of the position of the control dial.
For more information, please refer to “Instruments and Controls” in your Owner’s
Manual.
Daytime Running Lights
The daytime running lights automatically turn on when the engine is running, the parking
brake is fully released, the select lever is out of the “P” position, and the light switch is set
to Off, “AUTO”, or “
”. Always turn on the headlights when it’s dark outside by rotating
the dial to the “
” or “AUTO” position.
TURN SIGNALS
Push fully up for the right turn signal and fully
down for the left turn signal. Your Subaru also
has a one-touch lane changer feature: push
slightly up and release to signal a right lane
change or push slightly down and release to
signal a left lane change.
Illumination Brightness Dial
CONTROLS
21
Page 47 of 156
Auto Vehicle Hold (AVH)
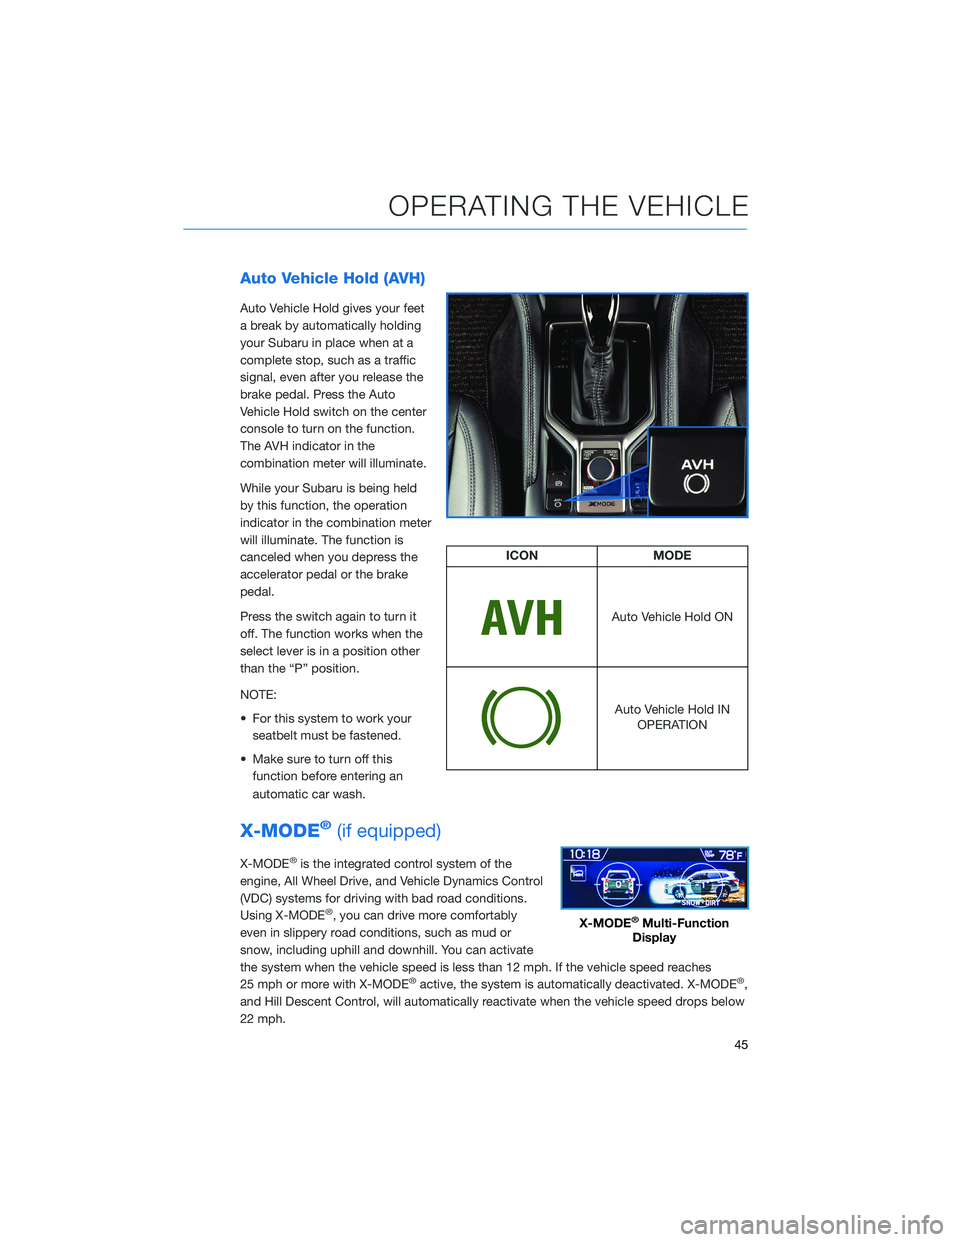
Auto Vehicle Hold gives your feet
a break by automatically holding
your Subaru in place when at a
complete stop, such as a traffic
signal, even after you release the
brake pedal. Press the Auto
Vehicle Hold switch on the center
console to turn on the function.
The AVH indicator in the
combination meter will illuminate.
While your Subaru is being held
by this function, the operation
indicator in the combination meter
will illuminate. The function is
canceled when you depress the
accelerator pedal or the brake
pedal.
Press the switch again to turn it
off. The function works when the
select lever is in a position other
than the “P” position.
NOTE:
• For this system to work yourseatbelt must be fastened.
• Make sure to turn off this function before entering an
automatic car wash.
X-MODE®(if equipped)
X-MODE®is the integrated control system of the
engine, All Wheel Drive, and Vehicle Dynamics Control
(VDC) systems for driving with bad road conditions.
Using X-MODE
®, you can drive more comfortably
even in slippery road conditions, such as mud or
snow, including uphill and downhill. You can activate
the system when the vehicle speed is less than 12 mph. If the vehicle speed reaches
25 mph or more with X-MODE
®active, the system is automatically deactivated. X-MODE®,
and Hill Descent Control, will automatically reactivate when the vehicle speed drops below
22 mph.
ICON MODE
Auto Vehicle Hold ON
Auto Vehicle Hold IN
OPERATION
X-MODE®Multi-Function
Display
OPERATING THE VEHICLE
45
Page 104 of 156
FRONT VIEW MONITOR(if equipped)
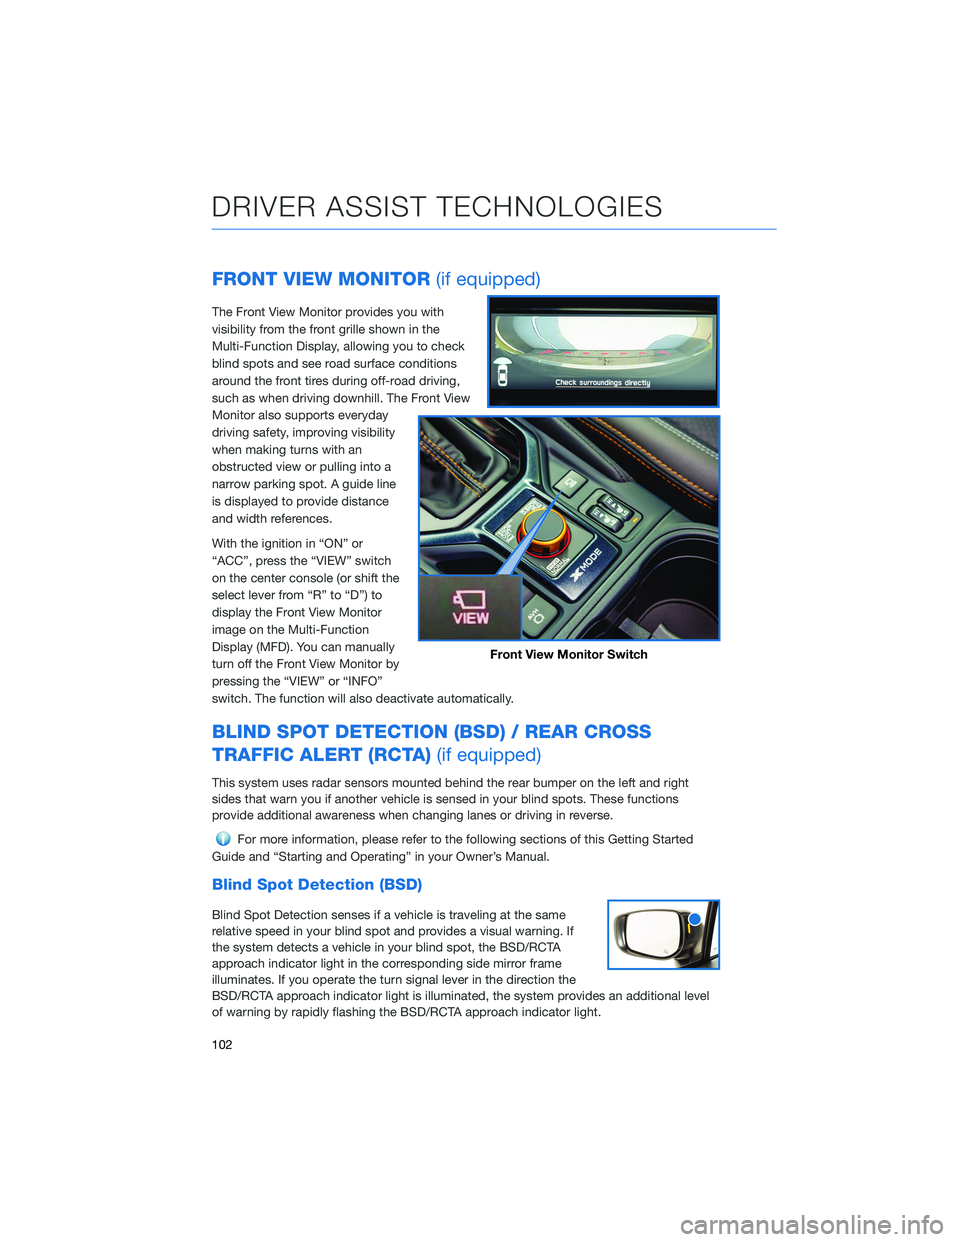
The Front View Monitor provides you with
visibility from the front grille shown in the
Multi-Function Display, allowing you to check
blind spots and see road surface conditions
around the front tires during off-road driving,
such as when driving downhill. The Front View
Monitor also supports everyday
driving safety, improving visibility
when making turns with an
obstructed view or pulling into a
narrow parking spot. A guide line
is displayed to provide distance
and width references.
With the ignition in “ON” or
“ACC”, press the “VIEW” switch
on the center console (or shift the
select lever from “R” to “D”) to
display the Front View Monitor
image on the Multi-Function
Display (MFD). You can manually
turn off the Front View Monitor by
pressing the “VIEW” or “INFO”
switch. The function will also deactivate automatically.
BLIND SPOT DETECTION (BSD) / REAR CROSS
TRAFFIC ALERT (RCTA) (if equipped)
This system uses radar sensors mounted behind the rear bumper on the left and right
sides that warn you if another vehicle is sensed in your blind spots. These functions
provide additional awareness when changing lanes or driving in reverse.
For more information, please refer to the following sections of this Getting Started
Guide and “Starting and Operating” in your Owner’s Manual.
Blind Spot Detection (BSD)
Blind Spot Detection senses if a vehicle is traveling at the same
relative speed in your blind spot and provides a visual warning. If
the system detects a vehicle in your blind spot, the BSD/RCTA
approach indicator light in the corresponding side mirror frame
illuminates. If you operate the turn signal lever in the direction the
BSD/RCTA approach indicator light is illuminated, the system provides an additional level
of warning by rapidly flashing the BSD/RCTA approach indicator light.
Front View Monitor Switch
DRIVER ASSIST TECHNOLOGIES
102
Page 105 of 156
Lane Change Assist (LCA)
Lane Change Assist (LCA) provides an additional level of protection by warning you of
rapidly approaching vehicles in the neighboring lanes. If LCA detects a vehicle
approaching at a high speed in the neighboring lanes, the BSD/RCTA approach indicator
light in the corresponding side mirror frame illuminates. If you operate the turn signal lever
in the direction the BSD/RCTA approach indicator light is illuminated, the system rapidly
flashes the BSD/RCTA approach indicator light.
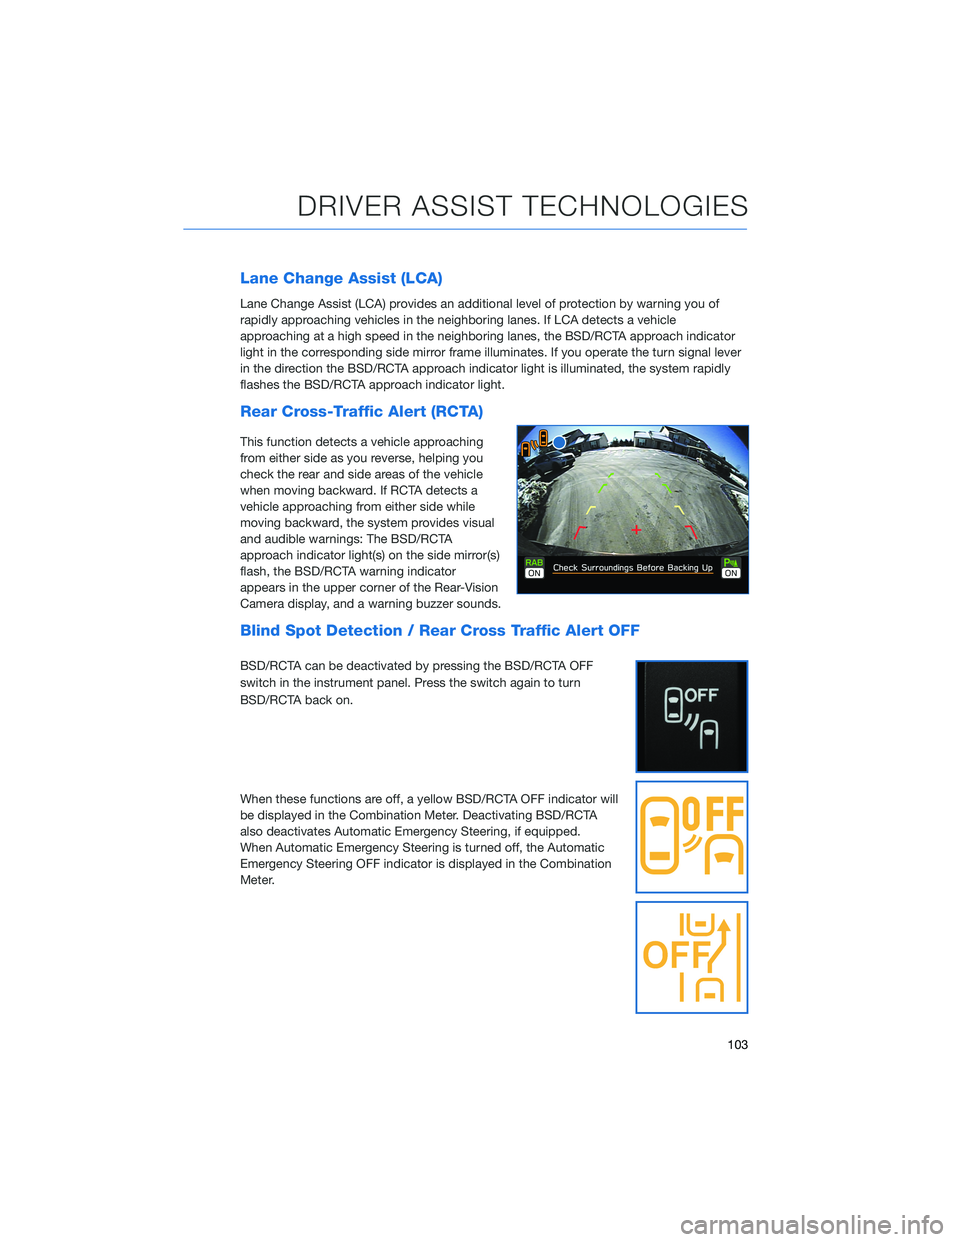
Rear Cross-Traffic Alert (RCTA)
This function detects a vehicle approaching
from either side as you reverse, helping you
check the rear and side areas of the vehicle
when moving backward. If RCTA detects a
vehicle approaching from either side while
moving backward, the system provides visual
and audible warnings: The BSD/RCTA
approach indicator light(s) on the side mirror(s)
flash, the BSD/RCTA warning indicator
appears in the upper corner of the Rear-Vision
Camera display, and a warning buzzer sounds.
Blind Spot Detection / Rear Cross Traffic Alert OFF
BSD/RCTA can be deactivated by pressing the BSD/RCTA OFF
switch in the instrument panel. Press the switch again to turn
BSD/RCTA back on.
When these functions are off, a yellow BSD/RCTA OFF indicator will
be displayed in the Combination Meter. Deactivating BSD/RCTA
also deactivates Automatic Emergency Steering, if equipped.
When Automatic Emergency Steering is turned off, the Automatic
Emergency Steering OFF indicator is displayed in the Combination
Meter.
DRIVER ASSIST TECHNOLOGIES
103
Page 111 of 156
DROWSY/INATTENTIVE WARNINGS
DriverFocus®detects when the driver is possibly not paying
attention or is becoming drowsy while driving. It works whether you
are a registered user or not. The system does not provide alerts
when the turn signals are operating or when the select lever is in the
“R” position.
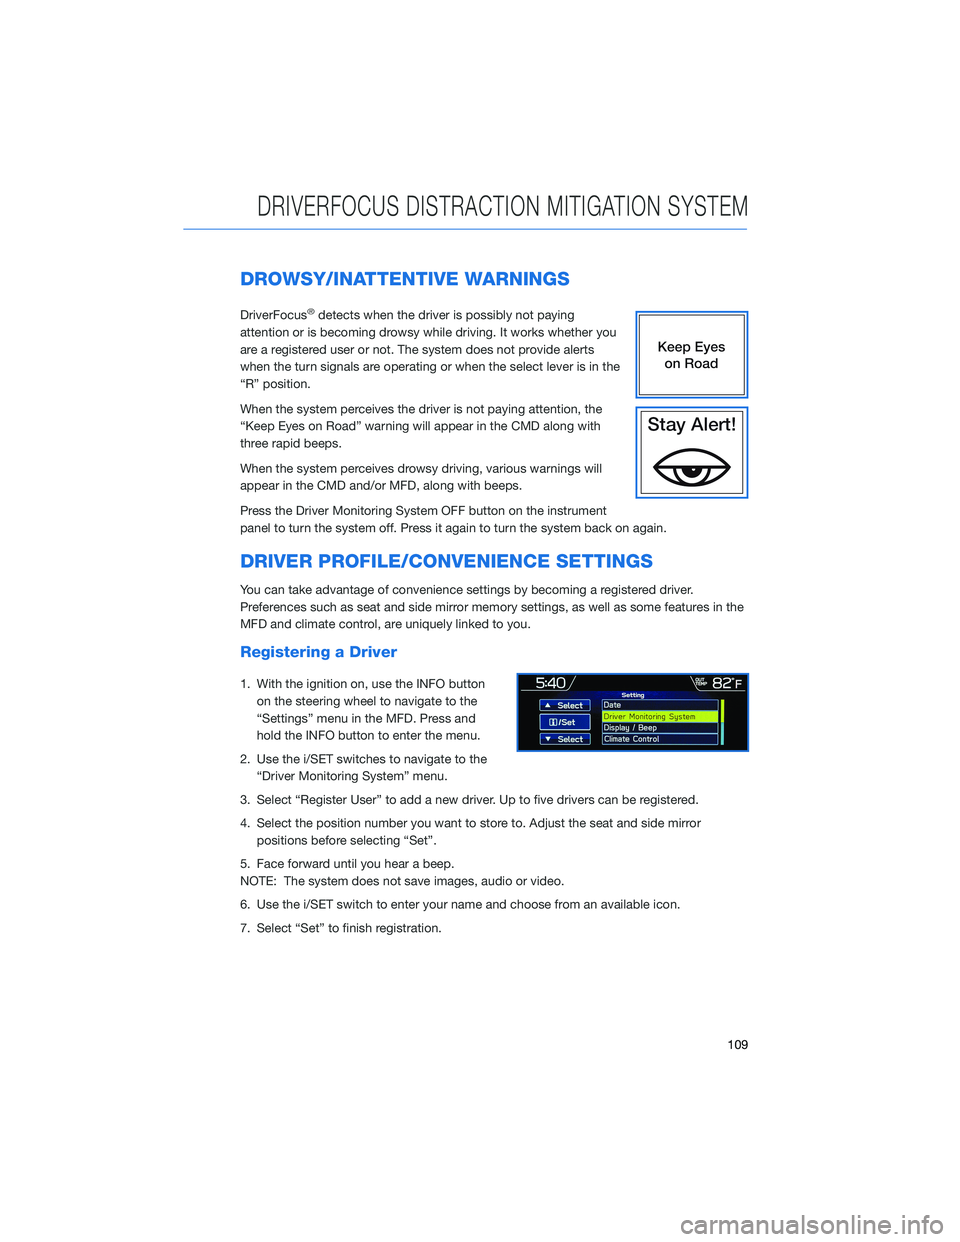
When the system perceives the driver is not paying attention, the
“Keep Eyes on Road” warning will appear in the CMD along with
three rapid beeps.
When the system perceives drowsy driving, various warnings will
appear in the CMD and/or MFD, along with beeps.
Press the Driver Monitoring System OFF button on the instrument
panel to turn the system off. Press it again to turn the system back on again.
DRIVER PROFILE/CONVENIENCE SETTINGS
You can take advantage of convenience settings by becoming a registered driver.
Preferences such as seat and side mirror memory settings, as well as some features in the
MFD and climate control, are uniquely linked to you.
Registering a Driver
1. With the ignition on, use the INFO button on the steering wheel to navigate to the
“Settings” menu in the MFD. Press and
hold the INFO button to enter the menu.
2. Use the i/SET switches to navigate to the “Driver Monitoring System” menu.
3. Select “Register User” to add a new driver. Up to five drivers can be registered.
4. Select the position number you want to store to. Adjust the seat and side mirror positions before selecting “Set”.
5. Face forward until you hear a beep.
NOTE: The system does not save images, audio or video.
6. Use the i/SET switch to enter your name and choose from an available icon.
7. Select “Set” to finish registration.
DRIVERFOCUS DISTRACTION MITIGATION SYSTEM
109
Page 144 of 156
FIRMWARE AND SOFTWARE UPDATES
For 8.0–inch Multimedia Plus and 8.0–inch Multimedia Navigation systems, you can
update the system software via a Wi-Fi connection or the aha™ application on your
smartphone (depending on your smartphone communication and transfer speed).
To accurately check for updates, make sure the clock is set to “Auto” with a GPS signal
available (system with navigation) or a phone paired via Bluetooth
®(system without
navigation). See page 87 for step by step directions on setting the clock. System
functionality will be restricted during installation.
1. Connect to a Wi-Fi network or start the aha application on your smartphone (see page 131).
2. Return to the general settings screen (if needed, press the “Home” button, select “Settings”, and then select “General”).
3. Select “Check for Updates”. • If “Automatically Check for Updates” is turned on at the general settings screen, anupdate check will be performed automatically before proceeding to the next step.
• If “Automatically Download Updates” is turned on at the general settings screen, the software update will be downloaded automatically before proceeding to “Update
Installation”.
4. If the “Software Update Ready to Download” pop-up is displayed, select “Download Now” to begin the download. The download status progress is displayed in the upper
right of the screen.
5. Select “Install Now” to start the installation process. The installation process will take several minutes to complete. If you need to stop the installation process, press
“Cancel”.
6. When the installation is complete, select “I Agree” on the confirmation message to complete the update process. By selecting “I Agree”, the system will restart
automatically.
HOW TO APPENDIX
142
Page 148 of 156
S
SAFETY AND SECURITY OVERVIEW . . 80
SEATING . . . . . . . . . . . . ...... 25
Head Restraint Adjustment . . ....26
Manual Seats . . . . . .........25
Power Driver’s Seat (if equipped) . . . 25
Seatbelt Adjuster . . . . . . . . . . . . 27
SETTINGS AND UPDATES OVERVIEW . 83 Connect to Home Wi-Fi . .......83
Performing Software Updates .....83
SOUND ................... 84
SPARE TIRE AND JACK . . ....... 53
STARTING THE VEHICLE . . . . . .... 39
Without Push-button Ignition .....39
With Push-button Ignition .......39
STEERING RESPONSIVE HEADLIGHTS (SRH) .................. 104
STEERING WHEEL CONTROLS . . . . . 63 Advanced Adaptive Cruise Control . . 98
Customizing EyeSight
®Settings . . . 99
STEREO CAMERA PRECAUTIONS . . 112
SUBARU STARLINK
®IN-VEHICLE
APPS . . . . . . . . . . . . ...... 75
aha™ by HARMAN . . . . . . . ....75
Android Auto™ . . . . . . . . . . . . . 76
Apple CarPlay
®.............76
Pandora®................75
SiriusXM®Travel Link . . ........76
SUBARU STARLINK®MOBILE APP . . 77
SUBARU STARLINK®WI-FI HOTSPOT . 82
T
TEXT MESSAGES . . . . . . . . . . . . . 74
TILT AND TELESCOPIC STEERING COLUMN . . . . . . . . . . . . . . . . 27
TIRE PRESSURE MONITORING SYSTEM (TPMS) .................. 58
TOUCHSCREEN . . . . . . . ....... 62
TOWING YOUR ALL-WHEEL DRIVE SUBARU . . . . . . . . . . . . ..... 6TRAILER TOWING CAPACITY . . . . . . 57
TURNING OFF THE VEHICLE
...... 48
Without Push-button Ignition .....48
With Push-button Ignition . . .....48
TURN SIGNALS . . . . . . ........ 21
V
VOICE RECOGNITION . ......... 64
Common Commands . . . . . . . . . . 65
Tips ....................64
W
WARNING AND INDICATOR LIGHTS . . 17
WELCOME .................. 4
WI-FI .................... 131
Connecting to a Wi-Fi Network . . . 131
Wi-Fi Hotspot Subscription . . . . . 133
WINDSHIELD GLASS AND DASHBOARD . . . . . . . ...... 112
WINDSHIELD WIPERS . ......... 22
X
X-MODE
®................. 45
Hill Descent Control (HDC) .......48
X-MODE
®Dual Mode System . . . . . 47
X-MODE®Standard System ......46
INDEX
146