2022 RAM CHASSIS CAB ECO mode
[x] Cancel search: ECO modePage 184 of 428

182STARTING AND OPERATING
When activated the feature will enable all of the
exterior lights sequentially for up to five minutes
allowing time to walk around and verify
functionality. The following exterior lights will
remain on for the entirety of the sequence:
Park/Running Lamps
Side Marker Lamps (if equipped)
License Lamp
Signature Lamp (if equipped)
Low Beams
Fog Lamps (if equipped)
Daytime Running Lamps
During this time the following lights will sequence,
each activating for three seconds:
1. Brake and CHMSL (third brake light)
2. Left turn signal
3. Right turn signal
4. Reverse Lamps
5. High Beam
This light check sequence will continue for a total
of five minutes. The sequence will only activate if the following
conditions are met:
Vehicle is equipped with the Trailer Tow
Package
Vehicle is in PARK
Vehicle is not in motion
Ignition in ACC or RUN
Remote start is inactive
Brakes are not applied
Left turn signal is not applied
Right turn signal not applied
Hazard switch is not applied
The sequence will cancel if any of the following
conditions occur:
Brakes are applied
Vehicle is shifted from PARK
Vehicle is no longer stationary
Left turn signal activated from stalk
Right turn signal is activated from stalk
Hazard switch is activated
Any button on the key fob is pushed
Ignition button is pushed
High Beam stalk position is changed
Sequence is canceled in the instrument cluster
TOWING TIPS
Before setting out on a trip, practice turning,
stopping, and backing up the trailer in an area
located away from heavy traffic.
Automatic Transmission
The DRIVE range can be selected when towing. The
transmission controls include a drive strategy to
avoid frequent shifting when towing. However, if
frequent shifting does occur while in DRIVE, select
TOW/HAUL mode or select a lower gear range
(using the Electronic Range Select (ERS) shift
control).
NOTE:Using TOW/HAUL mode or selecting a lower gear
range (using the ERS shift control) while operating
the vehicle under heavy loading conditions will
improve performance and extend transmission life
by reducing excessive shifting and heat build-up.
This action will also provide better engine braking.
6-Speed Automatic Transmission Only
When towing a loaded trailer up steep grades at
low speeds (20 mph [32 km/h] or below), holding
your vehicle in FIRST gear (using the ERS shift
control) can help to avoid transmission
overheating.
22_DPF_OM_EN_USC_t.book Page 182
Page 185 of 428

STARTING AND OPERATING183
If you regularly tow a trailer for more than
45 minutes of continuous operation, then change
the automatic transmission fluid and filter(s) as
specified for "police, taxi, fleet, or frequent trailer
towing." Ú page 329.
NOTE:Check the automatic transmission fluid level
before towing (6-speed automatic only).
Tow/Haul Mode
To reduce potential for automatic transmission
overheating, activate TOW/HAUL mode when
driving in hilly areas, or select a lower gear range
(using the Electronic Range Select (ERS) shift
control) on more severe grades.
Cruise Control — If Equipped
Do not use on hilly terrain or with heavy loads.
When using the Cruise Control, if you experience
speed drops greater than 10 mph (16 km/h),
disengage until you can get back to cruising
speed.
Use Cruise Control in flat terrain and with light
loads to maximize fuel efficiency.
SNOWPLOW — IF EQUIPPED
Snowplow Prep Packages are available as a factory
installed option. These packages include
components necessary to equip your vehicle with a
snowplow.
NOTE:Before installation of a snowplow it is highly recom -
mended that the owner/installer obtain and follow
the recommendations contained within the current
Body Builder’s Guide. See an authorized dealer,
installer or snowplow manufacturer for this infor -
mation. There are unique electrical systems that
must be connected to properly ensure operator
safety and prevent overloading vehicle systems.
BEFORE PLOWING
Check the hydraulic system for leaks and proper
fluid level.
Check the mounting bolts and nuts for proper
tightness.
Check the runners and cutting edge for exces -
sive wear. The cutting edge should be ¼ to
½ inches (6 cm to 1.2 cm) above ground in
snow plowing position.
Check that snowplow lighting is connected and
functioning properly.
SNOWPLOW PREP PACKAGE MODEL
A
VAILABILITY
For Information about snowplow applications visit
www.ramtrucks.com or refer to the current Body
Builder’s Guide.
1. The maximum number of occupants in the
truck should not exceed two.
2. The total GVWR or the Front GAWR or the Rear GAWR should never be exceeded.
3. Cargo capacity will be reduced by the addition of options or passengers, etc.WARNING!
Attaching a snowplow to this vehicle could
adversely affect performance of the airbag
system in a collision. Do not expect that the
airbag will perform as described earlier in this
manual.
CAUTION!
The “Lamp Out” indicator could illuminate if
exterior lamps are not properly installed.
4
22_DPF_OM_EN_USC_t.book Page 183
Page 189 of 428

STARTING AND OPERATING187
4. Shift the transfer case into N (Neutral):
With manual shift transfer case, shift the
transfer case lever into N (Neutral).
With electronically shifted transfer case,
push and hold the transfer case N (Neutral)
button. Some models have a small,
recessed "N" button (at the center of the
transfer case switches) that must be
pressed using a ballpoint pen or similar
object. Other models have a rectangular N
(Neutral) switch, below the rotary transfer
case control knob. The N (Neutral) indicator
light will blink while the shift is in progress.
The light will stop blinking (stay on solid)
when the shift to N (Neutral) is complete.
After the shift is completed and the N
(Neutral) light stays on, release the N
(Neutral) button.
5. Release the parking brake.
6. Shift the transmission into REVERSE.
7. Release the brake pedal for five seconds and ensure that there is no vehicle movement.
8. Repeat steps 6 and 7 with automatic transmission in DRIVE.
9. Shift the transmission to NEUTRAL. Firmly apply the parking brake. Turn off the engine.
For vehicles with Keyless Enter ‘n Go™, push
and hold the ENGINE START/STOP button until
the engine shuts off. 10. Shift the transmission into PARK.
11. Place the ignition in the OFF mode, and
remove the key fob.
12. Attach the vehicle to the tow vehicle using a suitable tow bar.
13. Release the parking brake.
NOTE:With electronically shifted transfer case:
Steps 2 through 3 are requirements that must
be met before pushing the N (Neutral) button,
and must continue to be met until the shift has
been completed. If any of these requirements
are not met before pushing the N (Neutral)
button or are no longer met during the shift, the
N (Neutral) indicator light will flash continuously
until all requirements are met or until the
N (Neutral) button is released.
The ignition must be in the ON/RUN mode for a
shift to take place and for the position indicator
lights to be operable. If the ignition is not in the
ON/RUN mode, the shift will not take place and
no position indicator lights will be on or flashing.
A flashing N (Neutral) position indicator light
indicates that shift requirements have not been
met.
Shifting Out Of N (Neutral)
Use the following procedure to prepare your
vehicle for normal usage:
1. Bring the vehicle to a complete stop, leaving it connected to the tow vehicle.
2. Firmly apply the parking brake.
3. Press and hold the brake pedal.
4. Start the engine, and shift the transmission into NEUTRAL.
With manual shift transfer case, shift the
transfer case lever to the desired position.
With electronically shifted transfer case
with rotary selector switch, push and hold
the transfer case N (Neutral) button until
the N (Neutral) indicator light turns off. After
the N (Neutral) indicator light turns off,
release the N (Neutral) button. After the N
(Neutral) button has been released, the
transfer case will shift to the position indi -
cated by the selector switch.
With electronically shifted transfer case
with push-button selector switch, push and
hold the switch for the desired transfer case
position, until the N (Neutral) indicator light
turns off and the desired position indicator
light turns on.
4
22_DPF_OM_EN_USC_t.book Page 187
Page 198 of 428

196MULTIMEDIA
Safety/Driving Assistance
Touchscreen Beep This setting will allow you to turn the touchscreen beep on or off.
Control Screen Timeout This setting allows you to set the Control Screen to turn off automatically after
five seconds or stay open until manually closed.
Navigation Next Turn Pop-ups Displayed in Cluster This setting will display navigation prompts in the Instrument Cluster Display.
Phone Pop-ups Displayed In Cluster This setting will display smartphone notifications and messages in the
Instrument Cluster Display.
Fuel Saver Display This setting will enable fuel saver mode in the Instrument Cluster Display.
Ready To Drive Pop-ups This setting will enable the Ready To Drive Pop-ups in the Instrument Cluster
Display.
Setting Name
Description
When the Safety/Driving Assistance button is selected on the touchscreen, the system displays the options related to the vehicle’s safety settings. These
options will differ depending on the features equipped on the vehicle. The settings may display in list form or within subfolders on the screen. To access a
subfolder, select the desired folder; the available options related to that feature will then display on the screen.
NOTE:Depending on the vehicle’s options, feature settings may vary.
Setting NameDescription
Forward Collision Warning Sensitivity This setting will change the distance at which the Forward Collision Warning
(FCW) alert sounds. The “Medium” setting will have the FCW system signal
when an object is in view, and the possibility of a collision is detected. The
“Near” setting will have the FCW system signal when the object is closer to the
vehicle. The “Far” setting will have the FCW system signal when an object is at
a far distance from the vehicle.
22_DPF_OM_EN_USC_t.book Page 196
Page 214 of 428

212MULTIMEDIA
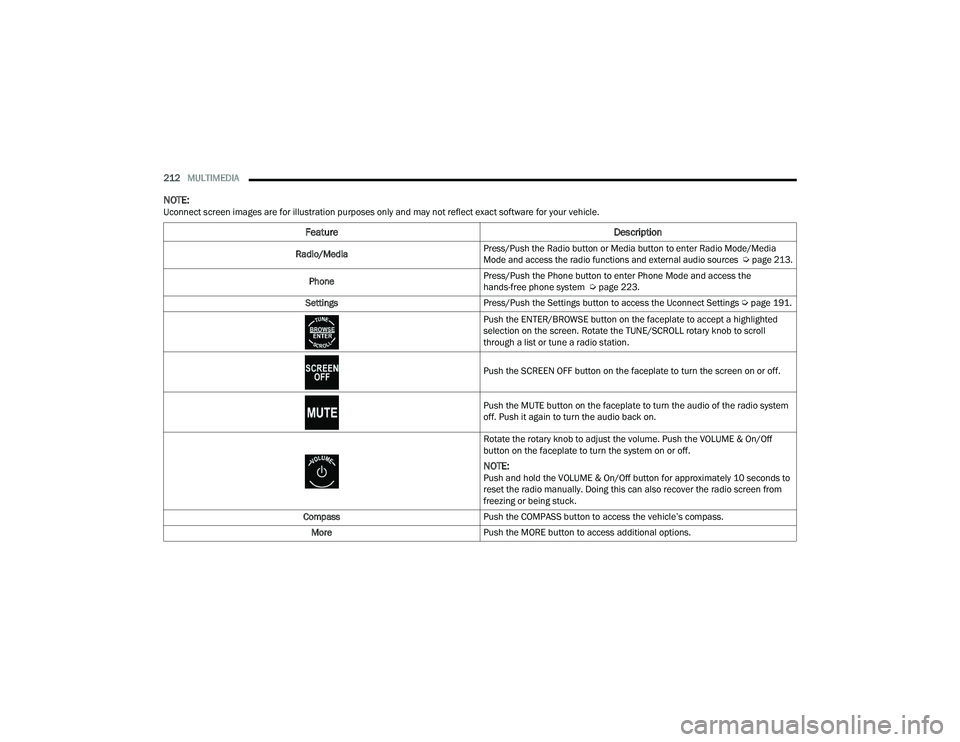
NOTE:Uconnect screen images are for illustration purposes only and may not reflect exact software for your vehicle.
Feature Description
Radio/Media
Press/Push the Radio button or Media button to enter Radio Mode/Media
Mode and access the radio functions and external audio sources
Ú
page 213.
Phone Press/Push the Phone button to enter Phone Mode and access the
hands-free phone system Ú
page 223.
Settings Press/Push the Settings button to access the Uconnect Settings Ú page 191.
Push the ENTER/BROWSE button on the faceplate to accept a highlighted
selection on the screen. Rotate the TUNE/SCROLL rotary knob to scroll
through a list or tune a radio station.
Push the SCREEN OFF button on the faceplate to turn the screen on or off.
Push the MUTE button on the faceplate to turn the audio of the radio system
off. Push it again to turn the audio back on.
Rotate the rotary knob to adjust the volume. Push the VOLUME & On/Off
button on the faceplate to turn the system on or off.
NOTE:Push and hold the VOLUME & On/Off button for approximately 10 seconds to
reset the radio manually. Doing this can also recover the radio screen from
freezing or being stuck.
Compass Push the COMPASS button to access the vehicle’s compass.
More Push the MORE button to access additional options.
22_DPF_OM_EN_USC_t.book Page 212
Page 216 of 428

214MULTIMEDIA
The right-hand control is a rocker-type switch with
a push button in the center and controls the
volume and mode of the sound system. Pushing
the top of the rocker switch will increase the
volume, and pushing the bottom of the rocker
switch will decrease the volume.
Pushing the center button will make the radio
switch between the various modes available
(AM/FM/SXM or Media, etc.).
The left-hand control is a rocker-type switch with a
push button in the center. The function of the
left-hand control is different depending on which
mode you are in.
The following describes the left-hand control
operation in each mode:
Radio Operation
Pushing the top of the switch will Seek Up for the
next available station and pushing the bottom of
the switch will Seek Down for the next available
station.
The button located in the center of the left-hand
control will tune to the next preset station that you
have programmed in the radio presets.
Media Mode
Pushing the top of the switch skips to the next
track on the selected media (AUX/USB/
Bluetooth®). Pushing the switch up twice will go
forward two tracks. Pushing the bottom switch goes to the beginning of the current track, or the
beginning of the previous track if it is within eight
seconds after the current track begins to play.
Double pressing the bottom button switch will skip
to the previous track if it is after eight seconds into
the current track.
RADIO MODE
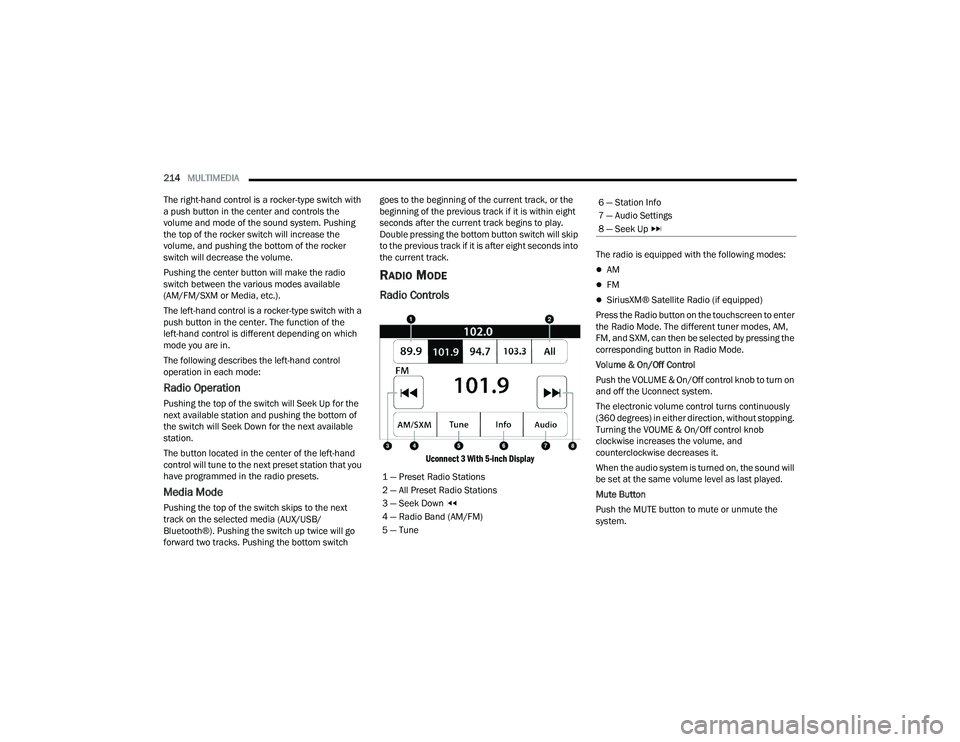
Radio Controls
Uconnect 3 With 5-inch Display
The radio is equipped with the following modes:
AM
FM
SiriusXM® Satellite Radio (if equipped)
Press the Radio button on the touchscreen to enter
the Radio Mode. The different tuner modes, AM,
FM, and SXM, can then be selected by pressing the
corresponding button in Radio Mode.
Volume & On/Off Control
Push the VOLUME & On/Off control knob to turn on
and off the Uconnect system.
The electronic volume control turns continuously
(360 degrees) in either direction, without stopping.
Turning the VOUME & On/Off control knob
clockwise increases the volume, and
counterclockwise decreases it.
When the audio system is turned on, the sound will
be set at the same volume level as last played.
Mute Button
Push the MUTE button to mute or unmute the
system.
1 — Preset Radio Stations
2 — All Preset Radio Stations
3 — Seek Down
4 — Radio Band (AM/FM)
5 — Tune
6 — Station Info
7 — Audio Settings
8 — Seek Up
22_DPF_OM_EN_USC_t.book Page 214
Page 217 of 428

MULTIMEDIA215
Tune/Scroll Control
Turn the rotary TUNE/SCROLL control knob
clockwise to increase or counterclockwise to
decrease the radio station frequency. Push the
ENTER/BROWSE button to choose a selection.
Seek
The Seek Up and Down functions are activated by
pressing the double arrow buttons on the
touchscreen to the right and left of the radio
station display or by pushing the left steering wheel
audio control button up or down.
Seek Up and Seek Down
Press and release the Seek Up or Seek
Down button to tune the radio to the next
available station or channel. During a Seek Up/
Down function, if the radio reaches the starting
station after passing through the entire band two
times, the radio will stop at the station where it
began.
Fast Seek Up and Fast Seek Down
Press and hold, and then release the Seek Up
or Seek Down button to advance the radio
through the available stations or channels at a
faster rate. The radio stops at the next available
station or channel when the button on the
touchscreen is released.
NOTE:
Pressing and holding either the Seek Up or
Seek Down button will scan the different
frequency bands at a slower rate.
Info — If Equipped
Press the Info button to display information related
to the currently playing song and radio station.
Direct Tune
Press the Tune button located at the bottom of the
radio screen to directly tune to a desired radio
station or channel.
Press the available number button on the
touchscreen to begin selecting a desired station.
Once a number has been entered, any numbers
that are no longer possible (stations that cannot be
reached) will become deactivated/grayed out.
Undo
You can backspace an entry by pressing the
Back button on the touchscreen.
GO
Once the last digit of a station has been entered,
press “Ok”. The Direct Tune screen will close, and
the system will automatically tune to that station.
RADIO VOICE COMMANDS
Use your voice to quickly get to the AM, FM, or
SiriusXM® Satellite Radio stations you would like
to hear. (Subscription or included SiriusXM®
Satellite Radio trial required.)
Push the VR button on the steering wheel and
wait for the beep to say a command. See an
example below:
“ Tune to ninety-five-point-five FM”
“Tune to Satellite Channel Hits 1”
Did You Know: At any time, if you are not sure of
what to say or want to learn a Voice Command,
push the VR button and say “ Help”. The system
provides you with a list of commands.
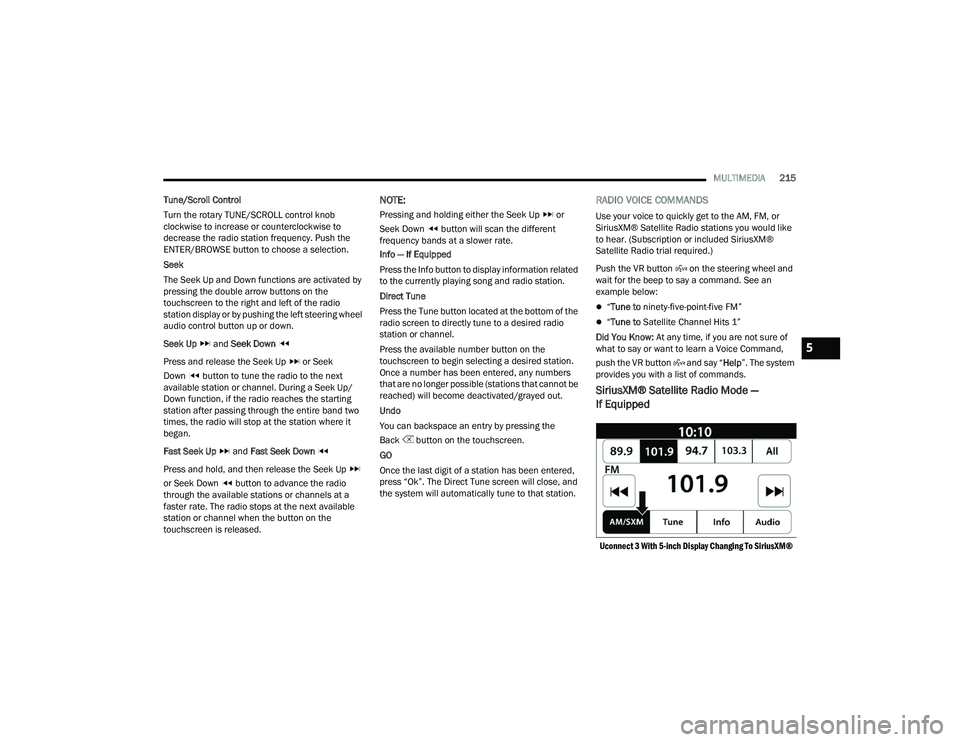
SiriusXM® Satellite Radio Mode —
If Equipped
Uconnect 3 With 5-inch Display Changing To SiriusXM®
5
22_DPF_OM_EN_USC_t.book Page 215
Page 219 of 428

MULTIMEDIA217
Uconnect 3 With 5-inch Display SiriusXM® Satellite Radio
REPLAY
Replay provides a means to store and replay up to
22 minutes of music audio and 48 minutes of talk
radio. Once the channel is switched, content in
replay memory is lost.
Press the Replay button on the touchscreen. The
Play/Pause, Rewind/Forward and Live buttons will
display at the top of the screen, along with the
replay time.
You can exit by pressing the Replay button on the
touchscreen any time during the Replay Mode.1 — Browse
2 — Radio Bands
3 — Direct Tune
4 — Info Button
5 — Next Button
Play/Pause Press the Pause/Play button on the touchscreen to pause the playing of live or rewound content
at any time. Play can be resumed by pressing the Pause/Play button again on the touchscreen.
Rewind Press the Rewind button on the touchscreen to rewind the content in steps of five seconds.
Pressing the Rewind button on the touchscreen for more than two seconds rewinds the content.
The radio begins playing the content at the point at which the press is released.
Forward Each press of the Forward button on the touchscreen forwards the content in steps of five
seconds. Forwarding of the content can only be done when the content is previously rewound,
and therefore, cannot be done for live content. A continuous press of the Forward button on the
touchscreen also forwards the content. The radio begins playing the content at the point at which
the press is released.
Live Press the Live button on the touchscreen to resume the playing of live content.
5
22_DPF_OM_EN_USC_t.book Page 217