2022 PEUGEOT LANDTREK bulb
[x] Cancel search: bulbPage 5 of 164
3
Contents
Checks 95
Maintenance 97
Free-wheeling 103
Advice on care and maintenance 103
8In the event of a breakdownWarning triangle 106
Fire extinguisher 106
Running out of fuel (Diesel) 107
Tool kit 107
Spare wheel 108
Changing a bulb 11 2
Fuses 11 6
12
V battery 11 6
Towing the vehicle 11 9
9Technical dataEngine technical data and towed loads 122
Petrol engines 123
Diesel engines 124
Dimensions 125
Identification markings 125
10Bluetooth® audio systemMenus 127
Steering mounted controls 128
Radio 128
Media 129
Telephone 129
11Peugeot Connect 10" TouchscreenFirst steps 131
Steering mounted controls 131
Menus 132
Navigation 133
Radio 133
Music player 133
Telephone 134
Applications 135
Settings 136
12Event data recorders
■
Alphabetical index
Page 51 of 164
49
Safety
5General safety
recommendations
On and off-road driving
This commercial and all-terrain type
vehicle can be driven on roads and rough
terrain. The higher ground clearance and
centre of gravity make this vehicle more
likely to tip over. Refer to the Driving
recommendations.
Do not remove the labels attached in
different places on your vehicle. They
include safety warnings as well as
identification information for the vehicle.
For all work on your vehicle, use a
qualified workshop that has the technical
information, skills and equipment required, all
of which a PEUGEOT dealer is able to
provide.
Depending on country regulations,
certain safety equipment may be
mandatory: high visibility safety vests,
warning triangles, breathalysers, spare bulbs,
spare fuses, fire extinguisher, first aid kit, mud
flaps at the rear of the vehicle, etc.
Installing electrical accessories:
– The fitting of electrical equipment or
accessories not approved by PEUGEOT
may
cause excessive current consumption and
faults and failures with the electrical system
of your vehicle. Contact a PEUGEOT dealer
for information on the range of approved
accessories.
–
As a safety measure, access to the
diagnostic socket, used for the vehicle's
electronic systems, is reserved strictly for
PEUGEOT
dealers or qualified workshops,
equipped with the special tools required (risk
of malfunctions of the vehicle's electronic
systems that could cause breakdowns or
serious accidents). The Manufacturer cannot
be held responsible if this advice is not
followed.
–
Any modification or adaptation not intended
or authorised by PEUGEOT
or carried out
without meeting the technical requirements
defined by the Manufacturer will result in the
suspension of the commercial warranty.
Installation of accessory radio
communication transmitters
Before installing a radio communication
transmitter with an external aerial, you must
without fail contact a PEUGEOT dealer for
the specification of transmitters which can
be fitted (frequency, maximum power, aerial
position, specific installation requirements),
in line with the Vehicle Electromagnetic
Compatibility Directive (2004/104/EC).
Declarations of conformity for radio
equipment
The relevant certificates are available on the
http://public.servicebox.peugeot.com/APddb/
website.
Operating speed thresholds
The speed threshold values, for the
operation of certain systems, are given for
information purposes only. The thresholds
may be different under actual conditions of
use of the vehicle.
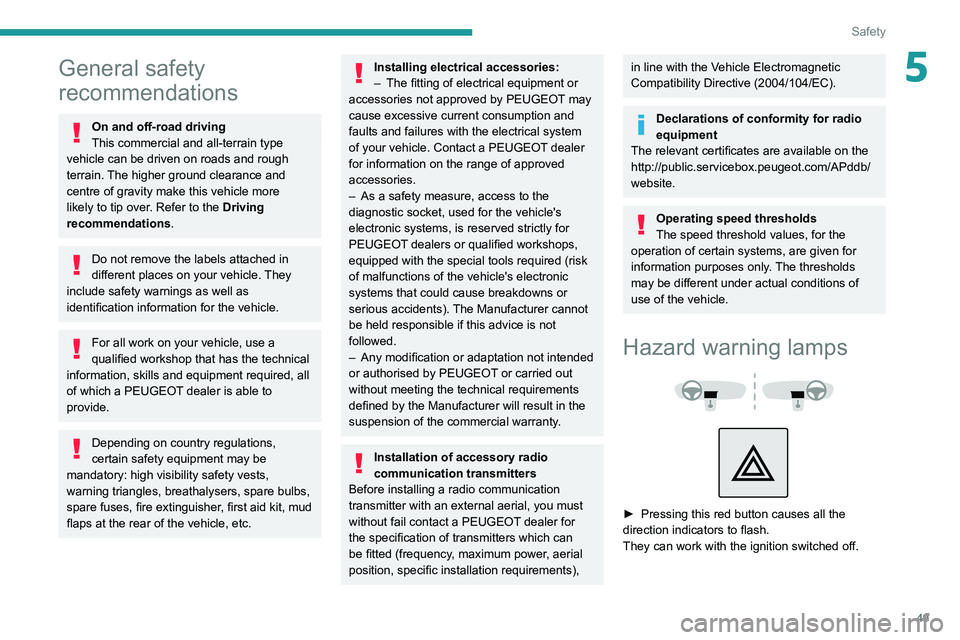
Hazard warning lamps
► Pressing this red button causes all the
direction indicators to flash.
They can work with the ignition switched off.
Page 114 of 164
11 2
In the event of a breakdown
Changing a bulb
In some weather conditions (e.g. low
temperature or humidity), misting on the
internal surface of the glass of the headlamps
and rear lamps is normal, and will disappear
after the lamps have been on for a few
minutes.
The headlamps have polycarbonate lenses with a protective coating:
–
Do not clean them with a dry or abrasive
cloth, nor with detergent or solvent
products.
–
Use a sponge and soapy water or a pH
neutral product.
–
When using a high-pressure washer on
persistent marks, do not keep the lance
directed towards the headlamps, lamps or
their edges for too long, so as not to damage
their protective coating and seals.
Changing a bulb must only be done with
the ignition off and after the headlamp /
lamp has been switched off for several
minutes - risk of serious burns!
Do not touch the bulb directly with your
fingers; use a lint-free cloth.
It is essential only to use anti-ultraviolet
(UV) type bulbs, so as not to damage the
headlamp.
Always replace a failed bulb with a new bulb
of the same type and specification. To avoid
lighting imbalance, replace the bulbs in pairs.
After changing a bulb
To refit, carry out the operations in
reverse order to removal.
Close the protective cover very carefully to
guarantee the sealing of the lamps.
Light-emitting diode (LED)
headlamps and lamps
Depending on version, the affected types of
headlamps/lamps are:
–
Offset daytime running lamps.
–
Direction indicator side repeaters.
–
Rear sidelamps.
–
Third brake lamp and loading bay lighting.
If you need to replace this type of bulb,
you must contact a PEUGEOT dealer or
a qualified workshop.
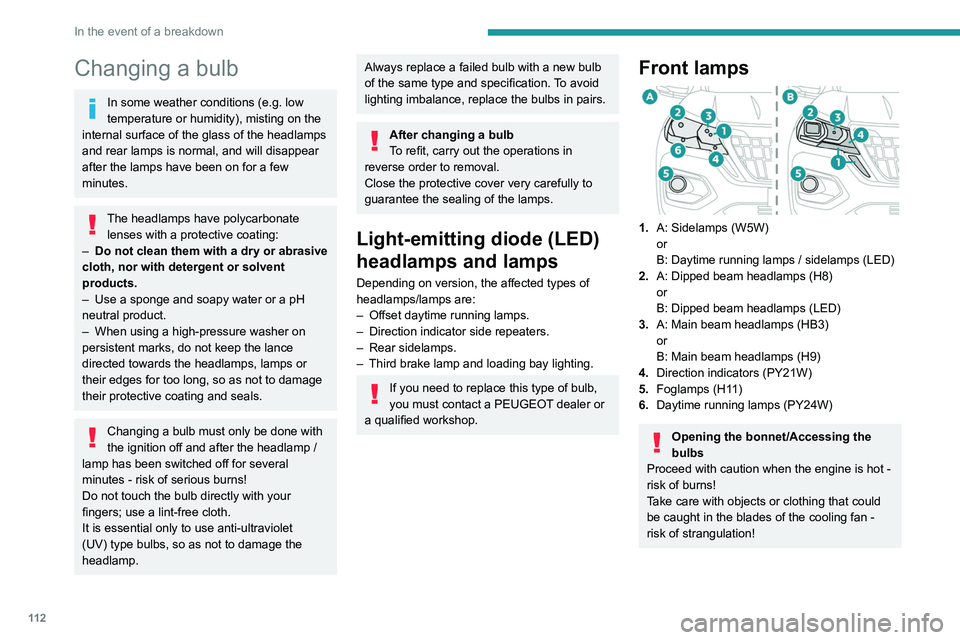
Front lamps
1. A: Sidelamps (W5W)
or
B: Daytime running lamps / sidelamps (LED)
2. A: Dipped beam headlamps (H8)
or
B: Dipped beam headlamps (LED)
3. A: Main beam headlamps (HB3)
or
B: Main beam headlamps (H9)
4. Direction indicators (PY21W)
5. Foglamps (H11)
6. Daytime running lamps (PY24W)
Opening the bonnet/Accessing the
bulbs
Proceed with caution when the engine is hot -
risk of burns!
Take care with objects or clothing that could
be caught in the blades of the cooling fan -
risk of strangulation!
Halogen bulbs (Hx)
To ensure good quality lighting, check
that the bulb is correctly positioned in its
housing.
Accessing the front lamps
Petrol engine
► Open the bonnet.
► To access the lamp on the right-hand side,
unclip the 3 clips securing the air filter cover,
then move it.
► If required, unscrew the 2 screws from the
coolant reservoir and move it, then unscrew the
3 screws at the base of the air filter to move it.
Page 115 of 164
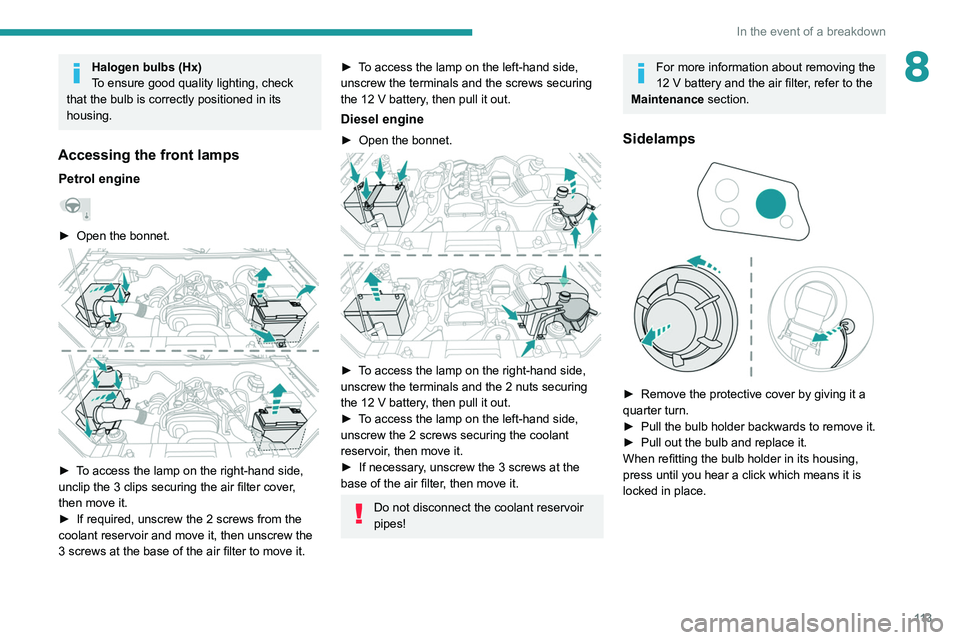
11 3
In the event of a breakdown
8Halogen bulbs (Hx)
To ensure good quality lighting, check
that the bulb is correctly positioned in its
housing.
Accessing the front lamps
Petrol engine
► Open the bonnet.
► To access the lamp on the right-hand side,
unclip the 3 clips securing the air filter cover,
then move it.
►
If required, unscrew the 2 screws from the
coolant reservoir and move it, then unscrew the
3 screws at the base of the air filter to move it.
► To access the lamp on the left-hand side,
unscrew the terminals and the screws securing
the 12
V battery, then pull it out.
Diesel engine
► Open the bonnet.
► To access the lamp on the right-hand side,
unscrew the terminals and the 2 nuts securing
the 12 V battery, then pull it out.
►
T
o access the lamp on the left-hand side,
unscrew the 2 screws securing the coolant
reservoir, then move it.
►
If necessary
, unscrew the 3 screws at the
base of the air filter, then move it.
Do not disconnect the coolant reservoir
pipes!
For more information about removing the
12 V battery and the air filter, refer to the
Maintenance section.
Sidelamps
► Remove the protective cover by giving it a
quarter turn.
►
Pull the bulb holder backwards to remove it.
►
Pull out the bulb and replace it.
When refitting the bulb holder in its housing,
press until you hear a click which means it is
locked in place.
Page 116 of 164
11 4
In the event of a breakdown
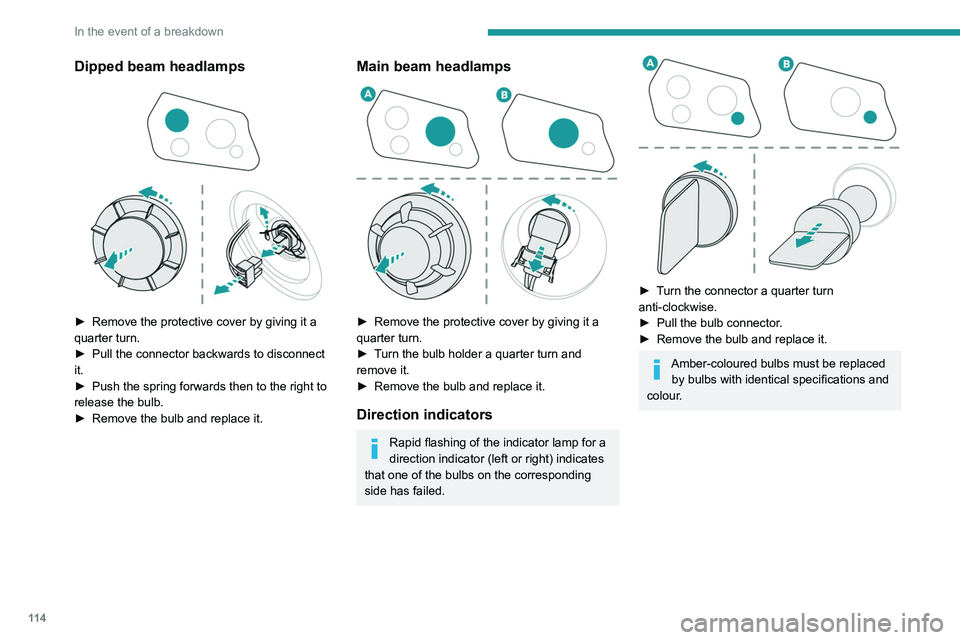
Dipped beam headlamps
► Remove the protective cover by giving it a
quarter turn.
►
Pull the connector backwards to disconnect
it.
►
Push the spring forwards then to the right to
release the bulb.
►
Remove the bulb and replace it.
Main beam headlamps
► Remove the protective cover by giving it a
quarter turn.
►
T
urn the bulb holder a quarter turn and
remove it.
►
Remove the bulb and replace it.
Direction indicators
Rapid flashing of the indicator lamp for a
direction indicator (left or right) indicates
that one of the bulbs on the corresponding
side has failed.
► Turn the connector a quarter turn
anti-clockwise.
►
Pull the bulb connector
.
►
Remove the bulb and replace it.
Amber-coloured bulbs must be replaced by bulbs with identical specifications and
colour.
Daytime running lamps
► Remove the protective cover by giving it a
quarter turn.
► Pull the bulb holder backwards to remove it.
► Pull out the bulb and replace it.
When refitting the bulb holder in its housing,
press until you hear a click which means it is
locked in place.
Foglamps
To access the foglamps:
► Open the bonnet.
Page 117 of 164
11 5
In the event of a breakdown
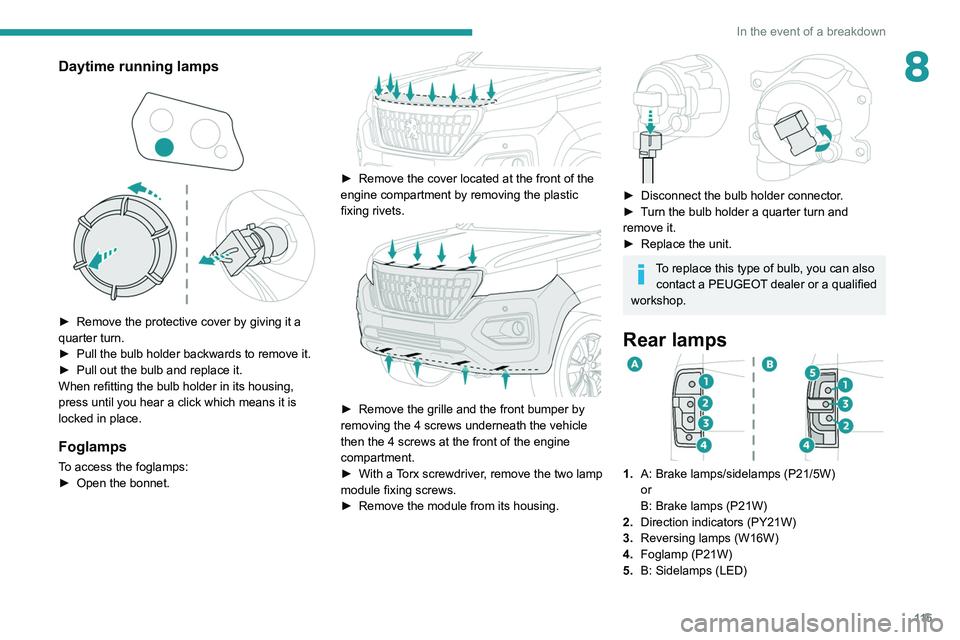
8Daytime running lamps
► Remove the protective cover by giving it a
quarter turn.
►
Pull the bulb holder backwards to remove it.
►
Pull out the bulb and replace it.
When refitting the bulb holder in its housing,
press until you hear a click which means it is
locked in place.
Foglamps
To access the foglamps:
► Open the bonnet.
► Remove the cover located at the front of the
engine compartment by removing the plastic
fixing rivets.
► Remove the grille and the front bumper by
removing the 4 screws underneath the vehicle
then the 4 screws at the front of the engine
compartment.
►
With a
Torx screwdriver, remove the two lamp
module fixing screws.
►
Remove the module from its housing.
► Disconnect the bulb holder connector .
► T urn the bulb holder a quarter turn and
remove it.
►
Replace the unit.
To replace this type of bulb, you can also contact a PEUGEOT dealer or a qualified
workshop.
Rear lamps
1. A: Brake lamps/sidelamps (P21/5W)
or
B: Brake lamps (P21W)
2. Direction indicators (PY21W)
3. Reversing lamps (W16W)
4. Foglamp (P21W)
5. B: Sidelamps
(LED)
Page 118 of 164
11 6
In the event of a breakdown
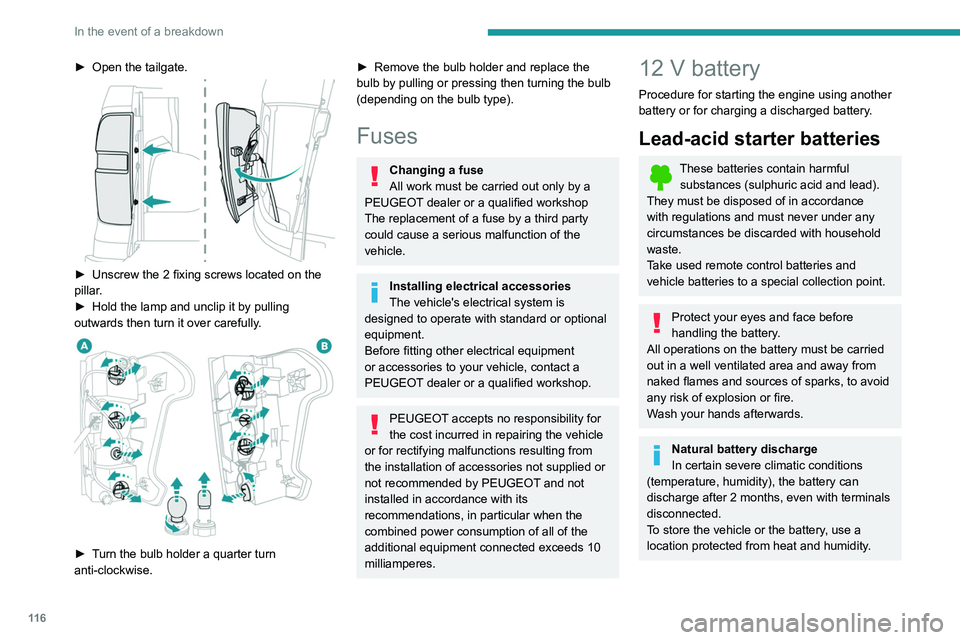
► Open the tailgate.
► Unscrew the 2 fixing screws located on the
pillar .
►
Hold the lamp and unclip it by pulling
outwards then turn it over carefully
.
► Turn the bulb holder a quarter turn
anti-clockwise.
► Remove the bulb holder and replace the
bulb by pulling or pressing then turning the bulb
(depending on the bulb type).
Fuses
Changing a fuse
All work must be carried out only by a
PEUGEOT dealer or a qualified workshop
The replacement of a fuse by a third party
could cause a serious malfunction of the
vehicle.
Installing electrical accessories
The vehicle's electrical system is
designed to operate with standard or optional
equipment.
Before fitting other electrical equipment
or accessories to your vehicle, contact a
PEUGEOT dealer or a qualified workshop.
PEUGEOT accepts no responsibility for
the cost incurred in repairing the vehicle
or for rectifying malfunctions resulting from
the installation of accessories not supplied or
not recommended by PEUGEOT and not
installed in accordance with its
recommendations, in particular when the
combined power consumption of all of the
additional equipment connected exceeds 10
milliamperes.
12 V battery
Procedure for starting the engine using another
battery or for charging a discharged battery.
Lead-acid starter batteries
These batteries contain harmful substances (sulphuric acid and lead).
They must be disposed of in accordance
with regulations and must never under any
circumstances be discarded with household
waste.
Take used remote control batteries and
vehicle batteries to a special collection point.
Protect your eyes and face before
handling the battery.
All operations on the battery must be carried
out in a well ventilated area and away from
naked flames and sources of sparks, to avoid
any risk of explosion or fire.
Wash your hands afterwards.
Natural battery discharge
In certain severe climatic conditions
(temperature, humidity), the battery can
discharge after 2 months, even with terminals
disconnected.
To store the vehicle or the battery, use a
location protected from heat and humidity.
Battery power loss
A battery can be discharged due to
power losses:
– Continuous electrical consumption of a
component (e.g. alarm, anti-theft device).
– Device powered up when the engine is off
(e.g. audio system, USB charger).
– Electrical leakage due to poor insulation of
electrical components.
If the power loss cannot be located, contact a
PEUGEOT dealer or a qualified workshop to
have the vehicle's electrical system checked.
Battery charge check
For batteries with a charge status
indicator, read the value indicated on the
battery directly.
For other types of batteries, the check can be
carried out with a voltmeter:
► Connect the voltmeter to the battery
terminals (respect the polarities).
► Read the voltage value.
► Turn the main beam headlamps on.
If the battery voltage remains at or above 10
V without rapidly decreasing, the charge is
correct.
If the battery voltage drops quickly or is less
than 10 V, the battery must be recharged or
replaced.
Accessing the battery
The battery is located under the bonnet.
Page 143 of 164

141
Alphabetical index
4x4 transmission selector 69
360° camera
84
A
ABS 50
Accessories
49
Additive, Diesel
95
Adjusting headlamp beam height
45
Adjusting headlamps
45
Adjusting head restraints
26
Adjusting seat
26–27
Adjusting the air distribution
35
Adjusting the air flow
35
Adjusting the date
13, 137
Adjusting the height and reach
of the steering wheel
28
Adjusting the seat angle
27
Adjusting the seat belt height
54
Adjusting the temperature
35
Adjusting the time
13, 137
Advice on care and maintenance
103
Advice on driving
6, 62–63
Airbags
55–57, 59
Airbags, curtain
56–57
Airbags, front
56–57, 60
Airbags, lateral
56–57
Air conditioning
32, 34, 35
Air conditioning, automatic
36
Air conditioning, dual-zone automatic
34–36
Air conditioning, manual
33, 36
Air intake 35
Air vents
32
Alarm
23
Android Auto connection
136
Anti-lock braking system (ABS)
50
Antitheft / Immobiliser
17
Apple CarPlay connection
135
Area, loading
41
Armrest, front
38
Armrest, rear
39
Assistance, emergency braking
50
Audible warning
50
Audio streaming (Bluetooth)
129
B
Battery 99
Battery, 12 V
95, 99, 116–119
Battery, charging
118–119
Battery, remote control
20–21
Bluetooth (hands-free)
129–130
Bluetooth (telephone)
135
Bodywork
104
Bonnet
91–92
Brake discs
96
Brake lamps
11 5
Brakes
96
Braking assistance system
50
Bulbs
11 3
Bulbs (changing)
112, 115
C
Capacity, fuel tank 89
Cap, fuel filler
89
Care of the bodywork
104
Central locking
17, 19
Changing a bulb
112, 115
Changing a fuse
11 6
Changing a wheel
107–109
Changing a wiper blade
47
Changing the engine oil
101
Changing the remote control battery
20
Checking the levels
93–95
Checks
92, 95–97
Checks, routine
95–96, 98
Child lock
61
Children
55, 60
Children (safety)
61
Child seats
55, 58–59
Child seats, ISOFIX
60
Cigar lighter
37
Cleaning (advice)
102–104
Cleaning the engine throttle housing
102
Closing the boot
18, 23
Closing the doors
18–19, 22
Configuration, vehicle
13–15
Connection, Bluetooth
130, 135
Connection, MirrorLink
136
Connectivity
135
Control, emergency door
20
Control stalk, lighting
43, 45
Control stalk, wipers
46, 48