2022 PEUGEOT LANDTREK door lock
[x] Cancel search: door lockPage 22 of 164
20
Access
Back-up procedures
Lost keys, remote control,
electronic key
Go to a PEUGEOT dealer with the vehicle's
registration certificate, your personal
identification documents and if possible, the label
bearing the key code.
The PEUGEOT dealer will be able to retrieve the
key code and the transponder code, enabling a
new key to be ordered.
Complete unlocking/locking
of the vehicle with the key
Use this procedure in the following situations:
– Remote control battery discharged.
–
Remote control malfunction.
–
V
ehicle battery discharged.
–
V
ehicle in an area subject to strong
electromagnetic interference.
In the first case, change the remote control
battery.
In the second case, reinitialise
the remote
control.
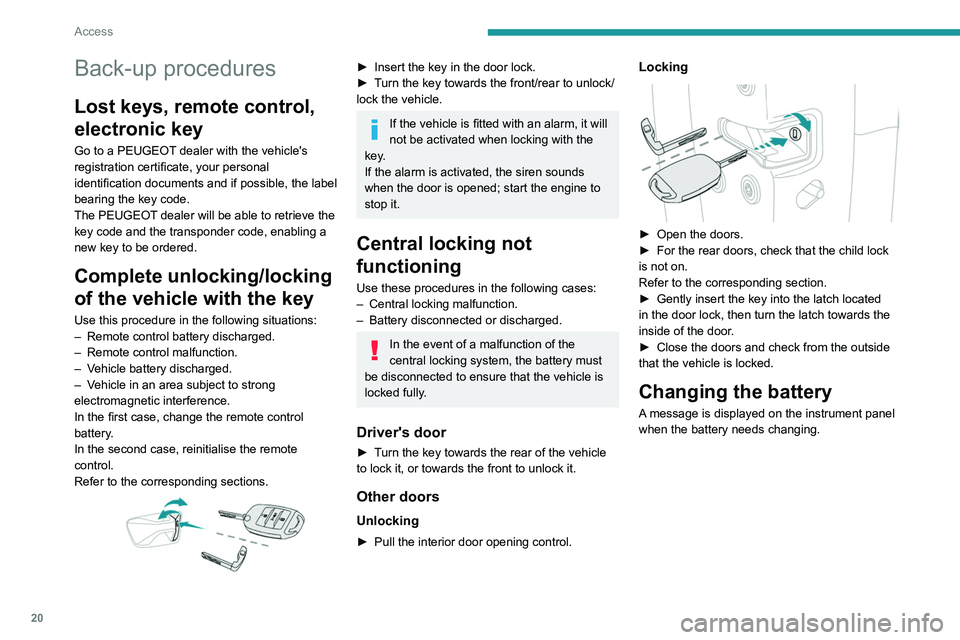
Refer to the corresponding sections.
► Insert the key in the door lock.
► T urn the key towards the front/rear to unlock/
lock the vehicle.
If the vehicle is fitted with an alarm, it will
not be activated when locking with the
key.
If the alarm is activated, the siren sounds
when the door is opened; start the engine to
stop it.
Central locking not
functioning
Use these procedures in the following cases:
– Central locking malfunction.
–
Battery disconnected or discharged.
In the event of a malfunction of the
central locking system, the battery must
be disconnected to ensure that the vehicle is
locked fully.
Driver's door
► Turn the key towards the rear of the vehicle
to lock it, or towards the front to unlock it.
Other doors
Unlocking
► Pull the interior door opening control.
Locking
► Open the doors.
► For the rear doors, check that the child lock
is not on.
Refer to the corresponding section.
►
Gently insert the key into the latch located
in the door lock, then turn the latch towards the
inside of the door
.
►
Close the doors and check from the outside
that the vehicle is locked.
Changing the battery
A message is displayed on the instrument panel
when the battery needs changing.
Page 24 of 164
22
Access
Doors
Opening
From outside
► After unlocking the vehicle or with the
"Keyless Entry and Starting" system electronic
key in the recognition zone, pull the door handle.
From inside
► Pull the interior opening control of a door; this
unlocks the vehicle completely .
With selective unlocking activated:
– Opening the driver's door unlocks
the driver's door only (if the vehicle has not
already been completely unlocked).
–
Opening one of the passenger doors
unlocks the rest of the vehicle.
Closing
If a door is not properly closed, a message is
displayed on the instrument panel if the engine
is running, accompanied by an audible signal
when the vehicle is travelling at more than 12
mph (20
km/h).
Tailgate
Safety recommendations
Never drive with the tailgate down.
Ensure that there are no people or
obstacles present (on the ground and higher
up) when unloading.
Never place your hands near the bracket
when handling the tailgate, there is a risk of
trapping your fingers.
The loading bay tailgate is heavy, open it
carefully.
Observe the payload indicated on the
manufacturer's label present on the vehicle.
Regularly check that the suspensions are in
good condition and that the tyres are inflated
to the recommended pressure.
Spread the load evenly in the loading bay.
Opening to 90°
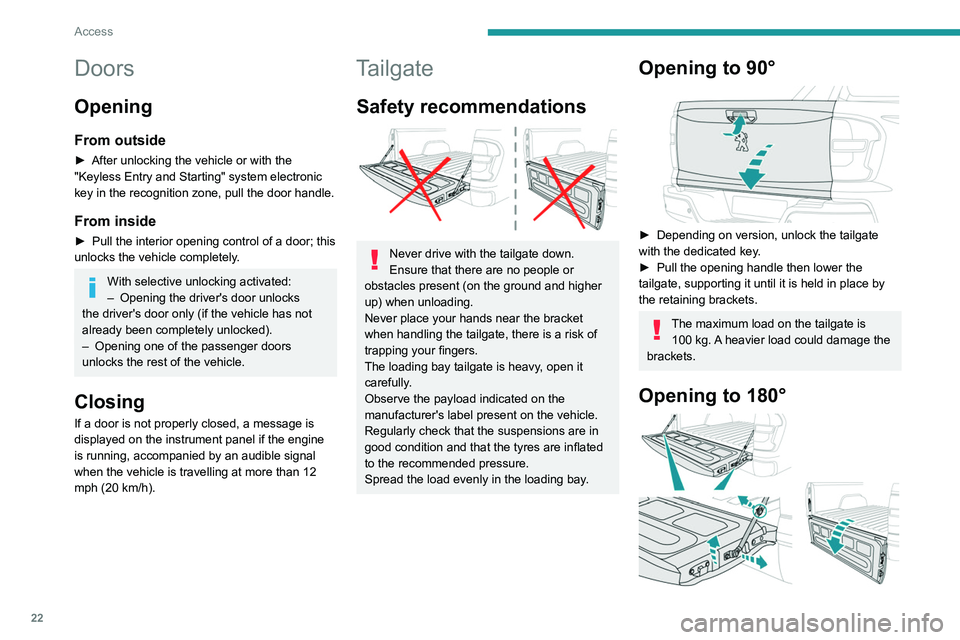
► Depending on version, unlock the tailgate
with the dedicated key .
►
Pull the opening handle then lower the
tailgate, supporting it until it is held in place by
the retaining brackets.
The maximum load on the tailgate is 100 kg. A heavier load could damage the
brackets.
Opening to 180°
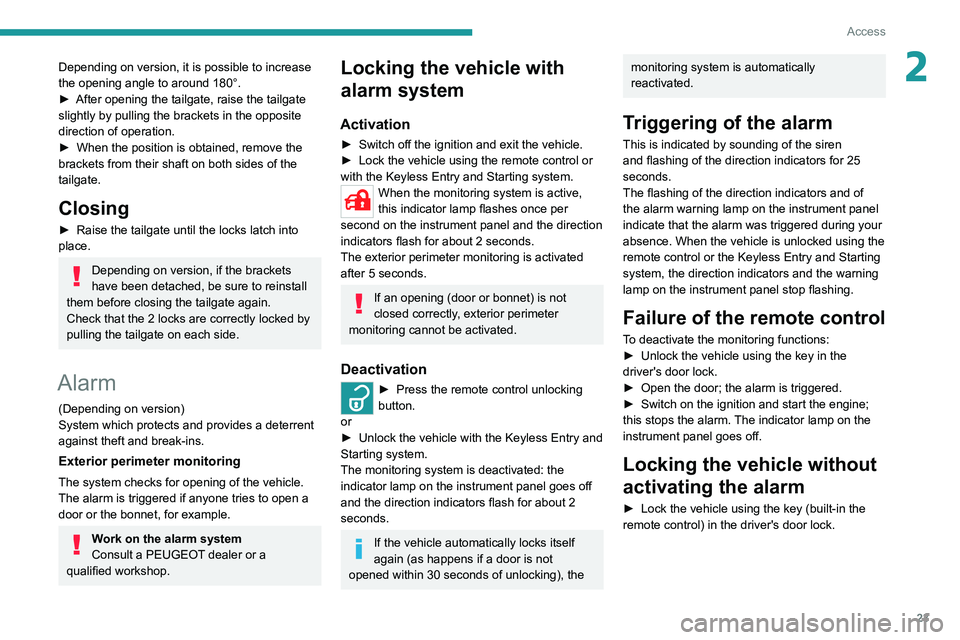
Depending on version, it is possible to increase
the opening angle to around 180°.
► After opening the tailgate, raise the tailgate
slightly by pulling the brackets in the opposite
direction of operation.
► When the position is obtained, remove the
brackets from their shaft on both sides of the
tailgate.
Closing
► Raise the tailgate until the locks latch into
place.
Depending on version, if the brackets
have been detached, be sure to reinstall
them before closing the tailgate again.
Check that the 2 locks are correctly locked by
pulling the tailgate on each side.
Alarm
(Depending on version)
System which protects and provides a deterrent
against theft and break-ins.
Exterior perimeter monitoring
The system checks for opening of the vehicle.
The alarm is triggered if anyone tries to open a
door or the bonnet, for example.
Work on the alarm system
Consult a PEUGEOT dealer or a
qualified workshop.
Page 25 of 164
23
Access
2Depending on version, it is possible to increase
the opening angle to around 180°.
►
After opening the tailgate, raise the tailgate
slightly by pulling the brackets in the opposite
direction of operation.
►
When the position is obtained, remove the
brackets from their shaft on both sides of the
tailgate.
Closing
► Raise the tailgate until the locks latch into
place.
Depending on version, if the brackets
have been detached, be sure to reinstall
them before closing the tailgate again.
Check that the 2 locks are correctly locked by
pulling the tailgate on each side.
Alarm
(Depending on version)
System which protects and provides a deterrent
against theft and break-ins.
Exterior perimeter monitoring
The system checks for opening of the vehicle.
The alarm is triggered if anyone tries to open a
door or the bonnet, for example.
Work on the alarm system
Consult a PEUGEOT dealer or a
qualified workshop.
Locking the vehicle with
alarm system
Activation
► Switch off the ignition and exit the vehicle.
► Lock the vehicle using the remote control or
with the Keyless Entry and Starting system.
When the monitoring system is active,
this indicator lamp flashes once per
second on the instrument panel and the direction
indicators flash for about 2 seconds.
The exterior perimeter monitoring is activated
after 5 seconds.
If an opening (door or bonnet) is not
closed correctly, exterior perimeter
monitoring cannot be activated.
Deactivation
► Press the remote control unlocking
button.
or
►
Unlock the vehicle with the Keyless Entry and
Starting system.
The monitoring system is deactivated: the
indicator lamp on the instrument panel goes off
and the direction indicators flash for about 2
seconds.
If the vehicle automatically locks itself
again (as happens if a door is not
opened within 30 seconds of unlocking), the
monitoring system is automatically
reactivated.
Triggering of the alarm
This is indicated by sounding of the siren
and flashing of the direction indicators for 25
seconds.
The flashing of the direction indicators and of
the alarm warning lamp on the instrument panel
indicate that the alarm was triggered during your
absence. When the vehicle is unlocked using the
remote control or the Keyless Entry and Starting
system, the direction indicators and the warning
lamp on the instrument panel
stop flashing.
Failure of the remote control
To deactivate the monitoring functions:
► Unlock the vehicle using the key in the
driver's door lock.
►
Open the door; the alarm is triggered.
►
Switch on the ignition and start the engine;
this stops the alarm.
The indicator lamp on the
instrument panel goes off.
Locking the vehicle without
activating the alarm
► Lock the vehicle using the key (built-in the
remote control) in the driver's door lock.
Page 26 of 164
24
Access
Malfunction
When the ignition is switched on, fixed
illumination of the indicator lamp on the
instrument panel indicates a system malfunction.
Have it checked by a PEUGEOT dealer or a
qualified workshop.
Automatic activation
(Depending on version)
The system is activated automatically 2 minutes
after the last door is closed.
►
T
o avoid triggering the alarm on entering the
vehicle, first press the unlocking button on the
remote control or unlock the vehicle using the
"Keyless Entry and Starting" system.
Deactivating the alarm
► Press the remote control unlocking
button for about 4 seconds. An audible
signal is triggered and the direction indicators
flash 4 times to indicate that the alarm is
deactivated (the indicator lamp on the instrument
panel is deactivated).
►
Reactivate the alarm by pressing the
unlocking button.
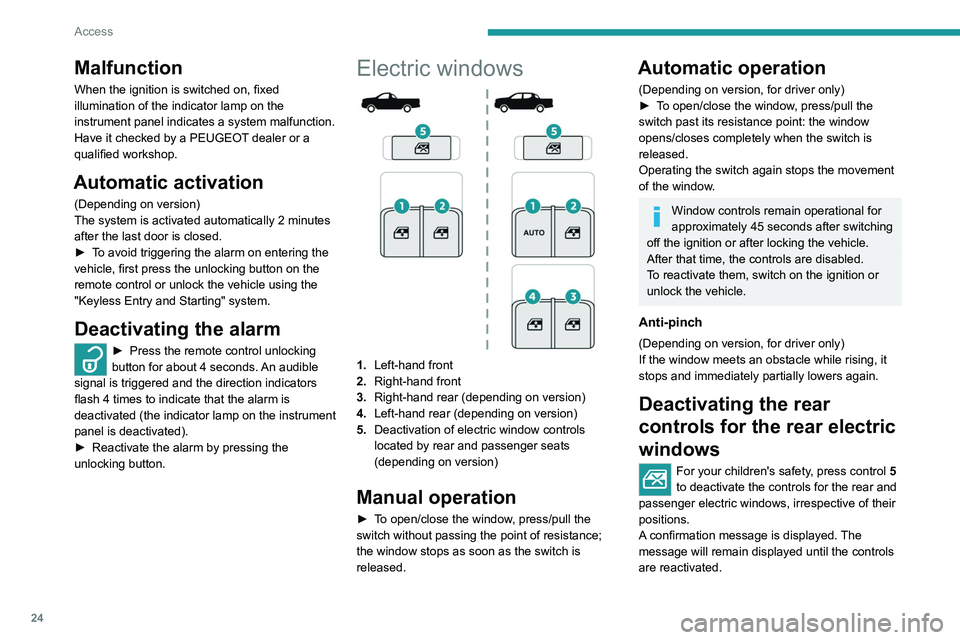
Electric windows
1. Left-hand front
2. Right-hand front
3. Right-hand rear (depending on version)
4. Left-hand rear (depending on version)
5. Deactivation of electric window controls
located by rear and passenger seats
(depending on version)
Manual operation
► To open/close the window, press/pull the
switch without passing the point of resistance;
the window stops as soon as the switch is
released.
Automatic operation
(Depending on version, for driver only)
►
T o open/close the window, press/pull the
switch past its resistance point: the window
opens/closes completely when the switch is
released.
Operating the switch again stops the movement
of the window.
Window controls remain operational for
approximately 45 seconds after switching
off the ignition or after locking the vehicle.
After that time, the controls are disabled.
To reactivate them, switch on the ignition or
unlock the vehicle.
Anti-pinch
(Depending on version, for driver only)
If the window meets an obstacle while rising, it
stops and immediately partially lowers again.
Deactivating the rear
controls for the rear electric
windows
For your children's safety, press control 5
to deactivate the controls for the rear and
passenger electric windows, irrespective of their
positions.
A confirmation message is displayed. The
message will remain displayed until the controls
are reactivated.
The rear electric windows can still be controlled
using the driver's controls.
Reinitialising the electric
windows
After reconnecting the battery, or in the event
of abnormal window movement, the anti-pinch
function must be reinitialised.
The anti-pinch function is disabled during the
following sequence of operations.
For the driver’s window:
► Raise the window until it is fully closed.
► Release then pull the control for at least one
second after the window reaches the closed
position. Repeat the operation twice in a row.
► Lower the window fully.
If an electric window meets an obstacle
during operation, the movement of the
window must be reversed. To do this, press
the relevant control.
When the driver operates the passengers’
electric window controls, it is important to
ensure that nothing can prevent the window
from closing properly.
It is important to ensure that passengers use
the electric windows correctly.
Pay particular attention to children when
operating the windows.
Be aware of passengers and/or other persons
present when closing windows remotely using
the electronic key.
Page 28 of 164
26
Ease of use and comfort
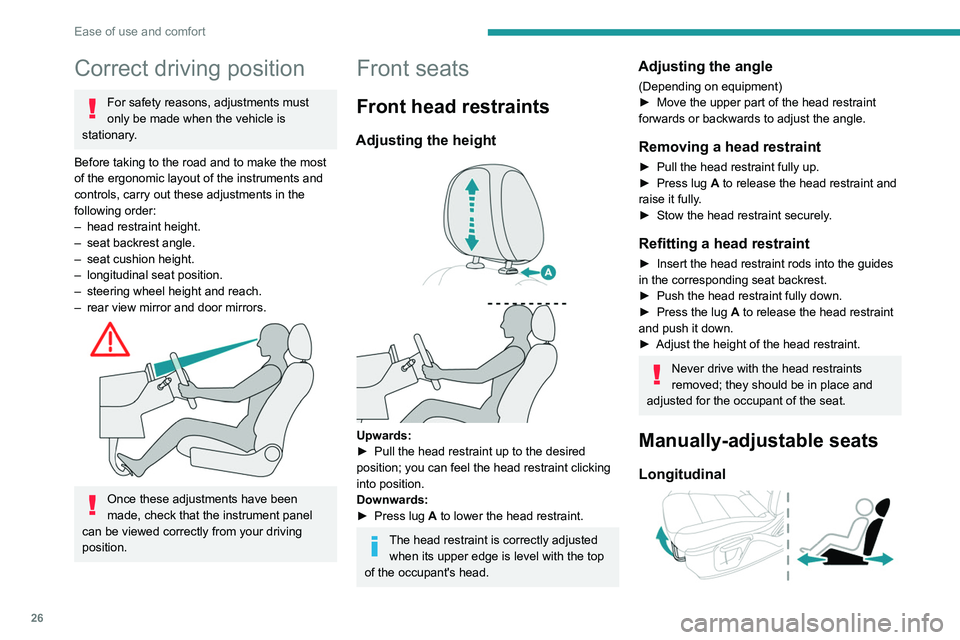
Correct driving position
For safety reasons, adjustments must
only be made when the vehicle is
stationary.
Before taking to the road and to make the most
of the ergonomic layout of the instruments and
controls, carry out these adjustments in the
following order:
–
head restraint height.
–
seat backrest angle.
–
seat cushion height.
–
longitudinal seat position.
–
steering wheel height and reach.
–
rear view mirror and door mirrors.
Once these adjustments have been
made, check that the instrument panel
can be viewed correctly from your driving
position.
Front seats
Front head restraints
Adjusting the height
Upwards:
► Pull the head restraint up to the desired
position; you can feel the head restraint clicking
into position.
Downwards:
►
Press lug
A to lower the head restraint.
The head restraint is correctly adjusted when its upper edge is level with the top
of the occupant's head.
Adjusting the angle
(Depending on equipment)
► Move the upper part of the head restraint
forwards or backwards to adjust the angle.
Removing a head restraint
► Pull the head restraint fully up.
► Press lug A to release the head restraint and
raise it fully.
►
Stow the head restraint securely
.
Refitting a head restraint
► Insert the head restraint rods into the guides
in the corresponding seat backrest.
►
Push the head restraint fully down.
►
Press the lug
A to release the head restraint
and push it down.
►
Adjust the height of the head restraint.
Never drive with the head restraints
removed; they should be in place and
adjusted for the occupant of the seat.
Manually-adjustable seats
Longitudinal
► Raise the control bar and slide the seat
forwards or backwards.
► Release the control bar to lock the seat in
position on one of the notches.
Backrest angle
► Pull the control all the way up and tilt the
backrest forwards or backwards to adjust it.
Height
(driver only)
► Pull the control upwards to raise or push it
downwards to lower, until you obtain the position
required.
Page 30 of 164
28
Ease of use and comfort
Folding the backrests
The backrests must only be operated with the vehicle stationary.
While driving, having a passenger in the rear,
behind the front benchseat is prohibited if the
benchseat backrests are tilted.
When sharp deceleration occurs, objects
placed on the folded backrest can turn into
projectiles.
Preliminary operations:
►
Lower the head restraints.
►
Check that no person or object will interfere
with folding down the backrests (clothing,
luggage, etc.).
►
Check that the outer seat belt is properly
tensioned along the pillars, the central belt is
stowed and the tongues of the belts are correctly
in the stowed position.
Deactivation of the front passenger
airbag is recommended.
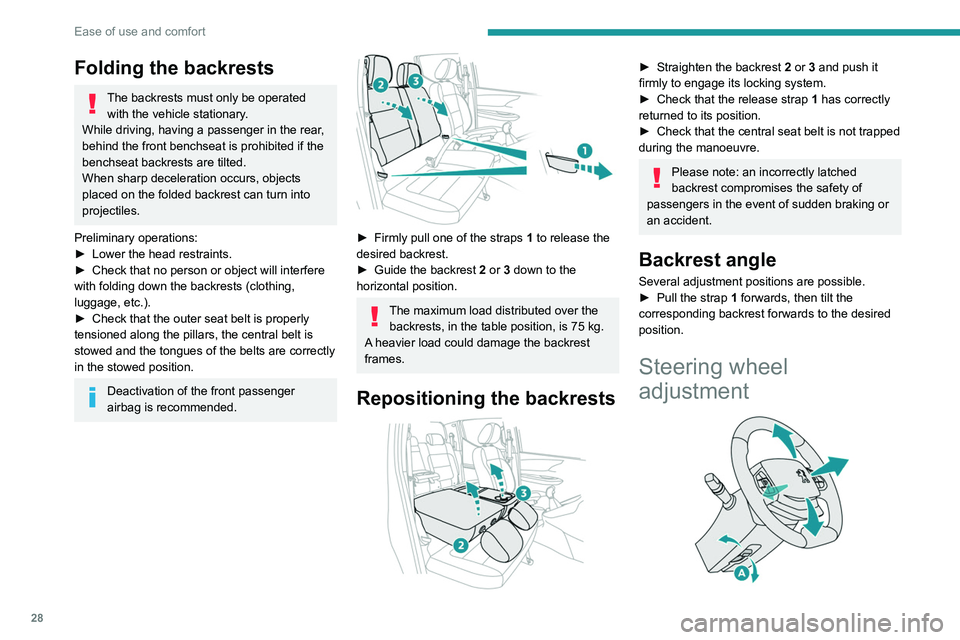
► Firmly pull one of the straps 1 to release the
desired backrest.
►
Guide the backrest
2 or 3 down to the
horizontal position.
The maximum load distributed over the backrests, in the table position, is 75 kg.
A heavier load could damage the backrest
frames.
Repositioning the backrests
► Straighten the backrest 2 or 3 and push it
firmly to engage its locking system.
►
Check that the release strap 1
has correctly
returned to its position.
►
Check that the central seat belt is not trapped
during the manoeuvre.
Please note: an incorrectly latched
backrest compromises the safety of
passengers in the event of sudden braking or
an accident.
Backrest angle
Several adjustment positions are possible.
► Pull the strap 1 forwards, then tilt the
corresponding backrest forwards to the desired
position.
Steering wheel
adjustment
► When stationary, pull control A to release the
steering wheel.
► Adjust the height and reach to suit your
driving position.
► Push the control to lock the steering wheel.
For safety reasons, these adjustments
must only be carried out with the vehicle
stationary.
Mirrors
Door mirrors
As a safety measure, the mirrors should be adjusted to reduce the "blind spots".
The objects that you see in the mirrors are
in fact closer than they appear. Take this
into account in order to correctly judge the
distance of vehicles approaching from behind.
Manual adjustment
► Directly manouevre the mirror glass to adjust
the mirror concerned.
Page 31 of 164
29
Ease of use and comfort
3► When stationary, pull control A to release the
steering wheel.
►
Adjust the height and reach to suit your
driving position.
►
Push the control to lock the steering wheel.
For safety reasons, these adjustments
must only be carried out with the vehicle
stationary.
Mirrors
Door mirrors
As a safety measure, the mirrors should be adjusted to reduce the "blind spots".
The objects that you see in the mirrors are
in fact closer than they appear. Take this
into account in order to correctly judge the
distance of vehicles approaching from behind.
Manual adjustment
► Directly manouevre the mirror glass to adjust
the mirror concerned.
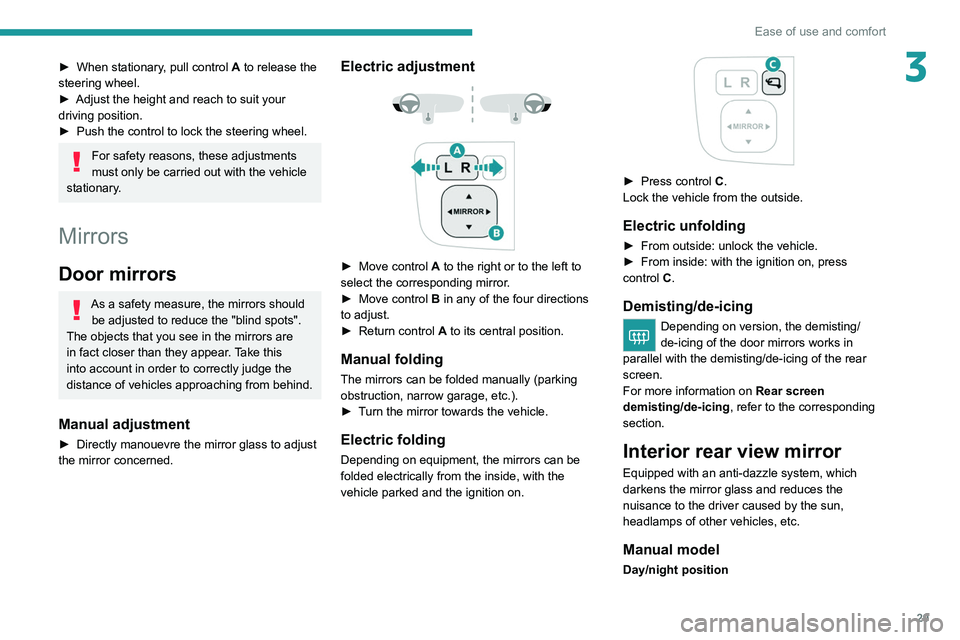
Electric adjustment
► Move control A to the right or to the left to
select the corresponding mirror.
►
Move control
B in any of the four directions
to adjust.
►
Return control A
to its central position.
Manual folding
The mirrors can be folded manually (parking
obstruction, narrow garage, etc.).
►
T
urn the mirror towards the vehicle.
Electric folding
Depending on equipment, the mirrors can be
folded electrically from the inside, with the
vehicle parked and the ignition on.
► Press control C.
Lock the vehicle from the outside.
Electric unfolding
► From outside: unlock the vehicle.
► From inside: with the ignition on, press
control
C.
Demisting/de-icing
Depending on version, the demisting/
de-icing of the door mirrors works in
parallel with the demisting/de-icing of the rear
screen.
For more information on Rear screen
demisting/de-icing , refer to the corresponding
section.
Interior rear view mirror
Equipped with an anti-dazzle system, which
darkens the mirror glass and reduces the
nuisance to the driver caused by the sun,
headlamps of other vehicles, etc.
Manual model
Day/night position
Page 40 of 164
38
Ease of use and comfort
These applications can be managed using the
steering-mounted controls or the audio system
controls.
When the USB socket is used, the
portable device charges automatically.
For more information about how to use this
equipment, refer to the sections describing
the audio and telematics systems.
Front armrest
(Depending on version)
It includes a storage space.
Opening
► To access the closed storage compartment,
lift the lever to open the lid.
This storage compartment can be used to house portable devices (mobile phone,
MP3 player, etc.) which can be connected to
the USB/Jack sockets or charged from the 12
V accessories socket in the centre console.
Closing
► Close the cover until it locks.
Mats
Fitting
When fitting it on the driver's side, only use
the mountings present on the carpet (a "click"
indicates proper locking).
The other mats are simply laid over the carpet.
Removing/refitting
► To remove it on the driver's side, move the
seat backwards and unclip the fasteners.
►
T
o refit it, position the mat and secure it by
pressing down.
►
Check that the mat is secured correctly
.
To avoid any risk of jamming the pedals:– Only use mats which are suited to the
fixings already present in the vehicle; these
fixings must be used.
–
Never fit one mat on top of another
.
The use of mats not approved by PEUGEOT
may interfere with access to the pedals and
hinder the operation of the cruise control/
speed limiter.
The approved mats have two fasteners
located underneath the seat.
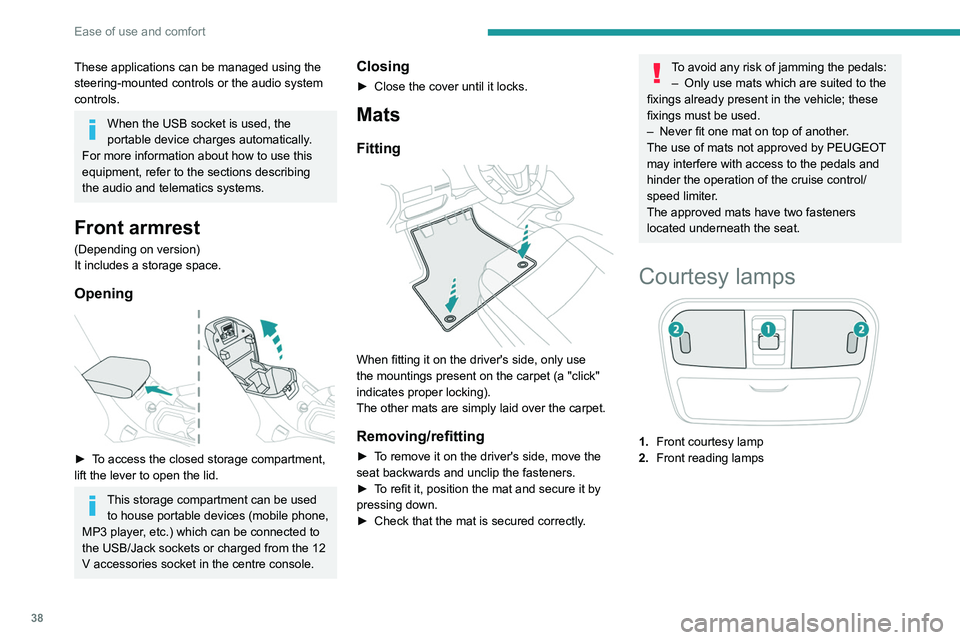
Courtesy lamps
1. Front courtesy lamp
2. Front reading lamps
3.Rear courtesy lamp
Front courtesy lamp
DOOR► Press this button, the courtesy lamp
gradually lights up:
• when unlocking the vehicle,
• when removing the key from the ignition,
• when opening a door,
• when the remote control locking button is
activated, in order to locate your vehicle.
It switches off gradually:
– when the vehicle is locked,
– when the ignition is switched on,
– 30 seconds after the last door is closed.
► Press this button again to permanently switch
the courtesy lamp off.