2022 PEUGEOT 308 lights
[x] Cancel search: lightsPage 16 of 260
14
Instruments
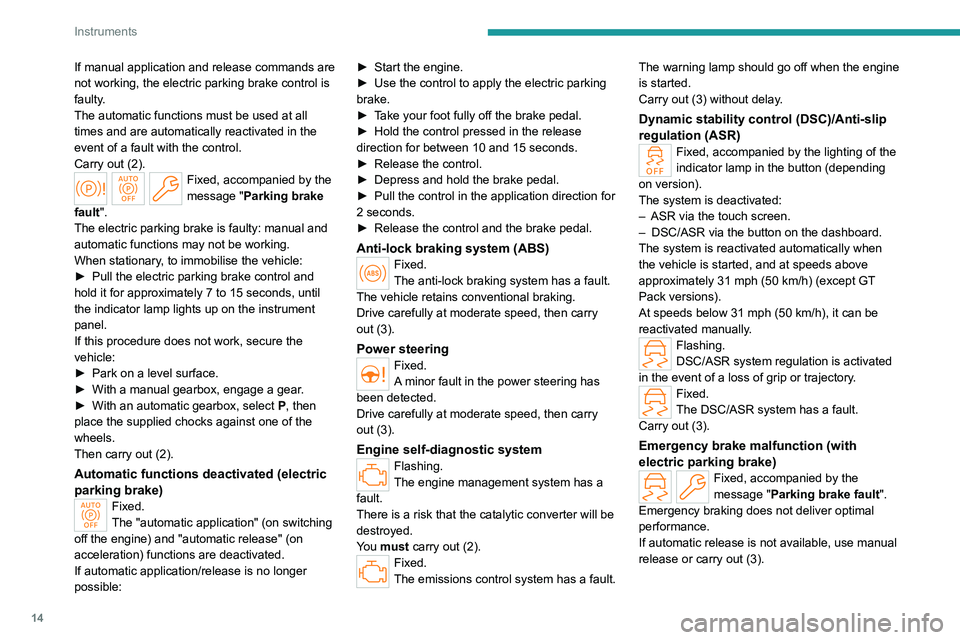
If manual application and release commands are
not working, the electric parking brake control is
faulty.
The automatic functions must be used at all
times and are automatically reactivated in the
event of a fault with the control.
Carry out (2).
Fixed, accompanied by the
message "Parking brake
fault".
The electric parking brake is faulty: manual and
automatic functions may not be working.
When stationary, to immobilise the vehicle:
►
Pull the electric parking brake control and
hold it for approximately 7 to 15 seconds, until
the indicator lamp lights up on the instrument
panel.
If this procedure does not work, secure the
vehicle:
►
Park on a level surface.
►
With a manual gearbox, engage a gear
.
►
With an automatic gearbox, select
P
, then
place the supplied chocks against one of the
wheels.
Then carry out (2).
Automatic functions deactivated (electric
parking brake)
Fixed.
The "automatic application" (on switching
off the engine) and "automatic release" (on
acceleration) functions are deactivated.
If automatic application/release is no longer
possible: ►
Start the engine.
►
Use the control to apply the electric parking
brake.
►
T
ake your foot fully off the brake pedal.
►
Hold the control pressed in the release
direction for between 10 and 15 seconds.
►
Release the control.
►
Depress and hold the brake pedal.
►
Pull the control in the application direction for
2
seconds.
►
Release the control and the brake pedal.
Anti-lock braking system (ABS)Fixed.
The anti-lock braking system has a fault.
The vehicle retains conventional braking.
Drive carefully at moderate speed, then carry
out (3).
Power steeringFixed.
A minor fault in the power steering has
been detected.
Drive carefully at moderate speed, then carry
out (3).
Engine self-diagnostic systemFlashing.
The engine management system has a
fault.
There is a risk that the catalytic converter will be
destroyed.
You must carry out (2).
Fixed.
The emissions control system has a fault. The warning lamp should go off when the engine
is started.
Carry out (3) without delay.
Dynamic stability control (DSC)/Anti-slip
regulation (ASR)
Fixed, accompanied by the lighting of the
indicator lamp in the button (depending
on version).
The system is deactivated:
–
ASR via the touch screen.
–
DSC/ASR via the button on the dashboard.
The system is reactivated automatically when
the vehicle is started, and at speeds above
approximately 31 mph (50
km/h) (except GT
Pack versions).
At speeds below 31
mph (50 km/h), it can be
reactivated manually.
Flashing.
DSC/ASR system regulation is activated
in the event of a loss of grip or trajectory.
Fixed.
The DSC/ASR system has a fault.
Carry out (3).
Emergency brake malfunction (with
electric parking brake)
Fixed, accompanied by the
message "Parking brake fault".
Emergency braking does not deliver optimal
performance.
If automatic release is not available, use manual
release or carry out (3).
Page 19 of 260
17
Instruments
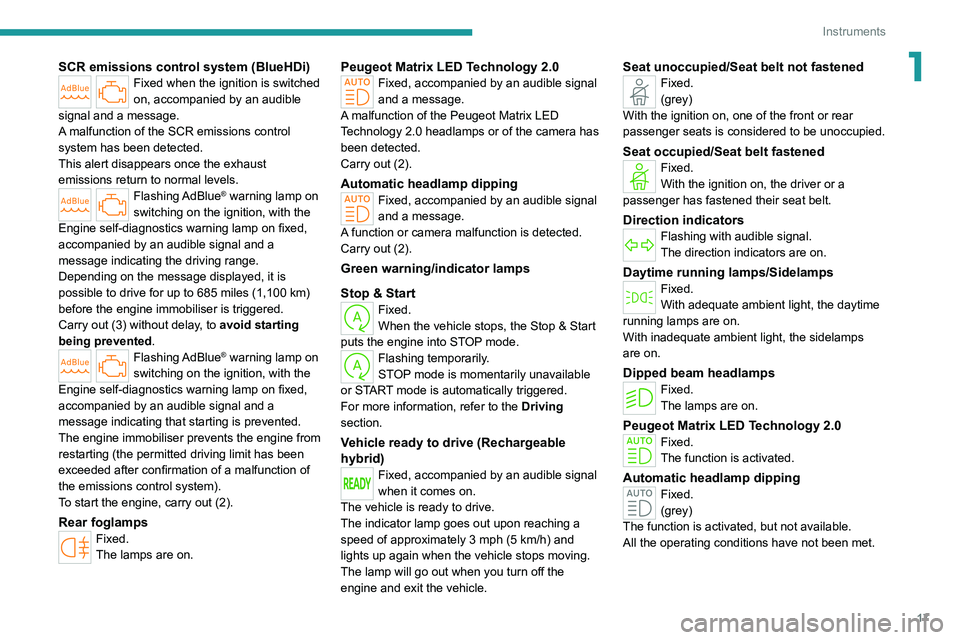
1SCR emissions control system (BlueHDi)Fixed when the ignition is switched
on, accompanied by an audible
signal and a message.
A malfunction of the SCR emissions control
system has been detected.
This alert disappears once the exhaust
emissions return to normal levels.
Flashing AdBlue® warning lamp on
switching on the ignition, with the
Engine self-diagnostics warning lamp on fixed,
accompanied by an audible signal and a
message indicating the driving range.
Depending on the message displayed, it is
possible to drive for up to 685 miles (1,100
km)
before the engine immobiliser is triggered.
Carry out (3) without delay, to avoid starting
being prevented.
Flashing AdBlue® warning lamp on
switching on the ignition, with the
Engine self-diagnostics warning lamp on fixed,
accompanied by an audible signal and a
message indicating that starting is prevented.
The engine immobiliser prevents the engine from
restarting (the permitted driving limit has been
exceeded after confirmation of a malfunction of
the emissions control system).
To start the engine, carry out (2).
Rear foglampsFixed.
The lamps are on.
Peugeot Matrix LED Technology 2.0Fixed, accompanied by an audible signal
and a message.
A malfunction
of the Peugeot Matrix LED
Technology 2.0 headlamps or of the camera has
been detected.
Carry out (2).
Automatic headlamp dippingFixed, accompanied by an audible signal
and a message.
A function or camera malfunction is detected.
Carry out (2).
Green warning/indicator lamps
Stop & Start
Fixed.
When the vehicle stops, the Stop & Start
puts the engine into STOP mode.
Flashing temporarily.
STOP mode is momentarily unavailable
or START mode is automatically triggered.
For more information, refer to the Driving
section.
Vehicle ready to drive (Rechargeable
hybrid)
Fixed, accompanied by an audible signal
when it comes on.
The vehicle is ready to drive.
The indicator lamp goes out upon reaching a
speed of approximately 3 mph (5
km/h) and
lights up again when the vehicle stops moving.
The lamp will go out when you turn off the
engine and exit the vehicle.
Seat unoccupied/Seat belt not fastenedFixed.
(grey)
With the ignition on, one of the front or rear
passenger seats is considered to be unoccupied.
Seat occupied/Seat belt fastenedFixed.
With the ignition on, the driver or a
passenger has fastened their seat belt.
Direction indicatorsFlashing with audible signal.
The direction indicators are on.
Daytime running lamps/SidelampsFixed.
With adequate ambient light, the daytime
running lamps are on.
With inadequate ambient light, the sidelamps
are on.
Dipped beam headlampsFixed.
The lamps are on.
Peugeot Matrix LED Technology 2.0
Fixed.
The function is activated.
Automatic headlamp dippingFixed.
(grey)
The function is activated, but not available.
All the operating conditions have not been met.
Page 21 of 260

19
Instruments
1at least 5 minutes for the reset to be
registered.
Reminder of the servicing information
Servicing information is accessible using
the Settings > Vehicle application on the
touch screen.
►
Then select
Safety > Diagnostics.
Engine oil level indicator
(Depending on version)
The level read will only be correct if the vehicle is on level ground and the engine
has been off for more than 30 minutes.
Low oil level
This is indicated by the message " Oil
level incorrect" on the instrument panel,
accompanied by the lighting of the Service
warning lamp and an audible signal.
If a low oil level is confirmed by a check using
the dipstick, the level must be topped up to avoid
damage to the engine.
For more information on Checking levels, refer
to the corresponding section.
Oil gauge malfunction
This is indicated by the message " Oil level
measurement invalid" on the instrument panel.
Consult a PEUGEOT dealer or a qualified
workshop.
In the event of a malfunction of the
electric gauge, the oil level is no longer
monitored.
If the system is faulty, you must check the
engine oil level using the manual dipstick
located in the engine compartment.
For more information on Checking levels,
refer to the corresponding section.
Coolant temperature
indicator
With the engine running:
– In zone A, the temperature is correct.
–
In zone
B, the temperature is too high.
The associated warning lamp and the
STOP
warning lamp light up in red on the
instrument panel, accompanied by the display of
a message and an audible signal.
You must stop the vehicle as soon as it is
safe to do so.
Wait a few minutes before switching off the
engine.
After switching off the ignition, carefully open the bonnet and check the coolant
level.
For more information on Checking
levels, refer to the corresponding
section.
AdBlue® range indicators
(BlueHDi)
The Diesel BlueHDi engines are equipped with
a system that associates the SCR (Selective
Catalytic Reduction) emissions control system
and the Diesel particle filter (DPF) for the
treatment of exhaust gases. They cannot
function without AdBlue
® fluid.
When the level of AdBlue® falls below the
reserve level (between 1,500 and 0 miles (2,400
and 0
km)), a warning lamp lights up when
the ignition is switched on and an estimate
of the distance that can be travelled before
engine starting is prevented is displayed in the
instrument panel.
The engine starting prevention system required by regulations is activated
automatically once the AdBlue
® tank is empty.
It is then no longer possible to start the
engine until the minimum level of AdBlue
® has
been topped up.
Page 52 of 260

50
Ease of use and comfort
Automatic "electrochrome" model
The electrochrome system uses a sensor that
detects the level of exterior brightness and that
coming from the rear of the vehicle, in order to
automatically and gradually switch between day
and night usage.
To ensure optimum visibility while manoeuvring, the mirror automatically
brightens when reverse gear is engaged.
The system is deactivated if the load in the
boot exceeds the height of the load space
cover or if the load space cover has items
placed on it.
Rechargeable hybrid vehicles
An LED, located below the interior rear
view mirror and visible from outside the
vehicle, lights up blue to indicate that the
vehicle is being driven in Electric mode
(depending on country of sale).
Rear bench seat
Rear head restraints
They have two positions:
– A high position , for when the seat is in use:
►
Pull the head restraint fully up.
–
A low position , for stowing, when the seat is
not in use: ►
Press the lug
A to release the head
restraint and push it down.
The rear head restraints can be removed.
Removing a head restraint
► Release the backrest using control 1 .
► T ilt the backrest slightly forwards.
►
Pull the head restraint fully up.
►
Press the lug
A to release the head restraint
and remove it completely.
Refitting a head restraint
► Insert the head restraint rods into the guides
in the corresponding backrest.
►
Push the head restraint fully down.
►
Press the lug
A to release the head restraint
and push it down.
Never drive with passengers seated at
the rear when the head restraints are
removed; the head restraints should be in
place and in the high position.
The head restraint for the centre seat
and those for the outer seats are not
interchangeable.
Folding the backrests
Each section of the backrest has one or two
release controls:
–
A
grip 1 on the outer edge of the backrest.
–
A
lever 2 on the boot side trim (SW).
Page 56 of 260
54
Ease of use and comfort
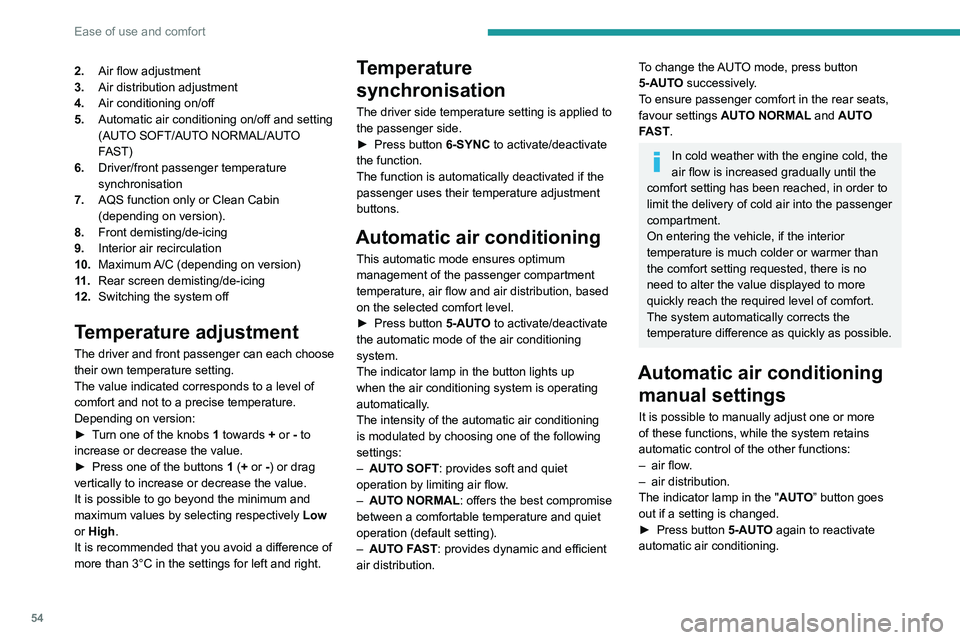
2.Air flow adjustment
3. Air distribution adjustment
4. Air conditioning on/off
5. Automatic air conditioning on/off and setting
(AUTO SOFT/AUTO NORMAL/AUTO
FAST)
6. Driver/front passenger temperature
synchronisation
7. AQS function only or Clean Cabin
(depending on version).
8. Front demisting/de-icing
9. Interior air recirculation
10. Maximum A/C (depending on version)
11 . Rear screen demisting/de-icing
12. Switching the system off
Temperature adjustment
The driver and front passenger can each choose
their own temperature setting.
The value indicated corresponds to a level of
comfort and not to a precise temperature.
Depending on version:
►
T
urn one of the knobs 1 towards + or - to
increase or decrease the value.
►
Press one of the buttons
1 (+ or -) or drag
vertically to increase or decrease the value.
It is possible to go beyond the minimum and
maximum values by selecting respectively Low
or High.
It is recommended that you avoid a difference of
more than 3°C in the settings for left and right.
Temperature
synchronisation
The driver side temperature setting is applied to
the passenger side.
►
Press button
6-SYNC to activate/deactivate
the function.
The function is automatically deactivated if the
passenger uses their temperature adjustment
buttons.
Automatic air conditioning
This automatic mode ensures optimum
management of the passenger compartment
temperature, air flow and air distribution, based
on the selected comfort level.
►
Press button
5-AUTO to activate/deactivate
the automatic mode of the air conditioning
system.
The indicator lamp in the button lights up
when the air conditioning system is operating
automatically.
The intensity of the automatic air conditioning
is modulated by choosing one of the following
settings:
–
AUT
O SOFT : provides soft and quiet
operation by limiting air flow.
–
AUT
O NORMAL: offers the best compromise
between a comfortable temperature and quiet
operation (default setting).
–
AUT
O FAST: provides dynamic and efficient
air distribution.
To change the AUTO mode, press button
5-AUTO successively.
To ensure passenger comfort in the rear seats,
favour settings AUTO NORMAL and AUTO
FAST.
In cold weather with the engine cold, the
air flow is increased gradually until the
comfort setting has been reached, in order to
limit the delivery of cold air into the passenger
compartment.
On entering the vehicle, if the interior
temperature is much colder or warmer than
the comfort setting requested, there is no
need to alter the value displayed to more
quickly reach the required level of comfort.
The system automatically corrects the
temperature difference as quickly as possible.
Automatic air conditioning manual settings
It is possible to manually adjust one or more
of these functions, while the system retains
automatic control of the other functions:
–
air flow
.
–
air distribution.
The indicator lamp in the " AUT
O” button goes
out if a setting is changed.
►
Press button
5-AUTO again to reactivate
automatic air conditioning.
Page 58 of 260
56
Ease of use and comfort
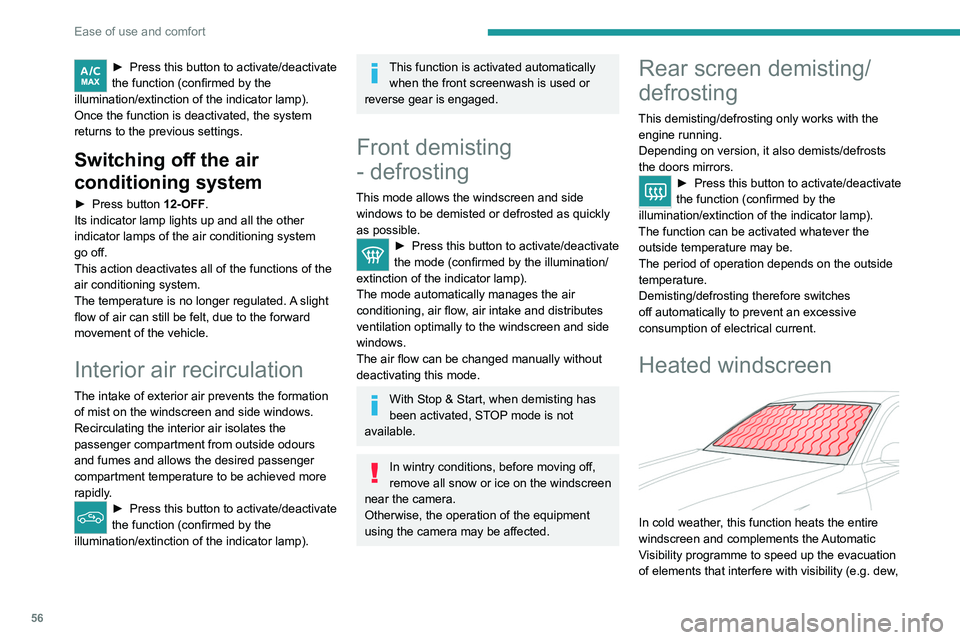
► Press this button to activate/deactivate
the function (confirmed by the
illumination/extinction of the indicator lamp).
Once the function is deactivated, the system
returns to the previous settings.
Switching off the air
conditioning system
► Press button 12-OFF.
Its indicator lamp lights up and all the other
indicator lamps of the air conditioning system
go off.
This action deactivates all of the functions of the
air conditioning system.
The temperature is no longer regulated. A slight
flow of air can still be felt, due to the forward
movement of the vehicle.
Interior air recirculation
The intake of exterior air prevents the formation
of mist on the windscreen and side windows.
Recirculating the interior air isolates the
passenger compartment from outside odours
and fumes and allows the desired passenger
compartment temperature to be achieved more
rapidly.
► Press this button to activate/deactivate
the function (confirmed by the
illumination/extinction of the indicator lamp).
This function is activated automatically when the front screenwash is used or
reverse gear is engaged.
Front demisting
- defrosting
This mode allows the windscreen and side windows to be demisted or defrosted as quickly
as possible.
► Press this button to activate/deactivate
the mode (confirmed by the illumination/
extinction of the
indicator lamp).
The mode automatically manages the air
conditioning, air flow, air intake and distributes
ventilation optimally to the windscreen and side
windows.
The air flow can be changed manually without
deactivating this mode.
With Stop & Start, when demisting has
been activated, STOP mode is not
available.
In wintry conditions, before moving off,
remove all snow or ice on the windscreen
near the camera.
Otherwise, the operation of the equipment
using the camera may be affected.
Rear screen demisting/
defrosting
This demisting/defrosting only works with the engine running.
Depending on version, it also demists/defrosts
the doors mirrors.
► Press this button to activate/deactivate
the function (confirmed by the
illumination/extinction of the indicator lamp).
The function can be activated whatever the outside temperature may be.
The period of operation depends on the outside
temperature.
Demisting/defrosting therefore switches
off automatically to prevent an excessive
consumption of electrical current.
Heated windscreen
In cold weather, this function heats the entire
windscreen and complements the Automatic
Visibility programme to speed up the evacuation
of elements that interfere with visibility (e.g.
dew,
Page 61 of 260
59
Ease of use and comfort
3allows a smartphone to be connected by Android
Auto® or CarPlay®, enabling certain smartphone
applications to be used on the touch screen.
For best results, use a cable made or approved
by the device manufacturer.
These applications can be managed using the
steering-mounted controls or the audio system
controls.
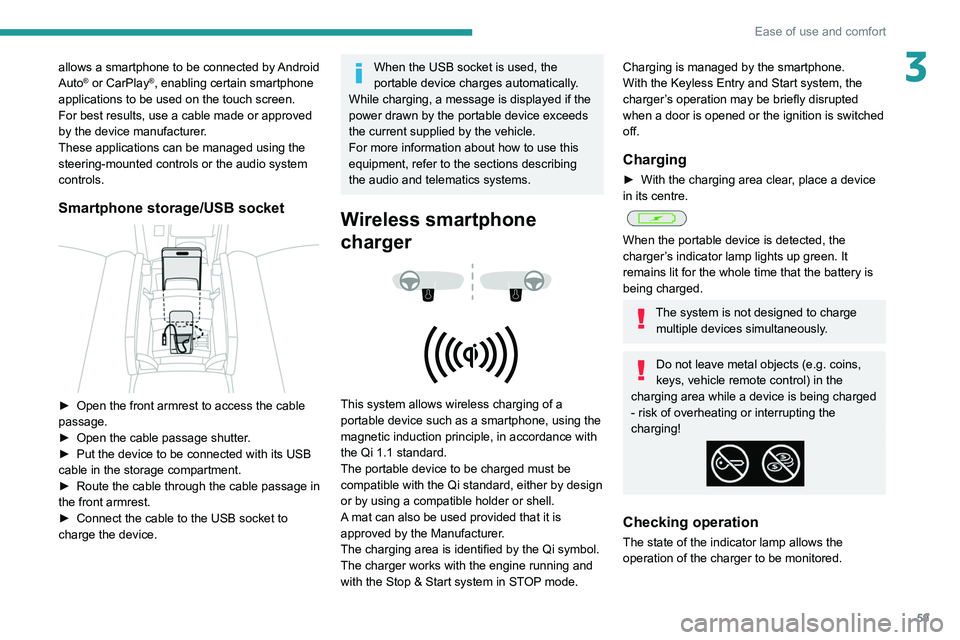
Smartphone storage/USB socket
► Open the front armrest to access the cable
passage.
►
Open the cable passage shutter
.
►
Put the device to be connected with its USB
cable in the storage compartment.
►
Route the cable through the cable passage in
the front armrest.
►
Connect the cable to the USB socket to
charge the device.
When the USB socket is used, the
portable device charges automatically.
While charging, a message is displayed if the
power drawn by the portable device exceeds
the current supplied by the vehicle.
For more information about how to use this
equipment, refer to the sections describing
the audio and telematics systems.
Wireless smartphone
charger
This system allows wireless charging of a
portable device such as a smartphone, using the
magnetic induction principle, in accordance with
the Qi 1.1 standard.
The portable device to be charged must be
compatible with the Qi standard, either by design
or by using a compatible holder or shell.
A mat can also be used provided that it is
approved by the Manufacturer.
The charging area is identified by the Qi symbol.
The charger works with the engine running and
with the Stop & Start system in STOP mode.
Charging is managed by the smartphone.
With the Keyless Entry and Start system, the
charger’s operation may be briefly disrupted
when a door is opened or the ignition is switched
off.
Charging
► With the charging area clear , place a device
in its centre.
When the portable device is detected, the
charger’s indicator lamp lights up green. It
remains lit for the whole time that the battery is
being charged.
The system is not designed to charge multiple devices simultaneously.
Do not leave metal objects (e.g. coins,
keys, vehicle remote control) in the
charging area while a device is being charged
- risk of overheating or interrupting the
charging!
Checking operation
The state of the indicator lamp allows the
operation of the charger to be monitored.
Page 71 of 260

69
Lighting and visibility
40 (Initial setting)Driver only or driver + front passenger
1 5 people
2 5 people + load in the boot
3 Driver only + load in the boot
4 5 6 Not used
Automatic Peugeot Matrix
LED Technology 2.0
headlamp adjustment
This system automatically adjusts the height of
the headlamp beams according to the load in the
vehicle.
In the event of a malfunction, this warning
lamp lights up on the instrument panel,
accompanied by the display of a message and
an audible signal.
The system places the headlamp beams in the
lowest position.
Have it checked by a PEUGEOT dealer or a
qualified workshop.
Do not touch the Peugeot Matrix LED
Technology 2.0 headlamps - risk of
electrocution!
Automatic illumination of lamps
With the lighting control stalk in the “ AUTO”
position and if a low level of exterior brightness
is detected by the rain/sunshine sensor, the
sidelamps and dipped beam headlamps are
switched on automatically, without any action on
the part of the driver. They may also come on if
rain is detected, at the same time as automatic
operation of the windscreen wipers.
As soon as the brightness returns to a sufficient
level or after the windscreen wipers are switched
off, the lamps are switched off automatically.
Malfunction
In the event of a malfunction of the rain/
sunshine sensor, the vehicle’s lamps
come on and this warning lamp is displayed on
the instrument panel, accompanied by an
audible signal and/or the display of a message.
Have it checked by a PEUGEOT dealer or a
qualified workshop.
Do not cover the rain/sunshine sensor
located at the top centre of the
windscreen behind the interior rear view
mirror; the associated functions would no
longer be controlled.
In fog or snow, the rain/sunshine sensor
may detect sufficient light. For this
reason, the lighting will not come on
automatically.
The inner surface of the windscreen may become misted up and affect the proper
operation of the rain/sunshine sensor.
In humid and cold weather, demist the
windscreen regularly.
Guide-me-home and
welcome lighting
Guide-me-home lighting
Automatic
With the ring of the lighting control stalk in the
"AUTO” position and when the light is poor, the
dipped beam headlamps come on automatically
when the ignition is switched off.
You can activate/deactivate and adjust the duration of the guide-me-home
lighting in the Settings
> Vehicle touch screen
application.
Manual