2022 PEUGEOT 308 sunroof
[x] Cancel search: sunroofPage 4 of 260

2
Contents
■
Overview
■
Eco-driving
1InstrumentsDriver information 10
Matrix instrument panel 10
Digital instrument panels 10
Warning and indicator lamps 12
Indicators 18
Manual test 21
Total distance recorder 22
Trip computer 22
10-inch touch screen 23
i-Toggles 25
Remotely operable additional functions
(Rechargeable hybrid)
25
2AccessRemote control / Key 27
Proximity Keyless Entry and Start 29
Central locking 31
Back-up procedures 32
Doors 34
Boot 34
Motorised tailgate (SW) 35
Alarm 38
Electric windows 40
Sunroof 41
3Ease of use and comfortDriving position 43
Front seats 44
Steering wheel adjustment 48
Heated steering wheel 48
Mirrors 48
Rear bench seat 50
Heating and Ventilation 52
Dual-zone automatic air conditioning 53
Front demisting - defrosting 56
Rear screen demisting/defrosting 56
Heated windscreen 56
Temperature pre-conditioning
(Rechargeable hybrid)
57
Front fittings 58
Courtesy lamps 61
Interior ambient lighting 62
Rear fittings 62
Boot fittings 63
4Lighting and visibilityExterior lighting control stalk 67
Direction indicators 68
Headlamp beam height adjustment 68
Automatic illumination of headlamps 69
Guide-me-home and welcome lighting 69
Automatic lighting systems - General
recommendations
70
Automatic headlamp dipping 70
Peugeot Matrix LED Technology 2.0 71
Wiper control stalk 73
Intermittent wipers 75
Automatic wipers 75
Changing a wiper blade 76
5SafetyGeneral safety recommendations 78
Hazard warning lamps 78
Horn 79
Pedestrian horn (Rechargeable hybrid) 79
Emergency or assistance 79
Electronic stability control (ESC) 81
Seat belts 84
Airbags 86
Child seats 88
Deactivating the front passenger airbag 90
ISOFIX child seats 91
i-Size child seats 93
Installing child seats 93
Child lock 96
6DrivingDriving recommendations 97
Starting / Switching off the engine
with the key
99
Starting/Switching off the engine with
Keyless Entry and Start
100
Starting rechargeable hybrid vehicles 101
Electric parking brake 102
Manual gearbox 104
Automatic gearbox 105
Driving modes 107
Hill start assist 109
Gear shift indicator 11 0
Stop & Start 11 0
Tyre under-inflation detection 111
Driving and manoeuvring aids - General
recommendations
11 3
Steering wheel with hands-on detection 11 4
Shortcuts for driving aids 11 5
Page 6 of 260
4
Overview
Presentation
These illustrations and descriptions are provided
for information. The presence and location of
some elements vary depending on the version
or trim level.
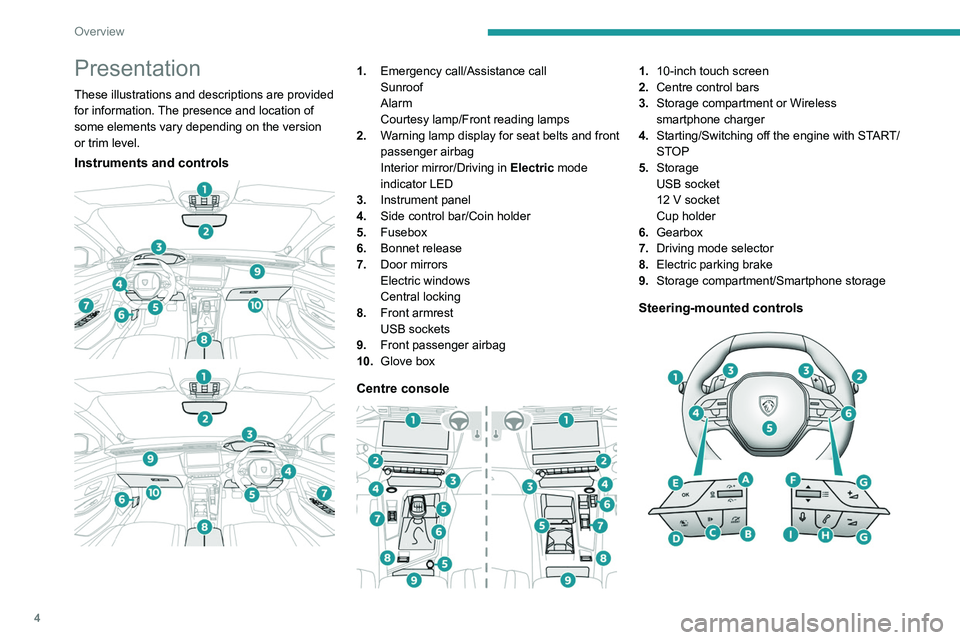
Instruments and controls
1. Emergency call/Assistance call
Sunroof
Alarm
Courtesy lamp/Front reading lamps
2. Warning lamp display for seat belts and front
passenger airbag
Interior mirror/Driving in Electric mode
indicator LED
3. Instrument panel
4. Side control bar/Coin holder
5. Fusebox
6. Bonnet release
7. Door mirrors
Electric windows
Central locking
8. Front armrest
USB sockets
9. Front passenger airbag
10. Glove box
Centre console
1.10-inch touch screen
2. Centre control bars
3. Storage compartment or Wireless
smartphone charger
4. Starting/Switching off the engine with START/
STOP
5. Storage
USB socket
12
V socket
Cup holder
6. Gearbox
7. Driving mode selector
8. Electric parking brake
9. Storage compartment/Smartphone storage
Steering-mounted controls
Page 29 of 260
27
Access
2Remote control / Key
Remote control function
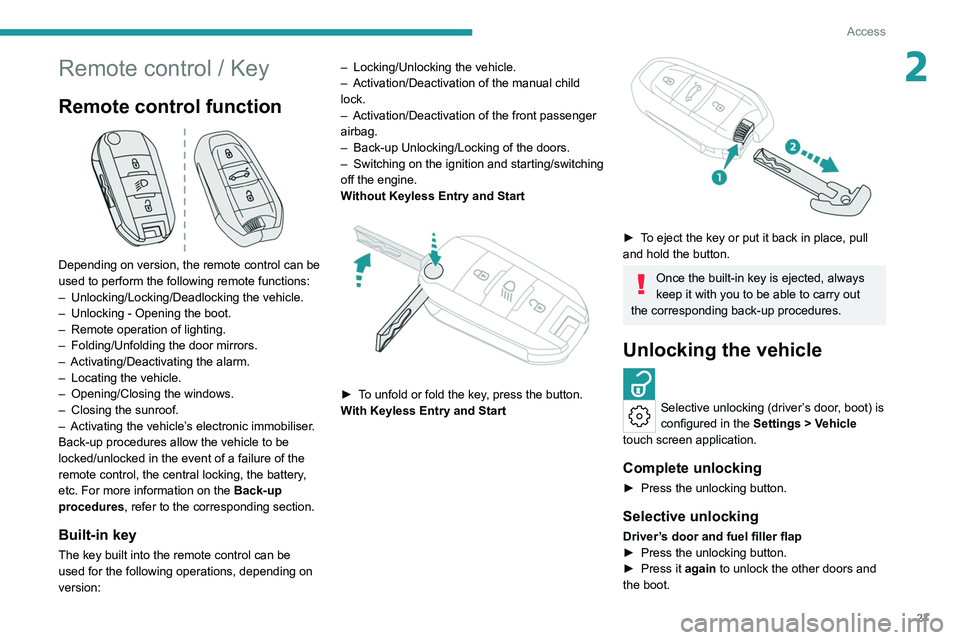
Depending on version, the remote control can be
used to perform the following remote functions:
–
Unlocking/Locking/Deadlocking the vehicle.
–
Unlocking - Opening the boot.
–
Remote operation of lighting.
–
Folding/Unfolding the door mirrors.
–
Activating/Deactivating the alarm.
–
Locating the vehicle.
–
Opening/Closing the windows.
–
Closing the sunroof.
–
Activating the vehicle’
s electronic immobiliser.
Back-up procedures allow the vehicle to be
locked/unlocked in the event of a failure of the
remote control, the central locking, the battery,
etc. For more information on the Back-up
procedures, refer to the corresponding section.
Built-in key
The key built into the remote control can be
used for the following operations, depending on
version: –
Locking/Unlocking the vehicle.
–
Activation/Deactivation of the manual child
lock.
–
Activation/Deactivation of the front passenger
airbag.
–
Back-up Unlocking/Locking of the doors.
–
Switching on the ignition and starting/switching
off the engine.
W
ithout Keyless Entry and Start
► To unfold or fold the key, press the button.
With Keyless Entry and Start
► To eject the key or put it back in place, pull
and hold the button.
Once the built-in key is ejected, always
keep it with you to be able to carry out
the corresponding back-up procedures.
Unlocking the vehicle
Selective unlocking (driver’s door, boot) is
configured in the Settings
> Vehicle
touch screen application.
Complete unlocking
► Press the unlocking button.
Selective unlocking
Driver’s door and fuel filler flap
► Press the unlocking button.
►
Press it
again to unlock the other doors and
the boot.
Page 30 of 260
28
Access
The charging nozzle can be unplugged on the
second press.
Complete or selective unlocking, and alarm
deactivation (depending on version), is confirmed
by the flashing of the direction indicators and the
lighting of the daytime running lamps.
Depending on version, the door mirrors unfold.
Opening the windows
►
T
o open the windows, press the unlocking
button for more than 3 seconds (depending on
version).
►
Press again to stop the windows opening.
Selective unlocking and opening of
the tailgate
By default, selective unlocking of the tailgate
is deactivated and its motorised operation is
activated.
► Press and hold this button to unlock
the boot and, depending on version,
trigger the motorised opening of the tailgate.
When selective unlocking of the tailgate is
activated, the doors and the fuel filler flap remain
locked.
If selective unlocking of the tailgate is
deactivated, pressing the button unlocks the
whole vehicle.
If motorised operation of the tailgate is
deactivated, pressing the button partially
opens the tailgate.
To lock the vehicle, it is necessary to close
the tailgate again.
Locking the vehicle
Normal locking
► Press the locking button.
The locking, and the activation of the alarm
depending on version,
is confirmed by the
lighting of the direction indicators and the
daytime running lamps.
Depending on version, the door mirrors fold.
An access (door or boot) that is not properly closed prevents locking of the
vehicle. However, if the vehicle is fitted with
an alarm, it will be activated after 45
seconds.
If the vehicle is unlocked but the doors or boot
are not subsequently opened,
the vehicle
will automatically lock itself again after about
30
seconds. If the vehicle is fitted with an
alarm, it will be reactivated automatically.
Deadlocking
Deadlocking renders the interior door
controls inoperative. It also deactivates
the central locking buttons.
The horn remains operational.
Never leave anyone inside the vehicle
when it is deadlocked.
► Press the locking button again within 3
seconds to deadlock the vehicle (confirmed by
the temporary lighting of the direction indicators).
Closing the windows and sunroof
An audible signal sounds before the start of the
movement.
►
T
o completely close the windows and,
depending on version, the sunroof, press the
locking button for more than 2 seconds.
►
Press again to stop closing.
Ensure that no person or object could
prevent the correct closing of the
windows and sunroof.
If, on versions with alarm, you want to
leave the windows and/or sunroof partially
open, you must first deactivate the interior
volumetric alarm protection.
For more information on the Alarm, refer to
the corresponding section.
Locating the vehicle
Helps you to locate your vehicle from a distance,
with the vehicle locked:
–
The direction indicators flash for approximately
10 seconds.
–
The door mirror spotlamps come on.
–
The courtesy lamps come on.
► Press this button.
Page 43 of 260

41
Access
2► Release the control, then pull it again for at
least one second.
If an electric window meets an obstacle
during operation, the movement of the
window must be reversed. To do this, press
the relevant control.
When the driver operates the passengers’
electric window controls, it is important to
ensure that nothing can prevent the window
from closing properly.
It is important to ensure that passengers use
the electric windows correctly.
Pay particular attention to children when
operating the windows.
Be aware of passengers and/or other persons
present when closing windows remotely using
the electronic key.
Do not put your head or arms through the
open windows when the vehicle is moving -
risk of serious injury!
Sunroof
The sunroof consists of a movable glass panel
that slides over the roof and a blind that can
be opened independently. Opening the sunroof
automatically opens the blind.
►
T
o operate the panoramic sunroof, use the
button in the roof console.
The sunroof can be operated when the ignition
is turned on (if the battery is charged enough),
with the engine running, in STOP mode of Stop
& Start, and up to 45 seconds after turning off
the ignition.
Precautions
Do not put your head or arms through the
sunroof while the vehicle is moving - risk
of serious injury!
Do not operate the sunroof if transverse
roof bars are fitted - risk of serious
damage!
Do not place heavy loads on the movable
glass panel of the sunroof.
If the sunroof is wet, following a rain
shower or washing the vehicle, wait until
it is completely dry before operating it.
Do not operate the sunroof if it is covered by
snow or ice - risk of damage!
Use only plastic scrapers to remove snow or
ice from the sunroof.
Regularly check the condition of the
sunroof seals (e.g. presence of dust,
dead leaves).
If using a car wash, check first that the roof is
correctly closed and keep the high-pressure
jet at least 30 centimetres from the seals.
Never leave the vehicle with the sunroof
open.
Operation
When opening the sunroof fully, the movable
glass moves to a partially open position, then
slides over the roof. Any intermediate position is
possible.
Before operating the sunroof control
button, ensure that no object or person
might prevent the movement.
Pay particular attention to children when
operating the sunroof.
If something is trapped when operating the
sunroof, reverse the movement of the sunroof
by pressing the control button in question.
The driver must ensure that passengers use
the sunroof correctly.
Any manual intervention on the position of
the sunroof may disturb the anti-pinch device.
Perform a reinitialisation.
Page 44 of 260
42
Access
Anti-pinch system
If the sunroof encounters an obstacle when
closing, the movement is automatically reversed.
Opening/closing the sunroof
► To open the sunroof, use the part of the
button located towards the rear.
►
T
o close the sunroof, use the part of the
button located towards the front.
Operating the button
► Pressing the button beyond its point of
resistance opens or closes the sunroof fully .
►
Pressing the button again stops the
movement in progress.
►
By keeping the button pressed (without going
beyond the point of resistance), the movement of
the glass stops when this button is released.
►
When the sunroof is closed: pressing once
without passing the point of resistance moves it
to the partially open position.
►
When the sunroof is partially open: pressing
once on the front part of the button, without
going beyond the point of resistance, closes it
completely
.
The sunroof and windows can be closed by holding down the remote control
locking button.
Press again to stop the manoeuvre.
Opening/closing the blind
► To open the blind, pull its handle backwards
until the desired position is reached. ►
T
o close the blind, push its handle forwards
until the desired position is reached.
Reinitialisation
Reinitialisation is required after reconnecting the
battery, or if the sunroof malfunctions or moves
in a jerky manner.
►
Check that nothing is affecting the movement
of the sunroof and that the seals are clean.
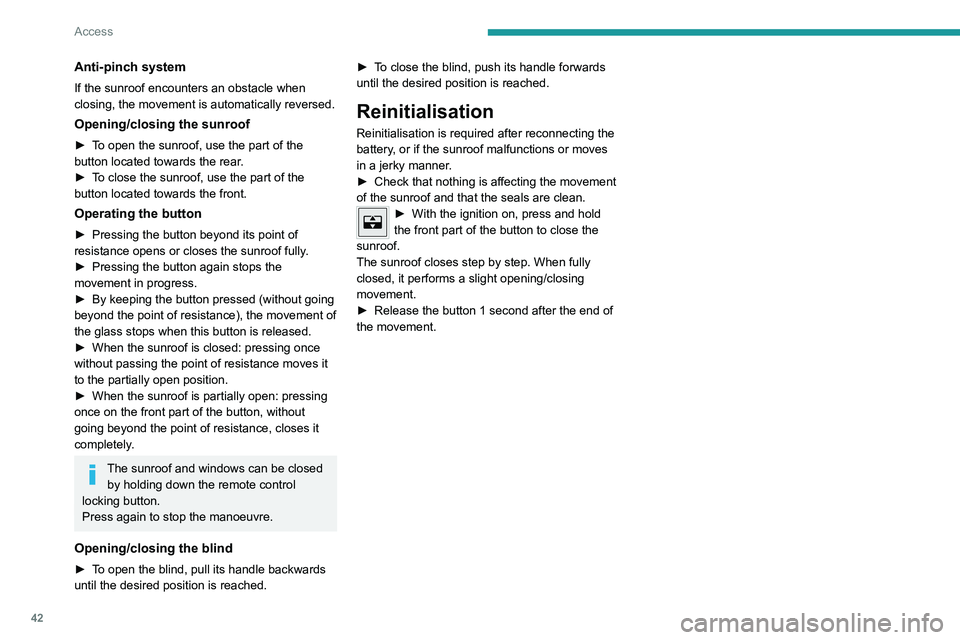
► With the ignition on, press and hold
the front part of the button to close the
sunroof.
The sunroof closes step by step. When fully
closed, it performs a slight opening/closing
movement.
►
Release the button 1 second after the end of
the movement.
Page 168 of 260
166
Practical information
Sunroof
Do not operate the sunroof when using
roof bars - risk of major damage!
Very cold climate screens
(Depending on country of sale)
Only available for Diesel vehicles.
This removable device prevents the
accumulation of snow around the radiator
cooling fan.
It consists of two elements for the upper part of
the front grille, a central element and two other
elements for the lower part.
In case of difficulty with installation/
removal
Contact a PEUGEOT dealer or a qualified
workshop.
Before any operation, ensure that the
engine is off and the cooling fan has
stopped.
It is essential to remove them when:
– the outside temperature exceeds
10°C.
–
recovery is in progress.
–
the speed is above 75 mph (120
km/h).
First installation
The type of grille depends on the vehicle version.
The lower screens are suitable for all versions.
The upper and centre screens can be adapted
according to the vehicle version.
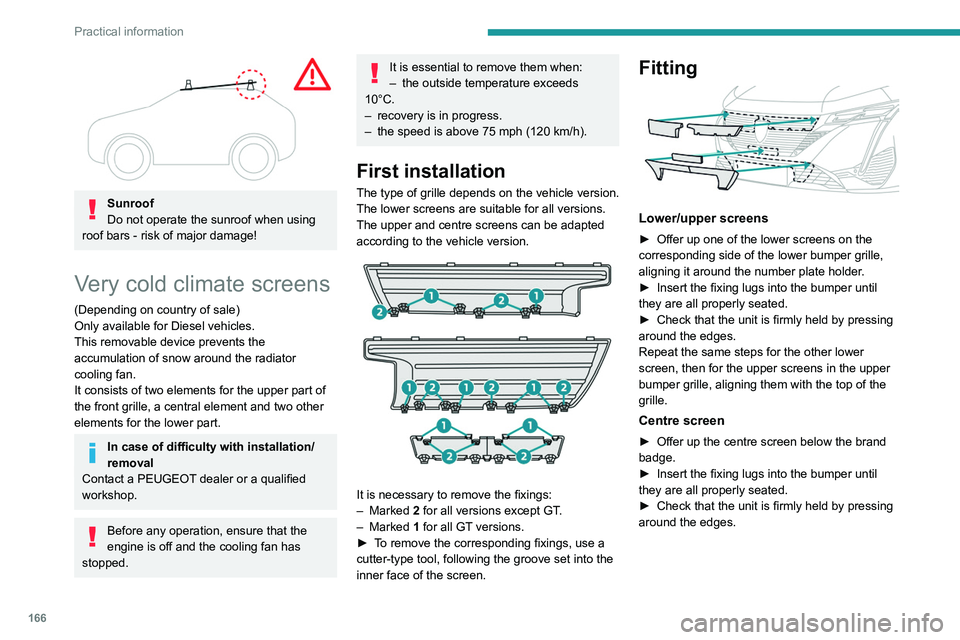
It is necessary to remove the fixings:
– Marked 2
for all versions except GT.
–
Marked 1
for all GT versions.
►
T
o remove the corresponding fixings, use a
cutter-type tool, following the groove set into the
inner face of the screen.
Fitting
Lower/upper screens
► Offer up one of the lower screens on the
corresponding side of the lower bumper grille,
aligning it around the number plate holder
.
►
Insert the fixing lugs into the bumper until
they are all properly seated.
►
Check that the unit is firmly held by pressing
around the edges.
Repeat the same steps for the other lower
screen, then for the upper screens in the upper
bumper grille, aligning them with the top of the
grille.
Centre screen
► Offer up the centre screen below the brand
badge.
►
Insert the fixing lugs into the bumper until
they are all properly seated.
►
Check that the unit is firmly held by pressing
around the edges.
Page 196 of 260
194
In the event of a breakdown
accessory batteries - risk of irreversible
damage!
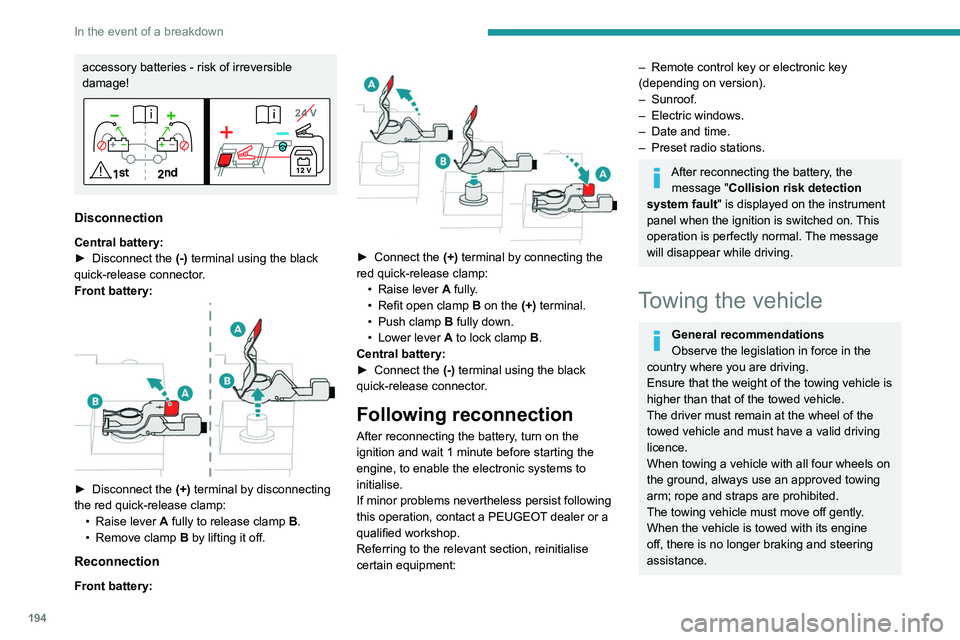
Disconnection
Central battery:
► Disconnect the (-)
terminal using the black
quick-release connector.
Front battery:
► Disconnect the (+) terminal by disconnecting
the red quick-release clamp: •
Raise lever
A
fully to release clamp
B
.
•
Remove clamp
B
by lifting it off.
Reconnection
Front battery:
► Connect the (+) terminal by connecting the
red quick-release clamp: •
Raise lever
A
fully.
•
Refit open clamp
B
on the (+) terminal.
•
Push clamp
B fully down.
•
Lower lever
A
to lock clamp B.
Central battery:
►
Connect the
(-) terminal using the black
quick-release connector.
Following reconnection
After reconnecting the battery, turn on the
ignition and wait 1 minute before starting the
engine, to enable the electronic systems to
initialise.
If minor problems nevertheless persist following
this operation, contact a PEUGEOT dealer or a
qualified workshop.
Referring to the relevant section, reinitialise
certain equipment:
– Remote control key or electronic key
(depending on version).
–
Sunroof.
–
Electric windows.
–
Date and time.
–
Preset radio stations.
After reconnecting the battery, the message "Collision risk detection
system fault" is displayed on the instrument
panel when the ignition is switched on. This
operation is perfectly normal. The message
will disappear while driving.
Towing the vehicle
General recommendations
Observe the legislation in force in the
country where you are driving.
Ensure that the weight of the towing vehicle is
higher than that of the towed vehicle.
The driver must remain at the wheel of the
towed vehicle and must have a valid driving
licence.
When towing a vehicle with all four wheels on
the ground, always use an approved towing
arm; rope and straps are prohibited.
The towing vehicle must move off gently.
When the vehicle is towed with its engine
off, there is no longer braking and steering
assistance.