2022 PEUGEOT 308 fold seats
[x] Cancel search: fold seatsPage 36 of 260
34
Access
► Turn the key to position 2 (Ignition on).
► Immediately press the closed padlock button
for a few seconds.
►
Switch off the ignition and remove the key
from the ignition switch.
The remote control is now fully operational
again.
With Keyless Entry and Start
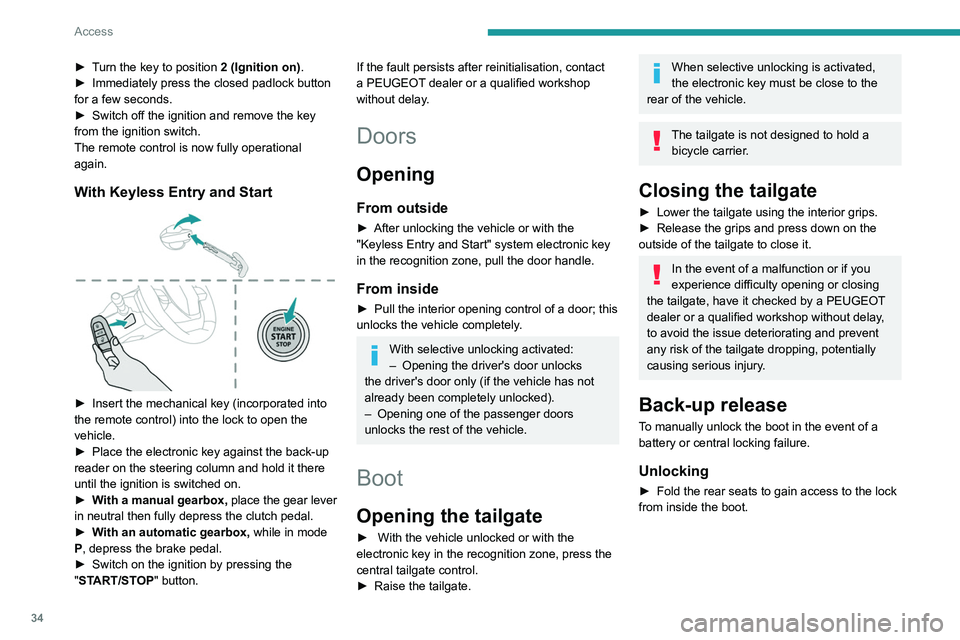
► Insert the mechanical key (incorporated into
the remote control) into the lock to open the
vehicle.
►
Place the electronic key against the back-up
reader on the steering column and hold it there
until the ignition is switched on.
►
W
ith a manual gearbox, place the gear lever
in neutral then fully depress the clutch pedal.
►
W
ith an automatic gearbox, while in mode
P, depress the brake pedal.
►
Switch on the ignition by pressing the
"
START/STOP" button.
If the fault persists after reinitialisation, contact
a PEUGEOT dealer or a qualified workshop
without delay.
Doors
Opening
From outside
► After unlocking the vehicle or with the
"Keyless Entry and Start" system electronic key
in the recognition zone, pull the door handle.
From inside
► Pull the interior opening control of a door; this
unlocks the vehicle completely .
With selective unlocking activated:
– Opening the driver's door unlocks
the driver's door only (if the vehicle has not
already been completely unlocked).
–
Opening one of the passenger doors
unlocks the rest of the vehicle.
Boot
Opening the tailgate
► With the vehicle unlocked or with the
electronic key in the recognition zone, press the
central tailgate control.
►
Raise the tailgate.
When selective unlocking is activated,
the electronic key must be close to the
rear of the vehicle.
The tailgate is not designed to hold a bicycle carrier.
Closing the tailgate
► Lower the tailgate using the interior grips.
► Release the grips and press down on the
outside of the tailgate to close it.
In the event of a malfunction or if you
experience difficulty opening or closing
the tailgate, have it checked by a PEUGEOT
dealer or a qualified workshop without delay,
to avoid the issue deteriorating and prevent
any risk of the tailgate dropping, potentially
causing serious injury.
Back-up release
To manually unlock the boot in the event of a
battery or central locking failure.
Unlocking
► Fold the rear seats to gain access to the lock
from inside the boot.
Page 52 of 260

50
Ease of use and comfort
Automatic "electrochrome" model
The electrochrome system uses a sensor that
detects the level of exterior brightness and that
coming from the rear of the vehicle, in order to
automatically and gradually switch between day
and night usage.
To ensure optimum visibility while manoeuvring, the mirror automatically
brightens when reverse gear is engaged.
The system is deactivated if the load in the
boot exceeds the height of the load space
cover or if the load space cover has items
placed on it.
Rechargeable hybrid vehicles
An LED, located below the interior rear
view mirror and visible from outside the
vehicle, lights up blue to indicate that the
vehicle is being driven in Electric mode
(depending on country of sale).
Rear bench seat
Rear head restraints
They have two positions:
– A high position , for when the seat is in use:
►
Pull the head restraint fully up.
–
A low position , for stowing, when the seat is
not in use: ►
Press the lug
A to release the head
restraint and push it down.
The rear head restraints can be removed.
Removing a head restraint
► Release the backrest using control 1 .
► T ilt the backrest slightly forwards.
►
Pull the head restraint fully up.
►
Press the lug
A to release the head restraint
and remove it completely.
Refitting a head restraint
► Insert the head restraint rods into the guides
in the corresponding backrest.
►
Push the head restraint fully down.
►
Press the lug
A to release the head restraint
and push it down.
Never drive with passengers seated at
the rear when the head restraints are
removed; the head restraints should be in
place and in the high position.
The head restraint for the centre seat
and those for the outer seats are not
interchangeable.
Folding the backrests
Each section of the backrest has one or two
release controls:
–
A
grip 1 on the outer edge of the backrest.
–
A
lever 2 on the boot side trim (SW).
Page 53 of 260
51
Ease of use and comfort
3The backrests should only be manoeuvred when the vehicle is
stationary.
First steps:
►
Lower the head restraints, or remove them
when carrying heavy loads.
►
Lift up the rear armrest.
►
If necessary
, move the front seats forward.
►
Check
that no person or object might interfere
with the folding of the backrests (e.g.
clothing,
luggage).
►
Check that the outer seat belts are lying flat
on the backrests.
The folding of the backrest is accompanied by a slight lowering of the
corresponding cushion.
To obtain a flat surface, it is necessary to
place the adjustable boot floor in the high
position.
When the backrest is released, the red
indicator in the release grip is visible.
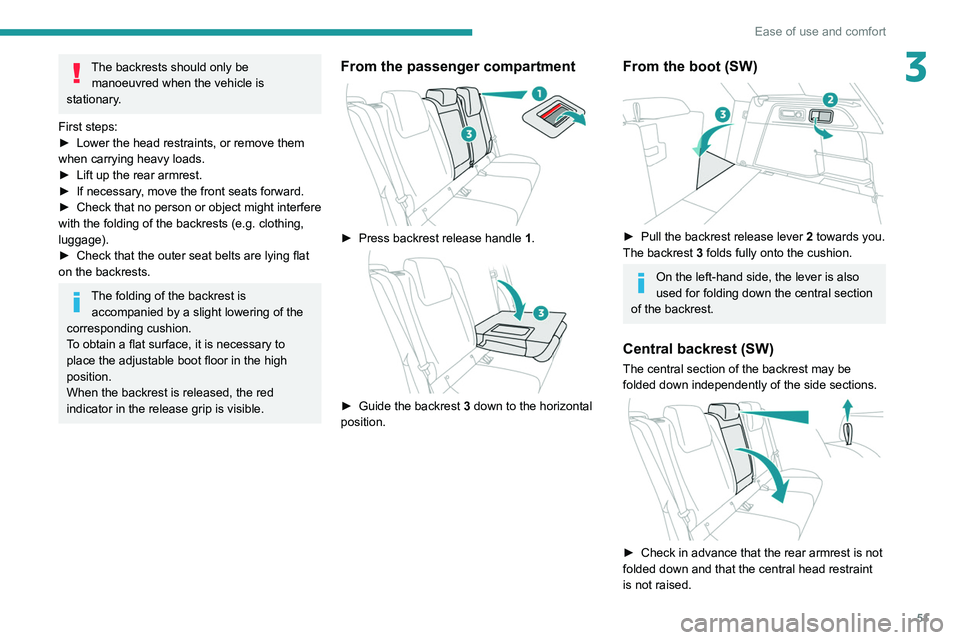
From the passenger compartment
► Press backrest release handle 1 .
► Guide the backrest 3 down to the horizontal
position.
From the boot (SW)
► Pull the backrest release lever 2 towards you.
The backrest 3 folds fully onto the cushion.
On the left-hand side, the lever is also
used for folding down the central section
of the backrest.
Central backrest (SW)
The central section of the backrest may be
folded down independently of the side sections.
► Check in advance that the rear armrest is not
folded down and that the central head restraint
is not raised.
Page 66 of 260
64
Ease of use and comfort
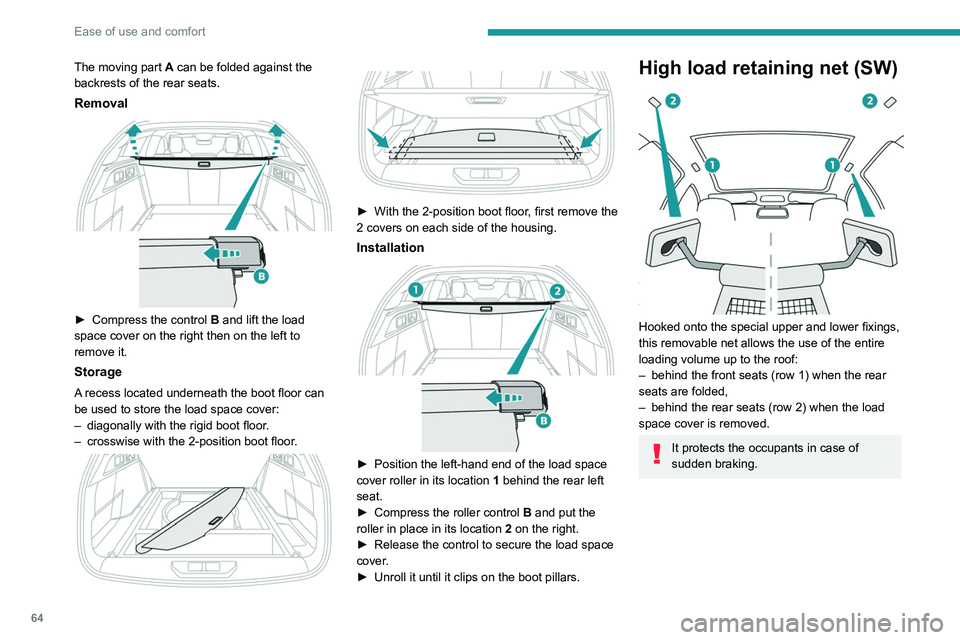
The moving part A can be folded against the
backrests of the rear seats.
Removal
► Compress the control B and lift the load
space cover on the right then on the left to
remove it.
Storage
A recess located underneath the boot floor can
be used to store the load space cover:
–
diagonally with the rigid boot floor
.
–
crosswise with the 2-position boot floor
.
► With the 2-position boot floor
, first remove the
2 covers on each side of the housing.
Installation
► Position the left-hand end of the load space
cover roller in its location 1
behind the rear left
seat.
►
Compress the roller control B
and put the
roller in place in its location 2 on the right.
►
Release the control to secure the load space
cover
.
►
Unroll it until it clips on the boot pillars.
High load retaining net (SW)
Hooked onto the special upper and lower fixings,
this removable net allows the use of the entire
loading volume up to the roof:
–
behind the front seats (row 1) when the rear
seats are folded,
–
behind the rear seats (row 2) when the load
space cover is removed.
It protects the occupants in case of
sudden braking.
Page 67 of 260
65
Ease of use and comfort
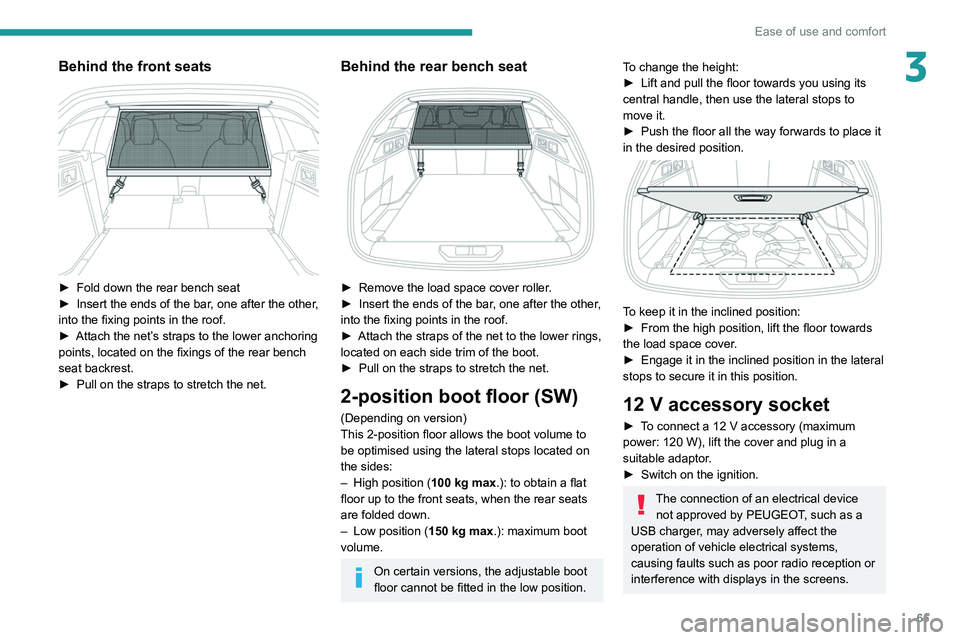
3Behind the front seats
► Fold down the rear bench seat
► Insert the ends of the bar , one after the other,
into the fixing points in the roof.
►
Attach the net’
s straps to the lower anchoring
points, located on the fixings of the rear bench
seat backrest.
►
Pull on the straps to stretch the net.
Behind the rear bench seat
► Remove the load space cover roller .
► Insert the ends of the bar , one after the other,
into the fixing points in the roof.
►
Attach the straps of the net to the lower rings,
located on each side trim of the boot.
►
Pull on the straps to stretch the net.
2-position boot floor (SW)
(Depending on version)
This 2-position floor allows the boot volume to
be optimised using the lateral stops located on
the sides:
–
High position ( 100
kg max.): to obtain a flat
floor up to the front seats, when the rear seats
are folded down.
–
Low position ( 150
kg max.): maximum boot
volume.
On certain versions, the adjustable boot
floor cannot be fitted in the low position.
To change the height:
► Lift and pull the floor towards you using its
central handle, then use the lateral stops to
move it.
►
Push the floor all the way forwards to place it
in the desired position.
To keep it in the inclined position:
► From the high position, lift the floor towards
the load space cover
.
►
Engage it in the inclined position in the lateral
stops to secure it in this position.
12 V accessory socket
► To connect a 12 V accessory (maximum
power: 120 W), lift the cover and plug in a
suitable adaptor.
►
Switch on the ignition.
The connection of an electrical device not approved by PEUGEOT, such as a
USB charger, may adversely affect the
operation of vehicle electrical systems,
causing faults such as poor radio reception or
interference with displays in the screens.
Page 68 of 260
66
Ease of use and comfort
Boot lamp
It comes on automatically when the boot is
opened and goes off automatically when the
boot is closed.
The lighting time varies according to the
circumstances:
–
When the ignition is off, approximately 10
minutes.
–
In energy saving mode, approximately 30
seconds.
–
With the engine running, unlimited.
Storage well
► Lift the rigid boot floor as far as possible or lift
the hinged boot carpet (depending on version) to
access the storage well.
►
With the 2-position boot floor (SW), lift the
boot floor as far as possible or lift the cover at
the back of
the boot to access one or other of the
storage wells.
The cover at the back of the boot
is also
accessible from the second row seats if the
backrests of the rear bench seat are folded
down.
Depending on version, it includes:
–
A
hazard warning triangle.
–
A
temporary puncture repair kit with the tool
kit.
–
A
spare wheel with the tool kit.
–
The traction battery charging cables
(Rechargeable hybrid). The load space cover can also be stored here
(SW).
Page 87 of 260
85
Safety
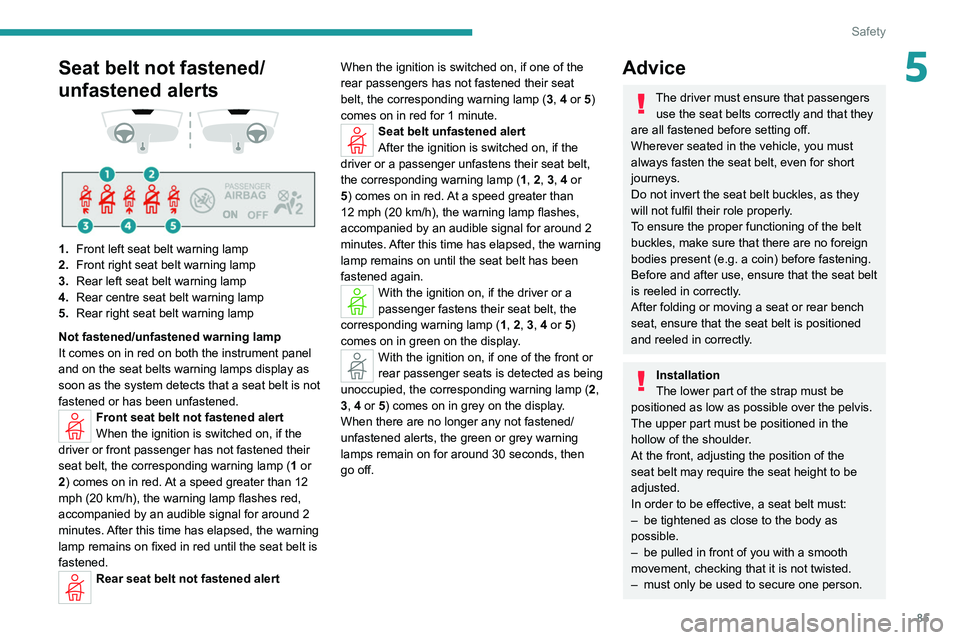
5Seat belt not fastened/
unfastened alerts
1. Front left seat belt warning lamp
2. Front right seat belt warning lamp
3. Rear left seat belt warning lamp
4. Rear centre seat belt warning lamp
5. Rear right seat belt warning lamp
Not fastened/unfastened warning lamp
It comes on in red on both the instrument panel
and on the seat belts warning lamps display as
soon as the system detects that a seat belt is not
fastened or has been unfastened.
Front seat belt not fastened alert
When the ignition is switched on, if the
driver or front passenger has not fastened their
seat belt, the corresponding warning lamp ( 1 or
2) comes on in red. At a speed greater than 12
mph (20
km/h), the warning lamp flashes red,
accompanied by an audible signal for around 2
minutes. After this time has elapsed, the warning
lamp remains on fixed in red until the seat belt is
fastened.
Rear seat belt not fastened alert When the ignition is switched on, if one of the
rear passengers has not fastened their seat
belt, the corresponding warning lamp (
3, 4 or 5)
comes on in red for 1 minute.
Seat belt unfastened alert
After the ignition is switched on, if the
driver or a passenger unfastens their seat belt,
the corresponding warning lamp ( 1, 2, 3, 4 or
5) comes on in red. At a speed greater than
12 mph (20
km/h), the warning lamp flashes,
accompanied by an audible signal for around 2
minutes. After this time has elapsed, the warning
lamp remains on until the seat belt has been
fastened again.
With the ignition on, if the driver or a
passenger fastens their seat belt, the
corresponding warning lamp ( 1, 2, 3, 4 or 5)
comes on in green on the display.
With the ignition on, if one of the front or
rear passenger seats is detected as being
unoccupied, the corresponding warning lamp ( 2,
3, 4 or 5) comes on in grey on the display.
When there are no longer any not fastened/
unfastened alerts, the green or grey warning
lamps remain on for around 30 seconds, then
go off.
Advice
The driver must ensure that passengers use the seat belts correctly and that they
are all fastened before setting off.
Wherever seated in the vehicle, you must
always fasten the seat belt, even for short
journeys.
Do not invert the seat belt buckles, as they
will not fulfil their role properly.
To ensure the proper functioning of the belt
buckles, make sure that there are no foreign
bodies present (e.g.
a coin) before fastening.
Before and after use, ensure that the seat belt
is reeled in correctly.
After folding or moving a seat or rear bench
seat, ensure that the seat belt is positioned
and reeled in correctly.
Installation
The lower part of the strap must be
positioned as low as possible over the pelvis.
The upper part must be positioned in the
hollow of the shoulder.
At the front, adjusting the position of the
seat belt may require the seat height to be
adjusted.
In order to be effective, a seat belt must:
–
be tightened as close to the body as
possible.
–
be pulled in front of you with a smooth
movement, checking that it is not twisted.
–
must only be used to secure one person.
Page 182 of 260
180
In the event of a breakdown
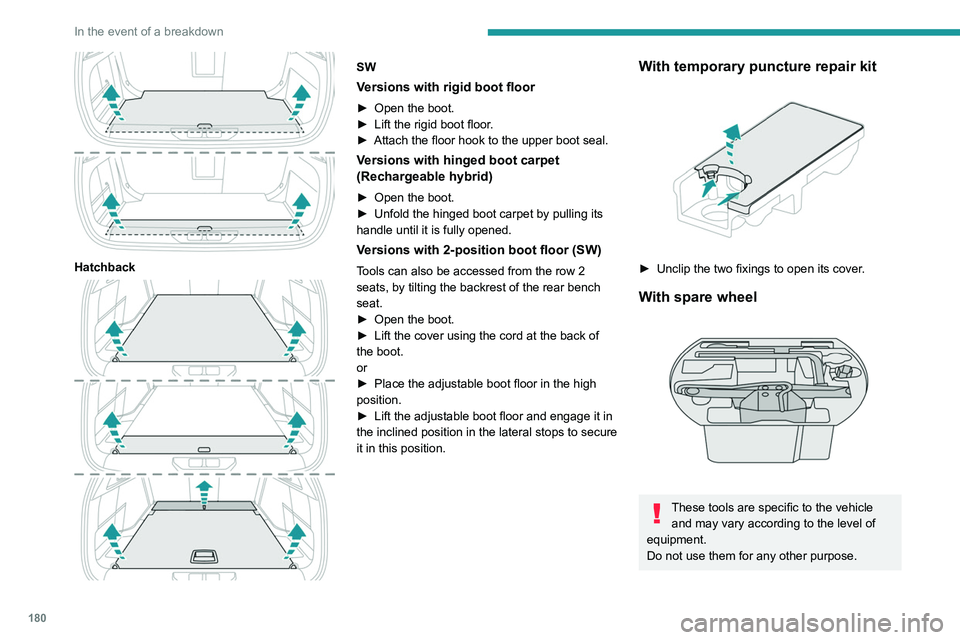
Hatchback
SW
Versions with rigid boot floor
► Open the boot.
► Lift the rigid boot floor .
►
Attach the floor hook to the upper boot seal.
Versions with hinged boot carpet
(Rechargeable hybrid)
► Open the boot.
► Unfold the hinged boot carpet by pulling its
handle until it is fully opened.
Versions with 2-position boot floor (SW)
Tools can also be accessed from the row 2
seats, by tilting the backrest of the rear bench
seat.
►
Open the boot.
►
Lift the cover using the cord at the back of
the boot.
or
►
Place the adjustable boot floor in the high
position.
►
Lift the adjustable boot floor and engage it in
the inclined position in the lateral stops to secure
it in this position.
With temporary puncture repair kit
► Unclip the two fixings to open its cover .
With spare wheel
These tools are specific to the vehicle
and may vary according to the level of
equipment.
Do not use them for any other purpose.