2022 PEUGEOT 301 wipers
[x] Cancel search: wipersPage 35 of 148

33
Lighting and visibility
4Headlamp beam height
adjustment
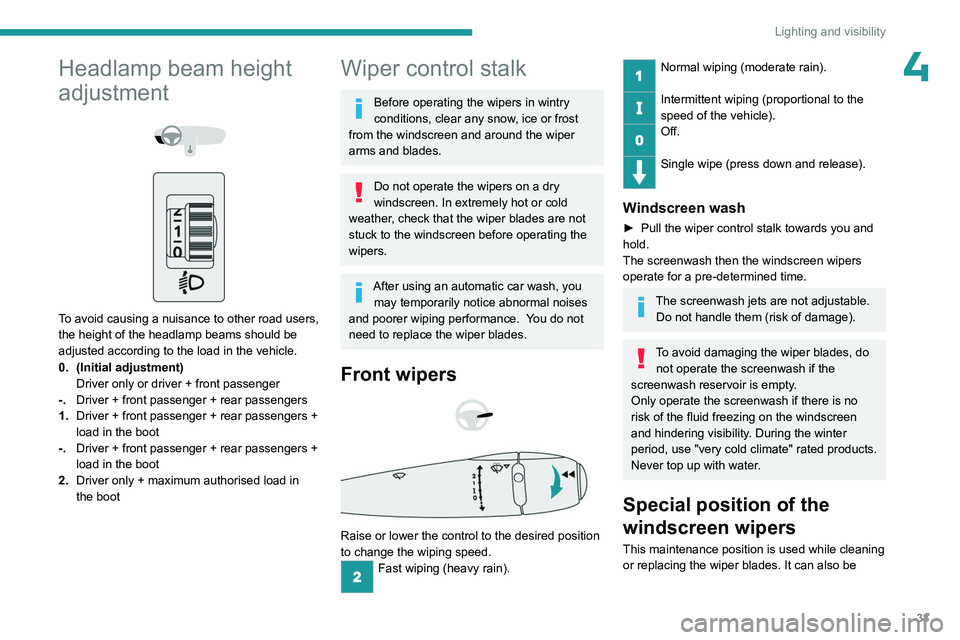
To avoid causing a nuisance to other road users,
the height of the headlamp beams should be
adjusted according to the load in the vehicle.
0. (Initial adjustment) Driver only or driver + front passenger
-. Driver + front passenger + rear passengers
1. Driver + front passenger + rear passengers +
load in the boot
-. Driver + front passenger + rear passengers +
load in the boot
2. Driver only + maximum authorised load in
the boot
Wiper control stalk
Before operating the wipers in wintry
conditions, clear any snow, ice or frost
from the windscreen and around the wiper
arms and blades.
Do not operate the wipers on a dry
windscreen. In extremely hot or cold
weather, check that the wiper blades are not
stuck to the windscreen before operating the
wipers.
After using an automatic car wash, you may temporarily notice abnormal noises
and poorer wiping performance.
You do not
need to replace the wiper blades.
Front wipers
Raise or lower the control to the desired position
to change the wiping speed.
Fast wiping (heavy rain).
Normal wiping (moderate rain).
Intermittent wiping (proportional to the
speed of the vehicle).
Off.
Single wipe (press down and release).
Windscreen wash
► Pull the wiper control stalk towards you and
hold.
The screenwash then the windscreen wipers
operate for a pre-determined time.
The screenwash jets are not adjustable. Do not handle them (risk of damage).
To avoid damaging the wiper blades, do not operate the screenwash if the
screenwash reservoir is empty.
Only operate the screenwash if there is no
risk of the fluid freezing on the windscreen
and hindering visibility. During the winter
period, use "very cold climate" rated products.
Never top up with water.
Special position of the
windscreen wipers
This maintenance position is used while cleaning
or replacing the wiper blades. It can also be
Page 91 of 148

89
In the event of a breakdown
8
For access to the (+) terminal:
► Release the bonnet by pulling the internal
release lever
, then the external safety catch.
►
Raise the bonnet.
(+)
Positive terminal with a quick-release
terminal.
(-) Negative terminal.
As the battery's negative terminal is not
accessible, a remote earth point is located on
the engine.
Starting using another battery
If the vehicle's battery is flat, the engine can be
started using a backup battery (either external or
from another vehicle) and jump leads or using a
battery booster.
Never start the engine by connecting a
battery charger.
Never use a 24
V or higher battery booster.
Check beforehand that the backup battery
has a nominal voltage of 12
V and a capacity
at least equal to that of the discharged
battery.
The two vehicles must not be in contact with
each other.
Switch off all electricity-consuming equipment
on both vehicles (audio system, wipers,
lighting, etc.).
Make sure that the jump leads are well away
from the engine’s moving parts (fan, belt,
etc.).
Do not disconnect the (+) terminal while the
engine is running.
► Lift the plastic cover on the (+) terminal, if the
vehicle has one.
►
Connect the red cable to the (+) terminal of
flat battery
A (at the metal elbow), then to the
(+) terminal of the backup battery
B or of the
booster.
►
Connect one end of the green or black cable
to the (-) terminal of the backup battery
B or of
the booster (or to an earth point on the assisting
vehicle).
►
Connect the other end of the green or black
cable to the earth point
C
.
►
Start the engine on the assisting vehicle and
leave it running for a few minutes.
►
Operate the starter on the broken down
vehicle and let the engine run.
If the engine does not start immediately
, switch
off the ignition and wait a few moments before
trying again.
►
W
ait for it to return to idle.
►
Disconnect the jump leads in reverse order.
►
Refit the plastic cover to the (+) terminal, if
the vehicle has one.
►
Allow the engine to run for at least
30
minutes, with the vehicle stationary, so that
the battery reaches an adequate state of charge.
Driving immediately without having
reached a sufficient level of charge may
affect some of the vehicle's functions (e.g.
Stop & Start).
Charging the battery using a battery
charger
For optimum service life of the battery, it is
essential to maintain an adequate state of
charge.
In some circumstances, it may be necessary to
charge the battery:
–
When using the vehicle mainly for short
journeys.
Page 92 of 148

90
In the event of a breakdown
– If the vehicle is to be taken off the road for
several weeks.
Consult a PEUGEOT
dealer or a qualified
workshop.
To charge the vehicle's battery yourself, use only a charger compatible with
lead-acid batteries with a nominal voltage of
12
V.
Follow the instructions provided by the
manufacturer of the charger.
Never reverse polarities.
It is not necessary to disconnect the
battery.
►
Switch the ignition off.
►
Switch off all electrical consumers (audio
system, lighting, wipers, etc.).
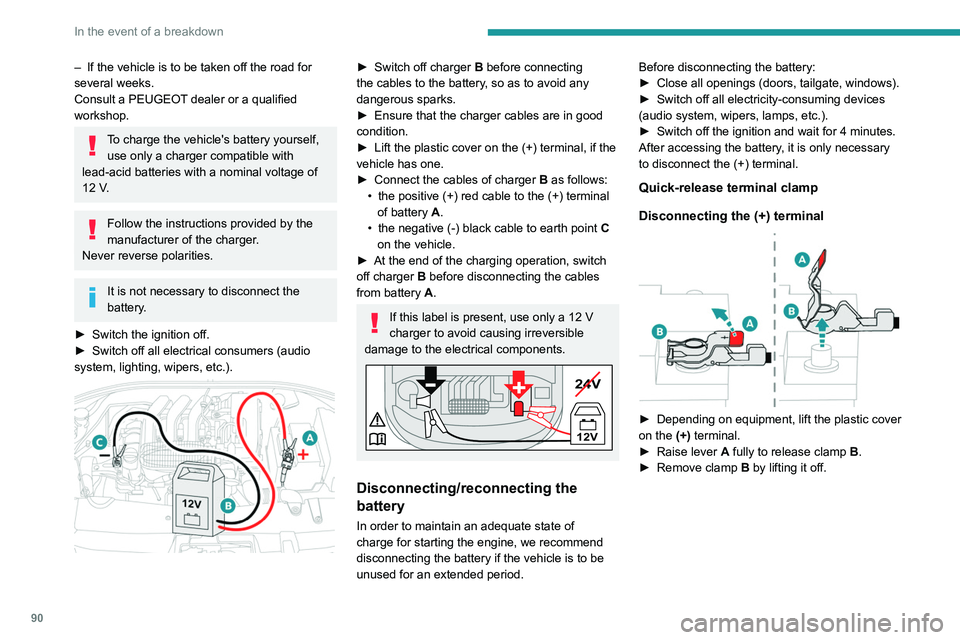
► Switch off charger B before connecting
the cables to the battery, so as to avoid any
dangerous sparks.
►
Ensure that the charger cables are in good
condition.
►
Lift the plastic cover on the (+) terminal, if the
vehicle has one.
►
Connect the cables of charger B
as follows:
•
the positive (+) red cable to the (+) terminal
of battery
A.
•
the negative (-) black cable to earth point C
on the vehicle.
►
At the end of the charging operation, switch
off charger B
before disconnecting the cables
from battery A.
If this label is present, use only a 12 V
charger to avoid causing irreversible
damage to the electrical components.
24V
12V
+
Disconnecting/reconnecting the
battery
In order to maintain an adequate state of
charge for starting the engine, we recommend
disconnecting the battery if the vehicle is to be
unused for an extended period. Before disconnecting the battery:
►
Close all openings (doors, tailgate, windows).
►
Switch off all electricity-consuming devices
(audio system, wipers, lamps, etc.).
►
Switch off the ignition and wait for 4
minutes.
After accessing the battery, it is only necessary
to disconnect the (+) terminal.
Quick-release terminal clamp
Disconnecting the (+) terminal
► Depending on equipment, lift the plastic cover
on the (+) terminal.
►
Raise lever
A
fully to release clamp
B
.
►
Remove clamp
B
by lifting it off.
Page 126 of 148

124
Alphabetical index
A
ABS 36
Accessories
35
Additive, Diesel
74–75
Adjusting headlamps
33
Adjusting head restraints
21
Adjusting seat
21–22
Adjusting the date
12, 119
Adjusting the headlamp beam height
33
Adjusting the height and reach of the
steering wheel
23
Adjusting the time
12, 118
Advice on care and maintenance
76
Advice on driving
6, 49–50
Airbags
39–41, 43
Airbags, curtain
40
Airbags, front
40–41, 43
Airbags, lateral
40–41
Air conditioning
24
Air conditioning, electronic (with
display screen)
26–27
Air conditioning, manual (without
display screen)
25
Air vents
24
Alarm
19–20
Anti-lock braking system (ABS)
36
Antitheft / Immobiliser
16
Armrest, front
28–29
Ashtray, portable
28
Assistance, emergency braking
36
Audio streaming (Bluetooth)
102–103, 114
B
Battery 88
Battery, 12 V
69, 74–75, 88–90
Battery, charging
88–89
Battery, remote control
17
Blanking screen (snow shield)
70
Bluetooth (hands-free)
102, 116
Bluetooth (telephone)
116–117
Bodywork
77
Bonnet
71–72
Boot
18–19
Boot (opening)
15
Brake discs
75
Brake lamps
86
Brakes
75
Braking assistance system
36
Brightness
11 8
Bulbs (changing)
83–84, 86
C
Capacity, fuel tank 67
Care of the bodywork
77
CD
100
CD, MP3
100
Central locking
16
Changing a bulb
83–84, 86
Changing a fuse
87
Changing a wheel
80
Changing a wiper blade
33–34
Changing the remote control battery 17
Changing to free-wheeling
76
Checking the levels
73–74
Checks
72, 74–75
Checks, routine
74–75
Child lock
44, 47–48
Children
38, 44–47
Children (safety)
48
Child seats
38, 41–44
Child seats, conventional
43
Child seats, ISOFIX
45–47
Cigar lighter
29
Cleaning (advice)
76–78
Clock
12
Closing the boot
18–19
Closing the doors
18
Connection, Apple CarPlay
11 5
Connection, Bluetooth
116–117
Connection, MirrorLink
11 5
Control, emergency boot release
19
Control, emergency door
17
Control stalk, lighting
31
Control stalk, wipers
33
Courtesy lamps
30
Cruise control
62–64
D
DAB (Digital Audio Broadcasting) -
Digital radio
11 3
Date (setting)
12, 119
Page 130 of 148

128
Alphabetical index
Traffic information (TA) 99
Trailer
69, 94–95
Trajectory control systems
36
Triangle, warning
79
Trip computer
12–14
Tyres
76, 97
Tyre under-inflation detection
58–60
U
Under-inflation (detection) 58
Unlocking
15
Unlocking from the inside
16
Unlocking the boot
15
Unlocking the doors
16–17
Updating the date
119
Updating the time
11 8
USB
100, 113, 115
V
Vehicle data recording and privacy 121
Ventilation
24–27
W
Warning and indicator lamps 7
Warning lamp, driver's seat belt
not fastened
38
Warning lamps 7
Warning lamp, seat belts
38
Warnings and indicators
7–8
Washing
61
Washing (advice)
76–77
Weights
93
Wheel, spare
76, 79–81
Windscreen, bottom of heated
27
Windscreen, heated
27
Wiper blades (changing)
33–34
Wipers
33