2022 PEUGEOT 301 fuse
[x] Cancel search: fusePage 4 of 148

2
Contents
■
Overview
■
Eco-driving
1Dashboard instrumentsInstrument panel 7
Warning and indicator lamps 7
Indicators 10
Distance recorders 11
Setting the date and time 12
Trip computer 12
2AccessRemote control / Key 15
Central locking 16
Back-up procedures 17
Doors 18
Boot 18
Alarm 19
Electric windows 20
3Ease of use and comfortFront seats 21
Rear bench seat 22
Steering wheel adjustment 23
Mirrors 23
Heating and Ventilation 24
Air conditioning, manual (without
display screen)
25
Electronic air conditioning (with
display screen)
26
Front demisting - defrosting 27
Demisting/de-icing the rear screen and/or
the door mirrors 28
Interior fittings 28
Courtesy lamps 30
4Lighting and visibilityExterior lighting control stalk 31
Direction indicators 32
Headlamp beam height adjustment 33
Wiper control stalk 33
Changing a wiper blade 34
5SafetyGeneral safety recommendations 35
Hazard warning lamps 35
Horn 36
Electronic stability control (ESC) 36
Seat belts 37
Airbags 39
Child seats 41
Deactivating the front passenger airbag 43
ISOFIX child seats 45
Child lock 48
6DrivingDriving recommendations 49
Starting-switching off the engine 51
Parking brake 52
Hill start assist 52
5-speed manual gearbox 53
6-speed manual gearbox 53
6-speed automatic gearbox 54
Gear shift indicator 56
Stop & Start 56
Tyre under-inflation detection 58
Driving and manoeuvring aids - General
recommendations
60
Speed limiter 61
Cruise control - Specific recommendations 62
Cruise control 63
Rear parking sensors 64
Reversing Camera 65
7Practical informationCompatibility of fuels 67
Refuelling 67
Misfuel prevention (Diesel) 68
Snow chains 68
Energy economy mode 69
Towing device 69
Very cold climate screen 70
Roof bars 70
Bonnet 71
Engine compartment 72
Checking levels 73
Checks 74
Free-wheeling 76
Advice on care and maintenance 76
8In the event of a breakdownWarning triangle 79
Running out of fuel (Diesel) 79
Tool kit 79
Spare wheel 80
Changing a bulb 83
Fuses 87
12 V battery 88
Page 6 of 148

4
Overview
Presentation
These illustrations and descriptions are intended
as a guide. The presence and location of some
components varies according to the version, trim
level and country of sale.
Instruments and controls
1.Bonnet release
2. Dashboard fuses
3. Horn
4. Instrument panel
5. Audio and telematics systems
6. Warning lamp display for seat belts and front
passenger airbag
Courtesy lamps
Rear view mirror 7.
Emergency warning lamps
Locking/unlocking from the inside
8. Adjusting the date/time
9. Heating, ventilation
Manual air conditioning (without display
screen)
Electronic air conditioning (with display
screen)
Front demisting/defrosting
Rear screen demisting/defrosting
Heated windscreen
10. Manual gearbox
Automatic gearbox (EAT6)
Gear shift indicator
11 . USB socket
12 V accessory socket / Cigar lighter
12. Parking brake
13. Electric windows deactivation
Steering-mounted controls
1.External lighting/direction indicators control
stalk
Voice recognition activation button 2.
Speed Limiter/Cruise Control
3. Audio system setting controls
4. Wiper/screenwash/trip computer control stalk
Side control bar
1.Manual headlamp beam height adjustment
2. DSC/ASR systems
3. Stop & Start
4. Boot lid opening
5. Alarm
6. Door mirrors adjustment
Labels
"Lighting and visibility - Exterior lighting
control stalk" and "In the event of a
breakdown - Changing a bulb" sections:
"Safety - Child seats - Deactivating the front
passenger airbag" section:
Page 37 of 148
35
Safety
5General safety
recommendations
Do not remove the labels attached in
different places on your vehicle. They
include safety warnings as well as
identification information for the vehicle.
For all work on your vehicle, use a
qualified workshop that has the technical
information, skills and equipment required, all
of which a PEUGEOT dealer is able to
provide.
Depending on country regulations,
certain safety equipment may be
mandatory: high visibility safety vests,
warning triangles, breathalysers, spare bulbs,
spare fuses, fire extinguisher, first aid kit, mud
flaps at the rear of the vehicle, etc.
Installing electrical accessories:
– The fitting of electrical equipment or
accessories not approved by PEUGEOT
may
cause excessive current consumption and
faults and failures with the electrical system
of your vehicle. Contact a PEUGEOT dealer
for information on the range of approved
accessories.
–
As a safety measure, access to the
diagnostic socket, used for the vehicle's
electronic systems, is reserved strictly for
PEUGEOT dealers or qualified workshops,
equipped with the special tools required (risk
of malfunctions of the vehicle's electronic
systems that could cause breakdowns or
serious accidents). The Manufacturer cannot
be held responsible if this advice is not
followed.
–
Any modification or adaptation not intended
or authorised by PEUGEOT
or carried out
without meeting the technical requirements
defined by the Manufacturer will result in the
suspension of the commercial warranty.
Installation of accessory radio
communication transmitters
Before installing a radio communication
transmitter with an external aerial, you must
without fail contact a PEUGEOT dealer for
the specification of transmitters which can
be fitted (frequency, maximum power, aerial
position, specific installation requirements),
in line with the Vehicle Electromagnetic
Compatibility Directive (2004/104/EC).
Declarations of conformity for radio
equipment
The relevant certificates are available on the
brand website:
http://public.servicebox.peugeot.com/APddb/
Hazard warning lamps
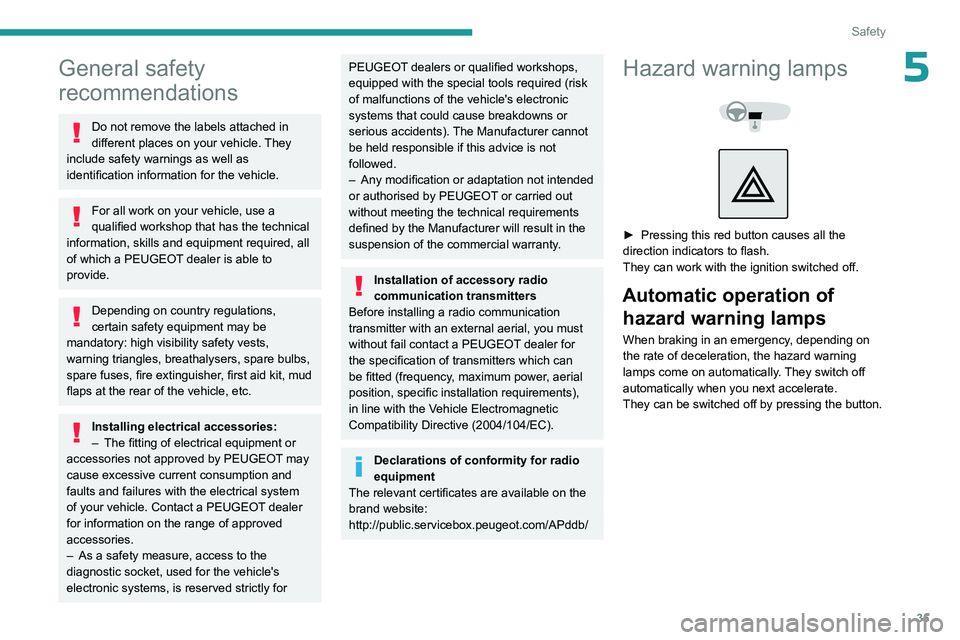
► Pressing this red button causes all the
direction indicators to flash.
They can work with the ignition switched off.
Automatic operation of hazard warning lamps
When braking in an emergency, depending on
the rate of deceleration, the hazard warning
lamps come on automatically. They switch off
automatically when you next accelerate.
They can be switched off by pressing the button.
Page 50 of 148
48
Safety
IL-SUSeat suitable for the installation of an
Isofix Semi-Universal seat which is either:
–
"rearward facing" fitted with a top tether
or a support leg,
–
"forward facing" fitted with a support
leg.
For advice on securing of the upper strap,
refer to the "ISOFIX mountings" section.
X Seat which is not suitable for the
installation of an ISOFIX seat of the size
category indicated.
Manual child lock
The system prevents a rear door from being
opened using its interior handle.
The control is located on the edge of each rear
door.
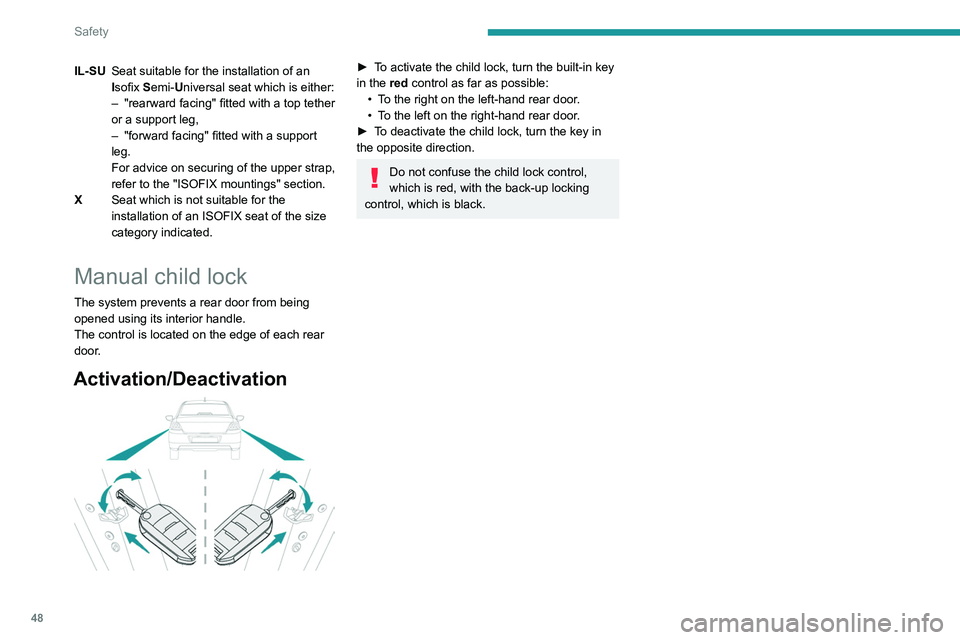
Activation/Deactivation
► To activate the child lock, turn the built-in key
in the red control as far as possible:
•
T
o the right on the left-hand rear door.
•
T
o the left on the right-hand rear door.
►
T
o deactivate the child lock, turn the key in
the opposite direction.
Do not confuse the child lock control,
which is red, with the back-up locking
control, which is black.
Page 74 of 148
72
Practical information
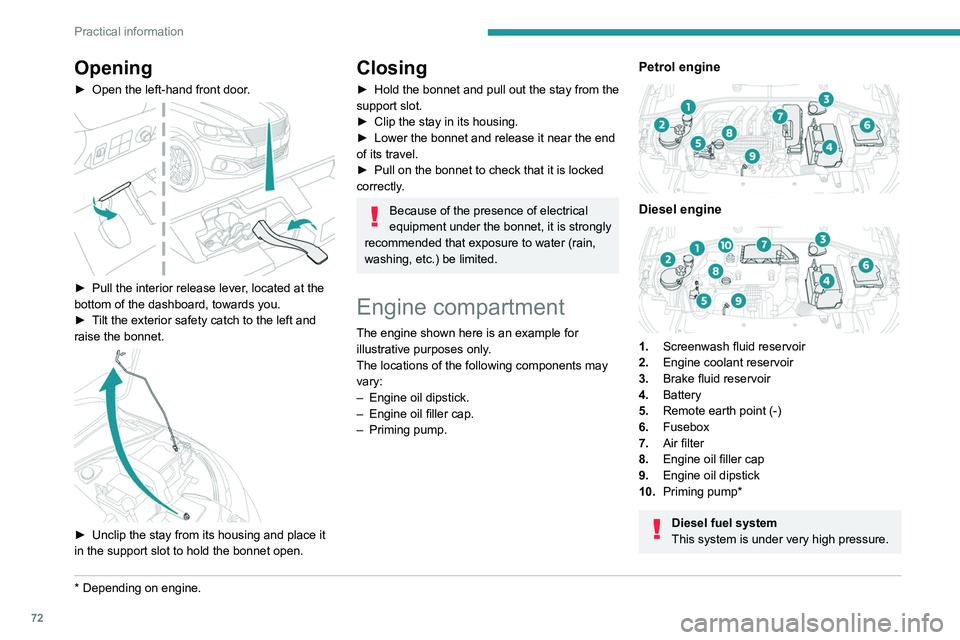
Opening
► Open the left-hand front door.
► Pull the interior release lever, located at the
bottom of the dashboard, towards you.
►
T
ilt the exterior safety catch to the left and
raise the bonnet.
► Unclip the stay from its housing and place it
in the support slot to hold the bonnet open.
* Depending on engine.
Closing
► Hold the bonnet and pull out the stay from the
support slot.
►
Clip the stay in its housing.
►
Lower the bonnet and release it near the end
of its travel.
►
Pull on the bonnet to check that it is locked
correctly
.
Because of the presence of electrical
equipment under the bonnet, it is strongly
recommended that exposure to water (rain,
washing, etc.) be limited.
Engine compartment
The engine shown here is an example for
illustrative purposes only.
The locations of the following components may
vary:
–
Engine oil dipstick.
–
Engine oil filler cap.
–
Priming pump.
Petrol engine
Diesel engine
1. Screenwash fluid reservoir
2. Engine coolant reservoir
3. Brake fluid reservoir
4. Battery
5. Remote earth point (-)
6. Fusebox
7. Air filter
8. Engine oil filler cap
9. Engine oil dipstick
10. Priming pump*
Diesel fuel system
This system is under very high pressure.
Page 89 of 148
87
In the event of a breakdown
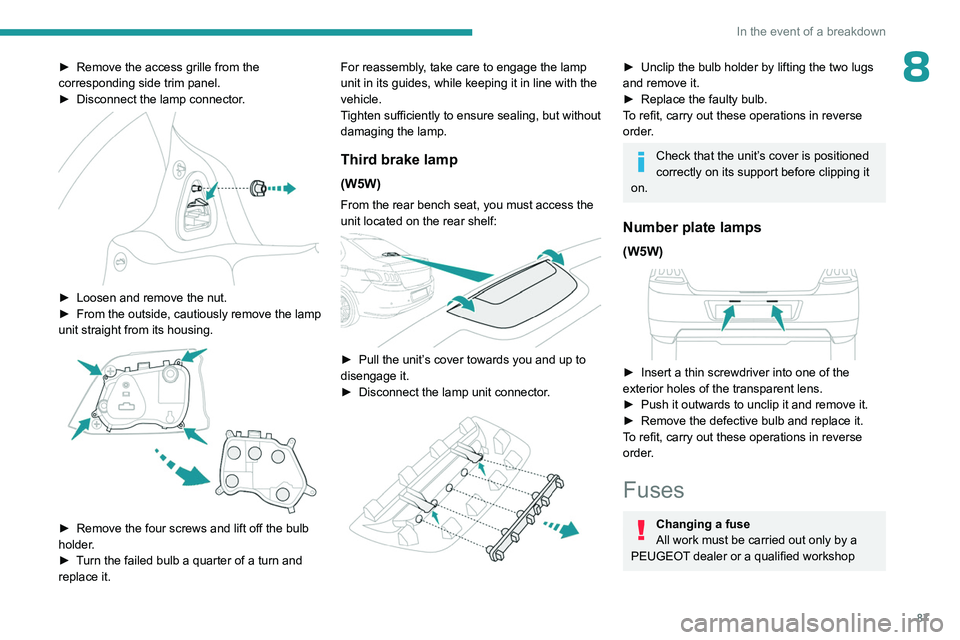
8► Remove the access grille from the
corresponding side trim panel.
►
Disconnect the lamp connector
.
► Loosen and remove the nut.
► From the outside, cautiously remove the lamp
unit straight from its housing.
► Remove the four screws and lift off the bulb
holder .
►
T
urn the failed bulb a quarter of a turn and
replace it. For reassembly, take care to engage the lamp
unit in its guides, while keeping it in line with the
vehicle.
Tighten sufficiently to ensure sealing, but without
damaging the lamp.
Third brake lamp
(W5W)
From the rear bench seat, you must access the
unit located on the rear shelf:
► Pull the unit’
s cover towards you and up to
disengage it.
►
Disconnect the lamp unit connector
.
► Unclip the bulb holder by lifting the two lugs
and remove it.
►
Replace the faulty bulb.
T
o refit, carry out these operations in reverse
order.
Check that the unit’s cover is positioned
correctly on its support before clipping it
on.
Number plate lamps
(W5W)
► Insert a thin screwdriver into one of the
exterior holes of the transparent lens.
►
Push it outwards to unclip it and remove it.
►
Remove the defective bulb and replace it.
T
o refit, carry out these operations in reverse
order.
Fuses
Changing a fuse
All work must be carried out only by a
PEUGEOT dealer or a qualified workshop
Page 90 of 148
88
In the event of a breakdown
The replacement of a fuse by a third party
could cause a serious malfunction of the
vehicle.
Installing electrical accessories
The vehicle's electrical system is
designed to operate with standard or optional
equipment.
Before fitting other electrical equipment
or accessories to your vehicle, contact a
PEUGEOT dealer or a qualified workshop.
PEUGEOT accepts no responsibility for
the cost incurred in repairing the vehicle
or for rectifying malfunctions resulting from
the installation of accessories not supplied or
not recommended by PEUGEOT and not
installed in accordance with its
recommendations, in particular when the
combined power consumption of all of the
additional equipment connected exceeds 10
milliamperes.
12 V battery
Lead-acid starter batteries
These batteries contain harmful substances (sulphuric acid and lead).
They must be disposed of in accordance
with regulations and must never under any
circumstances be discarded with household
waste.
Dispose of used batteries at a designated
collection point.
Protect your eyes and face before
handling the battery.
All operations on the battery must be carried
out in a well ventilated area and away from
naked flames and sources of sparks, to avoid
any risk of explosion or fire.
Wash your hands afterwards.
Electronic control units/LED
technology headlamps
Never connect the negative jump lead to the
metal part of the electronic control units or at
the back of the headlamps.
Risk of destroying the electronic control units
and/or headlamps!
Connect to the remote earth point provided
for this purpose.
Frozen battery
Never try to charge a frozen battery - risk
of explosion!
If the battery has frozen, have it checked by a
PEUGEOT dealer or by a qualified workshop,
who will verify that the internal components
have not been damaged and that the case
has not cracked, which could lead to a risk of
leakage of toxic and corrosive acid.
Automatic gearbox
Never try to start the engine by pushing
the vehicle.
Symbols
No sparks or naked flames, no smoking.
Always protect your eyes. Explosive gases can cause blindness and injury.
Keep the vehicle's battery out of the reach
of children.
The vehicle's battery contains sulphuric acid which can make you go blind or
cause severe burns.
For more information, refer to the
handbook.
Explosive gases can be present close to
the battery.
Procedure for starting the engine using another
battery or for charging a discharged battery.
Accessing the battery
The battery is located under the bonnet.
Page 126 of 148
124
Alphabetical index
A
ABS 36
Accessories
35
Additive, Diesel
74–75
Adjusting headlamps
33
Adjusting head restraints
21
Adjusting seat
21–22
Adjusting the date
12, 119
Adjusting the headlamp beam height
33
Adjusting the height and reach of the
steering wheel
23
Adjusting the time
12, 118
Advice on care and maintenance
76
Advice on driving
6, 49–50
Airbags
39–41, 43
Airbags, curtain
40
Airbags, front
40–41, 43
Airbags, lateral
40–41
Air conditioning
24
Air conditioning, electronic (with
display screen)
26–27
Air conditioning, manual (without
display screen)
25
Air vents
24
Alarm
19–20
Anti-lock braking system (ABS)
36
Antitheft / Immobiliser
16
Armrest, front
28–29
Ashtray, portable
28
Assistance, emergency braking
36
Audio streaming (Bluetooth)
102–103, 114
B
Battery 88
Battery, 12 V
69, 74–75, 88–90
Battery, charging
88–89
Battery, remote control
17
Blanking screen (snow shield)
70
Bluetooth (hands-free)
102, 116
Bluetooth (telephone)
116–117
Bodywork
77
Bonnet
71–72
Boot
18–19
Boot (opening)
15
Brake discs
75
Brake lamps
86
Brakes
75
Braking assistance system
36
Brightness
11 8
Bulbs (changing)
83–84, 86
C
Capacity, fuel tank 67
Care of the bodywork
77
CD
100
CD, MP3
100
Central locking
16
Changing a bulb
83–84, 86
Changing a fuse
87
Changing a wheel
80
Changing a wiper blade
33–34
Changing the remote control battery 17
Changing to free-wheeling
76
Checking the levels
73–74
Checks
72, 74–75
Checks, routine
74–75
Child lock
44, 47–48
Children
38, 44–47
Children (safety)
48
Child seats
38, 41–44
Child seats, conventional
43
Child seats, ISOFIX
45–47
Cigar lighter
29
Cleaning (advice)
76–78
Clock
12
Closing the boot
18–19
Closing the doors
18
Connection, Apple CarPlay
11 5
Connection, Bluetooth
116–117
Connection, MirrorLink
11 5
Control, emergency boot release
19
Control, emergency door
17
Control stalk, lighting
31
Control stalk, wipers
33
Courtesy lamps
30
Cruise control
62–64
D
DAB (Digital Audio Broadcasting) -
Digital radio
11 3
Date (setting)
12, 119