2022 PEUGEOT 301 ad blue
[x] Cancel search: ad bluePage 5 of 148

3
Contents
Towing the vehicle 91
9Technical dataEngine technical data and towed loads 93
Petrol engines 94
Diesel engines 95
Dimensions 96
Identification markings 96
10Bluetooth® audio systemMenus 99
Radio 99
Media 100
Telephone 102
Audio settings 105
Frequently asked questions 106
11PEUGEOT Connect RadioFirst steps 108
Steering mounted controls 109
Menus 11 0
Applications 111
Radio 111
DAB (Digital Audio Broadcasting) radio 11 3
Media 11 3
Telephone 11 5
Settings 11 8
Frequently asked questions 11 9
12Vehicle data recording and privacy
■
Alphabetical index
■
Appendix
Page 8 of 148

6
Eco-driving
Eco-driving
Eco-driving refers to a range of everyday
practices that allow the motorist to optimise
the vehicle's energy consumption (fuel and/or
electricity) and CO
2 emissions.
Optimise your use of the gearbox
With a manual gearbox, move off gently and
change up promptly. While accelerating, change
up early.
With an automatic gearbox, favour automatic
mode. Do not depress the accelerator pedal
heavily or suddenly.
The gear shift indicator prompts you to engage
the most suitable gear. Whenever this indication
is displayed on the instrument panel, follow it
straight away.
With an automatic gearbox, this indicator
appears only in manual mode.
Drive smoothly
Maintain a safe distance between vehicles, use
engine braking rather than the brake pedal and
press the accelerator gradually. These practices
help to save on energy consumption, reduce
CO
2 emissions and decrease general traffic
noise.
When the traffic is flowing smoothly, select the
cruise control.
Control the use of electrical equipment
Before moving off, if the passenger compartment
is too warm, ventilate it by opening the windows
and air vents before using the air conditioning.
At speeds above 31
mph (50 km/h), close the
windows and leave the air vents open.
Consider using equipment that can help keep
the temperature in the passenger compartment
down (e.g.
sunroof blind, window blinds).
Unless automatically regulated, switch off the air
conditioning as soon as the desired temperature
has been reached.
Switch off the demisting and defrosting functions,
if they are not managed automatically.
Switch off the heated seat as soon as possible.
Adapt your use of the headlamps and/or
foglamps to the level of visibility, in accordance
with current legislation in the country in which
you are driving.
Avoid running the engine before moving off,
particularly in winter (other than in severe wintry
conditions: temperature below -23°C). The
vehicle will warm up much faster while driving.
As a passenger, avoid connecting your
multimedia devices (e.g.
film, music, video
game) to help reduce the consumption of energy.
Disconnect all portable devices before leaving
the vehicle.
Limit the causes of excess consumption
Spread loads throughout the vehicle. Place the
heaviest items in the boot as close as possible to
the rear seats. Limit the loads carried in the vehicle and
minimise wind resistance (e.g.
roof bars, roof
rack, bicycle carrier, trailer). Preferably, use a
roof box.
Remove roof bars and roof racks after use.
At the end of winter, remove snow tyres and refit
summer tyres.
Comply with the servicing instructions
Check tyre pressures regularly, with the tyres
cold, referring to the label in the door aperture on
the driver's side.
Carry out this check in particular:
–
before a long journey
.
–
at each change of season.
–
after a long period out of use.
Do not forget the spare wheel and, where
applicable, the tyres on your trailer or caravan.
Have your vehicle serviced regularly (e.g.
engine
oil, oil filter, air filter, passenger compartment
filter, etc.). Observe the schedule of operations in
the manufacturer's service schedule.
With a BlueHDi Diesel engine, if the SCR system
has a fault, your vehicle will emit pollution. Visit
a PEUGEOT dealer or a qualified workshop
as soon as possible to restore your vehicle's
nitrogen oxide emissions to legal levels.
When filling the fuel tank, do not continue after
the third cut-out of the nozzle, to avoid overflow.
You will only see the fuel consumption of your
new vehicle settle down to a consistent average
after the first 1,900 miles (3,000 kilometres).
Page 12 of 148

10
Dashboard instruments
Power steeringFixed.
The power steering has a fault.
Drive carefully at moderate speed, then carry
out (3).
ServiceTemporarily on. One or more minor faults, for which there
is/are no specific warning lamp(s), have been
detected.
Identify the cause of the fault using the message
displayed on the instrument panel.
You may be able to deal with some faults
yourself, such as changing the battery in the
remote control.
For other faults, such as with the tyre under-
inflation detection system, carry out (3).
Fixed.
One or more major faults, for which there
is/are no specific warning lamp(s), have been
detected.
Identify the cause of the fault using the message
displayed on the instrument panel, then carry
out (3).
Rear foglampFixed.
The lamp is on.
Green warning/indicator lamps
Stop & Start
Fixed.
When the vehicle stops, the Stop & Start
system puts the engine into STOP mode.
Flashing temporarily.
STOP mode is momentarily unavailable
or START mode is automatically triggered.
For more information, refer to the Driving
section.
Front foglampsFixed.
The front foglamps are on.
Direction indicatorsFlashing with audible signal.
The direction indicators are on.
Dipped beam headlampsFixed.
The lamps are on.
Blue warning/indicator lamps
Main beam headlamps
Fixed.
The lamps are on.
Black/white warning lamps
Foot on the clutch
Fixed.
Stop & Start: the change to START mode
is rejected because the clutch pedal is not fully
depressed.
Fully depress the clutch pedal.
Foot on the brakeFixed.
Insufficient or no pressure on the brake
pedal.
With an automatic gearbox, with the engine
running, before releasing the parking brake, to
move out of position P.
Indicators
Service indicator
The servicing information is expressed in terms
of distance (miles or kilometres) and time
(months or days).
The alert is given at whichever of these two
terms is reached first.
The servicing information is displayed in the
instrument panel. Depending on the version of
the vehicle:
–
The distance recorder display line indicates
the distance remaining before the next service
is due, or the distance travelled since it was due
preceded by the "-" sign.
–
An alert message indicates the distance
remaining, as well as the period before the next
service is due or how long it is overdue.
The value indicated is calculated according to the distance covered and
the time elapsed since the last service.
The alert may also be triggered close to a
due date.
Page 13 of 148

11
Dashboard instruments
1Service spannerOn temporarily when the ignition is
switched on.
Between 620 and 1,860 miles (1,000 and 3,000
km) remain before the next service is due.
Fixed, when the ignition is switched on.
The next service is due in less than 620
miles (1,000 km).
Have your vehicle serviced very soon.
Service spanner flashingFlashing then fixed, when the
ignition is switched on.
(With
BlueHDi Diesel engines, associated with
the Service warning lamp.)
The servicing interval has been exceeded.
Have your vehicle serviced as soon as possible.
Resetting the service indicator
After each service, the service indicator must be
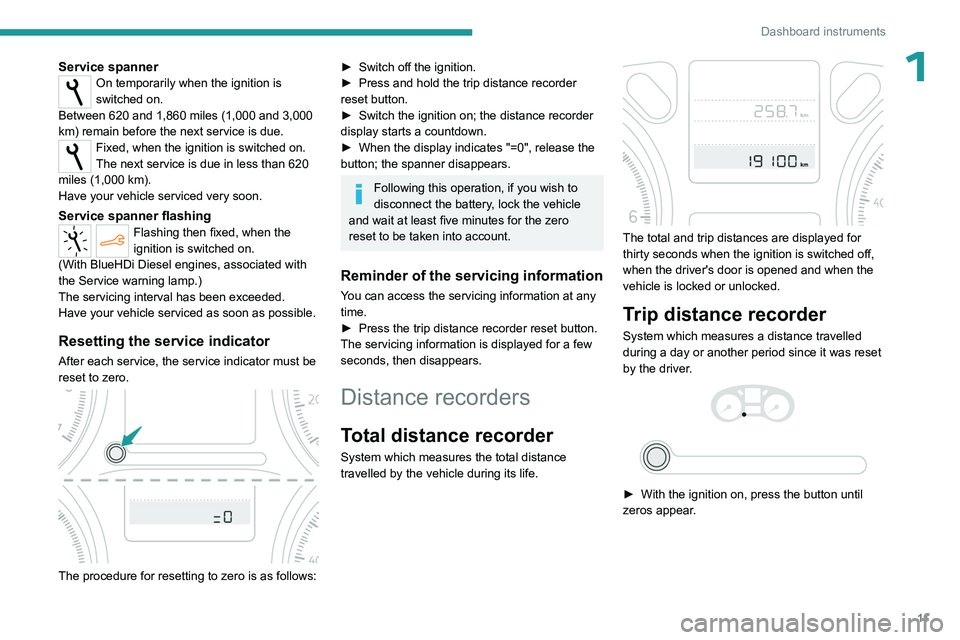
reset to zero.
The procedure for resetting to zero is as follows:
► Switch off the ignition.
► Press and hold the trip distance recorder
reset button.
►
Switch the ignition on; the distance recorder
display starts a countdown.
►
When the display indicates "=0", release the
button; the spanner disappears.
Following this operation, if you wish to
disconnect the battery, lock the vehicle
and wait at least five minutes for the zero
reset to be taken into account.
Reminder of the servicing information
You can access the servicing information at any
time.
►
Press the trip distance recorder reset button.
The servicing
information is displayed for a few
seconds, then disappears.
Distance recorders
Total distance recorder
System which measures the total distance
travelled by the vehicle during its life.
The total and trip distances are displayed for
thirty seconds when the ignition is switched off,
when the driver's door is opened and when the
vehicle is locked or unlocked.
Trip distance recorder
System which measures a distance travelled
during a day or another period since it was reset
by the driver.
► With the ignition on, press the button until
zeros appear .
Page 14 of 148

12
Dashboard instruments
Setting the date and time
With instrument panel
Use the left-hand button on the instrument panel
to carry out the operations in the following order:
►
Press the button for more than two seconds:
the minutes flash.
►
Press the button to increase the minutes.
►
Press the button for more than two seconds:
the hours flash.
►
Press the button to increase the hours.
►
Press the button for more than two seconds:
24H or 12H is displayed,
►
Press the button to select 24H or 12H.
►
Press the button for more than two seconds
to complete the adjustments.
After approximately 30 seconds with no action,
the display returns to normal.
Audio system/Bluetooth
Use the audio system buttons to carry out the
operations in the following order:
► Press the " MENU" button.
► Using the arrows, select the
" Personalisation - Configuration " menu then
confirm by pressing the dial.
►
Using the arrows, select the " Screen
configuration " menu then confirm.
►
Using the arrows, select the " Set date and
time
" menu then confirm.
►
Select the setting then confirm.
►
Modify the setting then confirm again to save
the change.
►
Adjust the settings one by one, confirming
each time.
►
Select the "
OK" tab on the screen then
confirm to exit the "Set date and time" menu.
For more information on setting the date
and time with the PEUGEOT Connect
Radio, refer to the corresponding section.
Trip computer
Displays information related to the current trip
(range, fuel consumption, average speed, etc.).
Instrument panel screen
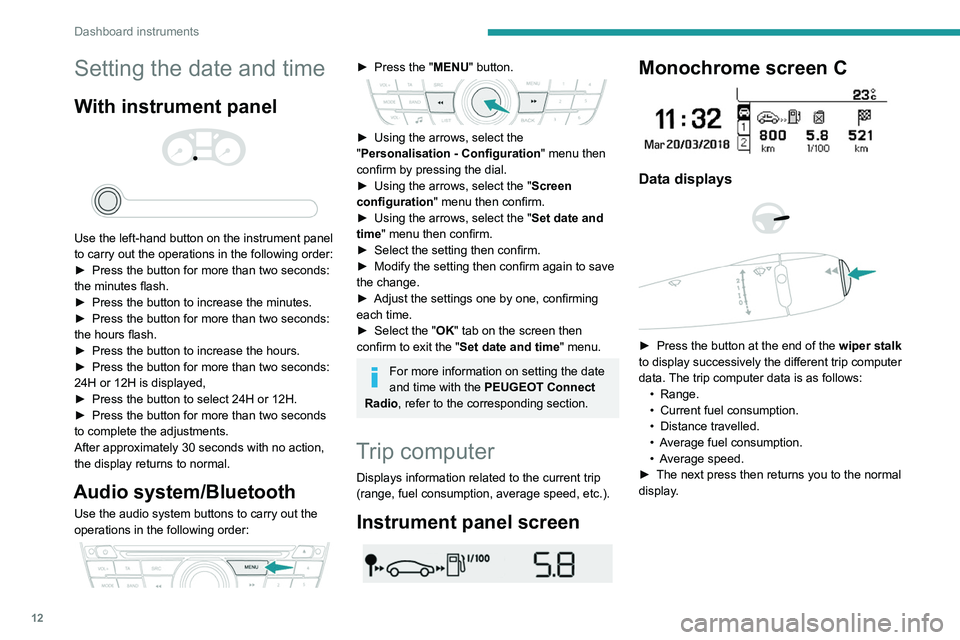
Monochrome screen C
Data displays
► Press the button at the end of the wiper stalk
to display successively the different trip computer
data. The trip computer data is as follows: •
Range.
•
Current fuel consumption.
•
Distance travelled.
•
A
verage fuel consumption.
•
A
verage speed.
►
The next press then returns you to the normal
display
.
Page 27 of 148

25
Ease of use and comfort
3water underneath the vehicle. This is perfectly
normal.
Servicing the ventilation and air
conditioning system
►
Ensure that the passenger compartment
filter is in good condition and have the filter
elements replaced regularly
.
We recommend using a composite passenger
compartment filter. Its specific active additive
helps protect against polluting gases and bad
smells.
►
T
o ensure correct operation of the
air conditioning system, have it checked
according to the recommendations in the
Manufacturer’s service schedule.
Stop & Start
The heating and air conditioning systems
only operate when the engine is running.
Temporarily deactivate the Stop & Start
system to maintain a comfortable temperature
in the passenger compartment.
For more information on the Stop &
Start
system, refer to the corresponding
section.
Air conditioning, manual (without display screen)
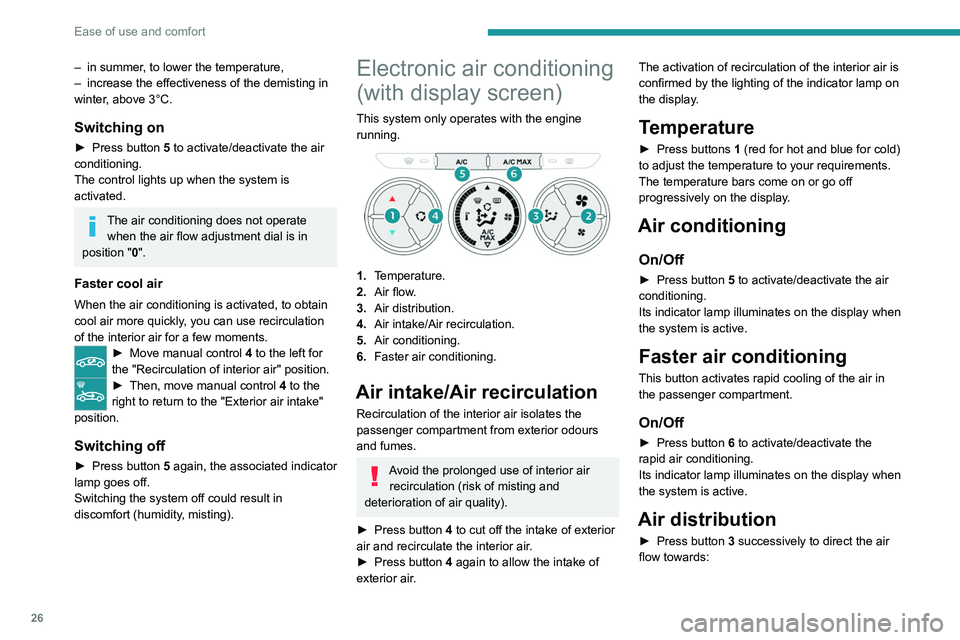
This system operates only with the engine
running.
1. Temperature
2. Air flow
3. Air distribution
4. Air intake
/ Air recirculation
5. Air conditioning
Temperature
► Turn the dial 1 from blue (cold) to red (hot) to
adjust the temperature to your liking.
Air flow
► Turn the dial 2 to obtain a comfortable air
flow.
Deactivation
If you put the air flow control in the 0 position, the
temperature is no longer controlled.
A slight flow of air can still be felt, resulting from
the forward movement of the vehicle.
Air distribution
Windscreen and side windows.
Windscreen, side windows and footwells.
Footwells.
Central and side air vents, footwells.
Central and side air vents.
The air distribution can be adapted by placing
the dial 3 to an intermediate notch or by closing
the air vents.
Air intake/Air recirculation
Recirculation of the interior air isolates the
passenger compartment from exterior odours
and fumes.
Return to exterior air intake as soon as possible
to avoid deterioration of the air quality and the
formation of mist.
► Move manual co ntrol 4 to the left for
the "Recirculation of interior air" position.
► Move manual co ntrol 4 to the right to
return to the "Exterior air intake" position.
Air conditioning
The air conditioning is designed to operate
efficiently in all seasons, with the windows
closed.
It allows you:
Page 28 of 148

26
Ease of use and comfort
– in summer, to lower the temperature,
– increase the effectiveness of the demisting in
winter
, above 3°C.
Switching on
► Press button 5 to activate/deactivate the air
conditioning.
The control lights up when the system is
activated.
The air conditioning does not operate when the air flow adjustment dial is in
position " 0".
Faster cool air
When the air conditioning is activated, to obtain
cool air more quickly, you can use recirculation
of the interior air for a few moments.
► Move manual co ntrol 4 to the left for
the "Recirculation of interior air" position.
► Then, move manual control 4 to the
right to return to the "Exterior air intake"
position.
Switching off
► Press button 5 again, the associated indicator
lamp goes off.
Switching the system off could result in
discomfort (humidity, misting).
Electronic air conditioning
(with display screen)
This system only operates with the engine
running.
1. Temperature.
2. Air flow.
3. Air distribution.
4. Air intake/Air recirculation.
5. Air conditioning.
6. Faster air conditioning.
Air intake/Air recirculation
Recirculation of the interior air isolates the
passenger compartment from exterior odours
and fumes.
Avoid the prolonged use of interior air
recirculation (risk of misting and
deterioration of air quality).
►
Press button
4 to cut off the intake of exterior
air and recirculate the interior air.
►
Press button
4 again to allow the intake of
exterior air. The activation of recirculation of the interior air is
confirmed by the lighting of the indicator lamp on
the display.
Temperature
► Press buttons
1 (red for hot and blue for cold)
to adjust the temperature to your requirements.
The temperature bars come on or go off
progressively on the display.
Air conditioning
On/Off
► Press button 5 to activate/deactivate the air
conditioning.
Its indicator lamp illuminates on the display when
the system is active.
Faster air conditioning
This button activates rapid cooling of the air in
the passenger compartment.
On/Off
► Press button 6 to activate/deactivate the
rapid air conditioning.
Its indicator lamp illuminates on the display when
the system is active.
Air distribution
► Press button 3 successively to direct the air
flow towards:
Page 67 of 148

65
Driving
6
This supplements the audible signal by
displaying bars on the screen whose location
represents the distance between the obstacle
and the vehicle (white: more distant, orange:
close, red: very close).
When the obstacle is very close, the "Danger"
symbol is displayed on the screen.
Deactivation/Activation
The function is deactivated or activated via the
vehicle configuration menu.
With audio system
The parking sensors can be configured in the "Personalisation - Configuration "
menu.
With touch screen
The parking sensors can be configured in the Driving/Vehicle
menu.
The function will be deactivated automatically if a trailer is being towed or
a bicycle carrier is fitted (vehicle fitted with a
tow bar or bicycle carrier recommended by
PEUGEOT).
Malfunction
In the event of a malfunction when
changing into reverse gear, this warning
lamp lights up on the instrument panel and/or a
message appears in the screen, accompanied
by an audible signal (short beep).
Have it checked by a PEUGEOT dealer or a
qualified workshop.
Reversing Camera
For more information, refer to the
General recommendations on the use
of driving and manoeuvring aids .
The reversing camera is automatically activated
when reverse gear is engaged.
The image is displayed on the touch screen.
The reversing camera function may be
supplemented with parking sensors.
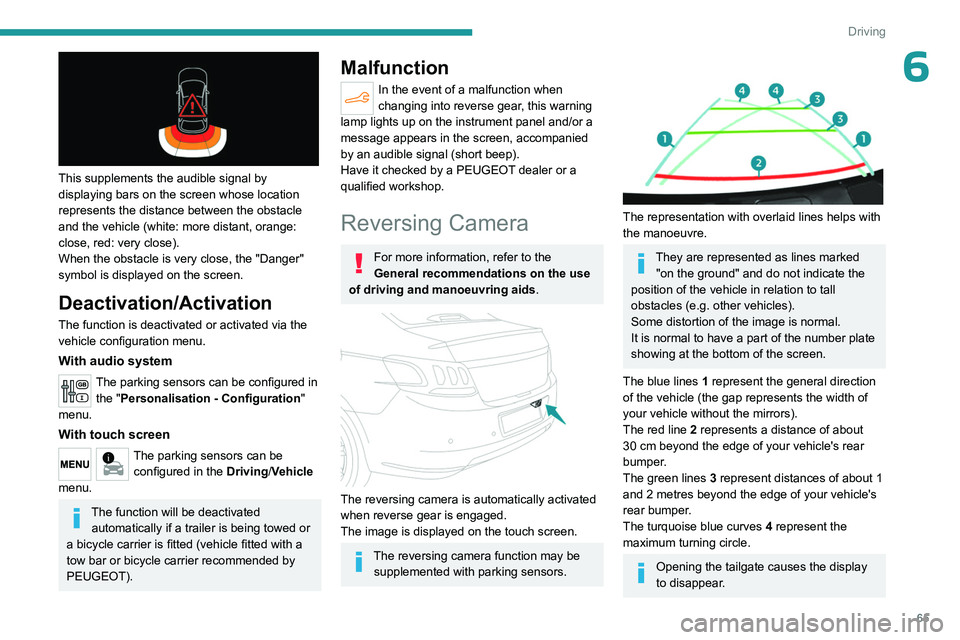
The representation with overlaid lines helps with
the manoeuvre.
They are represented as lines marked "on the ground" and do not indicate the
position of the vehicle in relation to tall
obstacles (e.g. other vehicles).
Some distortion of the image is normal.
It is normal to have a part of the number plate
showing at the bottom of the screen.
The blue lines
1
represent the general direction
of the vehicle (the gap represents the width of
your vehicle without the mirrors).
The red line
2
represents a distance of about
30
cm beyond the edge of your vehicle's rear
bumper.
The green lines
3
represent distances of about 1
and 2
metres beyond the edge of your vehicle's
rear bumper.
The turquoise blue curves
4
represent the
maximum turning circle.
Opening the tailgate causes the display
to disappear.