2022 PEUGEOT 3008 remove seats
[x] Cancel search: remove seatsPage 72 of 292
70
Ease of use and comfort
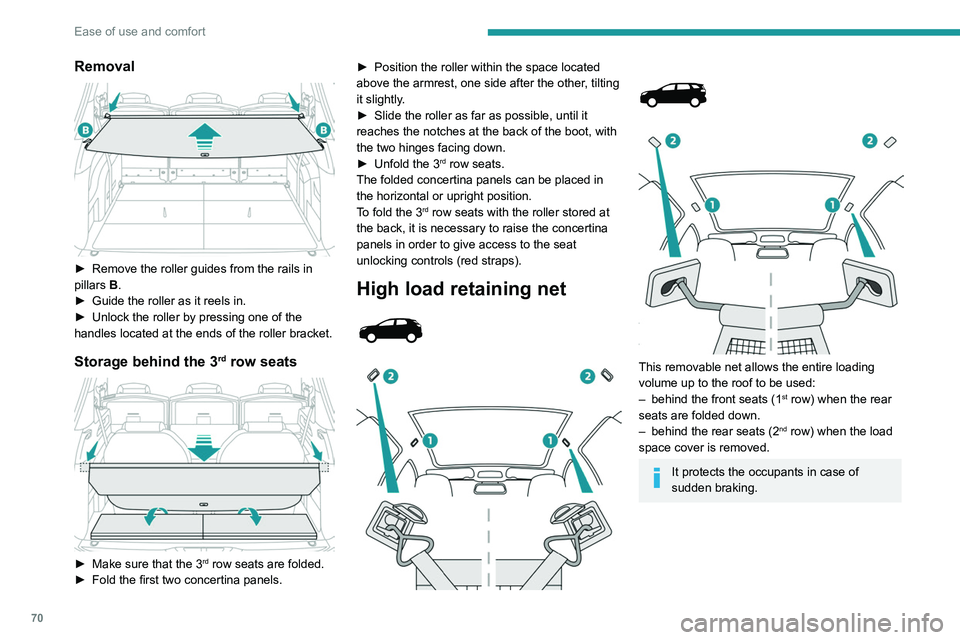
Removal
► Remove the roller guides from the rails in
pillars B
.
►
Guide the roller as it reels in.
►
Unlock the roller by pressing one of the
handles located at the ends of the roller bracket.
Storage behind the 3rd row seats
► Make sure that the 3rd row seats are folded.
►
Fold the first two concertina panels. ►
Position the roller within the space located
above the armrest, one side after the other
, tilting
it slightly.
►
Slide the roller as far as possible, until it
reaches the notches at the back of the boot, with
the two hinges facing down.
►
Unfold the 3rd row seats.
The folded concertina panels can be placed in
the horizontal or upright position.
To fold the 3
rd row seats with the roller stored at
the back, it is necessary to raise the concertina
panels in order to give access to the seat
unlocking controls (red straps).
High load retaining net
This removable net allows the entire loading
volume up to the roof to be used:
–
behind the front seats (1st row) when the rear
seats are folded down.
–
behind the rear seats (2nd row) when the load
space cover is removed.
It protects the occupants in case of
sudden braking.
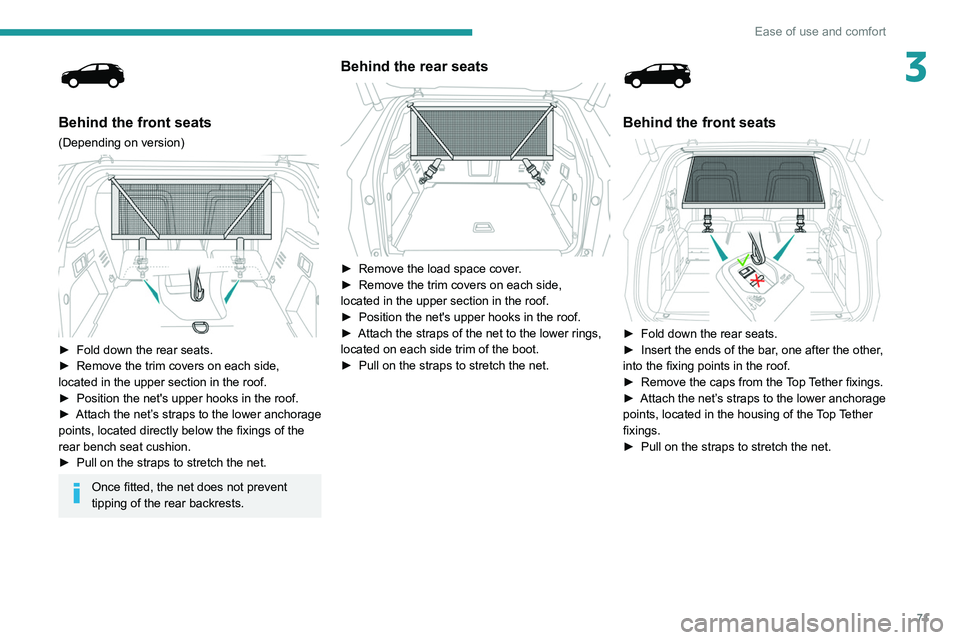
Behind the front seats
(Depending on version)
► Fold down the rear seats.
► Remove the trim covers on each side,
located in the upper section in the roof.
► Position the net's upper hooks in the roof.
► Attach the net’s straps to the lower anchorage
points, located directly below the fixings of the
rear bench seat cushion.
► Pull on the straps to stretch the net.
Once fitted, the net does not prevent
tipping of the rear backrests.
Page 73 of 292
71
Ease of use and comfort
3
Behind the front seats
(Depending on version)
► Fold down the rear seats.
► Remove the trim covers on each side,
located in the upper section in the roof.
►
Position the net's upper hooks in the roof.
►
Attach
the net’s straps to the lower anchorage
points, located directly below the fixings of the
rear bench seat cushion.
►
Pull on the straps to stretch the net.
Once fitted, the net does not prevent
tipping of the rear backrests.
Behind the rear seats
► Remove the load space cover .
► Remove the trim covers on each side,
located in the upper section in the roof.
►
Position the net's upper hooks in the roof.
►
Attach the straps of the net to the lower rings,
located on each side trim of the boot.
►
Pull on the straps to stretch the net.
Behind the front seats
► Fold down the rear seats.
► Insert the ends of the bar , one after the other,
into the fixing points in the roof.
►
Remove the caps from the
Top Tether fixings.
►
Attach
the net’s straps to the lower anchorage
points, located in the housing of the Top Tether
fixings.
►
Pull on the straps to stretch the net.
Page 74 of 292
72
Ease of use and comfort
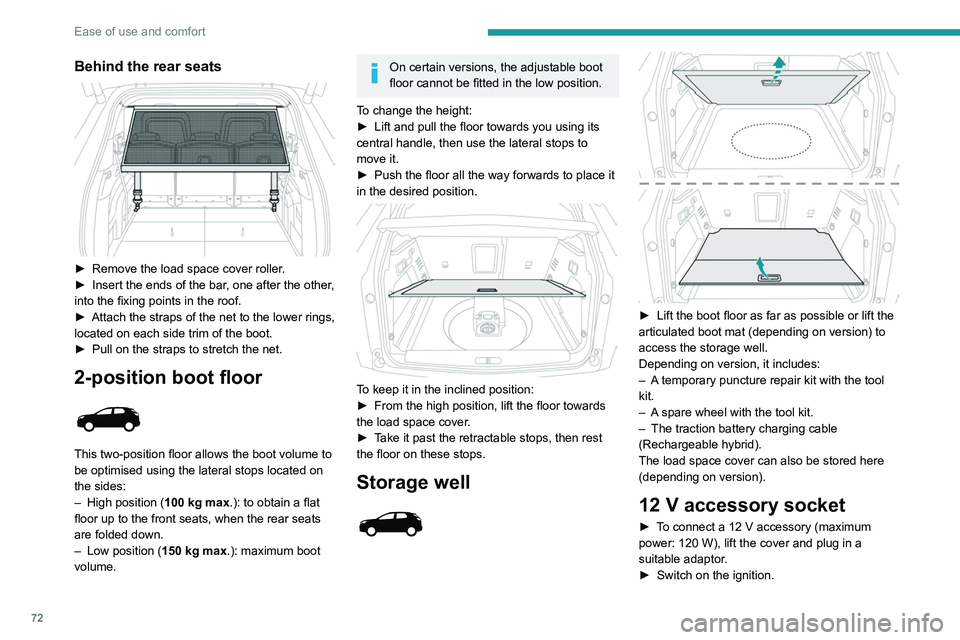
Behind the rear seats
► Remove the load space cover roller.
► Insert the ends of the bar , one after the other,
into the fixing points in the roof.
►
Attach the straps of the net to the lower rings,
located on each side trim of the boot.
►
Pull on the straps to stretch the net.
2-position boot floor
This two-position floor allows the boot volume to
be optimised using the lateral stops located on
the sides:
–
High position ( 100
kg max.): to obtain a flat
floor up to the front seats, when the rear seats
are folded down.
–
Low position ( 150
kg max.): maximum boot
volume.
On certain versions, the adjustable boot
floor cannot be fitted in the low position.
To change the height:
►
Lift and pull the floor towards you using its
central handle, then use the lateral stops to
move it.
►
Push the floor all the way forwards to place it
in the desired position.
To keep it in the inclined position:
► From the high position, lift the floor towards
the load space cover
.
►
T
ake it past the retractable stops, then rest
the floor on these stops.
Storage well
► Lift the boot floor as far as possible or lift the
articulated boot mat (depending on version) to
access the storage well.
Depending on version, it includes:
–
A
temporary puncture repair kit with the tool
kit.
–
A
spare wheel with the tool kit.
–
The traction battery charging cable
(Rechargeable hybrid).
The load space cover can also be stored here
(depending on version).
12 V accessory socket
► To connect a 12 V accessory (maximum
power: 120 W), lift the cover and plug in a
suitable adaptor.
►
Switch on the ignition.
The connection of an electrical device not approved by PEUGEOT, such as a
USB charger, may adversely affect the
operation of vehicle electrical systems,
causing faults such as poor radio reception or
interference with displays in the screens.
Boot lamp
It comes on automatically when the boot is
opened and goes off automatically when the
boot is closed.
The lighting time varies according to the
circumstances:
– When the ignition is off, approximately 10
minutes.
– In energy saving mode, approximately 30
seconds.
– With the engine running, unlimited.
Page 99 of 292
97
Safety
5the head, chest or arms cannot be ruled out
when an airbag is deployed. The bag inflates
almost instantly (within a few milliseconds)
then deflates within the same time,
discharging the hot gas via openings provided
for this purpose.
After an accident or if the vehicle has been
stolen, have the airbag systems checked.
All work must be carried out only by a
PEUGEOT dealer or a qualified workshop.
Front airbags
Do not drive holding the steering wheel
by its spokes or resting your hands on the
centre part of the wheel.
Passengers must not place their feet on the
dashboard.
Do not smoke as deployment of the airbags
can cause burns or the risk of injury from a
cigarette or pipe.
Never remove or pierce the steering wheel or
hit it violently.
Do not fix or attach anything to the steering
wheel or dashboard, as this could cause
injuries when the airbags are deployed.
Lateral airbags
Use only approved seat covers
compatible with the deployment of these
airbags. For information on the range of seat
covers suitable for your vehicle, contact a
PEUGEOT dealer.
Do not fix or attach anything to the seat
backrests (e.g. clothing) as this could cause
injuries to the chest or arm when the airbag is
deployed.
Do not sit with the upper part of the body any
nearer to the door than necessary.
The vehicle's front door panels include side
impact sensors.
A damaged door or any unauthorised or
incorrectly executed work (modification or
repair) on the front doors or their interior trim
could compromise the operation of these
sensors - risk of malfunction of the lateral
airbags!
All work must be carried out only by a
PEUGEOT dealer or a qualified workshop.
Curtain airbags
Do not fix or attach anything to the roof,
as this could cause head injuries when the
curtain airbag is deployed.
Do not remove the grab handles installed on
the roof, as these help to secure the curtain
airbags.
Child seats
The regulations on carrying children are specific to each country. Refer to the
legislation in force in your country.
For maximum safety, please observe the
following recommendations:
–
In accordance with European regulations,
all children under the age of 12 or less than
1,5 metres tall must travel in approved child
seats suited to their weight , on seats fitted with
a seat belt or ISOFIX mountings.
–
Statistically
, the safest seats in your
vehicle for carrying children are the rear
seats.
–
Children weighing less than 9 kg must
travel in the "rearward facing" position,
whether in the front or rear of the vehicle.
It is recommended that children travel
on the rear seats of the vehicle:
–
‘rearward facing’ up to the age of 3,
–
‘forward facing’ over the age of 3.
Make sure that the seat belt is correctly
positioned and tightened.
For child seats with a support leg, ensure that
the support leg is in firm and steady contact
with the floor.
Advice
An incorrectly installed child seat compromises the child's safety in the
event of an accident.
Ensure that there is no seat belt or seat belt
buckle under the child seat, as this could
destabilise it.
Page 100 of 292
98
Safety
Remember to fasten the seat belts or the
harness of child seats, keeping the slack
relative to the child's body to a minimum,
even for short journeys.
When installing a child seat using the seat
belt, ensure that the seat belt is tightened
correctly on the child seat and that it secures
the child seat firmly on the seat of the vehicle.
If the passenger seat is adjustable, move it
forwards if necessary.
Remove the head restraint before
installing a child seat with a backrest on a
passenger seat.
Ensure that the head restraint is stored or
attached securely to prevent it from being
thrown around the vehicle in the event of
sharp braking. Refit the head restraint once
the child seat has been removed.
Installing a booster seat
The chest part of the seat belt must be
positioned on the child's shoulder without
touching the neck.
Ensure that the lap part of the seat belt
passes correctly over the child's thighs.
Use a booster seat with backrest, equipped
with a belt guide at shoulder level.
Additional protections
To prevent accidental opening of the
doors and rear windows, use the "Child lock".
Take care not to open the rear windows by
more than one third.
To protect young children from the rays of the
sun, fit side blinds on the rear windows.
As a safety precaution, do not leave:
–
a child alone and unattended in a vehicle,
–
a child or an animal in a vehicle which is
exposed to the sun, with the windows closed,
–
the keys within reach of children inside the
vehicle.
Child seat at the rear
Forward-facing or rearward-facing
► Move the vehicle's front seat forward and
straighten the backrest so that the legs of the
child in the forward-facing or rearward-facing
child seat itself do not touch the vehicle's front
seat.
►
Check that the backrest of the forward-facing
child seat is as close as possible to the backrest
of the vehicle's rear seat, and ideally in contact
with it.
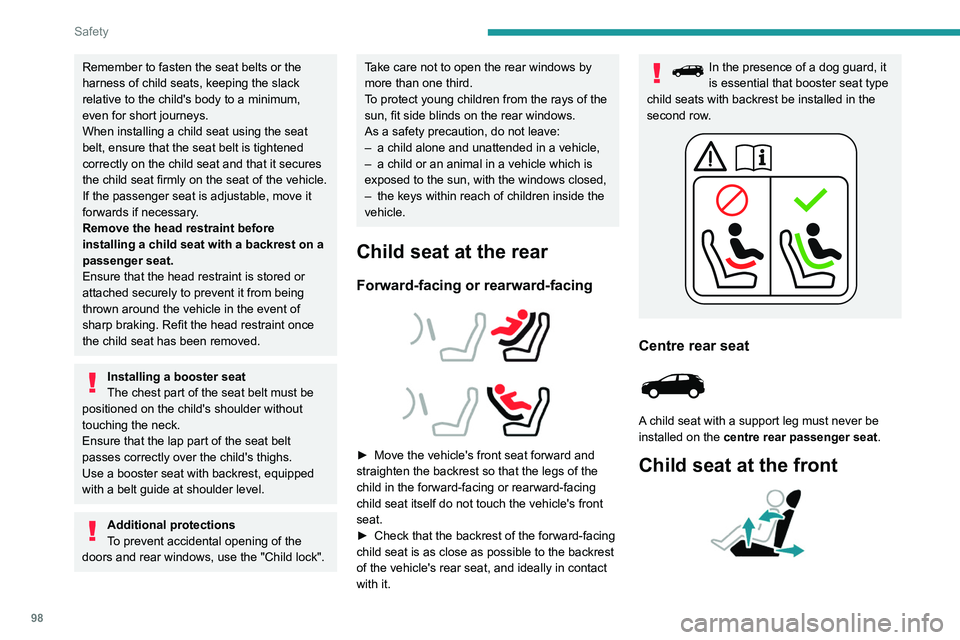
In the presence of a dog guard, it
is essential that booster seat type
child seats with backrest be installed in the
second row.
Centre rear seat
A child seat with a support leg must never be
installed on the centre rear passenger seat .
Child seat at the front
► Adjust the front passenger seat to the
highest and fully back longitudinal position ,
with the backrest straightened.
"Forward facing"
You must leave the front passenger airbag active.
"Rearward facing"
The front passenger airbag must be deactivated before installing a rearward
facing child seat. Otherwise, the child risks
being seriously injured or killed if the
airbag is deployed .
Page 102 of 292
100
Safety
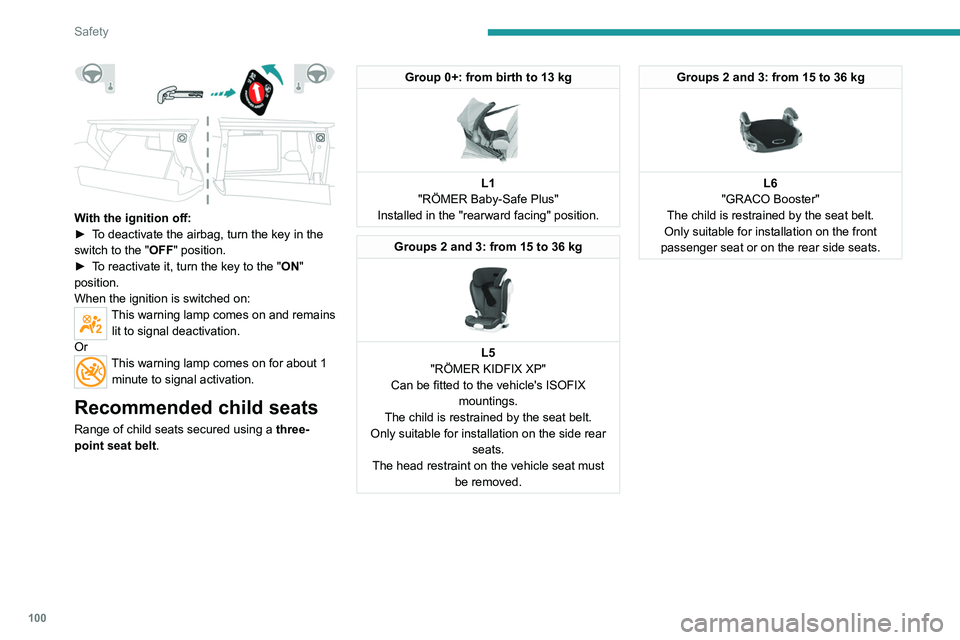
With the ignition off:
► T o deactivate the airbag, turn the key in the
switch to the "OFF " position.
►
T
o reactivate it, turn the key to the "ON"
position.
When the ignition is switched on:
This warning lamp comes on and remains lit to signal deactivation.
Or
This warning lamp comes on for about 1 minute to signal activation.
Recommended child seats
Range of child seats secured using a three-
point seat belt .
Group 0+: from birth to 13 kg
L1
"RÖMER Baby-Safe Plus"
Installed in the "rearward facing" position.
Groups 2 and 3: from 15 to 36 kg
L5
"RÖMER KIDFIX XP"
Can be fitted to the vehicle's ISOFIX mountings.
The child is restrained by the seat belt.
Only suitable for installation on the side rear seats.
The head restraint on the vehicle seat must be removed.
Groups 2 and 3: from 15 to 36 kg
L6
"GRACO Booster"
The child is restrained by the seat belt.
Only suitable for installation on the front
passenger seat or on the rear side seats.
Locations for child seats secured using the seat belt
In accordance with European regulations, this table indicates the option\
s for installing universally approved (a) child seats secured using the seat belt,
based on the child’s weight and the seat position in the vehicle.
Weight of the child/indicative age
Seat Front passenger
airbag Under 13 kg
(groups 0 (b) and 0+)
Up to about 1 year old From 9 to 18 kg
(group 1)
From about 1 to 3 years old From 15 to 25 kg
(group 2)
From about 3 to 6 years old From 22 to 36 kg
(group 3)
From about 6 to 10 years old
Row 1 (c) Passenger seat
with height adjustment (d)
without height
adjustment (e)
Deactivated: "OFF" U
UUU
Activated: "ON" XUF UFUF
Row 2 (f) Rear seats (c) (g)
U UUU
Row 3 (f)Rear side seats
UUUU
Page 105 of 292
103
Safety
5
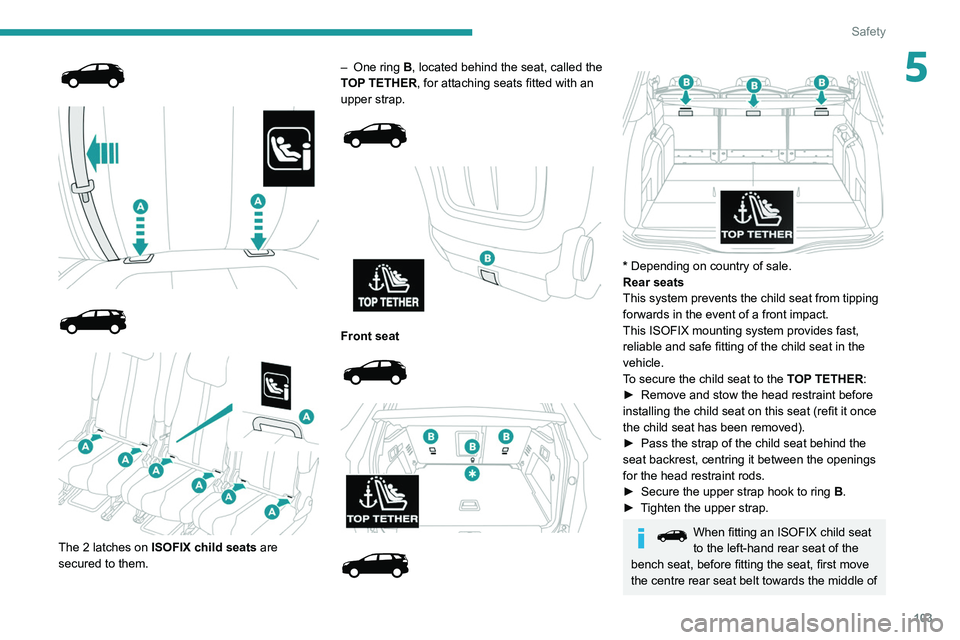
The 2 latches on ISOFIX child seats are
secured to them. –
One ring
B, located behind the seat, called the
TOP TETHER, for attaching seats fitted with an
upper strap.
Front seat
* Depending on country of sale.
Rear seats
This system prevents the child seat from tipping
forwards in the event of a front impact.
This ISOFIX mounting system provides fast,
reliable and safe fitting of the child seat in the
vehicle.
To secure the child seat to the TOP TETHER:
►
Remove and stow the head restraint before
installing the child seat on this seat (refit it once
the child seat has been removed).
►
Pass the strap of the child seat behind the
seat backrest, centring it between the openings
for the head restraint rods.
►
Secure the upper strap hook to ring
B
.
►
T
ighten the upper strap.
When fitting an ISOFIX child seat
to the left-hand rear seat of the
bench seat, before fitting the seat, first move
the centre rear seat belt towards the middle of
Page 106 of 292
104
Safety
the vehicle, so as to avoid the seat interfering
with the operation of the seat belt.
An incorrectly installed child seat in a vehicle compromises the child's safety in
the event of an accident.
Strictly observe the fitting instructions
provided in the user guide supplied with the
child seat.
For information about the options for
fitting ISOFIX child seats in your vehicle,
refer to the summary table.
Recommended ISOFIX child
seats
Also consult the user guide from the child seat’s manufacturer to find out how to
install and remove the seat.
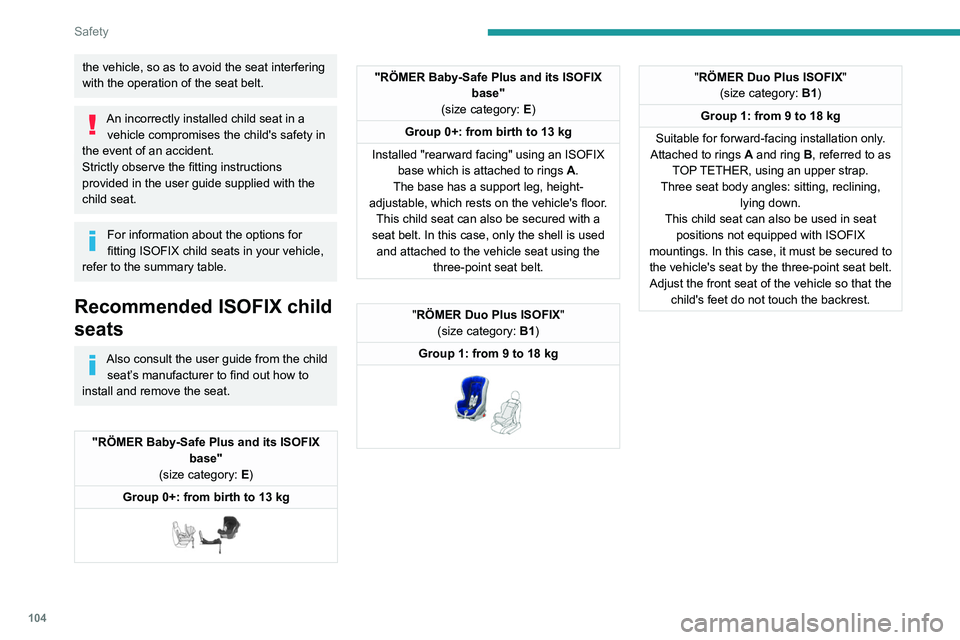
"RÖMER Baby-Safe Plus and its ISOFIX base"
(size category: E)
Group 0+: from birth to 13 kg
"RÖMER Baby-Safe Plus and its ISOFIX base"
(size category: E)
Group 0+: from birth to 13 kg
Installed "rearward facing" using an ISOFIX base which is attached to rings
A
.
The base has a support leg, height-
adjustable, which rests on the vehicle's floor. This child seat can also be secured with a
seat belt. In this case, only the shell is used and attached to the vehicle seat using the three-point seat belt.
"RÖMER Duo Plus ISOFIX "
(size category: B1)
Group 1: from 9 to 18 kg
"RÖMER Duo Plus ISOFIX "
(size category: B1)
Group 1: from 9 to 18 kg
Suitable for forward-facing installation only.
Attached to rings
A and ring B, referred to as
TOP TETHER, using an upper strap.
Three seat body angles: sitting, reclining, lying down.
This child seat can also be used in seat positions not equipped with ISOFIX
mountings. In this case, it must be secured to the vehicle's seat by the three-point seat belt. Adjust the front seat of the vehicle so that the child's feet do not touch the backrest.Locations for ISOFIX child seats
In accordance with European regulations, this table shows the options for installing ISOFIX child seats on vehicle seats fitted with ISOFIX mountings.
In the case of universal and semi-universal ISOFIX child seats, the ISOF\
IX size category, as determined by a letter from A to G, is indicated on the child
seat next to the i-Size logo.
Weight of the child / indicative age
Under 10 kg
(group 0)
Up to about 6 months old Under 10 kg
Under 13 kg
(group 0)
(group 0+)
Up to about 1 year old From 9 to 18 kg
(group 1)
From about 1 to 3 years old
Type of ISOFIX child seat Carrycot"Rearward facing" "Rearward
facing" "Forward facing
"
ISOFIX size category F G C D E C D A B B1
Seat Front
passenger airbag
Row 1 (a) Passenger
seat
with or
without height adjustment Deactivated:
"OFF" X
IL ILIUF/IL
Activated: "ON" X
XXIUF/IL
Row 2 Rear side seats IL (b)
ILILIUF/IL
Rear central seat Not ISOFIX