2022 PEUGEOT 3008 rear view mirror
[x] Cancel search: rear view mirrorPage 4 of 292

2
Contents
■
Overview
■
Eco-driving
1InstrumentsDigital instrument panels 9
Warning and indicator lamps 11
Indicators 17
Manual test 21
Distance recorders 21
Lighting dimmer 21
Trip computer 22
Touch screen 23
Remote functions (Rechargeable hybrid) 25
2AccessRemote control / Key 26
Keyless Entry and Starting 28
Central locking 30
Back-up procedures 30
Doors 32
Boot 32
Hands-free tailgate 33
Alarm 36
Electric windows 38
Panoramic sunroof 39
3Ease of use and comfortDriving position 42
Front seats 43
Steering wheel adjustment 47
Mirrors 47
Rear bench seat 49
Rear seats 50
Seat modularity 55
Heating and Ventilation 56
Dual-zone automatic air conditioning 57
Front demisting - defrosting 60
Heated windscreen 60
Rear screen demisting/defrosting 61
Temperature pre-conditioning
(Rechargeable hybrid)
61
Front fittings 62
Courtesy lamps 65
Interior ambient lighting 66
Rear fittings 66
Boot fittings 68
4Lighting and visibilityLighting control stalk 74
Direction indicators 75
Headlamp beam height adjustment 76
Automatic illumination of headlamps 76
Guide-me-home and welcome lighting 77
Automatic lighting systems - General
recommendations
77
Automatic headlamp dipping 77
Static cornering lighting 78
Night Vision 79
Wiper control stalk 80
Automatic wipers 81
Changing a wiper blade 83
5SafetyGeneral safety recommendations 84
Hazard warning lamps 84
Horn 85
Pedestrian horn (Rechargeable hybrid) 85
Emergency or assistance 85
Electronic stability control (ESC) 87
Advanced Grip Control 89
Hill Assist Descent Control 90
Seat belts 91
Airbags 95
Child seats 97
Deactivating the front passenger airbag 99
ISOFIX child seats 102
i-Size child seats 107
Child lock 108
6DrivingDriving recommendations 11 0
Starting/Switching off the engine 111
Starting rechargeable hybrid vehicles 11 2
Electric parking brake 11 4
6-speed manual gearbox 11 6
Automatic gearbox 11 6
Electric automatic gearbox
(Rechargeable hybrid)
11 9
Hill start assist 121
Driving modes 121
Gear shift indicator 123
Stop & Start 123
Tyre under-inflation detection 125
Driving and manoeuvring aids - General
recommendations
126
Memorising speeds 128
Speed Limit Recognition and
Recommendation
128
Speed limiter 132
Cruise control - Specific recommendations 133
Cruise control 134
Drive Assist Plus 135
Adaptive Cruise Control 136
Page 6 of 292

4
Overview
Presentation
These illustrations and descriptions are intended
as a guide. The presence and location of some
elements vary depending on the version or trim
level.
Instruments and controls
1.Sunroof and blind controls
Front courtesy/map reading lamps
Warning lamp display for seat belts and front
passenger airbag
Emergency call/Assistance call
2. Interior rear view mirror/Driving in Electric
mode indicator LED
3. Head-up digital display
4. Fusebox
5. Bonnet release
6. Door mirror and electric window control panel
7. Front passenger airbag
8. Glove box
Deactivation of the front passenger airbag
1.8" PEUGEOT Connect Radio (or 10" HD
PEUGEOT Connect Nav) touch screen
2. 12 V socket/USB socket
Wireless smartphone charger
3. "START/STOP" button
4. Gearbox control 5.
Electric parking brake
6. Hill Assist Descent Control
7. "SPORT" or “ECO” programme
or
Driving mode selector and/or Advanced Grip
Control
8. Advanced Grip Control
Steering-mounted controls
1.External lighting controls/Direction indicators
2. Wiper controls/Screenwash/Trip computer
3. Automatic gearbox control paddles
4. Horn/Driver front airbag
5. Controls for Cruise control/Speed limiter/
Adaptive Cruise Control
6. Instrument panel and audio system
adjustment controls
Page 50 of 292
48
Ease of use and comfort
If the mirrors are folded using control A,
they will not unfold when the vehicle is
unlocked.
Electric unfolding
► From outside: unlock the vehicle.
► From inside: with the ignition on, place
control
A in the central position and then pull it
rearwards.
Depending on version, the automatic
door mirror folding/unfolding function is
configured via the Driving
/ Vehicle touch
screen menu.
Otherwise, this setting can be carried out at a
PEUGEOT dealer or a qualified workshop.
Automatic tilting in reverse gear
Depending on version, this function allows to
automatically tilt the mirrors downwards to assist
with parking manoeuvres in reverse gear.
With the engine running, on engaging reverse
gear, the mirror glasses tilt downwards.
They return to their initial position:
–
A
few seconds after coming out of reverse
gear.
–
Once the vehicle speed exceeds 6 mph
(10
km/h).
–
When the engine is switched off.
This function is set via the Driving/Vehicle touch screen menu.
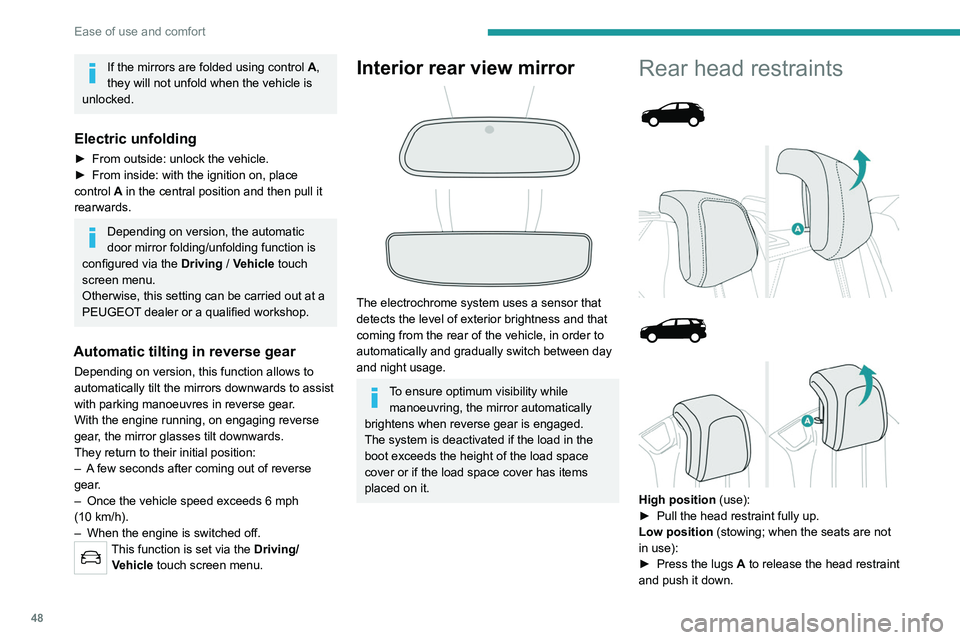
Interior rear view mirror
The electrochrome system uses a sensor that
detects the level of exterior brightness and that
coming from the rear of the vehicle, in order to
automatically and gradually switch between day
and night usage.
To ensure optimum visibility while manoeuvring, the mirror automatically
brightens when reverse gear is engaged.
The system is deactivated if the load in the
boot exceeds the height of the load space
cover or if the load space cover has items
placed on it.
Rear head restraints
High position (use):
► Pull the head restraint fully up.
Low position (stowing; when the seats are not
in use):
►
Press the lugs
A to release the head restraint
and push it down.
The rear head restraints can be removed.
Removing a head restraint
► Pull the head restraint fully up.
► Press the lugs A to release the head restraint
and remove it completely.
► Store the head restraint.
Refitting a head restraint
► Insert the head restraint rods into the guides
in the corresponding seat backrest.
► Push the head restraint down as far as it will
go.
► Press the lugs A to release the head restraint
and push it down.
Never drive with passengers seated at
the rear when the head restraints are
removed; the head restraints should be in
place and in the high position.
The head restraint for the central seat and those for the side seats
are not interchangeable.
Rear bench seat
Bench seat with fixed cushions and split folding
backrests (2/3-1/3) to adapt the boot load space.
Page 78 of 292

76
Lighting and visibility
Headlamp beam height
adjustment
Manual adjustment of LED
technology headlamps
To avoid dazzling other road users, the height
of these headlamp beams must be adjusted
according to the load in the vehicle.
0 (Initial setting) Driver only or driver + front passenger
1 5 people
2 Not used
3 5 people + load in the boot
4 Not used
5 Driver only + load in the boot
6 Not used
0 (Initial setting)
Driver only or driver + front passenger
1 Driver only or driver + front passenger + row 3
2 7 people
3 7 people + load in the boot
4 Not used
5 Driver only + load in the boot
6 Not used
Automatic adjustment of
the Full LED technology
headlamps
This system automatically adjusts the height of
the headlamp beams according to the load in the
vehicle.
In the event of a malfunction, this warning
lamp comes on on the instrument panel,
accompanied by the display of a message and
an audible signal.
The system places the headlamp beams in the
lowest position.
Have it checked by a PEUGEOT dealer or a
qualified workshop.
Do not touch the "Full LED" technology
headlamps - risk of electrocution!
Automatic illumination of lamps
With the lighting control stalk in the “ AUTO”
position and if a low level of exterior brightness
is detected by the rain/sunshine sensor, the
sidelamps and dipped beam headlamps are
switched on automatically, without any action on
the part of the driver. They may also come on if
rain is detected, at the same time as automatic
operation of the windscreen wipers.
As soon as the brightness returns to a sufficient
level or after the windscreen wipers are switched
off, the lamps are switched off automatically.
Malfunction
In the event of a malfunction of the rain/
sunshine sensor, the vehicle’s lamps
come on and this warning lamp is displayed on
the instrument panel, accompanied by an
audible signal and/or the display of a message.
Have it checked by a PEUGEOT dealer or a
qualified workshop.
Do not cover the rain/sunshine sensor
located at the top centre of the
windscreen behind the interior rear view
mirror; the associated functions would no
longer be controlled.
In fog or snow, the rain/sunshine sensor
may detect sufficient light. For this
reason, the lighting will not come on
automatically.
The inner surface of the windscreen may become misted up and affect the proper
operation of the rain/sunshine sensor.
In humid and cold weather, demist the
windscreen regularly.
Guide-me-home and
welcome lighting
Guide-me-home lighting
With the ring of the lighting control stalk in the
"AUTO" position and when the light is poor, the
dipped beam headlamps come on automatically
when the ignition is switched off.
You can activate/deactivate this function and adjust the guide-me-home lighting
duration in the Driving/Vehicle touch screen
menu.
Welcome lighting
When the vehicle is unlocked, if the ambient
light is low and the "Automatic illumination of
headlamps" function is activated, this system
automatically turns on certain exterior lamps
as well as certain lamps in the passenger
compartment.
Page 84 of 292
82
Lighting and visibility
The rainfall detection function uses a rain/
sunshine sensor located at the top centre of the
windscreen, behind the rear view mirror.
Do not cover the rain/sunshine sensor.
When using an automatic car wash,
switch off the automatic wipers and the
ignition.
In winter, wait until the windscreen is
completely clear of ice before activating the
automatic wipers.
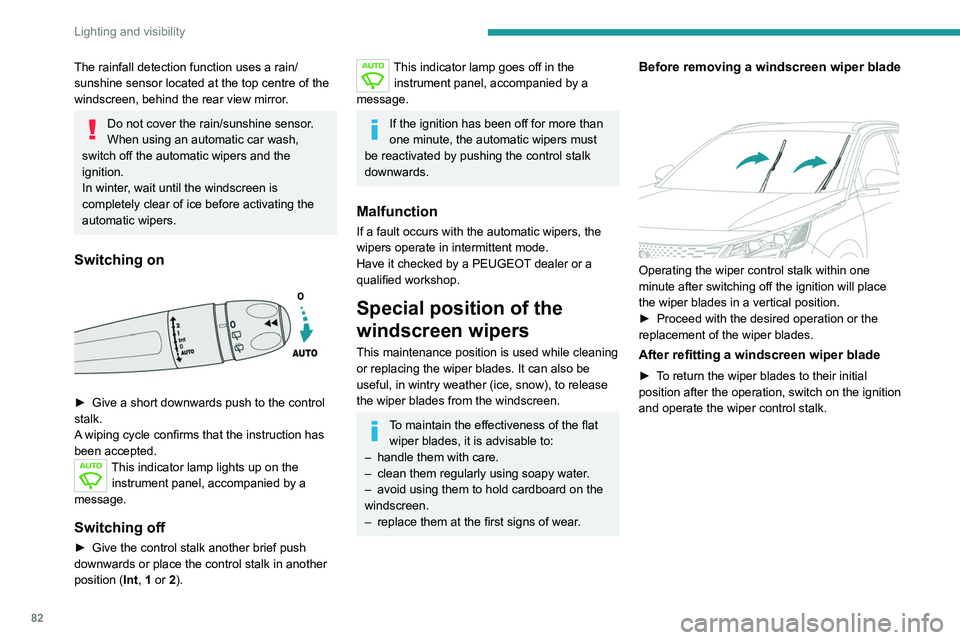
Switching on
► Give a short downwards push to the control
stalk.
A
wiping cycle confirms that the instruction has
been accepted.
This indicator lamp lights up on the instrument panel, accompanied by a
message.
Switching off
► Give the control stalk another brief push
downwards or place the control stalk in another
position ( Int
, 1 or 2).
This indicator lamp goes off in the
instrument panel, accompanied by a
message.
If the ignition has been off for more than
one minute, the automatic wipers must
be reactivated by pushing the control stalk
downwards.
Malfunction
If a fault occurs with the automatic wipers, the
wipers operate in intermittent mode.
Have it checked by a PEUGEOT dealer or a
qualified workshop.
Special position of the
windscreen wipers
This maintenance position is used while cleaning
or replacing the wiper blades. It can also be
useful, in wintry weather (ice, snow), to release
the wiper blades from the windscreen.
To maintain the effectiveness of the flat wiper blades, it is advisable to:
–
handle them with care.
–
clean them regularly using soapy water
.
–
avoid using them to hold cardboard on the
windscreen.
–
replace them at the first signs of wear
.
Before removing a windscreen wiper blade
Operating the wiper control stalk within one
minute after switching off the ignition will place
the wiper blades in a vertical position.
►
Proceed with the desired operation or the
replacement of the wiper blades.
After refitting a windscreen wiper blade
► To return the wiper blades to their initial
position after the operation, switch on the ignition
and operate the wiper control stalk.
Changing a wiper blade
Removing/Refitting at the front
► Carry out these wiper blade replacement
operations from the driver's side.
► Starting with the wiper blade farthest from
you, hold each arm by the rigid section and raise
it as far as possible.
Take care not to hold the arms at the jet locations.
Do not touch the wiper blades - risk of
irreparable deformation.
Do not release them while moving them. Risk
of damaging the windscreen!
► Clean the windscreen using screenwash
fluid.
Do not apply "Rain X" type water-
repellent products.
Page 124 of 292
122
Driving
When the message disappears, the selected
mode is activated and remains indicated on the
instrument panel (except Normal
mode).
With petrol / Diesel engines
Whenever the ignition is switched on,
Normal driving mode is selected by default.
Normal
To restore the default settings.
Eco
To reduce energy consumption by reducing the
performance of the heating and air conditioning,
without deactivating them.
Sport
With a manual gearbox: to obtain more dynamic
driving with action on the power steering,
accelerator and the possibility of displaying the
vehicle’s dynamic settings on the instrument
panel.
With an automatic gearbox: to obtain more
dynamic driving with action on the power
steering, accelerator, gear changes and
possibility of displaying the vehicle’s dynamic
settings on the instrument panel.
Depending on version, with an EAT8
gearbox and the gear selector in mode
D, except in
Sport mode, fully releasing the
accelerator pedal allows free-wheeling which
can save fuel.
A drop in engine speed is normal (rev counter
at idle, drop in engine noise).
With rechargeable hybrid
engine
Whenever the ignition is switched on, Electric
driving mode is selected by default.
Electric
Allows driving using 100% electrical energy.
The maximum speed is approximately 84 mph
(135
km/h).
When starting the vehicle, if the conditions do
not allow the activation or retention of Electric
mode, the message "Electric mode currently
unavailable" is displayed on the instrument
panel. The vehicle automatically changes to
Hybrid mode.
If a blue LED comes on under the interior rear
view mirror, visible from outside the vehicle, this
confirms that you are driving in Electric mode.
The LED can be turned off by inserting
the tip of a paper clip or other accessory
into the hole under the mirror.
Conditions of activation
–
Adequate battery charge level. Charging
the vehicle after each drive is therefore
recommended. Electric
mode is available as
long as there is power left in the battery.
–
Outside temperature between approximately
-5°C and 45°C.
Manually exiting the mode
►
Fully depress the accelerator pedal, or
►
Select another mode.
In case of non-use of the vehicle for a
long period (several months), a restart of
the petrol engine may occur even if the
battery is charged.
In the event of multiple starts of the
internal combustion engine without a
sufficient rise in
temperature,
Electric mode may be
temporarily unavailable (natural phenomenon
of dilution of fuel in oil). A message is then
displayed on the instrument panel (" ZEV
mode unavailable: automatic operation in
progress").
To regain normal electrical operation, drive
approximately 50 miles (80 km) in "motorway"
conditions or approximately 125 miles (200
km) in urban conditions.
This phenomenon does not cause any
mechanical or electrical damage. It can occur
several times in the life of the vehicle.
Hybrid
To optimise the vehicle's fuel consumption by
managing the alternating or simultaneous
operation of the two types of engine ,
depending on driving conditions and driving
style.
In Hybrid mode, it is possible to drive in 100%
electric mode if the battery charge level is
sufficient and acceleration requirements are
moderate.
Sport
To obtain more dynamic driving in order to
benefit from the maximum performance of the
vehicle.
Electric power is used to supplement the petrol
engine as long as there is energy left in the
battery.
4WD (4-wheel drive)
(Depending on version)
Improves the vehicle's grip at low and moderate
speeds by driving all 4 wheels continuously.
4WD mode (4-wheel drive) is especially
suited to driving on snow-covered roads and
difficult terrain (e.g. mud, sand) as well as ford
crossings, at moderate speed.
Depending on the driving conditions and the
battery charge level, 4WD mode may be 100%
electric.
If the system does not detect a situation of wheel
slipping or poor grip after 300 metres of driving, it
switches to Hybrid mode.
This mode will be even more effective if the vehicle is fitted with suitable tyres,
such as winter tyres.
The grip can be improved up to 84 mph
(135 km/h) using the electric motors; above this
speed, the vehicle is driven by the front wheels
only.
Page 158 of 292
156
Driving
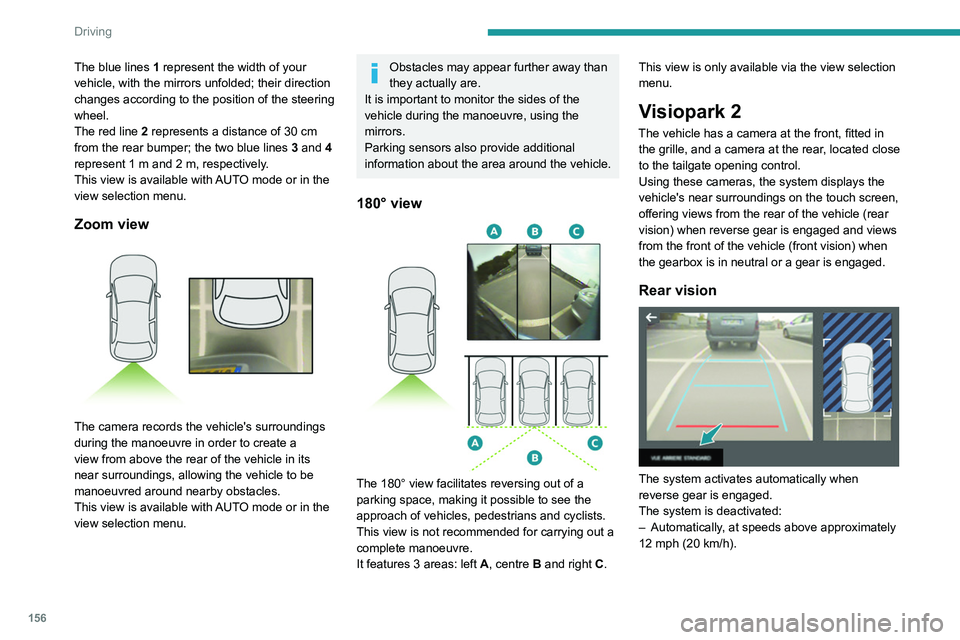
The blue lines 1 represent the width of your
vehicle, with the mirrors unfolded; their direction
changes according to the position of the steering
wheel.
The red line 2 represents a distance of 30
cm
from the rear bumper; the two blue lines 3 and 4
represent 1
m and 2 m, respectively.
This view is available with AUTO mode or in the
view selection menu.
Zoom view
The camera records the vehicle's surroundings
during the manoeuvre in order to create a
view from above the rear of the vehicle in its
near surroundings, allowing the vehicle to be
manoeuvred around nearby obstacles.
This view is available with AUTO mode or in the
view selection menu.
Obstacles may appear further away than
they actually are.
It is important to monitor the sides of the
vehicle during the manoeuvre, using the
mirrors.
Parking sensors also provide additional
information about the area around the vehicle.
180° view
The 180° view facilitates reversing out of a
parking space, making it possible to see the
approach of vehicles, pedestrians and cyclists.
This view is not recommended for carrying out a
complete manoeuvre.
It features 3 areas: left A, centre B and right C. This view is only available via the view selection
menu.
Visiopark 2
The vehicle has a camera at the front, fitted in
the grille, and a camera at the rear, located close
to the tailgate opening control.
Using these cameras, the system displays the
vehicle's near surroundings on the touch screen,
offering views from the rear of the vehicle (rear
vision) when reverse gear is engaged and views
from the front of the vehicle (front vision) when
the gearbox is in neutral or a gear is engaged.
Rear vision
The system activates automatically when
reverse gear is engaged.
The system is deactivated:
–
Automatically
, at speeds above approximately
12 mph (20
km/h).
– When shifting out of reverse (the front vision
image replaces the rear vision image for 7
seconds).
– By pressing the white arrow in the upper-left
corner of the touch screen.
If a trailer or a bicycle carrier is fitted to
the towball, the area behind the vehicle
on the view from above goes dark.
The surroundings are reconstructed by the
front camera only.
The rear vision views are similar to those for the
Visiopark 1 function.
For more information on the Visiopark
1 function, refer to the corresponding section.
Front and rear vision
With the engine running and the speed
below 12 mph (20 km/h), the system is
activated via the Driving/Vehicle touch screen
menu:
► Select "Visual parking assistance".
Page 159 of 292
157
Driving
6– When shifting out of reverse (the front vision
image replaces the rear vision image for 7
seconds).
–
By pressing the white arrow in the upper-left
corner of the touch screen.
If a trailer or a bicycle carrier is fitted to
the towball, the area behind the vehicle
on the view from above goes dark.
The surroundings are reconstructed by the
front camera only.
The rear vision views are similar to those for the
Visiopark 1 function.
For more information on the Visiopark
1
function, refer to the corresponding section.
Front and rear vision
With the engine running and the speed
below 12 mph (20 km/h), the system is
activated via the Driving/Vehicle touch screen
menu:
►
Select "
Visual parking assistance". AUTO mode is displayed by default, with front
vision, if the gearbox is in neutral or with a
gear engaged, or with rear vision, if reverse is
engaged.
The system is deactivated:
–
Automatically above about 19 mph (30
km/h)
(the image disappears temporarily from 12 mph
(20 km/h)).
–
By pressing the white arrow in the upper-left
corner of the touch screen.
AUTO mode
This mode is activated by default.
Using sensors in the front bumper, the automatic
view changes from the front view (standard) to
the view from above (zoom) as an obstacle is
approached during a manoeuvre.
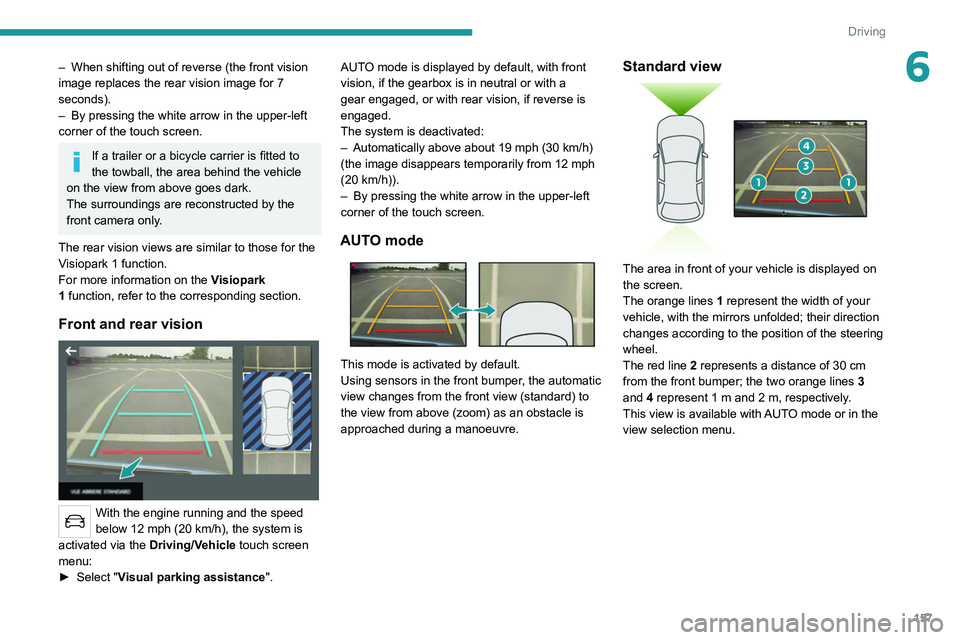
Standard view
The area in front of your vehicle is displayed on
the screen.
The orange lines 1 represent the width of your
vehicle, with the mirrors unfolded; their direction
changes according to the position of the steering
wheel.
The red line 2 represents a distance of 30 cm
from the front bumper; the two orange lines 3
and 4 represent 1 m and 2 m, respectively.
This view is available with AUTO mode or in the
view selection menu.