2022 NISSAN TITAN USB
[x] Cancel search: USBPage 15 of 635
18. USB ports*
19. Hazard warning flasher switch (P. 6-2)
20. Parking Aids system switch (P. 2-62)Vehicle Dynamic Control (VDC) OFF
switch (P. 2-58)
21. Trailer Brake Controller Unit (TBCU)
(if so equipped) (P. 2-63)
22. 4WD shif t switch (if so equipped)
(P. 5-111)
23. Push-button ignition switch (P. 5-13)
24. Driver supplemental knee air bag
(P. 1-80)
25. Tilt and telescopic steering wheel
control (P. 3-26)
26. Parking brake (P. 5-23)
27. Hood release (P. 3-23)
28. Headlight aiming control
(if so equipped) (P. 2-45)
Power inverter switch (if so equipped)
(P. 2-61)
Cargo lamp switch (P. 2-53)
Electronic locking rear differential
(E-Lock) system switch (if so equipped)
(P. 2-60)
Hill descent control system switch
(if so equipped) (P. 2-59) 29. Headlight switch (P. 2-45)
Fog light switch (if so equipped) (P. 2-52)
Instrument brightness control
switches (P. 2-51)
Trip reset switch (P. 2-7)
*Refer to the separate NissanConnect®
Owner’s Manual
Refer to the page number indicated in
parenthesis for operating details.
Illustrated table of contents0-7
Page 108 of 635
Hill descent control switch (if so equipped).....2-59
Electronic locking rear differential (E-Lock)
system switch (if so equipped) .................2-60
Power inverter switch (if so equipped) ..........2-61
Parking Aids system switch ....................2-62
Tow mode switch .............................. 2-63
Emergency call (SOS) button (if so equipped) . . . 2-63
Trailer Brake Controller Unit (TBCU)
(if so equipped) ................................. 2-63
Rear Door Alert ................................. 2-64
Power outlets .................................. 2-65
12v Outlets .................................. 2-65
120v outlets (if so equipped) .................2-66
USB/iPod® charging ports (if so equipped) ......2-68
Extended storage switch .......................2-69
Storage ........................................ 2-70
Front-door pockets ......................... 2-70
Rear-door pockets .......................... 2-70
Console side pockets (if so equipped) .......2-70
Seatback pockets ........................... 2-71
Under-seat storage (if so equipped) .........2-71
Console box storage trays
(if so equipped) .............................. 2-73
Cell phone storage tray (if so equipped) .....2-73
Glovebox ................................... 2-73Console box (if so equipped)
................2-74
Center armrest storage (if so equipped) .....2-75
Under front seat storage bin
(if so equipped) .............................. 2-76
Overhead sunglasses storage
(if so equipped) .............................. 2-76
Cup holders ................................. 2-77
Grocery hooks (if so equipped) ..............2-80
Bed liner storage bins (if so equipped) .......2-80
Cargo hooks (if so equipped) ................2-81
C-Channel cargo hooks (if so equipped) .....2-81
Windows ....................................... 2-82
Power windows ............................. 2-82
Rear power window switch
(if so equipped) .............................. 2-84
Rear sliding window (if so equipped) .........2-85
Moonroof (if so equipped) ......................2-86
P
ower moonroof ............................ 2-86
Interior lights ................................... 2-88
Console light (if so equipped) ................2-89
Map lights (if so equipped) ...................2-89
Personal Lights (if so equipped) .............2-90
HomeLink® Universal Transceiver
(if so equipped) ................................. 2-90
Programming HomeLink® ...................2-91
Page 111 of 635
18. USB ports*
19. Hazard warning flasher switch (P. 6-2)
20. Parking Aids system switch (P. 2-62)Vehicle Dynamic Control (VDC) OFF
switch (P. 2-58)
21. Trailer Brake Controller Unit (TBCU)
(if so equipped) (P. 2-63)
22. 4WD shif t switch (if so equipped)
(P. 5-111)
23. Push-button ignition switch (P. 5-13)
24. Driver supplemental knee air bag
(P. 1-80)
25. Tilt and telescopic steering wheel
control (P. 3-26)
26. Parking brake (P. 5-23)
27. Hood release (P. 3-23)
28. Headlight aiming control (if so
equipped) (P. 2-45)
Power inverter switch (if so equipped)
(P. 2-61)
Cargo lamp switch (P. 2-53)
Electronic locking rear differential
(E-Lock) system switch (if so equipped)
(P. 2-60)
Hill descent control system switch
(if so equipped) (P. 2-59) 29. Headlight switch (P. 2-45)
Fog light switch (if so equipped) (P. 2-52)
Instrument brightness control
switches (P. 2-51)
Trip reset switch (P. 2-7)
*Refer to the separate NissanConnect®
Owner’s Manual
Refer to the page number indicated in
parenthesis for operating details.
Instruments and controls2-5
Page 174 of 635
Do not use the outlet located in the truck
box with accessories that exceed 120 volt.
Do not use double adapters or more than
one electrical accessory. When the dual
wall bed liner is installed (if so equipped),
the power outlet is still accessible through
the access door in the bed liner.
CAUTION
• Operation of the 120 volt system with
the ignition in the ON position and
the engine not running (idle) will
drain the battery charge. This could
lead to a dead battery or no start
condition.
• The outlet and plug may be hot dur-
ing or immediately af ter use.
• Use power outlets with the engine
running to avoid discharging the ve-
hicle battery.
• Do not use double adaptors or more
than one electrical accessory.
• Avoid using power outlets when the
air conditioner, headlights or rear
window defroster is on.
• Before inserting or disconnecting a
plug, be sure the electrical accessory
being used is turned OFF. •
Push the plug in as far as it will go. If
good contact is not made, the plug
may overheat or the internal tem-
perature fuse may open.
• When not in use, be sure to close the
cap. Do not allow water or any other
liquid to contact the outlet.
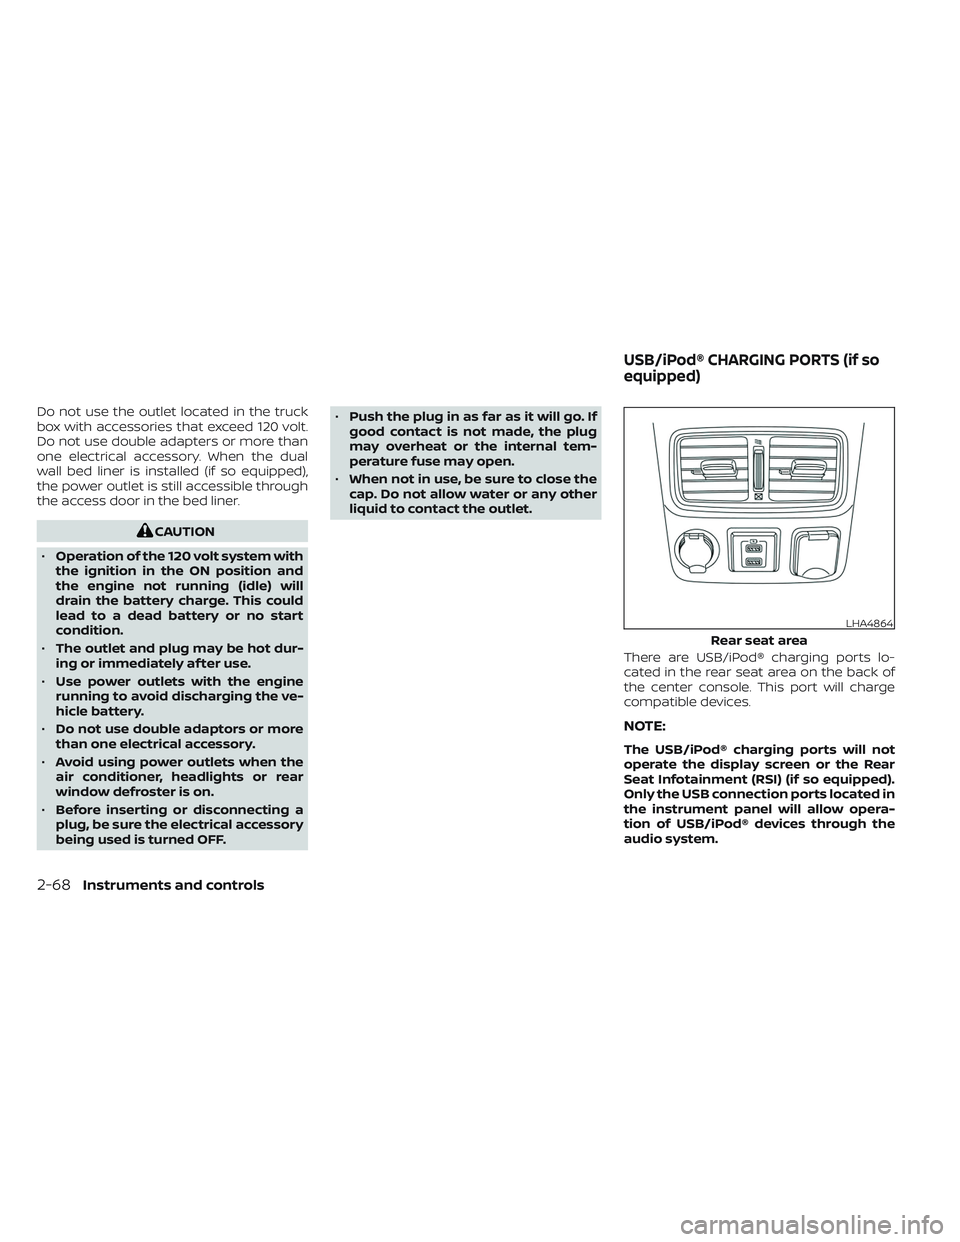
There are USB/iPod® charging ports lo-
cated in the rear seat area on the back of
the center console. This port will charge
compatible devices.
NOTE:
The USB/iPod® charging ports will not
operate the display screen or the Rear
Seat Infotainment (RSI) (if so equipped).
Only the USB connection ports located in
the instrument panel will allow opera-
tion of USB/iPod® devices through the
audio system.
LHA4864
Rear seat area
USB/iPod® CHARGING PORTS (if so
equipped)
2-68Instruments and controls
Page 243 of 635

Remote control buttons.....................4-50
Wireless headphone operation ..............4-51
General operation ........................... 4-52
Video operation ............................. 4-54
HDMI/MHL connection ......................4-55
USB/SD card operation ......................4-56
Slingplayer® ................................. 4-62
Miracast® ................................... 4-64
Using the mobile application on your
mobile device ............................... 4-65SmartStream
............................... 4-66
Settings ..................................... 4-68
Troubleshooting ............................ 4-76
Specifications ............................... 4-78
Compliance information ....................4-79
Car phone or CB radio .......................... 4-82
iPod®/iPhone® ................................. 4-83
Page 285 of 635
WARNING
• It is unlawful in most jurisdictions for
a person to drive a motor vehicle
which is equipped with a television
monitor or screen that is visible, di-
rectly or indirectly, to the driver while
operating the vehicle. In the interest
of safety, the unit should never be
installed where it will be directly or
indirectly visible, by the operator of
the motor vehicle.
• For safety reasons when changing
discs, it is recommended that the ve-
hicle is not in motion, and that you do
not allow children to unfasten safety
belts to change discs or make any
adjustments to the system. System
adjustments can be accomplished
using the remote control, while
safety belts remain fastened. •
Enjoy your RSI system but remember
that safety of all passengers remains
the number one priority. Devices in-
stalled in the USB, HDMI, or head-
phone jack may protrude and create
a potential eye impact hazard for un-
belted passengers during a vehicle
accident. To reduce the risk of injury,
use only SD cards (hidden on lef t side
of driver side monitor) or low-profile
USB storage devices.
CAUTION
• If your vehicle is equipped with a
wireless rear seat audio system or
any other wireless infrared device,
make sure it is powered off when op-
erating the RSI system. If both sys-
tems are powered on at the same
time, the two systems may obstruct
each other, possibly creating unde-
sirable audio interference through
the wireless headphones.
• Do not touch the inner pins of the
jacks on the front panel. Electrostatic
discharge may cause permanent
damage to the device. •
The LCD display screen is not touch-
screen. Do not put pressure or add
suction cups on the screen.
• Caution children to avoid touching or
scratching the screen, as it may be-
come dirty or damaged.
• Be sure to run the vehicle engine
while using the system. Using this
system without running the engine
can result in battery drain. To avoid
the risk of battery drain, please re-
member to turn off the system when
the vehicle is not in use.
WELCOME
The Rear Seat Infotainment (RSI) system,
with built-in Wi-Fi, has some advanced fea-
tures. Before operating this system, read
this section thoroughly and retain it for fu-
ture reference.
System features
• Twin 8-inch Color TFT-LCD Panels with 1024x600 Resolution
• Internal Wi-Fi Network
• Bluetooth® 4.1 Audio Streaming
• Miracast®/Smart View Capability
• SmartStream Content Sharing
• USB 2.0 Port, SDXC Card Input
REAR SEAT INFOTAINMENT (RSI) (if
so equipped)
Monitor, climate, audio, phone and voice recognition systems4-43
Page 287 of 635
then select channel “A” to listen to monitor
A, or channel “B” to listen to monitor B. Ad-
just the audio level using the volume con-
trol on each headphone.
Wired headphones
There is a 3.5mm stereo headphone out-
put on each monitor which can be used
with most standard stereo headphones
(wired headphones sold separately).
Bluetooth® streaming audio
To listen to audio throughout the entire ve-
hicle, the system includes the ability to
stream audio over a Bluetooth® connec-
tion to the vehicle’s stereo system.
When monitor A is selected as the source
to stream from, the audio output to the
wireless and wired headphones will be dis-
abled (only on monitor A). To use the wire-
less or wired headphones with monitor A,
you must turn off the Bluetooth® stream-
ing feature. To enable/disable Bluetooth®
streaming, navigate to the “SETTINGS”
menu, or press
on the remote control
during content playback. For additional in-
formation, see “Settings” (P. 4-68).
Media compatibility
For a list of compatible media formats for
this system, see “Storage device format-
ting” (P. 4-45).
• The metadata or file information of some audio and video files may not be correctly
displayed.
• It is not possible to play content that is protected by DRM (Digital Rights
Management).
• There may be a delay before playback begins when using USB flash drives or SD
cards with complex folder hierarchies or
many files.
• Some audio, video, and image files may be incompatible with this system due to
file characteristics, file format, recording
sof tware used, directory structure,
and/or the type of audio/video encoding
used.
Storage device formatting
This system is compatible with several
types of formatting for USB flash drives and
SD cards. Refer to the documentation that
comes with your storage device for more
details on how to format.
FAT32 - USB and SDHC
Good for smaller capacity storage devices,
but individual files on the drive must be less
than 4GB. This format is good for music
and images.
EX-FAT - USB and SDXC
Better choice for larger capacity storage
devices with files that are more than 4GB.
This format is better for larger files such as
full-length movies.
NTFS - USB and SDXC
Best choice for very large capacity storage
devices - with no limitations on file size. This
format can be used for all file sizes.
Monitor, climate, audio, phone and voice recognition systems4-45
Page 290 of 635
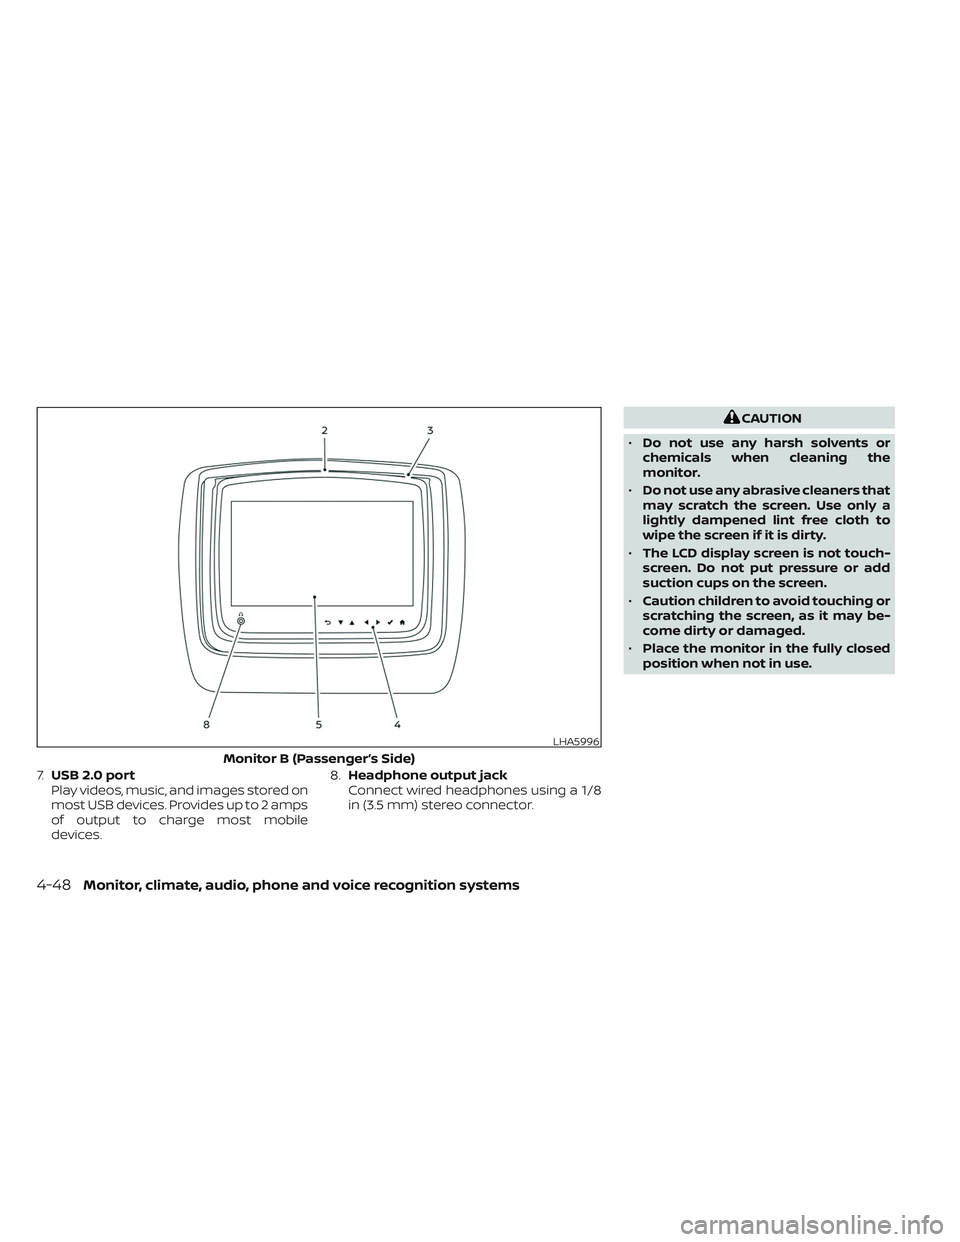
7.USB 2.0 port
Play videos, music, and images stored on
most USB devices. Provides up to 2 amps
of output to charge most mobile
devices. 8.
Headphone output jack
Connect wired headphones using a 1/8
in (3.5 mm) stereo connector.
CAUTION
• Do not use any harsh solvents or
chemicals when cleaning the
monitor.
• Do not use any abrasive cleaners that
may scratch the screen. Use only a
lightly dampened lint free cloth to
wipe the screen if it is dirty.
• The LCD display screen is not touch-
screen. Do not put pressure or add
suction cups on the screen.
• Caution children to avoid touching or
scratching the screen, as it may be-
come dirty or damaged.
• Place the monitor in the fully closed
position when not in use.
LHA5996
Monitor B (Passenger’s Side)
4-48Monitor, climate, audio, phone and voice recognition systems