2022 NISSAN TITAN lock
[x] Cancel search: lockPage 67 of 635
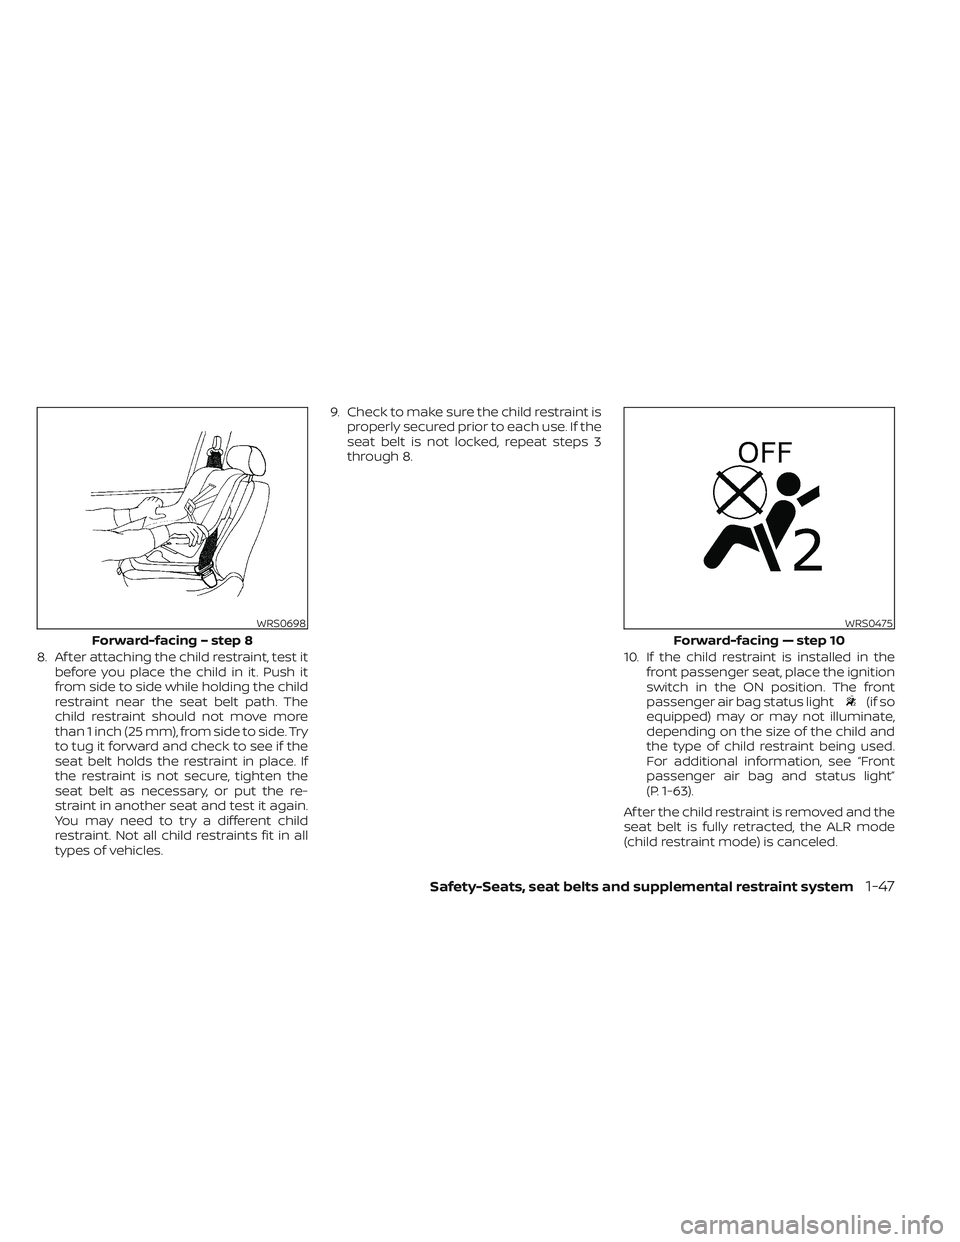
8. Af ter attaching the child restraint, test itbefore you place the child in it. Push it
from side to side while holding the child
restraint near the seat belt path. The
child restraint should not move more
than 1 inch (25 mm), from side to side. Try
to tug it forward and check to see if the
seat belt holds the restraint in place. If
the restraint is not secure, tighten the
seat belt as necessary, or put the re-
straint in another seat and test it again.
You may need to try a different child
restraint. Not all child restraints fit in all
types of vehicles. 9. Check to make sure the child restraint is
properly secured prior to each use. If the
seat belt is not locked, repeat steps 3
through 8.
10. If the child restraint is installed in thefront passenger seat, place the ignition
switch in the ON position. The front
passenger air bag status light
(if so
equipped) may or may not illuminate,
depending on the size of the child and
the type of child restraint being used.
For additional information, see “Front
passenger air bag and status light”
(P. 1-63).
Af ter the child restraint is removed and the
seat belt is fully retracted, the ALR mode
(child restraint mode) is canceled.
WRS0698
Forward-facing – step 8
WRS0475
Forward-facing — step 10
Safety-Seats, seat belts and supplemental restraint system1-47
Page 70 of 635
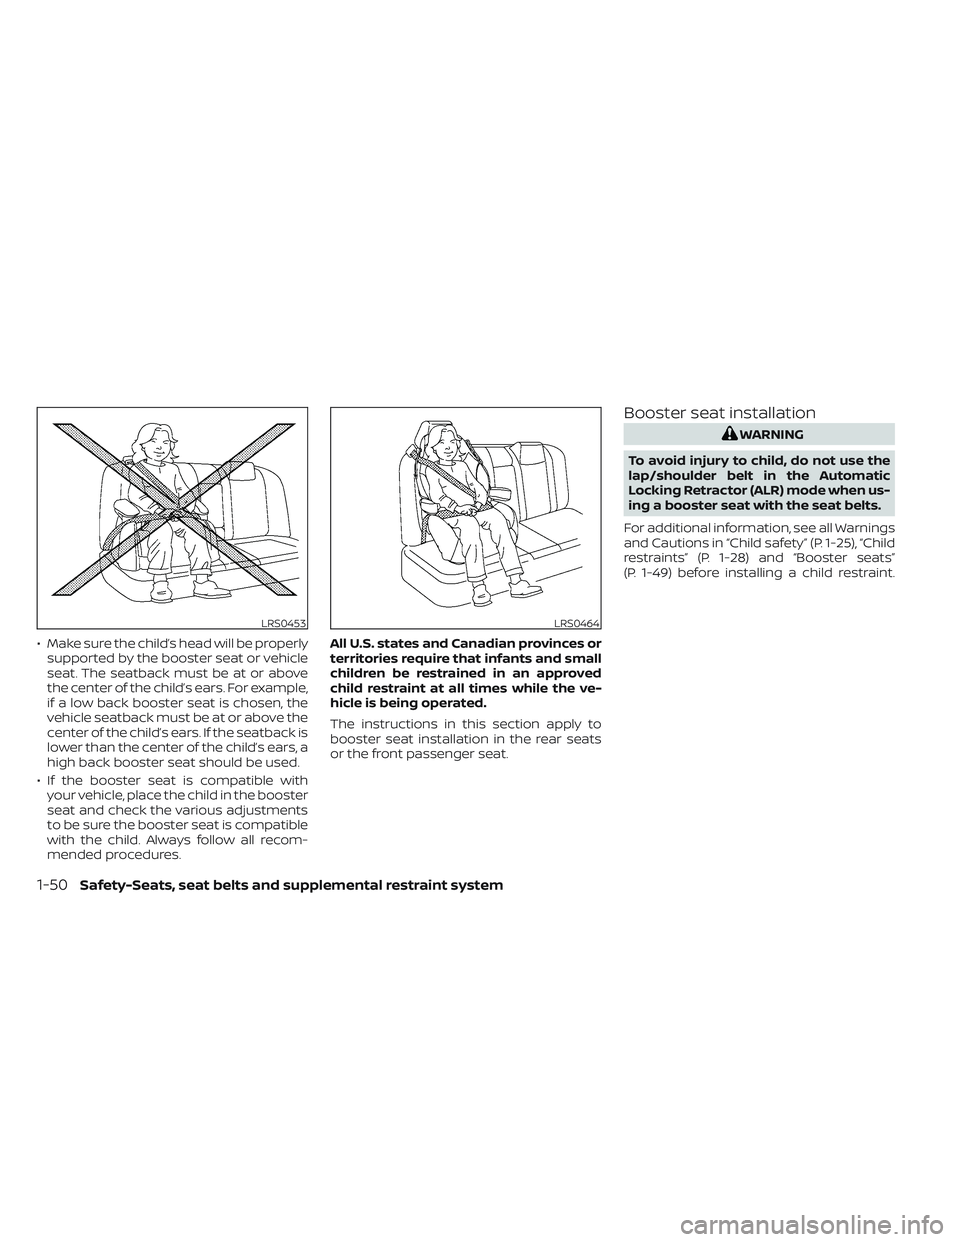
• Make sure the child’s head will be properlysupported by the booster seat or vehicle
seat. The seatback must be at or above
the center of the child’s ears. For example,
if a low back booster seat is chosen, the
vehicle seatback must be at or above the
center of the child’s ears. If the seatback is
lower than the center of the child’s ears, a
high back booster seat should be used.
• If the booster seat is compatible with your vehicle, place the child in the booster
seat and check the various adjustments
to be sure the booster seat is compatible
with the child. Always follow all recom-
mended procedures. All U.S. states and Canadian provinces or
territories require that infants and small
children be restrained in an approved
child restraint at all times while the ve-
hicle is being operated.
The instructions in this section apply to
booster seat installation in the rear seats
or the front passenger seat.
Booster seat installation
WARNING
To avoid injury to child, do not use the
lap/shoulder belt in the Automatic
Locking Retractor (ALR) mode when us-
ing a booster seat with the seat belts.
For additional information, see all Warnings
and Cautions in “Child safety” (P. 1-25), “Child
restraints” (P. 1-28) and “Booster seats”
(P. 1-49) before installing a child restraint.
LRS0453LRS0464
1-50Safety-Seats, seat belts and supplemental restraint system
Page 86 of 635

NOTE:
This vehicle’s occupant classification
sensor system locks the classification
during driving so it is important that you
confirm that the front passenger is prop-
erly classified prior to driving. Also, the
occupant classification sensor system
may recalculate the weight of the occu-
pant when the vehicle comes to a stop
(i.e. stop light, stop sign, etc.), so front
passenger seat occupants should con-
tinue to remain seated as outlined
above.
Troubleshooting
If you think the front passenger air bag
status light is incorrect:
1. If the light is ON with no front passengerand no objects on the front passenger
seat:
This may be due to the following condi-
tions that may be interfering with the
weight sensors:
• An object weighing over 9.1 lbs. (4 kg) hanging on the seat or placed in the seat-
back pocket.
• A child restraint or other object pressing against the rear of the seatback. • A rear passenger pushing or pulling on
the back of the front passenger seat.
• Forcing the front seat or seatback against an object on the seat or floor be-
hind it.
• An object placed under the front passen- ger seat.
• An object placed between the seat cush- ion and center console or between the
seat cushion and the door.
If the vehicle is moving, please come to a
stop when it is safe to do so. Check and
correct any of the above conditions. Re-
start the vehicle and wait 1 minute.
NOTE:
A system check will be performed during
which the front passenger air bag status
light will remain lit for about 7 seconds
initially.
If the light is still ON af ter this, the vehicle
should be checked as soon as possible. It is
recommended that you visit a NISSAN
dealer for this service.
2. If the light is ON with an adult occupying the front passenger seat:
• Occupant is a small adult — the air bag light is functioning as intended. The
front passenger air bag is suppressed. However, if the occupant is not a small
adult, then this may be due to the following
conditions that may be interfering with the
weight sensors:
• Occupant is not sitting upright, leaning
against the seatback, and centered on
the seat cushion with his/her feet com-
fortably extended to the floor.
• A child restraint or other object pressing against the rear of the seatback.
• A rear passenger pushing or pulling on the back of the front passenger seat.
• Forcing the front seat or seatback against an object on the seat or floor be-
hind it.
• An object placed under the front passen- ger seat.
• An object placed between the seat cush- ion and center console or between the
seat cushion and the door.
If the vehicle is moving, please come to a
stop when it is safe to do so. Check and
correct any of the above conditions. Re-
start the vehicle and wait 1 minute.
1-66Safety-Seats, seat belts and supplemental restraint system
Page 104 of 635

If any of the following conditions occur, the
front air bag, side air bag, curtain air bag,
knee air bag and pretensioner systems
need servicing:
• The supplemental air bag warning lightremains on af ter approximately 7
seconds.
• The supplemental air bag warning light flashes intermittently.
• The supplemental air bag warning light does not come on at all.
Under these conditions, the front air bag,
side air bag, curtain air bag or pretensioner
systems may not operate properly. They
must be checked and repaired. It is recom-
mended that you visit a NISSAN dealer for
this service.
WARNING
If the supplemental air bag warning
light is on, it could mean that the front
air bag, side air bag, curtain air bag,
knee air bag and/or pretensioner sys-
tems will not operate in an accident. To
help avoid injury to yourself or others,
have your vehicle checked as soon as
possible. It is recommended that you
visit a NISSAN dealer for this service.
REPAIR AND REPLACEMENT
PROCEDURE
The front air bags, side air bags, curtain air
bags, knee air bags and pretensioner(s) are
designed to inflate on a one-time-only ba-
sis. As a reminder, unless it is damaged, the
supplemental air bag warning light re-
mains illuminated af ter inflation has oc-
curred. These systems should be repaired
and/or replaced as soon as possible. It is
recommended that you visit a NISSAN
dealer for this service.
When maintenance work is required on the
vehicle, the front air bags, side air bags,
curtain air bags, knee air bags, pretension-
er(s) and related parts should be pointed
out to the person performing the mainte-
nance. The ignition switch should always
be placed in the LOCK position when work-
ing under the hood or inside the vehicle.
WARNING
• Once a front air bag, side air bag, cur-
tain air bag or knee air bag has in-
flated, the air bag module will not
function again and must be replaced.
Additionally, the activated preten-
sioner(s) must also be replaced. The
air bag module and pretensioner(s)
should be replaced. It is recom-
mended that you visit a NISSAN
dealer for this service. However, the
air bag module and pretensioner(s)
cannot be repaired.
• The front air bag, side air bag, curtain
air bag and knee air bag systems and
the pretensioner system should be
inspected if there is any damage to
the front end or side portion of the
vehicle. It is recommended that you
visit a NISSAN dealer for this service.
• If you need to dispose of the supple-
mental air bag or pretensioner sys-
tems or scrap the vehicle, it is recom-
mended that you visit a NISSAN
dealer. Incorrect disposal procedures
could cause personal injury.
1-84Safety-Seats, seat belts and supplemental restraint system
Page 108 of 635
Hill descent control switch (if so equipped).....2-59
Electronic locking rear differential (E-Lock)
system switch (if so equipped) .................2-60
Power inverter switch (if so equipped) ..........2-61
Parking Aids system switch ....................2-62
Tow mode switch .............................. 2-63
Emergency call (SOS) button (if so equipped) . . . 2-63
Trailer Brake Controller Unit (TBCU)
(if so equipped) ................................. 2-63
Rear Door Alert ................................. 2-64
Power outlets .................................. 2-65
12v Outlets .................................. 2-65
120v outlets (if so equipped) .................2-66
USB/iPod® charging ports (if so equipped) ......2-68
Extended storage switch .......................2-69
Storage ........................................ 2-70
Front-door pockets ......................... 2-70
Rear-door pockets .......................... 2-70
Console side pockets (if so equipped) .......2-70
Seatback pockets ........................... 2-71
Under-seat storage (if so equipped) .........2-71
Console box storage trays
(if so equipped) .............................. 2-73
Cell phone storage tray (if so equipped) .....2-73
Glovebox ................................... 2-73Console box (if so equipped)
................2-74
Center armrest storage (if so equipped) .....2-75
Under front seat storage bin
(if so equipped) .............................. 2-76
Overhead sunglasses storage
(if so equipped) .............................. 2-76
Cup holders ................................. 2-77
Grocery hooks (if so equipped) ..............2-80
Bed liner storage bins (if so equipped) .......2-80
Cargo hooks (if so equipped) ................2-81
C-Channel cargo hooks (if so equipped) .....2-81
Windows ....................................... 2-82
Power windows ............................. 2-82
Rear power window switch
(if so equipped) .............................. 2-84
Rear sliding window (if so equipped) .........2-85
Moonroof (if so equipped) ......................2-86
P
ower moonroof ............................ 2-86
Interior lights ................................... 2-88
Console light (if so equipped) ................2-89
Map lights (if so equipped) ...................2-89
Personal Lights (if so equipped) .............2-90
HomeLink® Universal Transceiver
(if so equipped) ................................. 2-90
Programming HomeLink® ...................2-91
Page 111 of 635
18. USB ports*
19. Hazard warning flasher switch (P. 6-2)
20. Parking Aids system switch (P. 2-62)Vehicle Dynamic Control (VDC) OFF
switch (P. 2-58)
21. Trailer Brake Controller Unit (TBCU)
(if so equipped) (P. 2-63)
22. 4WD shif t switch (if so equipped)
(P. 5-111)
23. Push-button ignition switch (P. 5-13)
24. Driver supplemental knee air bag
(P. 1-80)
25. Tilt and telescopic steering wheel
control (P. 3-26)
26. Parking brake (P. 5-23)
27. Hood release (P. 3-23)
28. Headlight aiming control (if so
equipped) (P. 2-45)
Power inverter switch (if so equipped)
(P. 2-61)
Cargo lamp switch (P. 2-53)
Electronic locking rear differential
(E-Lock) system switch (if so equipped)
(P. 2-60)
Hill descent control system switch
(if so equipped) (P. 2-59) 29. Headlight switch (P. 2-45)
Fog light switch (if so equipped) (P. 2-52)
Instrument brightness control
switches (P. 2-51)
Trip reset switch (P. 2-7)
*Refer to the separate NissanConnect®
Owner’s Manual
Refer to the page number indicated in
parenthesis for operating details.
Instruments and controls2-5
Page 118 of 635
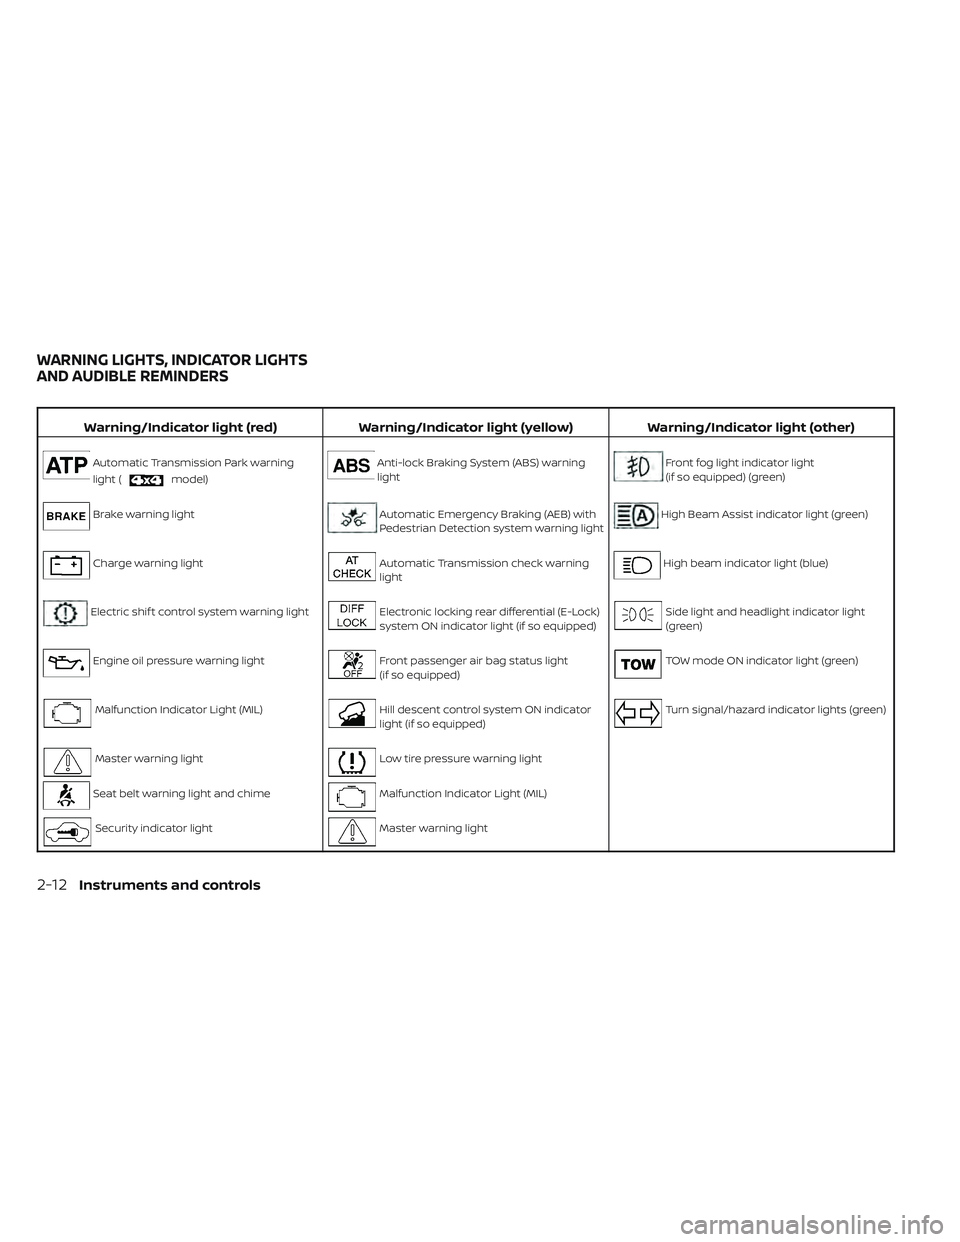
Warning/Indicator light (red)Warning/Indicator light (yellow) Warning/Indicator light (other)
Automatic Transmission Park warning
light (
model)
Anti-lock Braking System (ABS) warning
lightFront fog light indicator light
(if so equipped) (green)
Brake warning lightAutomatic Emergency Braking (AEB) with
Pedestrian Detection system warning lightHigh Beam Assist indicator light (green)
Charge warning lightAutomatic Transmission check warning
lightHigh beam indicator light (blue)
Electric shif t control system warning lightElectronic locking rear differential (E-Lock)
system ON indicator light (if so equipped)Side light and headlight indicator light
(green)
Engine oil pressure warning lightFront passenger air bag status light
(if so equipped)TOW mode ON indicator light (green)
Malfunction Indicator Light (MIL)Hill descent control system ON indicator
light (if so equipped)Turn signal/hazard indicator lights (green)
Master warning lightLow tire pressure warning light
Seat belt warning light and chimeMalfunction Indicator Light (MIL)
Security indicator lightMaster warning light
WARNING LIGHTS, INDICATOR LIGHTS
AND AUDIBLE REMINDERS
2-12Instruments and controls
Page 120 of 635

•If the ATP light is on, this indicates
that the automatic transmission P
(Park) position will not function and
the transfer case is in neutral.
• When parking, always make sure that
the 4WD shif t indicator light illumi-
nates and the parking brake is set.
Failure to engage the transfer posi-
tion in 2WD, 4H or 4LO could result in
the vehicle moving unexpectedly, re-
sulting in serious personal injury or
property damage.
• Shif t the 4WD switch into the 2WD, 4H
or 4LO position again to turn off the
ATP warning light when the shif t le-
ver is in the P position and the ATP
warning light is on. (Before shif ting
the 4WD switch into the 4LO position,
move the shif t lever to the N position
once, shif t the shif t lever into P again
and make sure the ATP warning light
is off.)
This light indicates that the automatic
transmission parking function is not en-
gaged. If the transfer control is not secured
in any drive position while the shif t lever is
in the P (Park) position, the transmission will
disengage and the drive wheels will not
lock.Brake warning light
This light functions for both the parking
brake and the foot brake systems.
Parking brake indicator
When the ignition switch is placed in the ON
position, the light comes on when the park-
ing brake is applied.
Low brake fluid warning light
When the ignition switch is placed in the ON
position, the light warns of a low brake fluid
level. If the light comes on while the engine
is running, with the parking brake not ap-
plied, stop the vehicle and perform the
following:
1. Check the brake fluid level. Add brake fluid as necessary. For additional infor-
mation, see “Brake fluid” (P. 8-14).
2. If the brake fluid level is correct, have the warning system checked. It is recom-
mended that you visit a NISSAN dealer
for this service.
WARNING
• Your brake system may not be work-
ing properly if the warning light is on.
Driving could be dangerous. If you
judge it to be safe, drive carefully to
the nearest service station for re-
pairs. Otherwise, have your vehicle
towed because driving it could be
dangerous.
• Pressing the brake pedal with the en-
gine stopped and/or a low brake
fluid level may increase your stop-
ping distance and braking will re-
quire greater pedal effort and pedal
travel.
• If the brake fluid level is below the
MINIMUM or MIN mark on the brake
fluid reservoir, do not drive until the
brake system has been checked. It is
recommended that you visit a
NISSAN dealer for this service.
2-14Instruments and controls