2022 NISSAN TITAN spare tire location
[x] Cancel search: spare tire locationPage 13 of 635

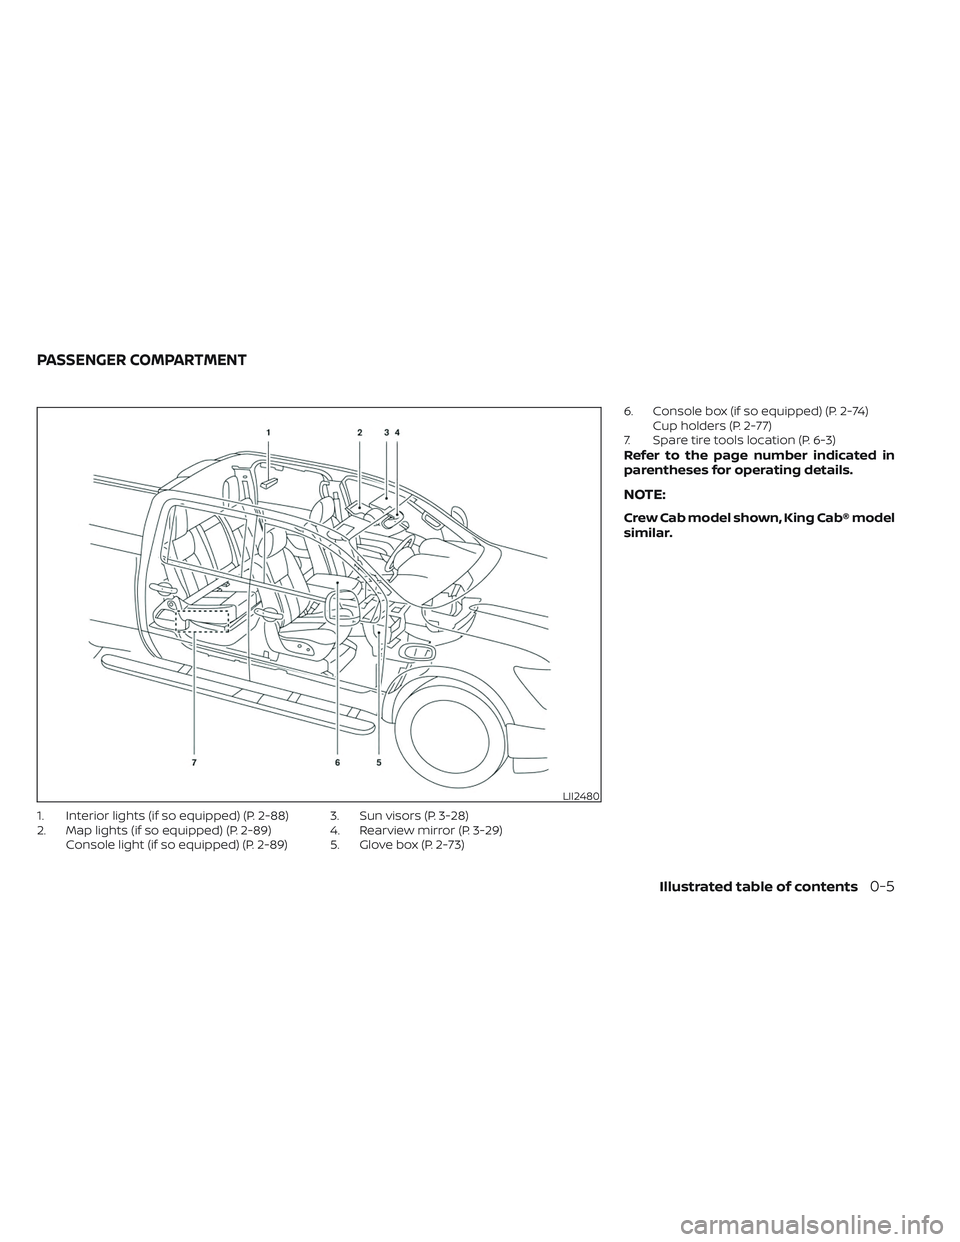
1. Interior lights (if so equipped) (P. 2-88)
2. Map lights (if so equipped) (P. 2-89)Console light (if so equipped) (P. 2-89) 3. Sun visors (P. 3-28)
4. Rearview mirror (P. 3-29)
5. Glove box (P. 2-73) 6. Console box (if so equipped) (P. 2-74)
Cup holders (P. 2-77)
7. Spare tire tools location (P. 6-3)
Refer to the page number indicated in
parentheses for operating details.
NOTE:
Crew Cab model shown, King Cab® model
similar.
LII2480
PASSENGER COMPARTMENT
Illustrated table of contents0-5
Page 332 of 635

prevent the TPMS from functioning prop-
erly. Always check the TPMS malfunction
telltale af ter replacing one or more tires or
wheels on your vehicle to ensure that the
replacement or alternate tires and wheels
allow the TPMS to continue to function
properly.
Additional information:
• When using a wheel without the TPMSsuch as the spare tire, the TPMS does not
monitor the tire pressure of the spare tire.
• The TPMS will activate only when the ve- hicle is driven at speeds above 16 mph (25
km/h). Also, this system may not detect a
sudden drop in tire pressure (for example,
a flat tire while driving).
• The low tire pressure warning light does not automatically turn off when the tire
pressure is adjusted. Af ter your tires are
inflated to the recommended pressure,
the vehicle must be driven at speeds
above 16 mph (25 km/h) to activate the
TPMS and turn off the low tire pressure
warning light. Use a tire pressure gauge
to check the tire pressure. • The “Tire Pressure Low – Add Air” warning
appears in the vehicle information dis-
play when the low tire pressure warning
light is illuminated and low tire pressure is
detected. The “Tire Pressure Low – Add
Air” warning turns off when the low tire
pressure warning light turns off.
• The “Tire Pressure Low – Add Air” warning does not appear if the low tire pressure
warning light illuminates to indicate a
TPMS malfunction.
• Tire pressure rises and falls depending on the heat caused by the vehicle’s opera-
tion and the outside temperature. Do not
reduce the tire pressure af ter driving be-
cause the tire pressure rises af ter driving.
Low outside temperature can lower the
temperature of the air inside the tire
which can cause a lower tire inflation
pressure. This may cause the low tire
pressure warning light to illuminate. If the
warning light illuminates, check the tire
pressure for all four tires.
• The Tire and Loading Information label is located in the driver's door opening.
For additional information, see “Low tire
pressure warning light” (P. 2-18) and “Tire
Pressure Monitoring System (TPMS)” (P. 6-3).WARNING
• Radio waves could adversely affect
electric medical equipment. Those
who use a pacemaker should contact
the electric medical equipment
manufacturer for the possible influ-
ences before use.
• If the low tire pressure warning light
illuminates while driving, avoid sud-
den steering maneuvers or abrupt
braking, reduce vehicle speed, pull
off the road to a safe location and
stop the vehicle as soon as possible.
Driving with under-inflated tires may
permanently damage the tires and
increase the likelihood of tire failure.
Serious vehicle damage could occur
and may lead to an accident and
could result in serious personal in-
jury. Check the tire pressure for all
four tires. Adjust the tire pressure to
the recommended COLD tire pres-
sure shown on the Tire and Loading
Information label to turn the low tire
pressure warning light off. If you have
a flat tire, replace it with a spare tire
as soon as possible. (For additional
information, see “Flat tire” (P. 6-3) for
changing a flat tire.)
5-6Starting and driving
Page 459 of 635

TIRE PRESSURE MONITORING
SYSTEM (TPMS)
This vehicle is equipped with TPMS. It moni-
tors tire pressure of all tires except the
spare. When the low tire pressure warning
light is lit, and the Tire Pressure Low — Add
Air warning appears in the vehicle informa-
tion display, one or more of your tires is
significantly under-inflated. If equipped, the
system also displays pressure of all tires
(except the spare tire) on the display screen
by sending a signal from a sensor that is
installed in each wheel. If the vehicle is be-
ing driven with low tire pressure, the TPMS
will activate and warn you of it by the low
tire pressure warning light. This system will
activate only when the vehicle is driven at
speeds above 16 mph (25 km/h). For addi-
tional information, see “Warning lights, indi-
cator lights and audible reminders” (P. 2-12)
and “Tire Pressure Monitoring System
(TPMS)” (P. 5-5).
WARNING
• Radio waves could adversely affect
electric medical equipment. Those
who use a pacemaker should contact
the electric medical equipment
manufacturer for the possible influ-
ences before use. •
If the low tire pressure warning light
illuminates while driving, avoid sud-
den steering maneuvers or abrupt
braking, reduce vehicle speed, pull
off the road to a safe location and
stop the vehicle as soon as possible.
Driving with under-inflated tires may
permanently damage the tires and
increase the likelihood of tire failure.
Serious vehicle damage could occur
and may lead to an accident and
could result in serious personal in-
jury. Check the tire pressure for all
four tires. Adjust the tire pressure to
the recommended COLD tire pres-
sure shown on the Tire and Loading
Information label to turn the low tire
pressure warning light OFF. If the
light still illuminates while driving af-
ter adjusting the tire pressure, a tire
may be flat or the TPMS may be mal-
functioning. If you have a flat tire, re-
place it with a spare tire as soon as
possible, If no tire is flat and all tires
are properly inflated, have the ve-
hicle checked. It is recom-
mended that you visit a NISSAN
dealer for this service •
When using a wheel without the
TPMS such as the spare tire, the TPMS
will not function and the low tire
pressure warning light will flash for
approximately one minute. The light
will remain on af ter one minute. Have
your tires replaced and/or TPMS sys-
tem reset as soon as possible. It is
recommended that you visit a
NISSAN dealer for these services.
• Replacing tires with those not origi-
nally specified by NISSAN could af-
fect the proper operation of the
TPMS.
• Do not inject any tire liquid or aerosol
tire sealant into the tires, as this may
cause a malfunction of the tire pres-
sure sensors.
CHANGING A FLAT TIRE
If you have a flat tire, follow the instructions
below:
Stopping the vehicle
1. Safely move the vehicle off the road and away from traffic.
2. Turn on the hazard warning flashers.
FLAT TIRE
In case of emergency6-3
Page 461 of 635

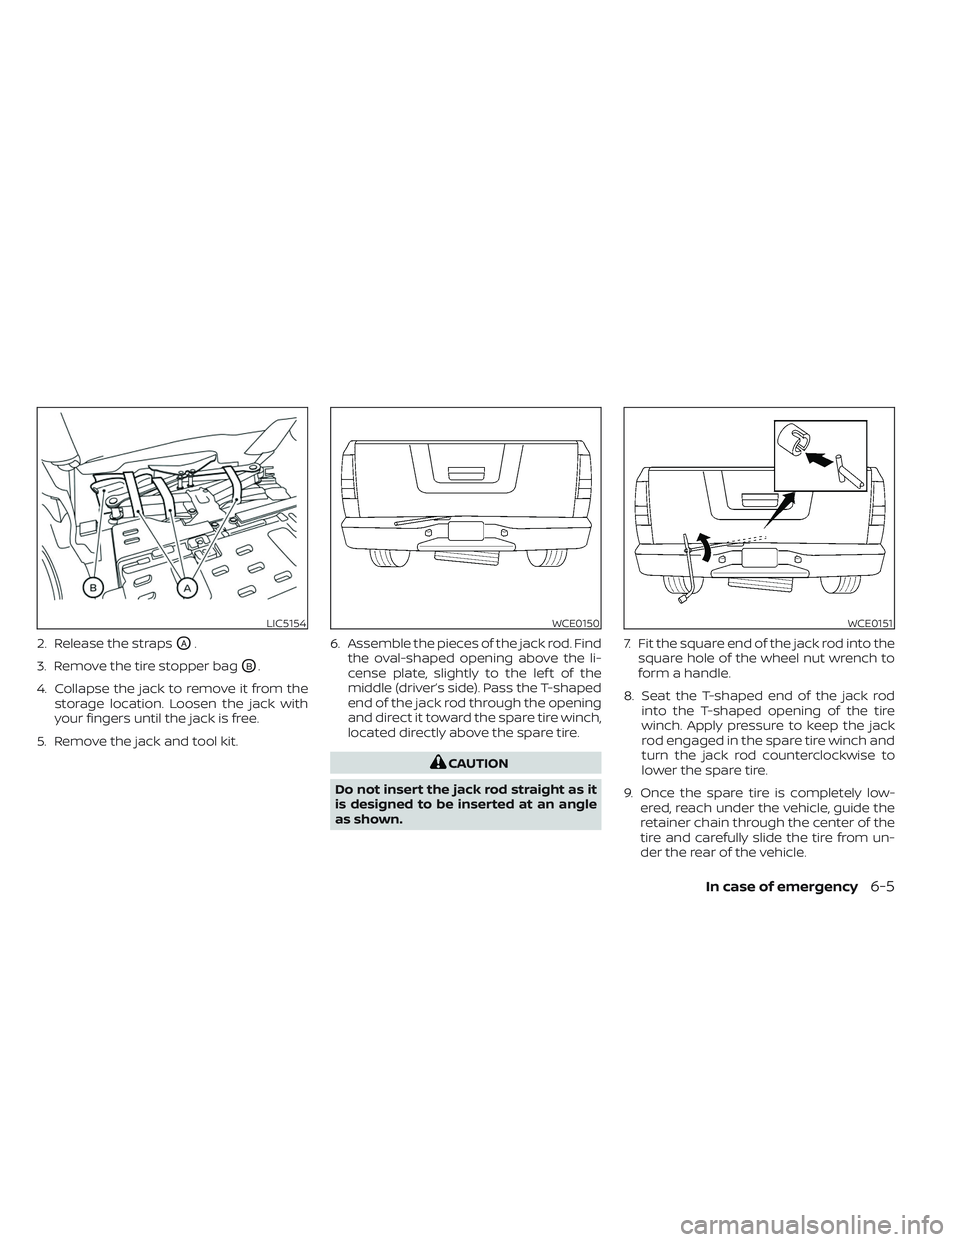
2. Release the strapsOA.
3. Remove the tire stopper bag
OB.
4. Collapse the jack to remove it from the storage location. Loosen the jack with
your fingers until the jack is free.
5. Remove the jack and tool kit. 6. Assemble the pieces of the jack rod. Find
the oval-shaped opening above the li-
cense plate, slightly to the lef t of the
middle (driver’s side). Pass the T-shaped
end of the jack rod through the opening
and direct it toward the spare tire winch,
located directly above the spare tire.
CAUTION
Do not insert the jack rod straight as it
is designed to be inserted at an angle
as shown. 7. Fit the square end of the jack rod into the
square hole of the wheel nut wrench to
form a handle.
8. Seat the T-shaped end of the jack rod into the T-shaped opening of the tire
winch. Apply pressure to keep the jack
rod engaged in the spare tire winch and
turn the jack rod counterclockwise to
lower the spare tire.
9. Once the spare tire is completely low- ered, reach under the vehicle, guide the
retainer chain through the center of the
tire and carefully slide the tire from un-
der the rear of the vehicle.
LIC5154WCE0150WCE0151
In case of emergency6-5
Page 523 of 635

CHANGING WHEELS AND TIRES
Tire rotation
NISSAN recommends rotating tires
every 7,500 miles (12,000 km).
For additional information on tire
replacing procedures, see “Flat tire”
(P. 6-3).
As soon as possible, tighten the
wheel nuts to the specified torque
with a torque wrench.Wheel nut tightening torque:
Non-XD models:
98 f t-lb (133 N·m)
XD models: 131 f t-lb (177 N·m)
The wheel nuts must be kept tight-
ened to specifications at all times.
It is recommended that wheel nuts
be tightened to specification at
each tire rotation interval.
WARNING
• Retighten the wheel nuts when
the vehicle has been driven for
600 miles (1,000 km) (also in
cases of a flat tire, etc.).
• Do not include the spare tire in
the tire rotation. •
For additional information re-
garding tires, refer to “Impor-
tant Tire Safety Information”
(US) or “Tire Safety Informa-
tion” (Canada) in the Warranty
Information Booklet.
• Af ter rotating the tires, do not
use the Easy-Fill Tire Alert to
adjust the tire pressure. In-
stead use a gauge to adjust the
tires to the correct pressure in
accordance with Tire and Load-
ing Information label.
CAUTION
To ensure proper operation of the
Easy-Fill Tire Alert system af ter a
tire rotation, re-set and register
the sensor to their new installed
locations. It is recommended that
you visit a NISSAN dealer for this
service.
WDI0258
Do-it-yourself8-43
Page 524 of 635

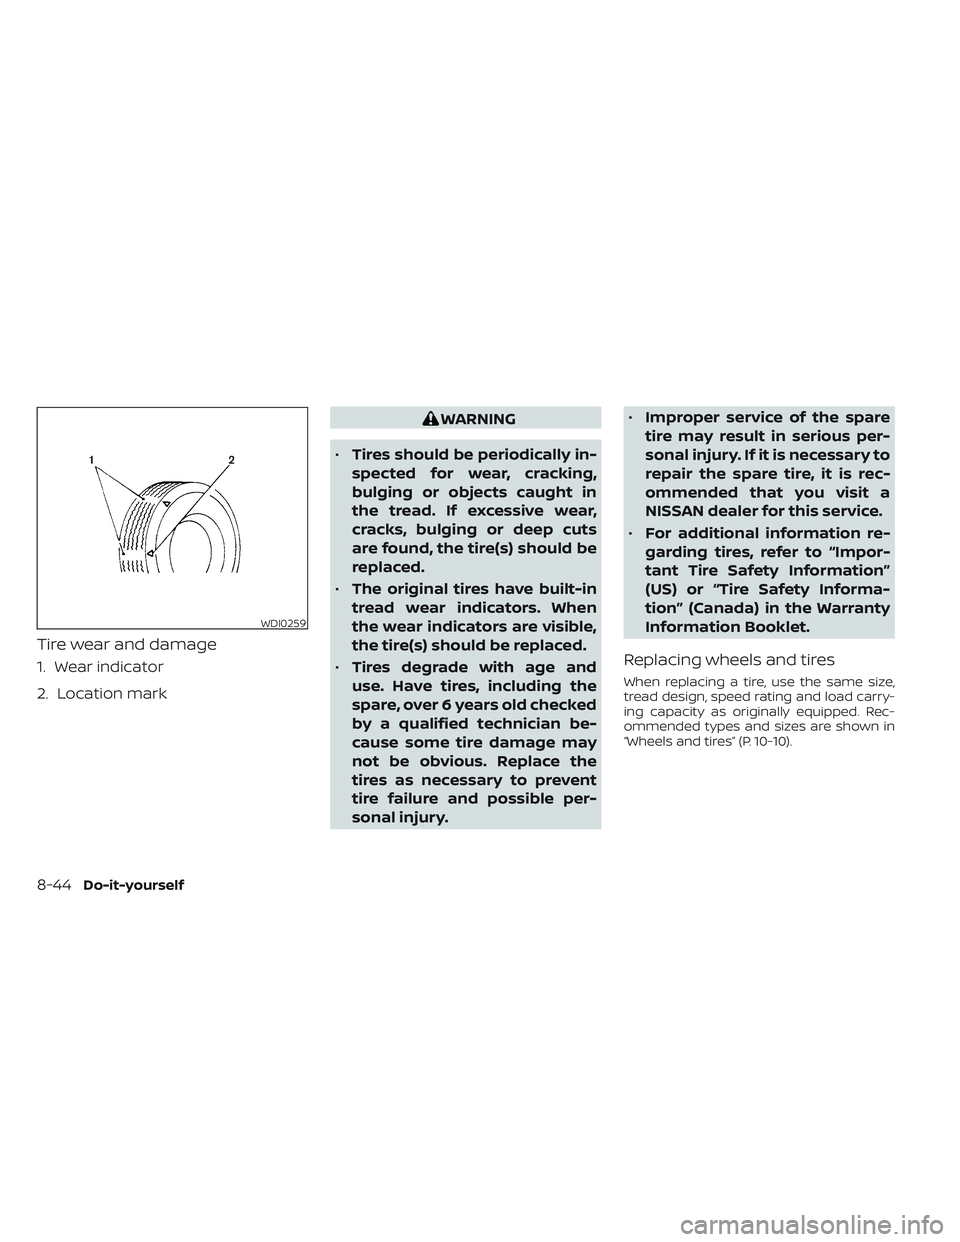
Tire wear and damage
1. Wear indicator
2. Location mark
WARNING
• Tires should be periodically in-
spected for wear, cracking,
bulging or objects caught in
the tread. If excessive wear,
cracks, bulging or deep cuts
are found, the tire(s) should be
replaced.
• The original tires have built-in
tread wear indicators. When
the wear indicators are visible,
the tire(s) should be replaced.
• Tires degrade with age and
use. Have tires, including the
spare, over 6 years old checked
by a qualified technician be-
cause some tire damage may
not be obvious. Replace the
tires as necessary to prevent
tire failure and possible per-
sonal injury. •
Improper service of the spare
tire may result in serious per-
sonal injury. If it is necessary to
repair the spare tire, it is rec-
ommended that you visit a
NISSAN dealer for this service.
• For additional information re-
garding tires, refer to “Impor-
tant Tire Safety Information”
(US) or “Tire Safety Informa-
tion” (Canada) in the Warranty
Information Booklet.
Replacing wheels and tires
When replacing a tire, use the same size,
tread design, speed rating and load carry-
ing capacity as originally equipped. Rec-
ommended types and sizes are shown in
“Wheels and tires” (P. 10-10).
WDI0259
8-44Do-it-yourself