2022 NISSAN TITAN window
[x] Cancel search: windowPage 192 of 635
•Do not place objects through the
opened rear window. Do not use the
rear window as a cargo area pass-
through. This may result in damage
to the rear window system, or per-
sonal injury.
Squeeze the handles of the lever
O1, then
slide the window open
O2.
POWER MOONROOF
The front moonroof is a power moonroof,
the rear moonroof is fixed glass. The power
moonroof will only operate when the igni-
tion switch is placed in the ON position. The
moonroof is operational for a period of
time, even if the ignition switch is placed in
the OFF position. If the driver's door or the
front passenger's door is opened during
this period of time, the power to the moon-
roof is canceled.
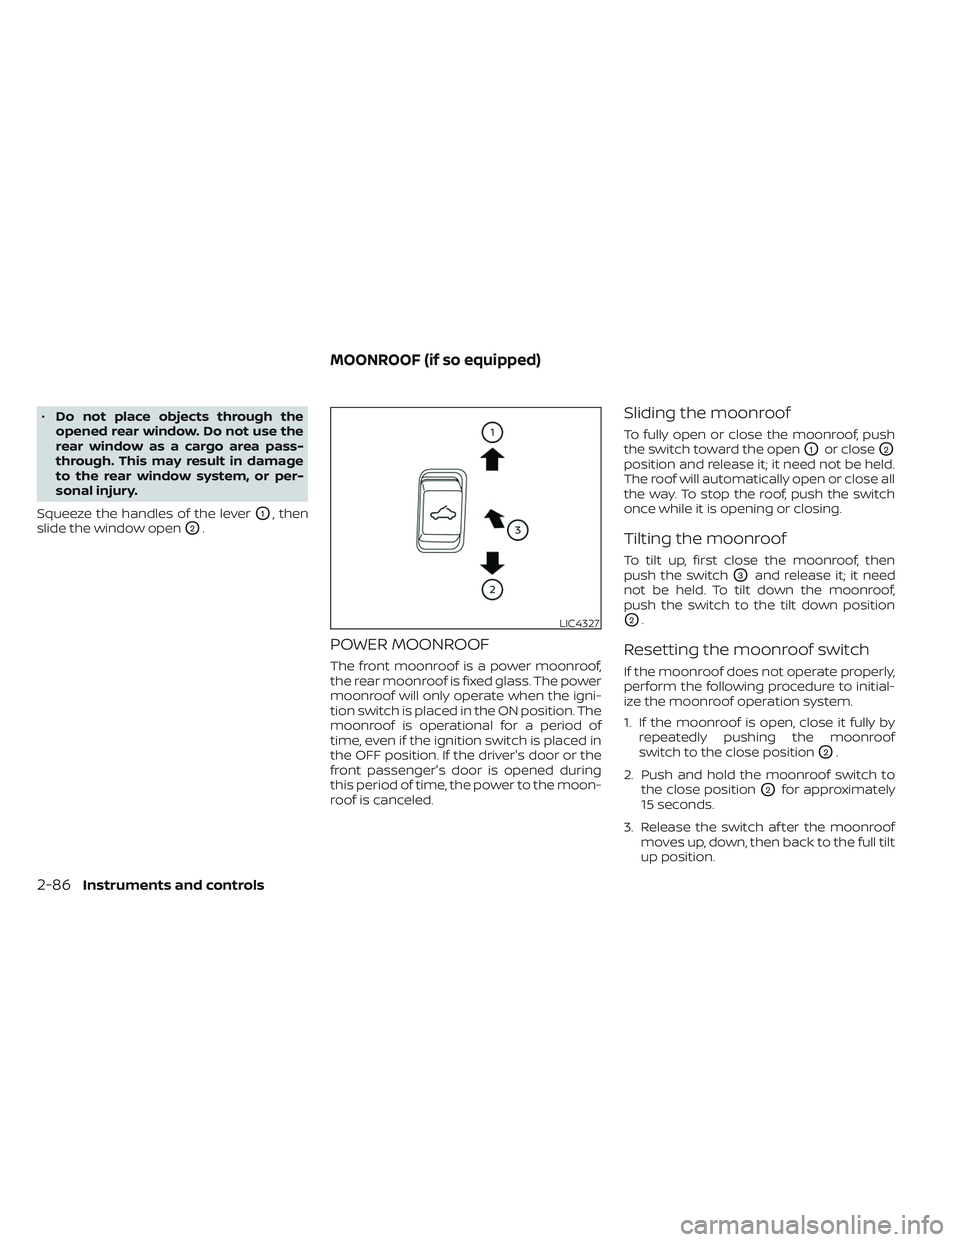
Sliding the moonroof
To fully open or close the moonroof, push
the switch toward the open
O1or closeO2
position and release it; it need not be held.
The roof will automatically open or close all
the way. To stop the roof, push the switch
once while it is opening or closing.
Tilting the moonroof
To tilt up, first close the moonroof, then
push the switch
O3and release it; it need
not be held. To tilt down the moonroof,
push the switch to the tilt down position
O2.
Resetting the moonroof switch
If the moonroof does not operate properly,
perform the following procedure to initial-
ize the moonroof operation system.
1. If the moonroof is open, close it fully by repeatedly pushing the moonroof
switch to the close position
O2.
2. Push and hold the moonroof switch to the close position
O2for approximately
15 seconds.
3. Release the switch af ter the moonroof moves up, down, then back to the full tilt
up position.
LIC4327
MOONROOF (if so equipped)
2-86Instruments and controls
Page 205 of 635
•To help avoid risk of injury or death
through unintended operation of the
vehicle and/or its systems, including
entrapment in windows or inadver-
tent door lock activation, do not
leave children, people who require
the assistance of others or pets unat-
tended in your vehicle. Additionally,
the temperature inside a closed ve-
hicle on a warm day can quickly be-
come high enough to cause a signifi-
cant risk of injury or death to people
and pets.
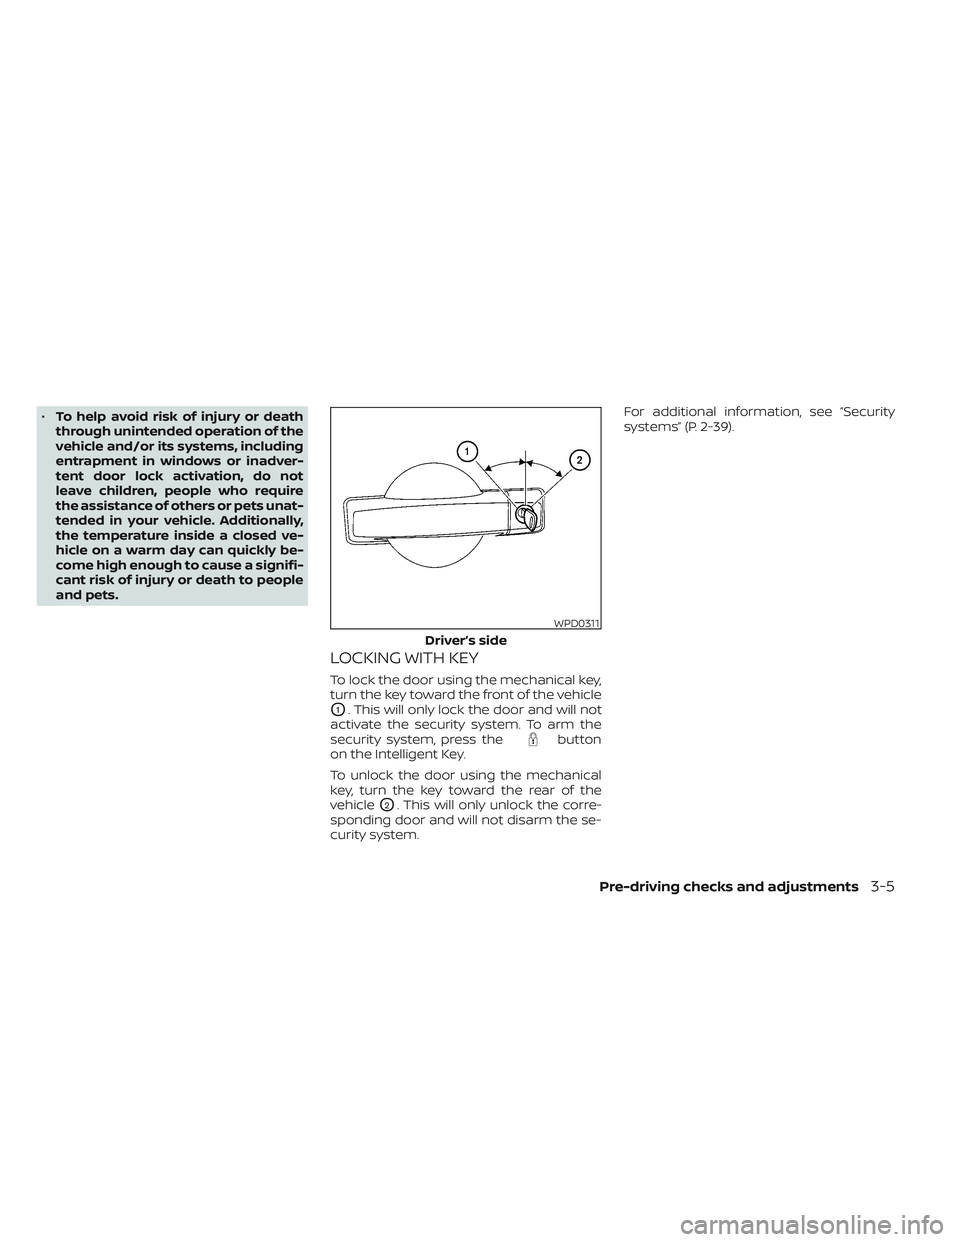
LOCKING WITH KEY
To lock the door using the mechanical key,
turn the key toward the front of the vehicle
O1. This will only lock the door and will not
activate the security system. To arm the
security system, press the
button
on the Intelligent Key.
To unlock the door using the mechanical
key, turn the key toward the rear of the
vehicle
O2. This will only unlock the corre-
sponding door and will not disarm the se-
curity system. For additional information, see “Security
systems” (P. 2-39).
WPD0311
Driver’s side
Pre-driving checks and adjustments3-5
Page 216 of 635
4. The hazard warning lights flash twiceand the horn beeps once.
5. All doors and the tailgate (if so equipped) will be locked.
WARNING
Af ter locking the doors using the Intel-
ligent Key, be sure that the doors have
been securely locked by operating the
door handles. Failure to follow these in-
structions may result in inadvertently
unlocking the doors, which may de-
crease the safety and security of your
vehicle.
Unlocking doors
1. Press thebutton on the Intelligent
Key to unlock the driver’s door.
2. The hazard warning lights flash once.
3. Press the
button again within 1
minute to unlock all doors and tailgate (if
so equipped).
All doors and tailgate (if so equipped) will be
locked automatically unless one of the fol-
lowing operations is performed within 1
minute af ter pressing the
button:
• Opening any doors.
• Pushing the ignition switch.
Using the interior lights
The interior lights illuminate for a period of
time when a door is unlocked and the
room light switch is in the DOOR position.
The lights can be turned off without waiting
by performing one of the following
operations:
• Placing the ignition switch in the ON position.
• Locking the doors with the Intelligent Key.
• Switching the room light switch to the “OFF” position.
For additional information, see “Interior
lights” (P. 2-88).
Opening windows
The Intelligent Key allows you to simultane-
ously open windows equipped with auto-
matic operation.
To open the windows, press the
but-
ton on the Intelligent Key for longer than 3
seconds af ter all doors are unlocked
The door windows will open while pressing
the
button on the Intelligent Key.
The door windows cannot be closed by
using the Intelligent Key.
Using the panic alarm
If you are near your vehicle and feel threat-
ened, you may activate the panic alarm to
call attention by pressing and holding the
button on the Intelligent Key for lon-
ger than 0.5 seconds.
The panic alarm and headlights will stay on
for a period of time.
The panic alarm stops when:
• It has run for a period of time.
• Any button is pressed on the Intelligent Key.
• The request switch (if so equipped) on the driver or passenger door is pushed and
the Intelligent Key is in range of the door
handle.
Trailer light check (if so equipped)
This functionality allows the customer to
confirm trailer light operation, without the
need of a second person to press the brake
pedal or activate each turn signal light. The
trailer light check can be performed by the
Intelligent Key or through the Vehicle Set-
tings in the vehicle information display. For
additional information, see “Vehicle infor-
mation display” (P. 2-23).
3-16Pre-driving checks and adjustments
Page 220 of 635
Thebutton will be on the NISSAN
Intelligent Key® if the vehicle has Remote
Engine Start. This feature allows the engine
to start from outside the vehicle.
Vehicles with an automatic climate control
system (if so equipped) may default to ei-
ther a heating or cooling mode depending
on outside and cabin temperatures. For
additional information, see “Remote Engine
Start with Intelligent Climate Control”
(P. 4-39).
Vehicles with a manual climate control sys-
tem (if so equipped) will default to the last
used heating or cooling mode. Laws in some local communities may re-
strict or prohibit the use of Remote Engine
Start, or the amount of time a parked ve-
hicle engine may idle. For example, some
laws require a person using Remote Engine
Start to have the vehicle in view or may
restrict idling time except in freezing tem-
peratures. Check local regulations for any
requirements.
Other conditions may affect the function of
the Remote Engine Start feature. For addi-
tional information, see “Conditions the Re-
mote Engine Start will not work” (P. 3-22).
Other conditions can affect the perfor-
mance of the Intelligent Key transmitter.
For additional information, see “NISSAN In-
telligent Key® system” (P. 3-9).
REMOTE ENGINE START
OPERATING RANGE
WARNING
• To help avoid risk of injury or death
through unintended operation of the
vehicle and/or its systems, including
entrapment in windows or inadver-
tent door lock activation, do not
leave children, people who require
the assistance of others or pets unat-
tended in your vehicle. Additionally,
the temperature inside a closed ve-
hicle on a warm day can quickly be-
come high enough to cause a signifi-
cant risk of injury or death to people
and pets.
• Do not use Remote Engine Start in
closed spaces such as a garage. Do
not breathe exhaust gases; they con-
tain colorless and odorless carbon
monoxide. Carbon monoxide is dan-
gerous. It can cause unconscious-
ness or death.
LPD2995
REMOTE ENGINE START (if so
equipped)
3-20Pre-driving checks and adjustments
Page 234 of 635

Heated mirrors (if so equipped)
Some outside mirrors can be heated to
defrost, defog, or de-ice for improved vis-
ibility. For additional information, see “Rear
window and/or outside mirror defroster
switch” (P. 2-44).
TAILGATE
Opening the tailgate
Pull the tailgate handle upward and lower
the tailgate. The support cables hold the
tailgate open.
When closing the tailgate, make sure the
latches are securely locked.
Do not drive the vehicle with the tailgate
down, unless equipped with NISSAN's
Bed Extender (accessory) or equivalent
in the extended position.For additional information on proper truck
box loading, see “Vehicle loading informa-
tion” (P. 10-20).
WARNING
• Never allow anyone to ride in the
cargo area or on the rear seat (if so
equipped) when it is in the folded po-
sition. Use of these areas by passen-
gers without proper restraints could
result in serious injury or death in an
accident or sudden stop.
• It is extremely dangerous to ride in a
cargo area inside a vehicle. In a colli-
sion, people riding in these areas are
more likely to be seriously injured or
killed.
• Do not allow people to ride in any
area of your vehicle that is not
equipped with seats and seat belts.
• Be sure everyone in your vehicle is in
a seat and using a seat belt properly.
LPD3103
TRUCK BOX
3-34Pre-driving checks and adjustments
Page 245 of 635
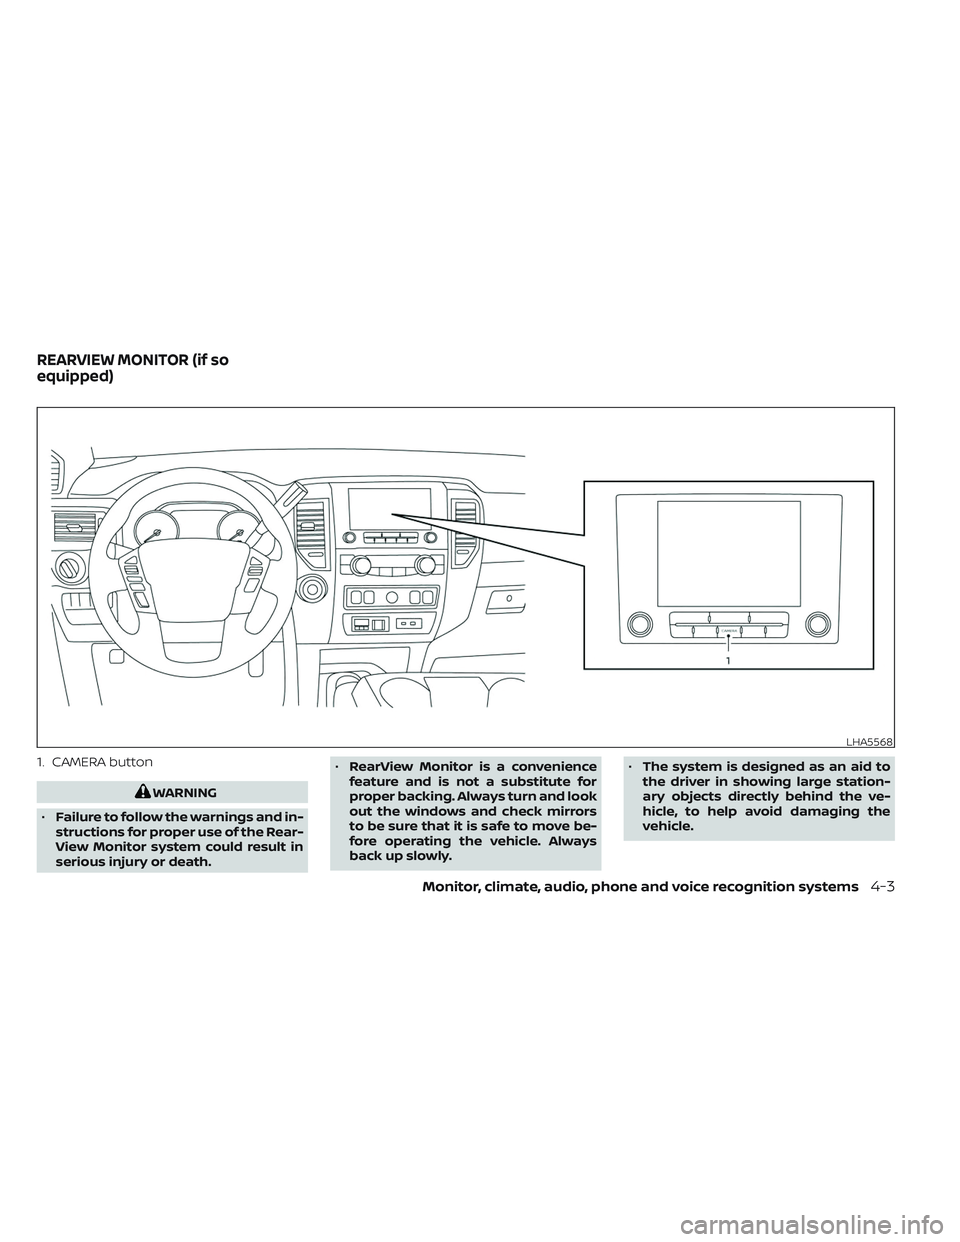
1. CAMERA button
WARNING
• Failure to follow the warnings and in-
structions for proper use of the Rear-
View Monitor system could result in
serious injury or death. •
RearView Monitor is a convenience
feature and is not a substitute for
proper backing. Always turn and look
out the windows and check mirrors
to be sure that it is safe to move be-
fore operating the vehicle. Always
back up slowly. •
The system is designed as an aid to
the driver in showing large station-
ary objects directly behind the ve-
hicle, to help avoid damaging the
vehicle.
LHA5568
REARVIEW MONITOR (if so
equipped)
Monitor, climate, audio, phone and voice recognition systems4-3
Page 272 of 635
Temperature control dial
The temperature control dial allows you to
adjust the temperature of the outlet air. To
lower the temperature, turn the dial to the
lef t. To increase the temperature, turn the
dial to the right.
Air recirculation button
ON position (Indicator light on)
Interior air is recirculated inside the vehicle.
Press the
button to the ON position
when:
• driving on a dusty road.
• to prevent traffic fumes from entering passenger compartment.
• for maximum cooling when using the air conditioner.
OFF position (Indicator light off )
If outside air is desired in off mode, press
the recirculation button until the indicator
turns off.
If fogging occurs, press the
front
windshield defrost button.
A/C (air conditioner) button
Start the engine, turn thefan speed
control dial to the desired position and
press the
button to turn on the air
conditioner. To turn off the air conditioner,
press the
button again.
The air conditioner cooling function op-
erates only when the engine is running.
Outside mirror defroster switch (if
so equipped)
For additional information, see “Rear win-
dow and/or outside mirror defroster
switch” (P. 2-44).
HEATER OPERATION
Heating
This mode is used to direct heated air to
the foot outlets. Some air also flows from
the defrost outlets.
1. Press the
button to the OFF posi-
tion for normal heating. The indicator
light on the
button will go off.
2. Press the
air flow control button.
3. Turn the
fan speed control dial to
the desired position. 4. Turn the temperature control dial to the
desired position between the middle
and the hot position.
Ventilation
This mode directs outside air to the side
and center vents.
1. Press the
button to the off position.
The indicator light on thebutton
willgooff.
2. Press the
air flow control button.
3. Turn the
fan speed control dial to
the desired position.
4. Turn the temperature control dial to the desired position.
Defrosting or defogging
This mode directs the air to the defrost
outlets to defrost/defog the windows.
1. Press the
defrost/defog button.
2. Turn the
fan speed control dial to
the desired position.
3. Turn the temperature control dial to the desired position between the middle
and the hot position.
4-30Monitor, climate, audio, phone and voice recognition systems
Page 274 of 635
AIR CONDITIONER OPERATION
Start the engine, turn thefan speed
control dial to the desired position, and
press the
button to activate the air
conditioner. When the air conditioner is on,
cooling and dehumidif ying functions are
added to the heater operation.
The air conditioner cooling function op-
erates only when the engine is running.
Cooling
This mode is used to cool and dehumidif y
the air.
1. Press the
button to the off position.
2. Press the
air flow control button.
3. Turn the
fan speed control dial to
the desired position.
4. Press the
button.
5. Turn the temperature control dial to the desired position between the middle
and the cold position. • For quick cooling when the outside tem-
perature is high, press the
button to
the on position. Be sure to return the
to the off position for normal cooling. The
indicator light on thebutton will go
off. You may also select MAX A/C for quick
cooling.
Dehumidified heating
This mode is used to heat and dehumidif y
the air.
1. Press the
button to the off position.
The indicator light on thebutton
willgooff.
2. Press the
air flow control button.
3. Turn the
fan speed control dial to
the desired position.
4. Press the
button on.
5. Turn the temperature control dial to the desired position.
Dehumidified defogging
This mode is used to defog the windows
and dehumidif y the air.
1. Press the
front defroster button.
2. Turn the
fan speed control dial to
the desired position. When the
orpositions are se-
lected, the air conditioner automatically
turns on if the outside temperature is ap-
proximately at or below freezing. The air
conditioning system will continue to oper-
ate until the
fan speed control dial is
turned to OFF, the air conditioner is turned
OFF, or the vehicle is shut off. If a position
other than the
front defrost air flow
button is selected, the A/C compressor will
not turn off even if the user had selected
A/C off prior to entering defrost. In
front defrost orfoot defrost the indi-
cator light on the A/C button will not turn
on if the user had selected A/C off. Turning
off the air conditioning via the A/C button is
not allowed in this mode. If the A/C button
indicator was on when entering this mode,
and the A/C button is selected in this
mode, the A/C button indicator will turn off,
but the A/C compressor will still be auto-
matically enabled. This dehumidifies the air
which helps defog the windshield. The
mode automatically turns off, allowing out-
side air to be drawn into the passenger
compartment to further improve the de-
fogging performance.
3. Turn the temperature control dial to the desired position.
4-32Monitor, climate, audio, phone and voice recognition systems