Page 29 of 635
Folding the rear bench seat up
To fold the rear bench seat up for storage
capacity behind the front seats or to re-
move the jacking tools from the storage
area:
1. Lif t the front of the seat cushion up.2. Fold the bottom of the seat cushion to-
ward the back of the vehicle until it locks
in place. 3. Repeat this process to raise and secure
the seat cushion on the other side of the
vehicle for maximum storage capacity.
To return the rear bench seat to a seating
position, pull the latch on the bottom of the
seat cushions to release the seat from the
locked position. Make sure to properly
push the seat cushion down into place.
LRS2766LRS2767LRS2768
Safety-Seats, seat belts and supplemental restraint system1-9
Page 462 of 635

10. Securely store the flat tire beneath thevehicle, from where the full size spare
was removed. To reinstall the wheel, re-
move the center cap (if so equipped)
and insert the retainer chain through
the wheel. Be sure the rubber rim cover
(if so equipped) is centered on the
wheel before lif ting. Use the assembled
jacking rod to slowly rotate the winch
clockwise to raise the wheel to the
vehicle.
11. To reinstall the jack and tool kit, reverse steps 1 through 5.
NOTE:
Inspect the rubber rim cover every six
years and replace as necessary. It is rec-
ommended that you visit a NISSAN
dealer for this service.
CAUTION
• Be sure to center the spare tire sus-
pending plate on the wheel and then
lif t the spare tire.
• Failure to use the rubber rim cover
may allow the chain to get stuck in
the wheel nut holes when stowed.
Removing bolt-on wheel caps (if
so equipped)
CAUTION
Do not use your hands to pry off wheel
caps or wheel covers. Doing so could
result in personal injury.
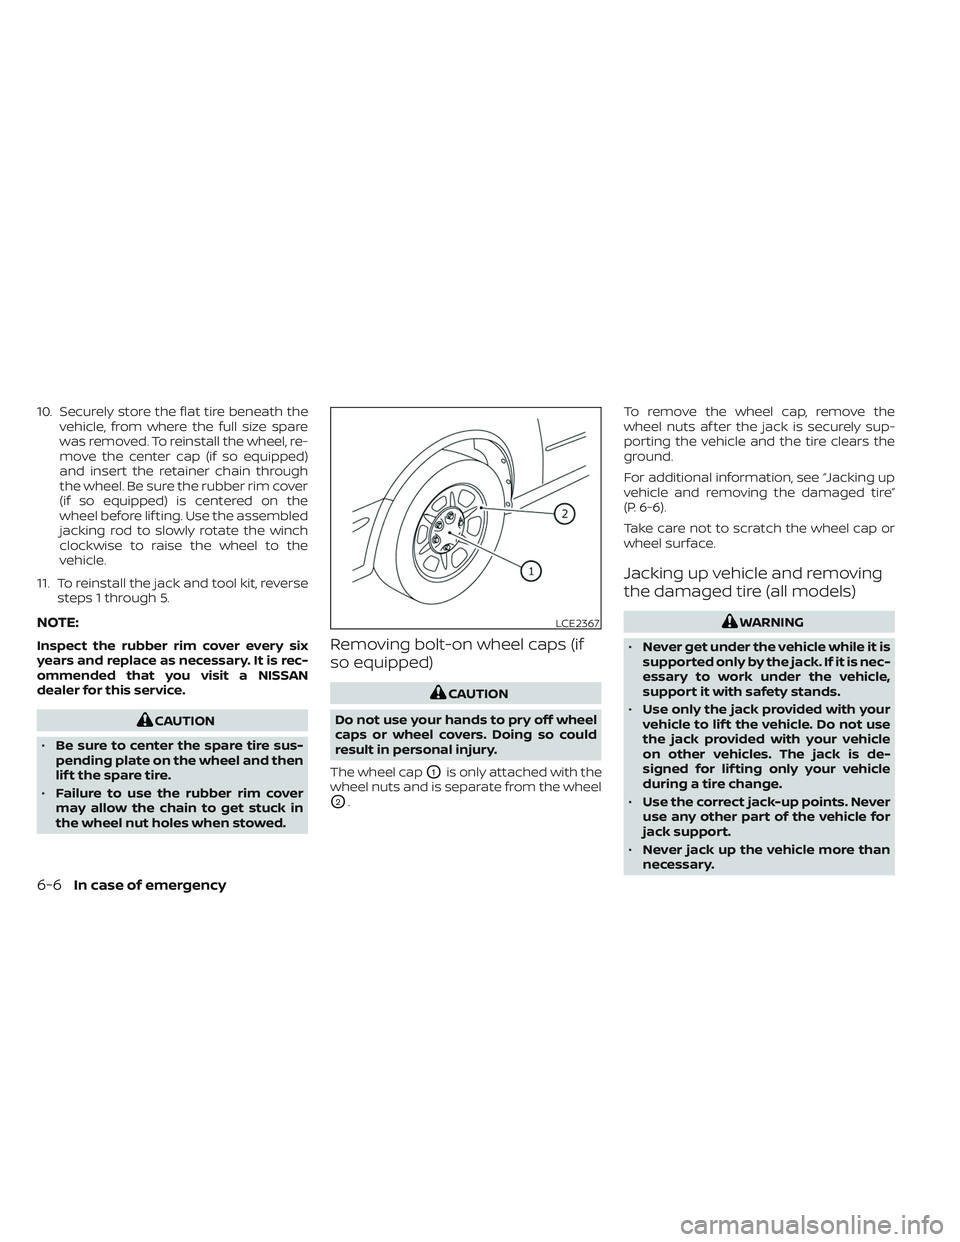
The wheel cap
O1is only attached with the
wheel nuts and is separate from the wheel
O2. To remove the wheel cap, remove the
wheel nuts af ter the jack is securely sup-
porting the vehicle and the tire clears the
ground.
For additional information, see “Jacking up
vehicle and removing the damaged tire”
(P. 6-6).
Take care not to scratch the wheel cap or
wheel surface.
Jacking up vehicle and removing
the damaged tire (all models)
WARNING
• Never get under the vehicle while it is
supported only by the jack. If it is nec-
essary to work under the vehicle,
support it with safety stands.
• Use only the jack provided with your
vehicle to lif t the vehicle. Do not use
the jack provided with your vehicle
on other vehicles. The jack is de-
signed for lif ting only your vehicle
during a tire change.
• Use the correct jack-up points. Never
use any other part of the vehicle for
jack support.
• Never jack up the vehicle more than
necessary.LCE2367
6-6In case of emergency
Page 465 of 635

4. Lower the vehicle slowly until the tiretouches the ground. Then, with the
wheel nut wrench, tighten the wheel
nuts securely in the sequence illustrated
(
O1,O2,O3,O4,O5,O6). Lower the vehicle
completely.
WARNING
• Incorrect wheel nuts or improperly
tightened wheel nuts can cause the
wheel to become loose or come off.
This could cause an accident.
• Do not use oil or grease on the wheel
studs or nuts. This could cause the
nuts to become loose.
• Retighten the wheel nuts when the
vehicle has been driven for 600 miles
(1,000 km) (also in cases of a flat tire,
etc.).
As soon as possible, tighten the wheel
nuts to the specified torque with a
torque wrench.
Wheel nut tightening torque:
Non-XD models: 98 f t-lb (133 N·m)
XD models: 131 f t-lb (177 N·m) The wheel nuts must be kept tightened
to specification at all times. It is recom-
mended that wheel nuts be tightened to
specifications at each lubrication
interval.
Adjust tire pressure to the COLD
pressure.
COLD pressure: Af ter vehicle has been
parked for 3 hours or more or driven less
than 1 mi. (1.6 km).
COLD tire pressures are shown on the
Tire and Loading Information label af-
fixed to the driver side center pillar.
Af ter adjusting tire pressure to the COLD
tire pressure, the display (if so equipped)
of the tire pressure information may
show higher pressure than the COLD tire
pressure af ter the vehicle has been
driven more than 1 mi. (1.6 km). This is
because the tire pressure increases as
the tire temperature rises. This does not
indicate a system malfunction.
5. Securely store the tools and jacking
equipment in the vehicle. For additional
information, see the “Getting the spare
tire and tools (Crew and King Cab® mod-
els)” (P. 6-4).
WARNING
• Always make sure that the spare tire
and jacking equipment are properly
secured af ter use. Such items can be-
come dangerous projectiles in an ac-
cident or sudden stop.
• The spare tire is designed for emer-
gency use. For additional informa-
tion, see “Wheels and tires” (P. 8-33).
In case of emergency6-9