2022 NISSAN TITAN lock
[x] Cancel search: lockPage 499 of 635

NOTE:
Do not try to open the top of the battery.
The Type B battery is not equipped with
removable vent caps.
JUMP STARTING
If jump starting is necessary, see “Jump
starting” (P. 6-10). If the engine does not
start by jump starting, the battery may
have to be replaced. It is recommended
that you visit a NISSAN dealer for this
service.
CAUTION
• Do not ground accessories directly to
the battery terminal. Doing so will
bypass the variable voltage control
system and the vehicle battery may
not charge completely.
• Use electrical accessories with the
engine running to avoid discharging
the vehicle battery.
NOTE:
If the battery is completely drained the
transmission will not manually shif t to
other positions.
Your vehicle is equipped with a variable
voltage control system. This system mea-
sures the amount of electrical discharge
from the battery and controls voltage gen-
erated by the generator.
The current sensor is located near the bat-
tery along the negative battery cable. If you
add electrical accessories to your vehicle,
be sure to ground them to a suitable body
ground such as the frame or engine block
area.
LDI3302
Battery (Type B) (if so equipped)
LDI2132
VARIABLE VOLTAGE CONTROL
SYSTEM (if so equipped)
Do-it-yourself8-19
Page 500 of 635

1. Power steering fluid pump pulley
2. Automatic belt tensioner pulley
3. Water pump pulley
4. Cooling fan pulley
5. Air conditioner compressor pulley
6. Crankshaf t pulley
7. Generator pulley
WARNING
Be sure the ignition switch is in the OFF
or LOCK position before servicing drive
belt. The engine could rotate
unexpectedly. 1. Visually inspect the belt for signs of un-
usual wear, cuts, fraying or looseness. If
the belt is in poor condition or is loose,
have it replaced or adjusted. It is recom-
mended that you visit a NISSAN dealer
for this service.
2. Have the belt checked regularly for con- dition and tension in accordance with
the maintenance schedule. For addi-
tional information, see the "Mainte-
nance and schedules" section of this
manual.
REPLACING SPARK PLUGS
Iridium-tipped spark plugs
It is not necessary to replace iridium-
tipped spark plugs as frequently as con-
ventional type spark plugs because they
last much longer. Follow the maintenance
log shown in the “Maintenance and sched-
ules” section of this manual. Do not service
iridium-tipped spark plugs by cleaning or
regapping.
•Always replace spark plugs with rec-
ommended or equivalent ones.
WDI0661
5.6L 8 cylinder (VK56VD engine model)
LDI2972
DRIVE BELT SPARK PLUGS
8-20Do-it-yourself
Page 505 of 635
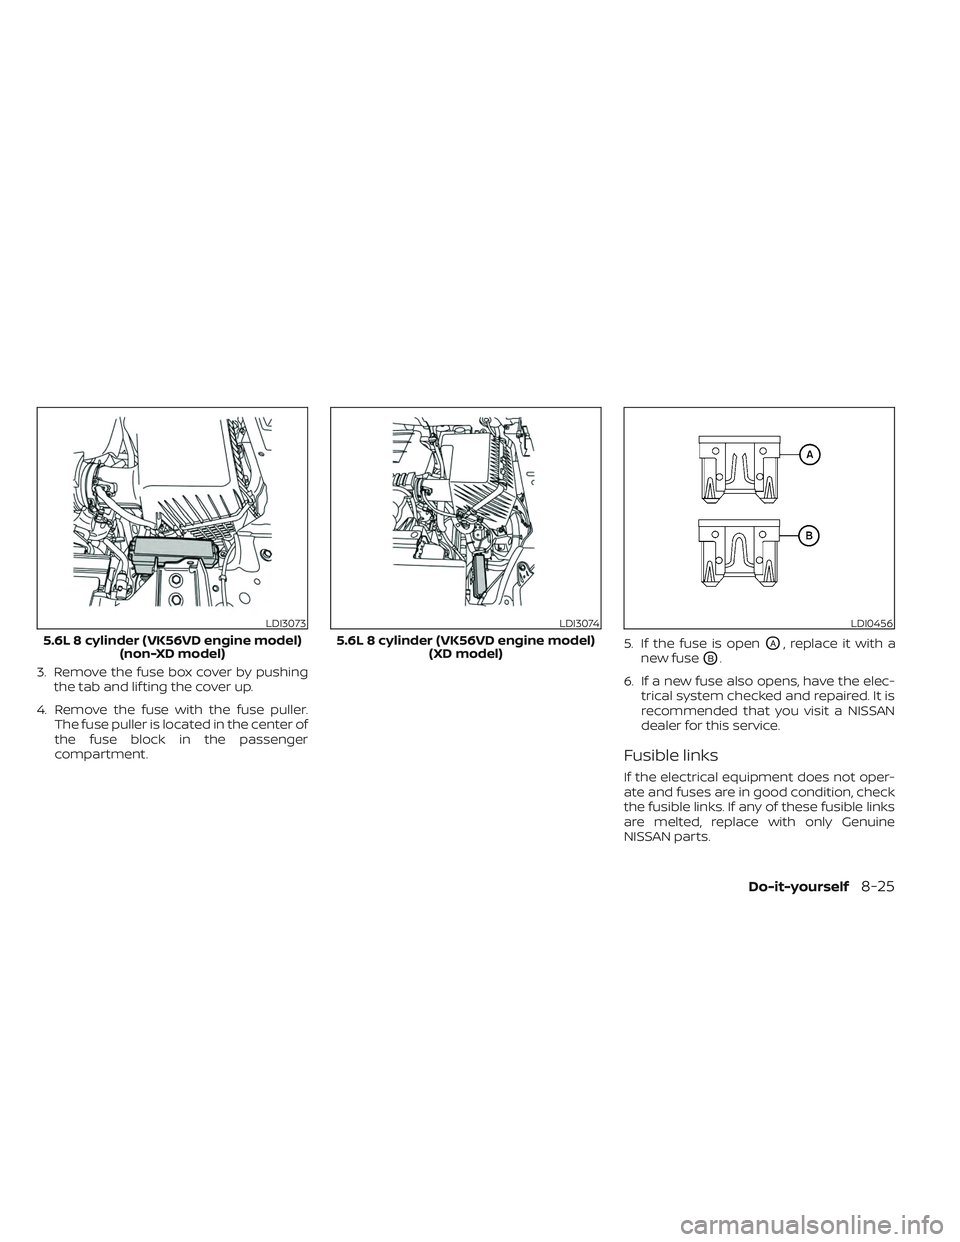
3. Remove the fuse box cover by pushingthe tab and lif ting the cover up.
4. Remove the fuse with the fuse puller. The fuse puller is located in the center of
the fuse block in the passenger
compartment. 5. If the fuse is open
OA, replace it with a
new fuse
OB.
6. If a new fuse also opens, have the elec- trical system checked and repaired. It is
recommended that you visit a NISSAN
dealer for this service.
Fusible links
If the electrical equipment does not oper-
ate and fuses are in good condition, check
the fusible links. If any of these fusible links
are melted, replace with only Genuine
NISSAN parts.
LDI3073
5.6L 8 cylinder (VK56VD engine model) (non-XD model)
LDI3074
5.6L 8 cylinder (VK56VD engine model) (XD model)
LDI0456
Do-it-yourself8-25
Page 512 of 635
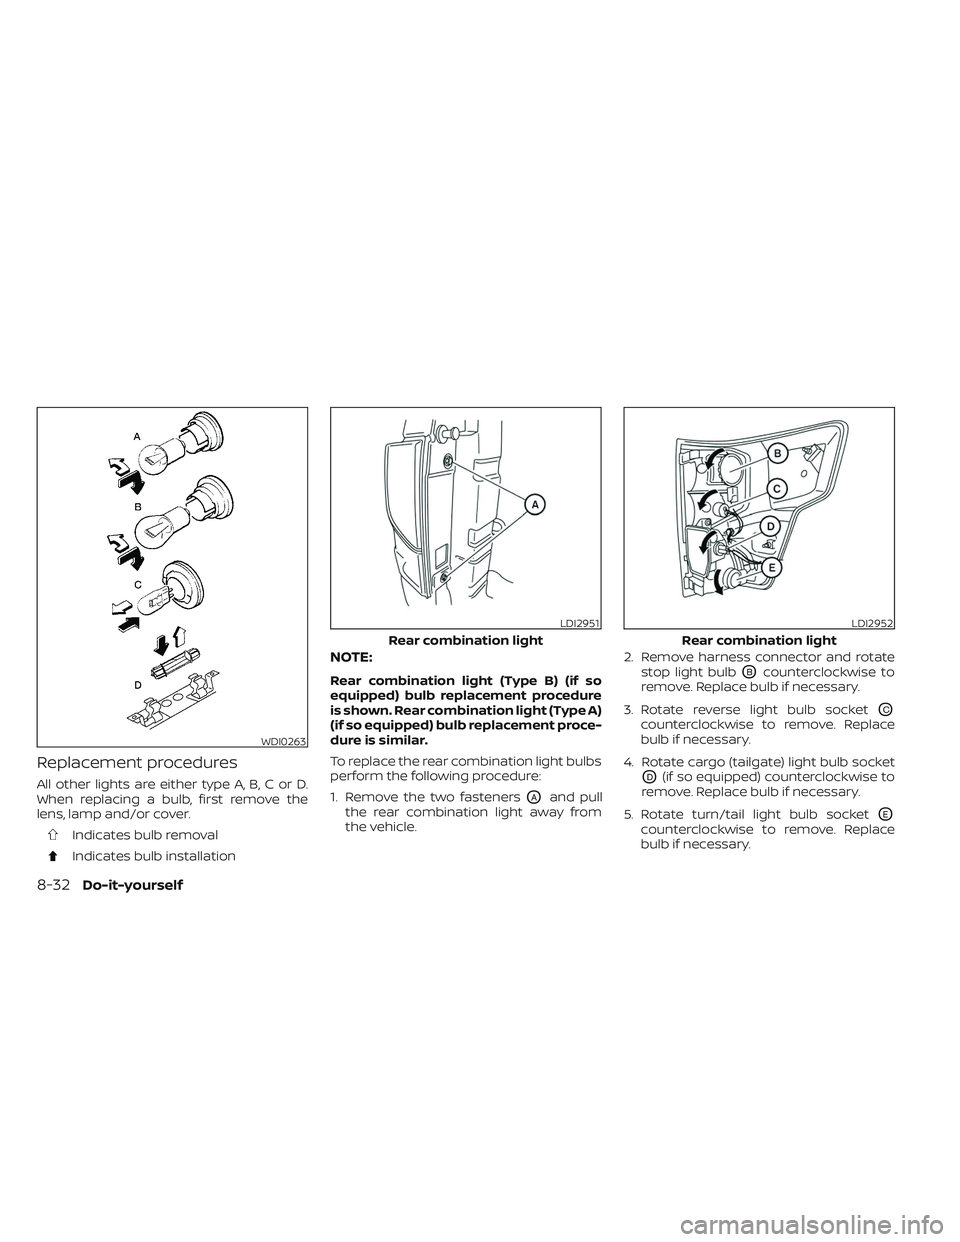
Replacement procedures
All other lights are either type A, B, C or D.
When replacing a bulb, first remove the
lens, lamp and/or cover.
Indicates bulb removal
Indicates bulb installation
NOTE:
Rear combination light (Type B) (if so
equipped) bulb replacement procedure
is shown. Rear combination light (Type A)
(if so equipped) bulb replacement proce-
dure is similar.
To replace the rear combination light bulbs
perform the following procedure:
1. Remove the two fasteners
OAand pull
the rear combination light away from
the vehicle. 2. Remove harness connector and rotate
stop light bulb
OBcounterclockwise to
remove. Replace bulb if necessary.
3. Rotate reverse light bulb socket
OC
counterclockwise to remove. Replace
bulb if necessary.
4. Rotate cargo (tailgate) light bulb socket
OD(if so equipped) counterclockwise to
remove. Replace bulb if necessary.
5. Rotate turn/tail light bulb socket
OE
counterclockwise to remove. Replace
bulb if necessary.
WDI0263
LDI2951
Rear combination light
LDI2952
Rear combination light
8-32Do-it-yourself
Page 531 of 635
Doors and engine hood:Check that the
doors and engine hood operate properly.
Also ensure that all latches lock securely.
Lubricate hinges, latches, latch pins, rollers
and links if necessary. Make sure that the
secondary latch keeps the hood from
opening when the primary latch is
released.
When driving in areas using road salt or
other corrosive materials, check lubrica-
tion frequently.
Check that the gas stays or struts properly
and securely hold the hood, trunk, or rear
hatch in a fully open position. If the hood,
trunk, or rear hatch is not held open, have
the gas stays or struts replaced.
Lights*: Clean the headlights on a regular
basis. Make sure that the headlights, stop
lights, tail lights, turn signal lights, and other
lights are all operating properly and in-
stalled securely. Also check headlight aim.
Road wheel nuts (lug nuts)*: When check-
ing the tires, make sure no wheel nuts are
missing, and check for any loose wheel
nuts. Tighten if necessary.
Tire rotation*: Rotate tires at the specified
interval shown in the maintenance
schedule. Tires*:
Check the pressure with a gauge
of ten and always prior to long distance
trips. If necessary, adjust the pressure in all
tires, including the spare, to the pressure
specified. Check carefully for damage, cuts
or excessive wear.
Tire Pressure Monitoring System (TPMS)
transmitter components: Replace the
TPMS transmitter grommet seal, valve core
and cap when the tires are replaced due to
wear or age.
Wheel alignment and balance: If the ve-
hicle should pull to either side while driving
on a straight and level road, or if you detect
uneven or abnormal tire wear, there may
be a need for wheel alignment. If the steer-
ing wheel or seat vibrates at normal high-
way speeds, wheel balancing may be
needed.
For additional information regarding tires,
refer to “Important Tire Safety Information”
(US) or “Tire Safety Information” (Canada) in
the Warranty Information Booklet.
Windshield: Clean the windshield on a
regular basis. Check the windshield at least
every six months for cracks or other dam-
age. Have a damaged windshield repaired
by a qualified repair facility. It is recom-
mended that you have a damaged wind- shield repaired by a NISSAN dealer, or a
NISSAN Certified Collision Center. To locate
a collision center in your area, refer to
http://collision.nissanusa.com.
Windshield wiper blades*:
Check for
cracks or wear if they do not wipe properly.
Inside the vehicle
The maintenance items listed here should
be checked on a regular basis, such as
when performing scheduled maintenance,
cleaning the vehicle, etc.
Accelerator pedal: Check the pedal for
smooth operation and make sure the
pedal does not bind or require uneven ef-
fort. Keep the floor mat away from the
pedal.
Automatic transmission P (Park) posi-
tion mechanism: On a fairly steep hill
check that your vehicle is held securely
with the shif t lever in the P (Park) position
without applying any brakes.
Brake pedal: Check the pedal for smooth
operation. If the brake pedal suddenly goes
down further than normal, the pedal feels
spongy or the vehicle seems to take longer
to stop, have your vehicle checked imme-
diately. It is recommended that you visit a
NISSAN dealer for this service.
Maintenance and schedules9-3
Page 532 of 635
Brakes:Check that the brakes do not pull
the vehicle to one side when applied.
Parking brake: Check the parking brake
operation regularly. The vehicle should be
securely held on a fairly steep hill with only
the parking brake applied. If the parking
brake needs adjustment, it is recom-
mended that you visit a NISSAN dealer for
this service.
Seats: Check seat position controls such
as seat adjusters, seatback recliner, etc., to
ensure they operate smoothly and all
latches lock securely in every position.
Check that the head restraints/headrests
move up and down smoothly and the locks
(if so equipped) hold securely in all latched
positions.
Seat belts: Check that all parts of the seat
belt system (for example, buckles, anchors,
adjusters and retractors) operate properly
and smoothly, and are installed securely.
Check the belt webbing for cuts, fraying,
wear or damage.
Steering wheel: Check for changes in the
steering system, such as excessive free-
play, hard steering or strange noises.
Warning lights and chimes: Make sure all
warning lights and chimes are operating
properly. Windshield wiper and washer*:
Check
that the wipers and washer operate prop-
erly and that the wipers do not streak.
Windshield defroster: Check that the air
comes out of the defroster outlets properly
and in sufficient quantity when operating
the heater or air conditioner.
Under the hood and vehicle
The maintenance items listed here should
be checked periodically (for example, each
time you check the engine oil or refuel).
Battery* (for maintenance free batter-
ies): For vehicles equipped with a sealed
maintenance free battery. It is recom-
mended that you visit a NISSAN dealer for
service.
Battery* (for serviceable batteries):
Check the fluid level in each cell. The fluid
should be at the bottom of the filler open-
ing. Vehicles operated in high tempera-
tures or under severe conditions require
frequent checks of the battery fluid level.
NOTE:
Care should be taken to avoid situations
that can lead to potential battery dis-
charge and potential no-start conditions
such as:
1. Installation or extended use of elec- tronic accessories that consume bat-
tery power when the engine is not
running (Phone chargers, GPS, DVD
players, etc.).
2. Vehicle is not driven regularly and/or only driven short distances.
In these cases, the battery may need to
be charged to maintain battery health.
Brake fluid level*: Make sure that the brake
fluid level is between the MIN and MAX lines
on the reservoir.
Engine coolant level*: Check the coolant
level when the engine is cold.
Engine drive belts*: Make sure the drive
belts are not frayed, worn, cracked or oily.
Engine oil level*: Check the level af ter
parking the vehicle on a level surface with
the engine off. Wait more than 10 minutes
for the oil to drain back into the oil pan.
9-4Maintenance and schedules
Page 571 of 635
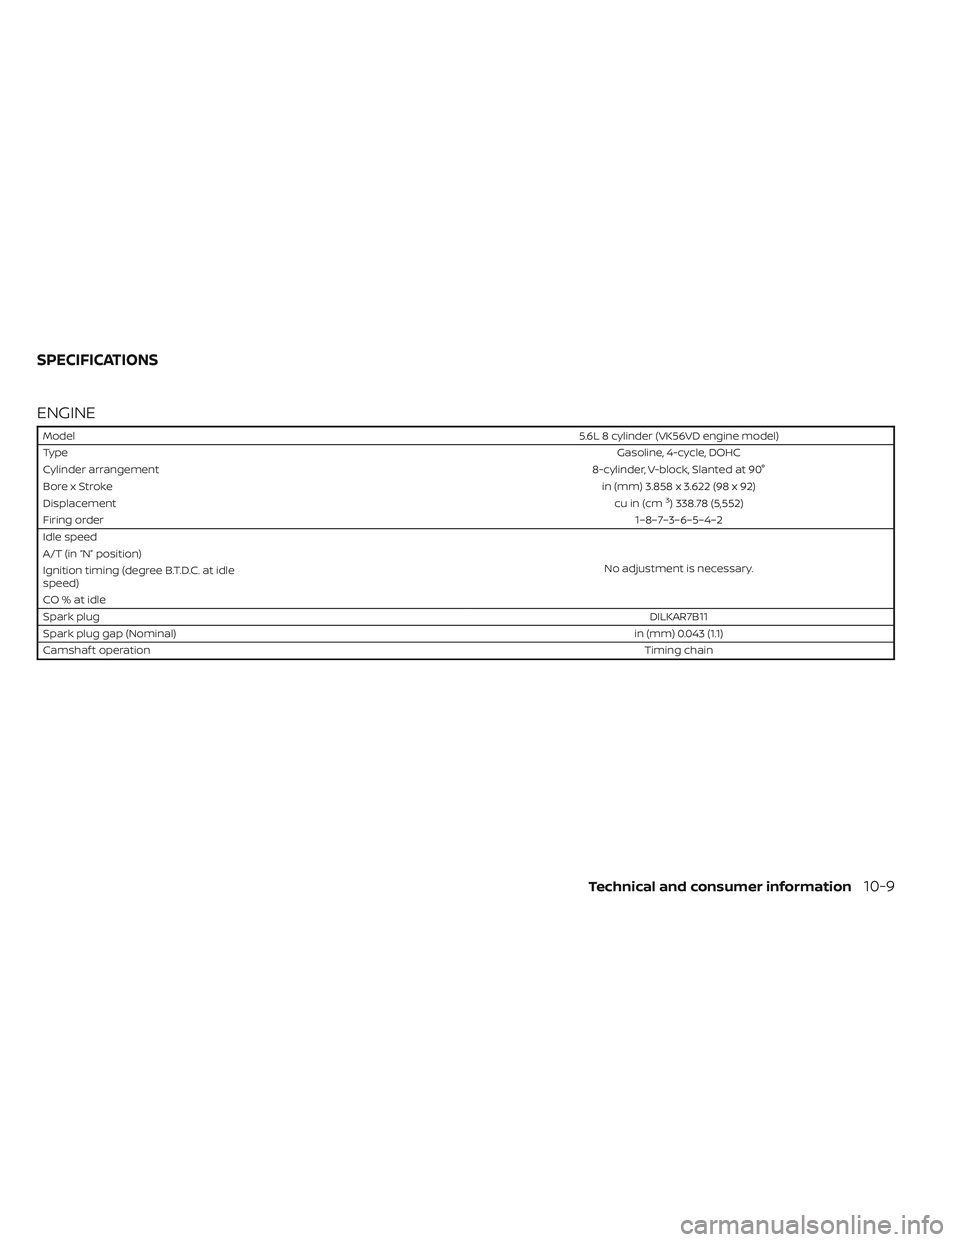
ENGINE
Model5.6L 8 cylinder (VK56VD engine model)
Type Gasoline, 4-cycle, DOHC
Cylinder arrangement 8-cylinder, V-block, Slanted at 90°
Bore x Stroke in (mm) 3.858 x 3.622 (98 x 92)
Displacement cu in (cm
3) 338.78 (5,552)
Firing order 1–8–7–3–6–5–4–2
Idle speed
No adjustment is necessary.
A/T (in “N” position)
Ignition timing (degree B.T.D.C. at idle
speed)
CO%atidle
Spark plug
DILKAR7B11
Spark plug gap (Nominal) in (mm) 0.043 (1.1)
Camshaf t operation Timing chain
SPECIFICATIONS
Technical and consumer information10-9
Page 587 of 635
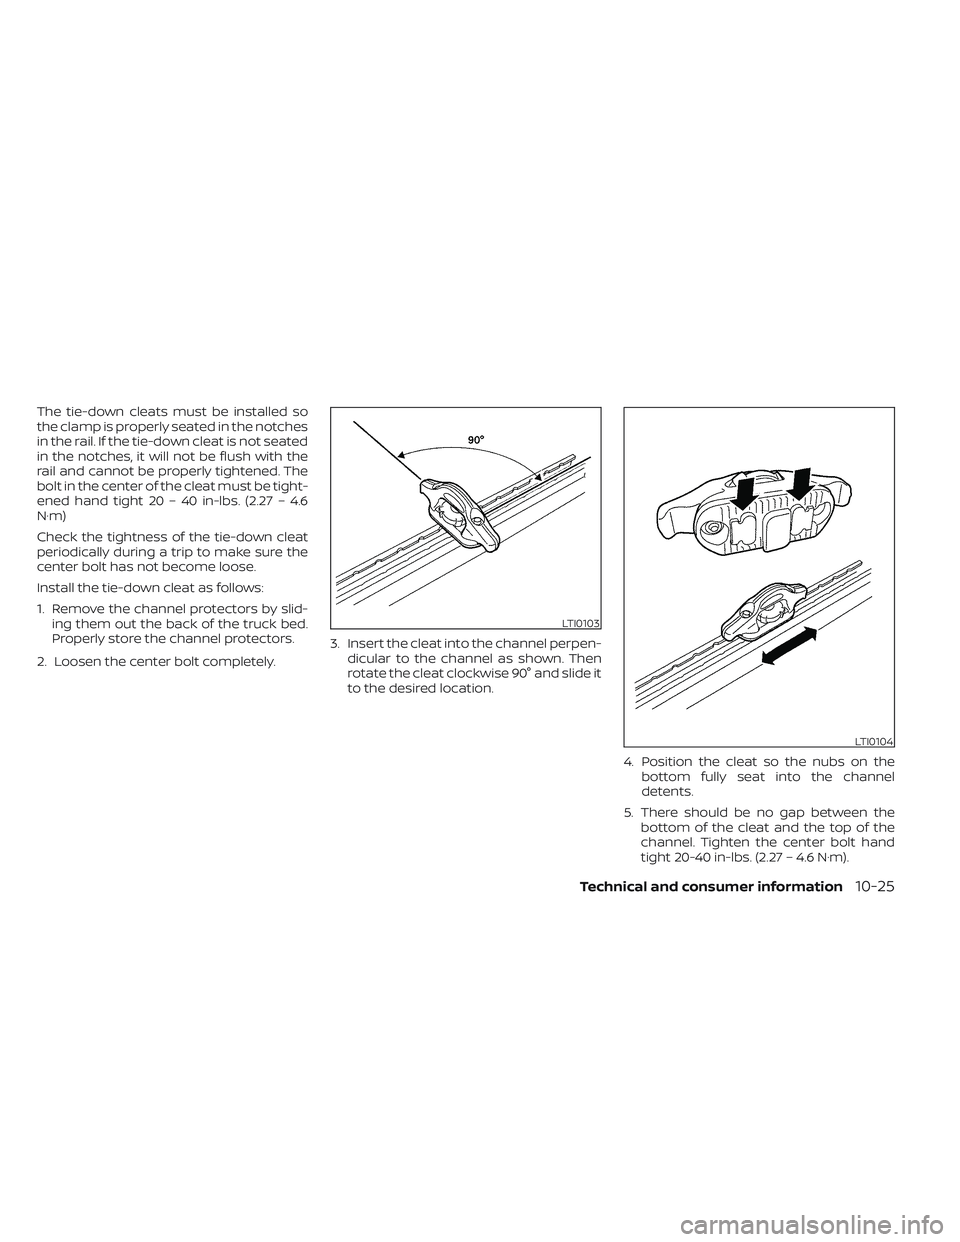
The tie-down cleats must be installed so
the clamp is properly seated in the notches
in the rail. If the tie-down cleat is not seated
in the notches, it will not be flush with the
rail and cannot be properly tightened. The
bolt in the center of the cleat must be tight-
ened hand tight 20 – 40 in-lbs. (2.27 – 4.6
N·m)
Check the tightness of the tie-down cleat
periodically during a trip to make sure the
center bolt has not become loose.
Install the tie-down cleat as follows:
1. Remove the channel protectors by slid-ing them out the back of the truck bed.
Properly store the channel protectors.
2. Loosen the center bolt completely. 3. Insert the cleat into the channel perpen-
dicular to the channel as shown. Then
rotate the cleat clockwise 90° and slide it
to the desired location.
4. Position the cleat so the nubs on thebottom fully seat into the channel
detents.
5. There should be no gap between the bottom of the cleat and the top of the
channel. Tighten the center bolt hand
tight 20-40 in-lbs. (2.27 – 4.6 N·m).
LTI0103
LTI0104
Technical and consumer information10-25