Page 11 of 528
Table of
contents
Safety-Seats, seat belts and supplemental restraint system
Instruments and controls
Pre-driving checks and adjustments
Monitor, climate, audio, phone and voice recognition systems
Starting and driving
In case of emergency
Appearance and care
Do-it-yourself
Maintenance and schedules
Technical and consumer information
Index
0
1
2
3
4
5
6
7
8
9
10
11
Page 18 of 528
1. Headlight/fog light (if so equipped)/turn signal switch (P. 2-55)
2. Steering wheel switch (P. 2-17) Audio controls (P. 4-45)
Bluetooth® Hands-Free Phone System
(P. 4-67)
3. Driver's supplemental air bag (P. 1-44) Horn (P. 2-62)
4. Meters and gauges (P. 2-4) Warning and indicators lights (P. 2-8)
Vehicle information display (P. 2-17),
(P. 2-34)
5. Cruise control switches (P. 5-58) Intelligent Cruise Control (ICC) switches
(if so equipped) (P. 5-59)
Bluetooth® Hands-Free Phone System
(P. 4-67)
6. Wiper and washer switch (P. 2-54)
7. Vents (P. 4-32)
8. Hazard warning flasher switch (P. 6-2)
9. Front passenger air bag status light
(P. 1-44)
10. Audio system (P. 4-45)
11. Front passenger supplemental air bag
(P. 1-44)
12. Glove box (P. 2-66)
13. Passenger supplemental knee air bag
(P. 1-44)
14. Shif t lever (P. 5-16)
15. Push-button ignition switch (P. 5-11)
16. Climate controls (P. 4-33, 4-40)
LII2638
INSTRUMENT PANEL
Page 92 of 528
1. Headlight/fog light (if so equipped)/turn signal switch (P. 2-55)
2. Steering wheel switch (P. 2-17) Audio controls (P. 4-45)
Bluetooth® Hands-Free Phone System
(P. 4-67)
3. Driver's supplemental air bag (P. 1-44) Horn (P. 2-62)
4. Meters and gauges (P. 2-4) Warning and indicators lights (P. 2-8)
Vehicle information display (P. 2-17),
(P. 2-34)
5. Cruise control switches (P. 5-58) Intelligent Cruise Control (ICC) switches
(if so equipped) (P. 5-59)
Bluetooth® Hands-Free Phone System
(P. 4-67)
6. Wiper and washer switch (P. 2-54)
7. Vents (P. 4-32)
8. Hazard warning flasher switch (P. 6-2)
9. Front passenger air bag status light
(P. 1-44)
10. Audio system (P. 4-45)
11. Front passenger supplemental air bag
(P. 1-44)
12. Glove box (P. 2-66)
13. Passenger supplemental knee air bag
(P. 1-44)
14. Shif t lever (P. 5-16)
15. Push-button ignition switch (P. 5-11)
16. Climate controls (P. 4-33, 4-40)
LII2638
INSTRUMENT PANEL
Page 108 of 528

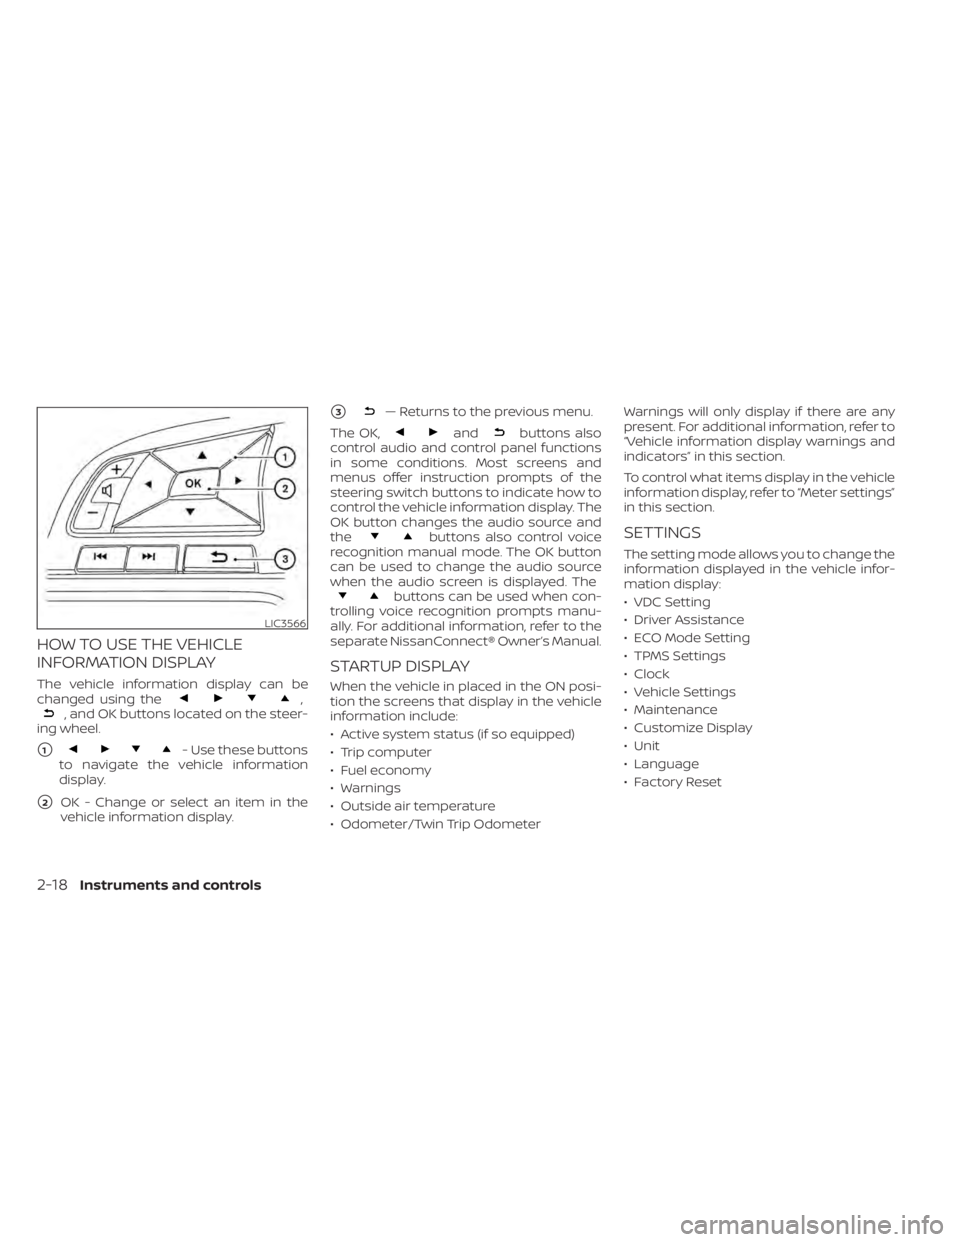
HOW TO USE THE VEHICLE
INFORMATION DISPLAY
The vehicle information display can be
changed using the,, and OK buttons located on the steer-
ing wheel.
�1
andbuttons also
control audio and control panel functions
in some conditions. Most screens and
menus offer instruction prompts of the
steering switch buttons to indicate how to
control the vehicle information display. The
OK button changes the audio source and
the
buttons also control voice
recognition manual mode. The OK button
can be used to change the audio source
when the audio screen is displayed. The
buttons can be used when con-
trolling voice recognition prompts manu-
ally. For additional information, refer to the
separate NissanConnect® Owner’s Manual.
STARTUP DISPLAY
When the vehicle in placed in the ON posi-
tion the screens that display in the vehicle
information include:
• Active system status (if so equipped)
• Trip computer
• Fuel economy
• Warnings
• Outside air temperature
• Odometer/Twin Trip Odometer Warnings will only display if there are any
present. For additional information, refer to
“Vehicle information display warnings and
indicators” in this section.
To control what items display in the vehicle
information display, refer to “Meter settings”
in this section.
SETTINGS
The setting mode allows you to change the
information displayed in the vehicle infor-
mation display:
• VDC Setting
• Driver Assistance
• ECO Mode Setting
• TPMS Settings
• Clock
• Vehicle Settings
• Maintenance
• Customize Display
• Unit
• Language
• Factory Reset
LIC3566
2-18Instruments and controls
Page 124 of 528
The vehicle information display is located
to the lef t of the speedometer. It displays
such items as:
• Vehicle settings
• Drive computer information
• Drive system warnings and settings
• Cruise control system information
• NISSAN Intelligent Key® operation infor-mation
• Indicators and warnings
• Tire pressure information
• Audio information
• Bluetooth® Hands-free Phone informa- tion • Driving Aids
• Odometer/twin trip odometer
• Distance to empty
• Clock and outside temperatureHOW TO USE THE VEHICLE
INFORMATION DISPLAY
The vehicle information display can be
changed using the,, and OK buttons located on the steer-
ing wheel.
�1
LIC3224LIC3566
VEHICLE INFORMATION DISPLAY– 7
INCH (18 cm) TYPE B (if so equipped)
Page 125 of 528

The OK,andbuttons also
control audio and control panel functions
in some conditions. Most screens and
menus offer instruction prompts of the
steering switch buttons to indicate how to
control the vehicle information display.
Dots on the right side of the vehicle infor-
mation display may appear if there is more
than one page of menu items or warning
messages, depending on the type of me-
ter. The OK button changes the audio
source and the
buttons also con-
trol voice recognition manual mode. The
OK button can be used to change the au-
dio source when the audio screen is dis-
played. The
buttons can be used
when controlling voice recognition
prompts manually. For additional informa-
tion, refer to the separate NissanConnect®
Owner’s Manual.
STARTUP DISPLAY
When the vehicle in placed in the ON posi-
tion the vehicle information display may
display the following screens (if so
equipped):
• Home
• Drive Computer — Speed, Fuel Economy, Trip Distance & Time
• Convenience • Digital speed and average speed
• Instant fuel economy/ average fuel
economy
• Tire Pressure
• Audio/telephone
• Intelligent Cruise Control (ICC)
• Driving Aids
• Settings
• Warnings*
*Warnings will only display if there are any
present. For additional information, refer to
“Vehicle information display warnings and
indicators” in this section.
To control what items display in the vehicle
information display, refer to “How to use the
vehicle information display” in this section.
RESETTING THE DRIVE COMPUTER
The drive computer is divided across three
screens:
• Average Speed
• Average Fuel Economy
• Trip Distance & Time
1. Press the
buttons
until you reach the desired drive com-
puter mode. 2. Press and hold the OK button for ap-
proximately 1 second to reset the infor-
mation on the currently displayed
screen.
NOTE:
If you wish to reset all drive computer
values at once, press and hold the OK
button for approximately 3 seconds until
a reset menu appears; and follow the
instructions.
SETTINGS
The setting mode allows you to change the
information displayed in the vehicle infor-
mation display. It also allows you to change
vehicle functions:
• VDC Setting
• ECO Mode Setting
• Driver Assistance
• TPMS Settings
• Clock
• Vehicle Settings
• Maintenance
• Customize Display
• Unit/Language
• Factory Reset
Instruments and controls2-35
Page 173 of 528

•Wetting may damage the Intelligent
Key. If the Intelligent Key gets wet,
immediately wipe until it is com-
pletely dry.
• Do not place the Intelligent Key for an
extended period in an area where
temperatures exceed 140°F (60°C).
• Do not attach the Intelligent Key with
a key holder that contains a magnet.
• Do not place the Intelligent Key near
equipment that produces a magnetic
field, such as a TV, audio equipment
and personal computers.
If an Intelligent Key is lost or stolen,
NISSAN recommends erasing the ID
code of that Intelligent Key from the
vehicle. This may prevent the unau-
thorized use of the Intelligent Key to
operate the vehicle. For information re-
garding the erasing procedure, it is rec-
ommended that you visit a NISSAN
dealer.
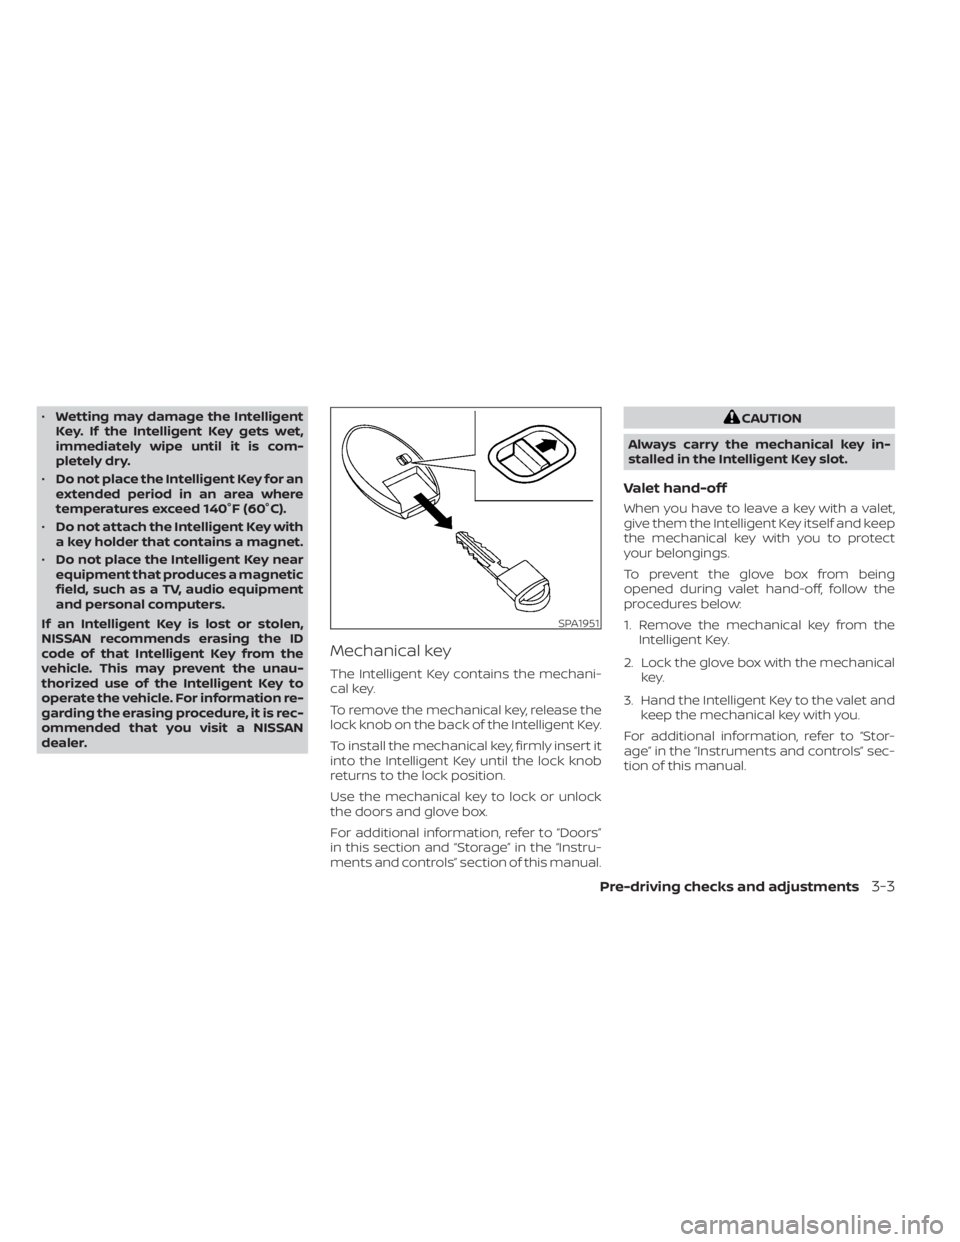
Mechanical key
The Intelligent Key contains the mechani-
cal key.
To remove the mechanical key, release the
lock knob on the back of the Intelligent Key.
To install the mechanical key, firmly insert it
into the Intelligent Key until the lock knob
returns to the lock position.
Use the mechanical key to lock or unlock
the doors and glove box.
For additional information, refer to “Doors”
in this section and “Storage” in the “Instru-
ments and controls” section of this manual.
SPA1951
Page 190 of 528

Thebutton will be on the NISSAN
Intelligent Key® if the vehicle has Remote
Engine Start. This feature allows the engine
to start from outside the vehicle.
The following features may be affected
when the Remote Engine Start feature is
used:
• Vehicles with a manual climate control system (if so equipped) will default to the
last used heating or cooling mode. • Vehicles with an automatic climate con-
trol system (if so equipped) will default to
either heating or cooling mode. For addi-
tional information, refer to “Remote En-
gine Start with Intelligent Climate Control”
in the “Monitor, climate, audio, phone and
voice recognition systems” section of this
manual.
Laws in some local communities may re-
strict the use of remote starters. For ex-
ample, some laws require a person using
Remote Engine Start to have the vehicle in
view. Check local regulations for any re-
quirements.
Other conditions may affect the function of
the Remote Engine Start feature. For addi-
tional information, refer to “Conditions the
Remote Engine Start will not work” in this
section.
Other conditions can affect the perfor-
mance of the Intelligent Key transmitter.
For additional information, refer to “NISSAN
Intelligent Key®” in this section.
REMOTE ENGINE START
OPERATING RANGE
CAUTION
When the Intelligent Key battery is dis-
charged or other strong radio wave
sources are present near the operating
location, the Intelligent Key operating
range becomes narrower, and the Intel-
ligent Key may not function properly.
The Remote Engine Start function can only
be used when the Intelligent Key is within
the specified operating range from the ve-
hicle.
LPD2995
REMOTE ENGINE START (if so
equipped)