2022 NISSAN SENTRA display
[x] Cancel search: displayPage 227 of 528
NOTE:
Do not adjust any of the display settings
of the Intelligent Around View Monitor
while the vehicle is moving. Make sure
the parking brake is firmly applied.
INTELLIGENT AROUND VIEW
MONITOR SYSTEM LIMITATIONS
Page 228 of 528
•Do not strike the cameras. They are
precision instruments. Doing so
could cause a malfunction or cause
damage resulting in a fire or an elec-
tric shock.
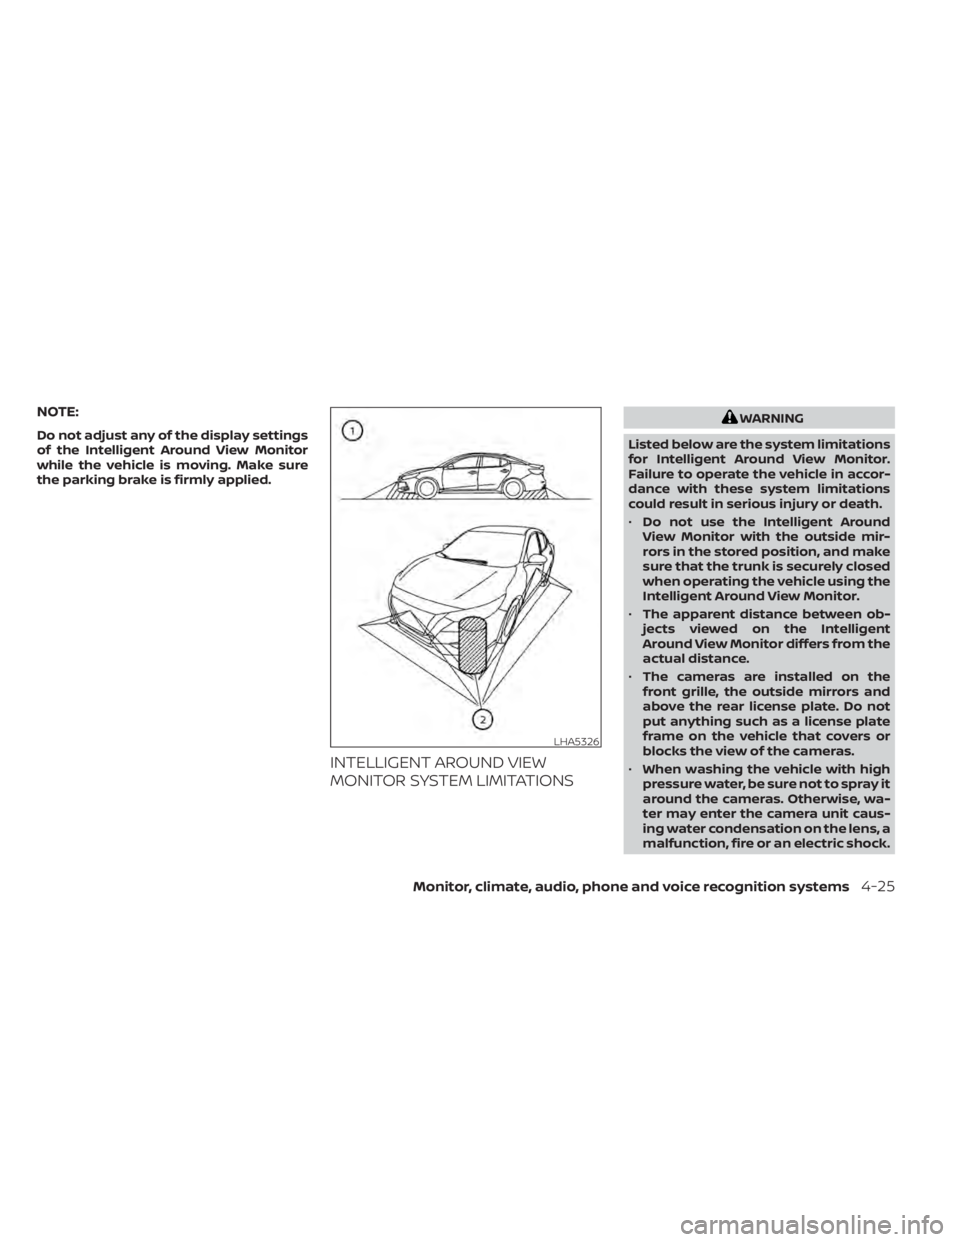
There are some areas where the system
will not show objects and the system does
not warn of moving objects. When in the
front or rear view display, an object below
the bumper or on the ground may not be
viewed
O1. When in the bird’s-eye view, a tall
object near the seam
O2of the camera
viewing areas will not appear in the moni-
tor.
The following are operating limitations and
do not represent a system malfunction:
• There may be a delay when switching between views.
• When the temperature is extremely high or low, the screen may not display objects
clearly.
• When strong light directly shines on the camera, objects may not be displayed
clearly.
• The screen may flicker under fluorescent light.
• The colors of objects on the Intelligent Around View Monitor may differ some-
what from the actual color of objects. • Objects on the Intelligent Around View
Monitor may not be clear and the color of
the object may differ in a dark environ-
ment.
• There may be differences in sharpness between each camera view of the bird's-
eye view.
• Do not use wax on the camera lens. Wipe off any wax with a clean cloth that has
been dampened with a diluted mild
cleaning agent, then wipe with a dry
cloth.
System temporarily unavailable
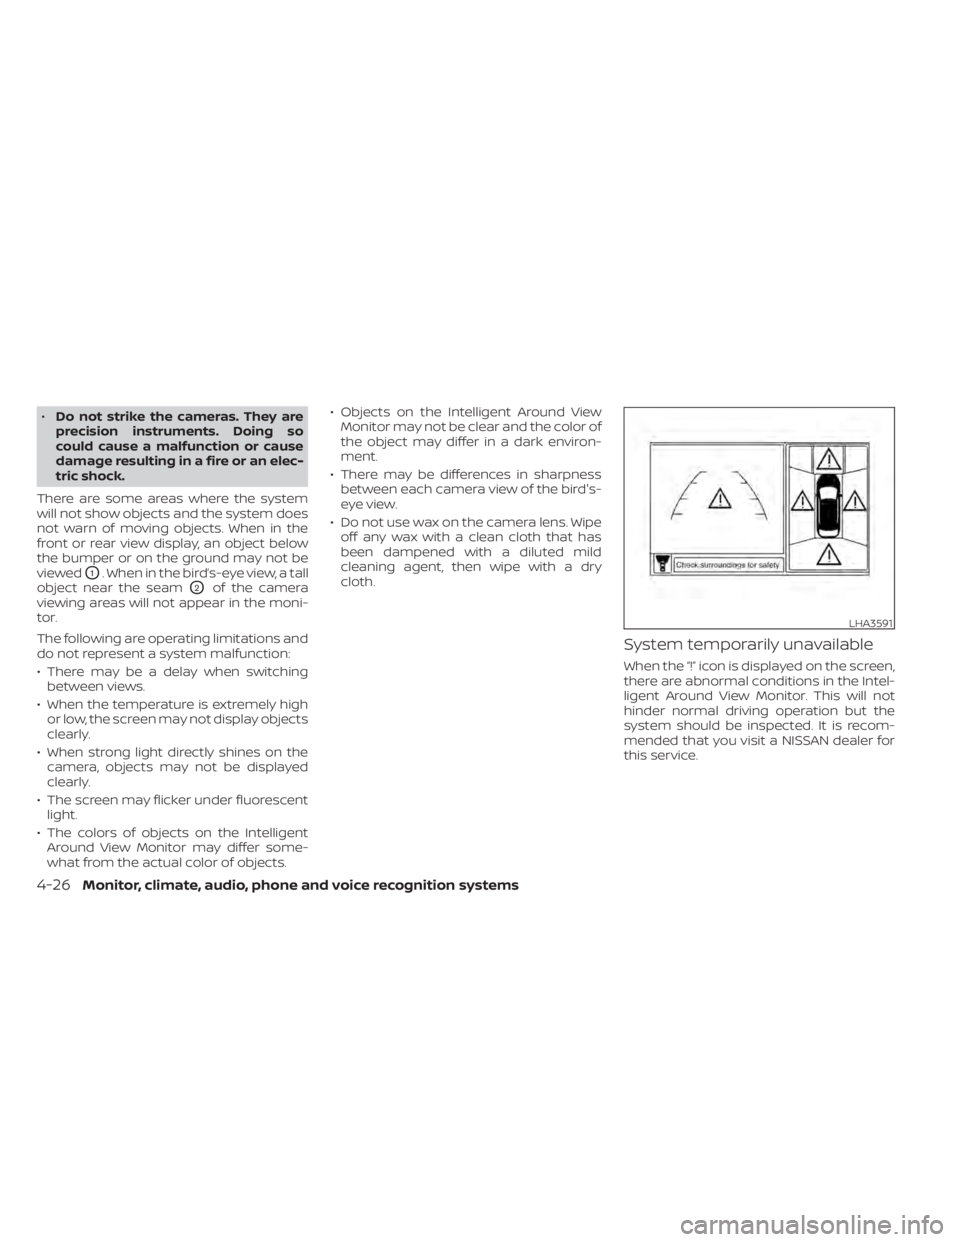
When the “!” icon is displayed on the screen,
there are abnormal conditions in the Intel-
ligent Around View Monitor. This will not
hinder normal driving operation but the
system should be inspected. It is recom-
mended that you visit a NISSAN dealer for
this service.
LHA3591
4-26Monitor, climate, audio, phone and voice recognition systems
Page 229 of 528
![NISSAN SENTRA 2022 Owners Manual When the “[X]” icon is displayed on the
screen, the camera image may be receiv-
ing temporary electronic disturbances
from surrounding devices. This will not hin-
der normal driving operation but NISSAN SENTRA 2022 Owners Manual When the “[X]” icon is displayed on the
screen, the camera image may be receiv-
ing temporary electronic disturbances
from surrounding devices. This will not hin-
der normal driving operation but](/manual-img/5/56784/w960_56784-228.png)
When the “[X]” icon is displayed on the
screen, the camera image may be receiv-
ing temporary electronic disturbances
from surrounding devices. This will not hin-
der normal driving operation but the sys-
tem should be inspected if it occurs fre-
quently. It is recommended that you visit a
NISSAN dealer for this service.SYSTEM MAINTENANCE
LHA3592LHA5325
Page 231 of 528
WARNING
Failure to follow the warnings and in-
structions for proper use of the Moving
Object Detection (MOD) system could
result in serious injury or death
• The MOD system is not a substitute
for proper vehicle operation and is
not designed to prevent contact with
objects surrounding the vehicle.
When maneuvering, always use the
outside mirrors and rearview mirror
and turn and check the surroundings
to ensure it is safe to maneuver.
• The system is deactivated at speeds
above 5 mph (8 km/h). It is reacti-
vated at lower speeds.
• The MOD system is not designed to
detect surrounding stationary
objects.
The MOD system can inform the driver of
moving objects near the vehicle when
backing out of garages, maneuvering in
parking lots and in other such instances.
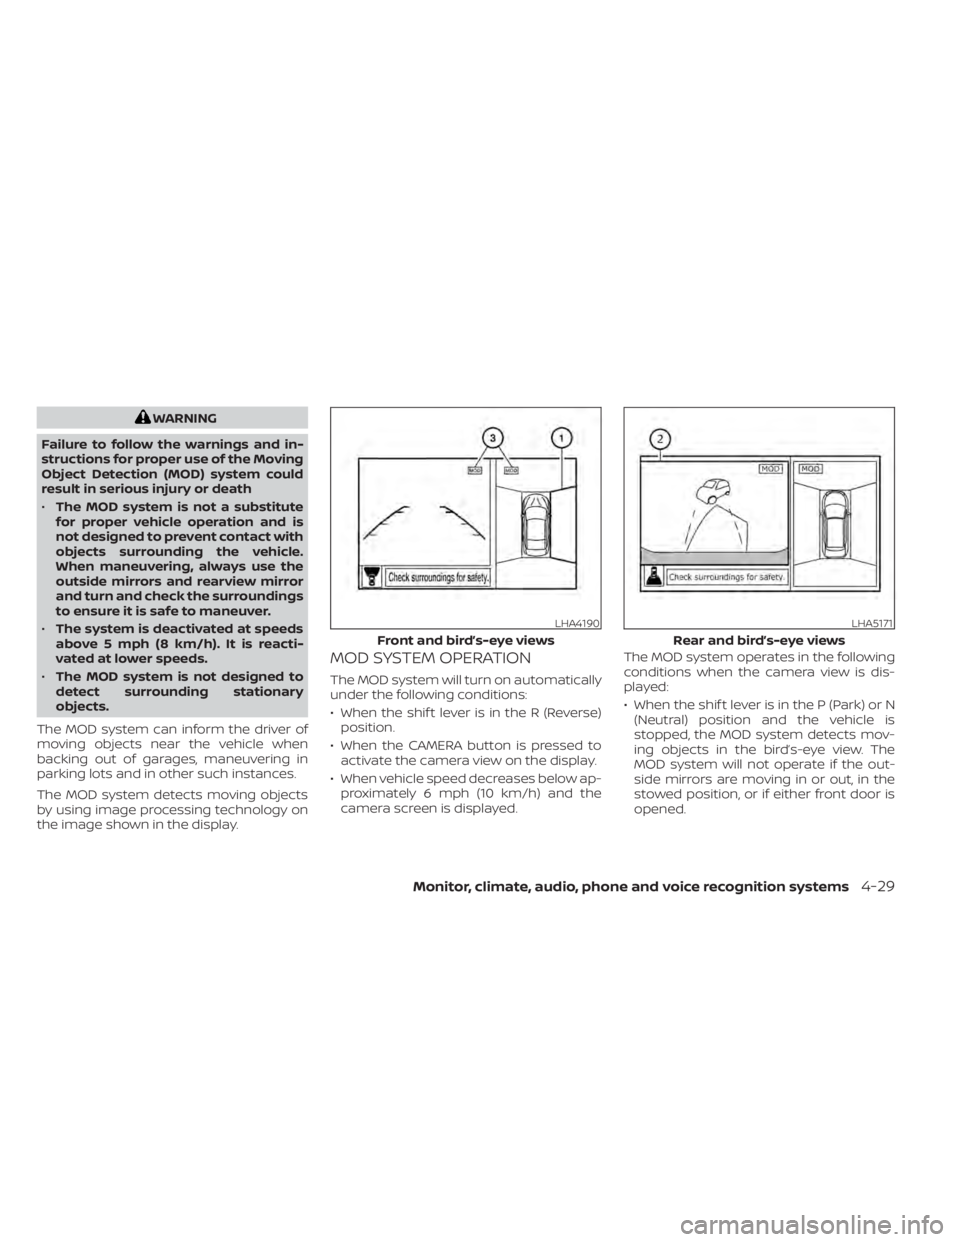
The MOD system detects moving objects
by using image processing technology on
the image shown in the display.
MOD SYSTEM OPERATION
The MOD system will turn on automatically
under the following conditions:
• When the shif t lever is in the R (Reverse) position.
• When the CAMERA button is pressed to activate the camera view on the display.
• When vehicle speed decreases below ap- proximately 6 mph (10 km/h) and the
camera screen is displayed. The MOD system operates in the following
conditions when the camera view is dis-
played:
• When the shif t lever is in the P (Park) or N
(Neutral) position and the vehicle is
stopped, the MOD system detects mov-
ing objects in the bird’s-eye view. The
MOD system will not operate if the out-
side mirrors are moving in or out, in the
stowed position, or if either front door is
opened.
LHA4190
Front and bird’s-eye views
Monitor, climate, audio, phone and voice recognition systems4-29
Page 232 of 528
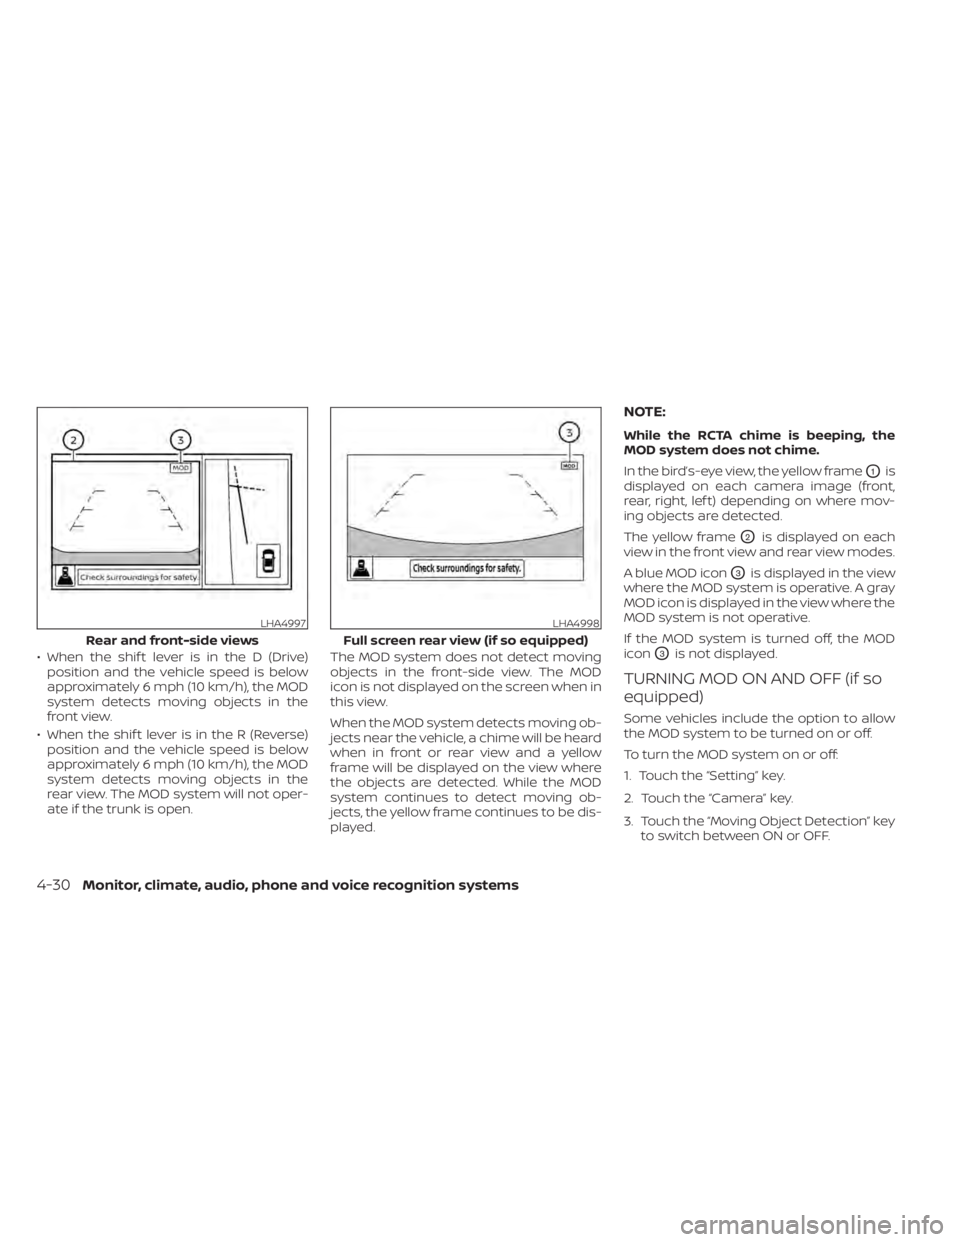
• When the shif t lever is in the D (Drive)position and the vehicle speed is below
approximately 6 mph (10 km/h), the MOD
system detects moving objects in the
front view.
• When the shif t lever is in the R (Reverse) position and the vehicle speed is below
approximately 6 mph (10 km/h), the MOD
system detects moving objects in the
rear view. The MOD system will not oper-
ate if the trunk is open. The MOD system does not detect moving
objects in the front-side view. The MOD
icon is not displayed on the screen when in
this view.
When the MOD system detects moving ob-
jects near the vehicle, a chime will be heard
when in front or rear view and a yellow
frame will be displayed on the view where
the objects are detected. While the MOD
system continues to detect moving ob-
jects, the yellow frame continues to be dis-
played.
NOTE:
While the RCTA chime is beeping, the
MOD system does not chime.
In the bird’s-eye view, the yellow frame
O1is
displayed on each camera image (front,
rear, right, lef t) depending on where mov-
ing objects are detected.
The yellow frame
O2is displayed on each
view in the front view and rear view modes.
A blue MOD icon
O3is displayed in the view
where the MOD system is operative. A gray
MOD icon is displayed in the view where the
MOD system is not operative.
If the MOD system is turned off, the MOD
icon
O3is not displayed.
TURNING MOD ON AND OFF (if so
equipped)
Some vehicles include the option to allow
the MOD system to be turned on or off.
To turn the MOD system on or off:
1. Touch the “Setting” key.
2. Touch the “Camera” key.
3. Touch the “Moving Object Detection” key to switch between ON or OFF.
LHA4997
Rear and front-side views
Page 242 of 528
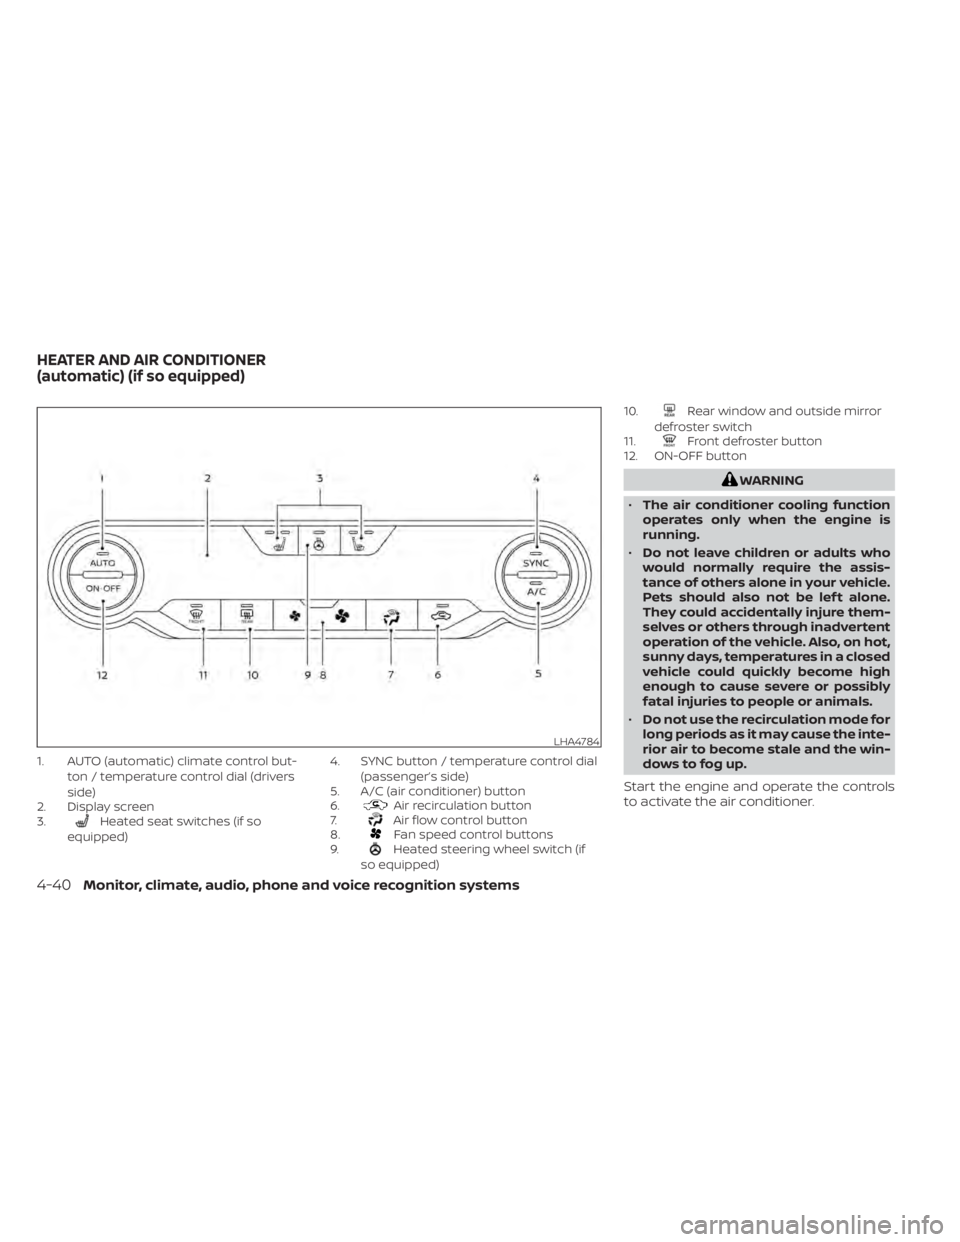
1. AUTO (automatic) climate control but-ton / temperature control dial (drivers
side)
2. Display screen
3.
Heated seat switches (if so
equipped) 4. SYNC button / temperature control dial
(passenger’s side)
5. A/C (air conditioner) button
6.Air recirculation button
7.Air flow control button
8.Fan speed control buttons
9.Heated steering wheel switch (if
so equipped) 10.
Rear window and outside mirror
defroster switch
11.
Front defroster button
12. ON-OFF button
LHA4784
HEATER AND AIR CONDITIONER
(automatic) (if so equipped)
Page 243 of 528
NOTE:
• Odors from inside and outside the ve-hicle can build up in the air conditioner
unit. Odor can enter the passenger
compartment through the vents.
• When parking, set the heater and air conditioner controls to turn off air re-
circulation to allow fresh air into the
passenger compartment. This should
help reduce odors inside the vehicle.
AUTOMATIC OPERATION
Cooling and/or dehumidified
heating (AUTO)
This mode may be used all year round as
the system automatically works to keep a
constant temperature. Air flow distribution,
air intake control, and fan speed are also
controlled automatically.
1. Press the AUTO button on.
2.
Turn the temperature control dial to the lef t
or right to set the desired temperature.
• Adjust the temperature display to about 75°F (24°C) for normal operation.
•
The temperature of the passenger com-
partment will be maintained automatically.
Air flow distribution, air intake control and fan
speed are also controlled automatically.
• A visible mist may be seen coming from the vents in hot, humid conditions as the
air is cooled rapidly. This does not indicate
a malfunction.
3. You can individually set driver's and front passenger's side temperature using
each temperature control dial. To syn-
chronize the driver’s and front passen-
ger’s temperature settings, press the
SYNC button.
Heating (A/C OFF)
The air conditioner does not activate. When
you need to heat only, use this mode.
1. Press the AUTO button.
2. Turn the temperature control dial to set the desired temperature.
• The temperature of the passenger com- partment will be maintained automati-
cally. Air flow distribution and fan speed
are also controlled automatically.
• Do not set the temperature lower than the outside air temperature. Otherwise,
the system may not work properly.
• Not recommended if windows fog up.
Dehumidified defrosting or
defogging
1. Press thefront defroster button on.
2. Turn the temperature control dial to set the desired temperature.
• To quickly remove ice from the outside of the windows, use the
fan speed con-
trol buttons to set the fan speed to maxi-
mum.
• As soon as possible af ter the windshield is clean, press the AUTO button to return
to the automatic mode.
• When the
front defroster button is
pressed, the air conditioner will automati-
cally be turned on at outside tempera-
tures above 36°F (2°C). The air recirculate
mode automatically turns off, allowing
outside air to be drawn into the passen-
ger compartment to further improve the
defogging performance.
Remote Engine Start with
Intelligent Climate Control (if so
equipped)
Vehicles equipped with automatic climate
controls and Remote Engine Start function
may go into automatic heating or cooling
Monitor, climate, audio, phone and voice recognition systems4-41
Page 244 of 528
mode when Remote Engine Start is acti-
vated depending on outside and cabin
temperatures. During this period, the cli-
mate control display and buttons will be
inoperable until the ignition switch is
turned on. In Remote Engine Start defrost-
ing mode, the rear window defroster and
heated steering wheel (if so equipped) may
be activated automatically.
MANUAL OPERATION
Fan speed control buttons
Press thefan speed control buttons
to manually control the fan speed.
Press the AUTO button to return to auto-
matic control of the fan speed.
Temperature control dial
The temperature control dial allows you to
adjust the temperature of the outlet air. To
lower the temperature, turn the dial to the
lef t. To increase the temperature, turn the
dial to the right. Temperature can be ad-
justed on the driver’s and passenger’s side.
Air recirculation
Press theair recirculation button to
recirculate interior air inside the vehicle.
The
indicator light on the button will
come on.
The air recirculation cannot be activated
when the air conditioner is in the
front
defrosting mode.
When the outside temperature exceeds
70°F (21°C), the air conditioning system may
default to air recirculation mode automati-
cally to reduce overall power consumption.
To exit air recirculation mode, deselect the
air recirculation button (indicator light will
turn off ) to enter fresh air mode.
Automatic intake air control
In the AUTO mode, the intake air will be
controlled automatically. To manually con-
trol the intake air, press the
air recir-
culation button. To return to the automatic
control mode, press and hold the
air
recirculation button for about 2 seconds.
The indicator light will flash twice, and then
the intake air will be controlled automati-
cally.
A/C (air conditioner) button
Start the engine, press thefan speed
control buttons to the desired position and
press the
button to turn on the air
conditioner. To turn off the air conditioner,
press the
button again.
The air conditioner cooling function op-
erates only when the engine is running.
Air flow control
Pressing thebutton manually con-
trols air flow and selects the air outlet:
— Air flows from center and side
vents.
— Air flows from center and sidevents and foot outlets.
— Air flows mainly from foot outlets.— Air flows from defroster and footoutlets.
4-42Monitor, climate, audio, phone and voice recognition systems