2022 NISSAN ROGUE SPORT ECU
[x] Cancel search: ECUPage 256 of 508
5-16Starting and driving
Continuously Variable Transmis-
sion (CVT) models
The ignition lock is designed so that the
ignition switch position cannot be
switched to OFF until the shift lever is
moved to the P (Park) position.
When the ignition switch cannot be
pushed toward the OFF position, proceed
as follows:
1. Move the shift lever into the P (Park)position.
2. Push the ignition switch. The ignition switch position will change to the ON
position.
3. Push the ignition switch again to the OFF position.
The shift lever can be moved from the P
(Park) position if the ignition switch is in
the ON position and the brake pedal is
depressed.
PUSH-BUTTON IGNITION SWITCH
POSITIONS
LOCK (Normal parking position)
The ignition switch can only be locked at
this position.
The ignition switch will lock when any
door is opened or closed with the ignition
switched off.
ON (Normal operating position)
The ignition system and the electrical
accessory power activate at this position
without the engine turned on.
The ON position has a battery saver
feature that will place the ignition switch
in the OFF position, if the vehicle is not
running, after some time under the fol-
lowing conditions:
. all doors are closed.
. shift lever is in P (Park) position (CVT
model) or N (Neutral) position (MT
model).
The battery saver feature will be can-
celled if any of the following occur:
. any door is opened.
. shift lever is moved out of the P (Park)
position (CVT model). .
ignition switch changes position.
OFF position
The engine is turned off in this position.
Auto ACC position
With the vehicle in the P (Park) position
(CVT models) or the N (Neutral) position
(MT models), the Intelligent Key with you
and the ignition placed from ON to OFF,
the radio can still be used for a period of
time, or until the driver’s door is opened.
After a period of time, functions such as
radio, navigation (if so equipped), and
Bluetooth® Hands-Free Phone System
may be restarted by turning on the audio
system (see the separate NissanConnect®
Owner’s Manual), or by pushing the UN-
LOCK button on the Intelligent Key for up
to a total of 30 minutes.
EMERGENCY ENGINE SHUT OFF
To shut off the engine in an emergency
situation while driving, perform the fol-
lowing procedure:
.Rapidly push the push-button ignition
switch 3 consecutive times in less
than 1.5 seconds, or
. Push and hold the push-button igni-
tion switch for more than 2 seconds.
Page 268 of 508
5-28Starting and driving
automatic brake hold function.
The electronic parking brake is automati-
cally released as soon as the vehicle
starts while the accelerator pedal is
depressed.
WARNING
.The electronic parking brake will
not be automatically applied
when the engine is stopped with-
out using the ignition switch (for
example, by engine stalling).
Without the vehicle stationary,
the electronic parking brake will
not be automatically applied
even if the engine is turned off
with the ignition switch.
. Before leaving the vehicle, move
the shift lever to the 1 (1st) or R
(Reverse) position and check that
the electronic parking brake in-
dicator light is illuminated to
confirm that the electronic park-
ing brake is applied. The electro-
nic parking brake indicator light
will remain on for a period of time
after the driver’s door is locked.
CAUTION
When parking in an area where the
outside temperature is below 32°F
(0°C), do not apply the parking brake
to prevent it from freezing.
For safe parking, place the shift lever
in the 1 (1st) or R (Reverse) position
and securely block the wheels.
NOTE:
. To keep the electronic parking brake
released after the engine is turned
off, place the ignition switch in the
OFF position, depress the brake
pedal and push down the parking
brake switch before opening the
driver’s door.
. If a malfunction occurs in the elec-
tronic parking brake system (for
example, due to battery discharge),
it is recommended to contact a
NISSAN dealer.
. If the shift lever is moved to the P
(Park) position when the brake force
is maintained by the automatic
brake hold function, the electronic
parking brake will apply automati-
cally. .
If the driver’s seat belt is unfastened
when the brake force is maintained
by the automatic brake hold func-
tion, the electronic parking brake
will apply automatically.
. If the ignition switch is placed in the
OFF position when the brake force is
maintained by the automatic brake
hold function, the electronic parking
brake will apply automatically.
Manual operation
The electronic parking brake will not be
automatically applied if the engine is
stopped without using the ignition switch
(for example, by engine stalling). In such a
case, you have to apply the parking brake
manually.
To apply: Pull the switch up
. The
indicator lightwill illuminate.
To release: With the ignition switch in the
ON position, depress the brake pedal and
push the switch down
. The indicator
lightwill turn off.
Before driving, check that the electronic
parking brake indicator light
goes
out. For additional information, see
“Warning lights, indicator lights and audi-
ble reminders” (P.2-10).
Page 385 of 508
To shut off the engine in an emergency
situation while driving, perform the fol-
lowing procedure:
.Rapidly push the push-button ignition
switch 3 consecutive times in less
than 1.5 seconds, or
. Push and hold the push-button igni-
tion switch for more than 2 seconds.TIRE PRESSURE MONITORING SYS-
TEM (TPMS)
This vehicle is equipped with the Tire
Pressure Monitoring System (TPMS). It
monitors tire pressure of all tires except
the spare (if so equipped). When the low
tire pressure warning light is lit, and the
“Tire Pressure Low - Add Air” warning
message is displayed in the vehicle in-
formation display, one or more of your
tires is significantly under-inflated. If the
vehicle is being driven with low tire
pressure, the TPMS will activate and warn
you of it by the low tire pressure warning
light. This system will activate only when
the vehicle is driven at speeds above 16
MPH (25 km/h). For more details, see
“Warning lights, indicator lights and audi-
ble reminders” (P.2-10) and “Tire Pressure
Monitoring System (TPMS)” (P.5-5).
WARNING
.If the low tire pressure warning
light illuminates while driving,
avoid sudden steering maneu-
vers or abrupt braking, reduce
vehicle speed, pull off the road
to a safe location and stop the
vehicle as soon as possible. Driv-
ing with under-inflated tires may
permanently damage the tires and increase the likelihood of tire
failure. Serious vehicle damage
could occur and may lead to an
accident and could result in ser-
ious personal injury. Check the
tire pressure for all four tires.
Adjust the tire pressure to the
recommended COLD tire pressure
shown on the Tire and Loading
Information label to turn the low
tire pressure warning light OFF. If
the light still illuminates while
driving after adjusting the tire
pressure, a tire may be flat. If
you have a flat tire, replace it with
a spare tire (if so equipped) or
repair it using the emergency tire
puncture repair kit (if so
equipped) as soon as possible.
. Since the spare tire (if so
equipped) is not equipped with
the TPMS, when a spare tire is
mounted or a wheel is replaced,
the TPMS will not function and
the low tire pressure warning
light will flash for approximately
1 minute. The light will remain on
after 1 minute. Have your tires
replaced and/or TPMS system
reset as soon as possible. It is
recommended you visit a NISSAN
dealer for these services.
In case of emergency6-3
EMERGENCY ENGINE SHUT OFF (models
with push-button ignition switch)FLAT TIRE
Page 386 of 508
6-4In case of emergency
.Replacing tires with those not
originally specified by NISSAN
could affect the proper operation
of the TPMS.
. Do not inject any tire liquid or
aerosol tire sealant into the tires,
as this may cause a malfunction
of the tire pressure sensors
(models without emergency tire
puncture repair kit).
. NISSAN recommends using only
Genuine NISSAN Emergency Tire
Sealant provided with your vehi-
cle. Other tire sealants may da-
mage the valve stem seal which
can cause the tire to lose air
pressure. Visit a NISSAN dealer
as soon as possible after using
tire repair sealant (models with
emergency tire puncture repair
kit).CHANGING A FLAT TIRE (models
with spare tire)
If you have a flat tire, follow the instruc-
tions below.
Stopping the vehicle
1. Safely move the vehicle off the road
and away from traffic.
2. Turn on the hazard warning flashers.
3. Park on a level surface and apply the parking brake.
4. Continuously Variable Transmission
(CVT) models:
Move the shift lever to the P (Park)
position.
Manual Transmission (MT) models:
Move the shift lever to the R (Reverse)
position.
5. Turn off the engine.
6. Raise the hood to warn other traffic, and to signal professional road assis-
tance personnel that you need assis-
tance.
7. Have all passengers get out of the vehicle and stand in a safe place, away
from traffic and clear of the vehicle.
WARNING
.Make sure the parking brake is
securely applied and the Manual
Transmission is shifted into R
(Reverse), or the CVT into P (Park).
. Never change tires when the ve-
hicle is on a slope, ice or slippery
areas. This is hazardous.
. Never change tires if oncoming
traffic is close to your vehicle.
Wait for professional road assis-
tance.
Page 390 of 508
6-8In case of emergency
SCE0504
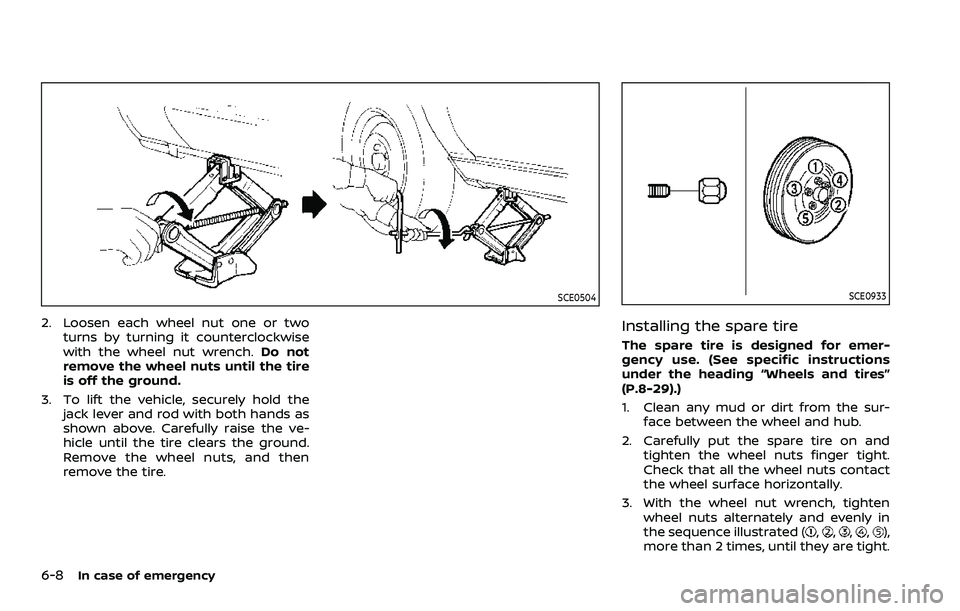
2. Loosen each wheel nut one or twoturns by turning it counterclockwise
with the wheel nut wrench. Do not
remove the wheel nuts until the tire
is off the ground.
3. To lift the vehicle, securely hold the jack lever and rod with both hands as
shown above. Carefully raise the ve-
hicle until the tire clears the ground.
Remove the wheel nuts, and then
remove the tire.
SCE0933
Installing the spare tire
The spare tire is designed for emer-
gency use. (See specific instructions
under the heading “Wheels and tires”
(P.8-29).)
1. Clean any mud or dirt from the sur-face between the wheel and hub.
2. Carefully put the spare tire on and tighten the wheel nuts finger tight.
Check that all the wheel nuts contact
the wheel surface horizontally.
3. With the wheel nut wrench, tighten wheel nuts alternately and evenly in
the sequence illustrated (
,,,,),
more than 2 times, until they are tight.
Page 391 of 508
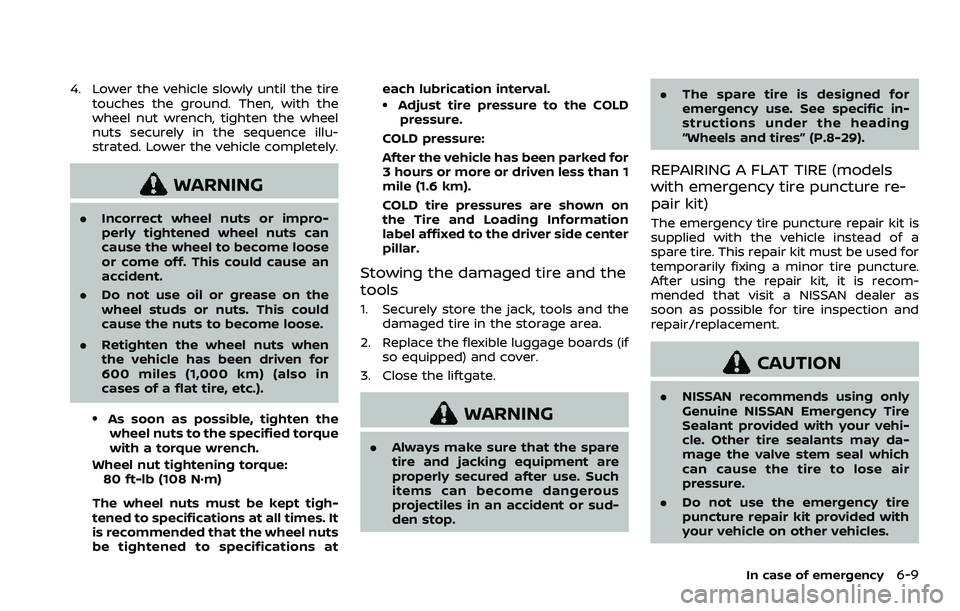
4. Lower the vehicle slowly until the tiretouches the ground. Then, with the
wheel nut wrench, tighten the wheel
nuts securely in the sequence illu-
strated. Lower the vehicle completely.
WARNING
.Incorrect wheel nuts or impro-
perly tightened wheel nuts can
cause the wheel to become loose
or come off. This could cause an
accident.
. Do not use oil or grease on the
wheel studs or nuts. This could
cause the nuts to become loose.
. Retighten the wheel nuts when
the vehicle has been driven for
600 miles (1,000 km) (also in
cases of a flat tire, etc.).
.As soon as possible, tighten the
wheel nuts to the specified torque
with a torque wrench.
Wheel nut tightening torque: 80 ft-lb (108 N·m)
The wheel nuts must be kept tigh-
tened to specifications at all times. It
is recommended that the wheel nuts
be tightened to specifications at each lubrication interval.
.Adjust tire pressure to the COLD
pressure.
COLD pressure:
After the vehicle has been parked for
3 hours or more or driven less than 1
mile (1.6 km).
COLD tire pressures are shown on
the Tire and Loading Information
label affixed to the driver side center
pillar.
Stowing the damaged tire and the
tools
1. Securely store the jack, tools and the damaged tire in the storage area.
2. Replace the flexible luggage boards (if so equipped) and cover.
3. Close the liftgate.
WARNING
. Always make sure that the spare
tire and jacking equipment are
properly secured after use. Such
items can become dangerous
projectiles in an accident or sud-
den stop. .
The spare tire is designed for
emergency use. See specific in-
structions under the heading
“Wheels and tires” (P.8-29).
REPAIRING A FLAT TIRE (models
with emergency tire puncture re-
pair kit)
The emergency tire puncture repair kit is
supplied with the vehicle instead of a
spare tire. This repair kit must be used for
temporarily fixing a minor tire puncture.
After using the repair kit, it is recom-
mended that visit a NISSAN dealer as
soon as possible for tire inspection and
repair/replacement.
CAUTION
.NISSAN recommends using only
Genuine NISSAN Emergency Tire
Sealant provided with your vehi-
cle. Other tire sealants may da-
mage the valve stem seal which
can cause the tire to lose air
pressure.
. Do not use the emergency tire
puncture repair kit provided with
your vehicle on other vehicles.
In case of emergency6-9
Page 394 of 508
6-12In case of emergency
SCE0868
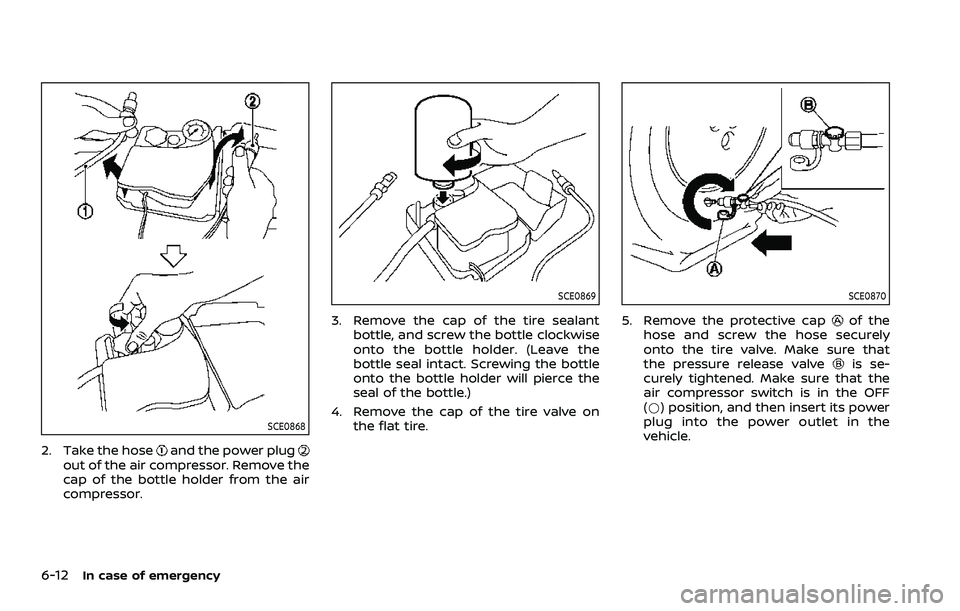
2. Take the hoseand the power plugout of the air compressor. Remove the
cap of the bottle holder from the air
compressor.
SCE0869
3. Remove the cap of the tire sealantbottle, and screw the bottle clockwise
onto the bottle holder. (Leave the
bottle seal intact. Screwing the bottle
onto the bottle holder will pierce the
seal of the bottle.)
4. Remove the cap of the tire valve on the flat tire.
SCE0870
5. Remove the protective capof the
hose and screw the hose securely
onto the tire valve. Make sure that
the pressure release valve
is se-
curely tightened. Make sure that the
air compressor switch is in the OFF
(*) position, and then insert its power
plug into the power outlet in the
vehicle.
Page 395 of 508
SCE0871
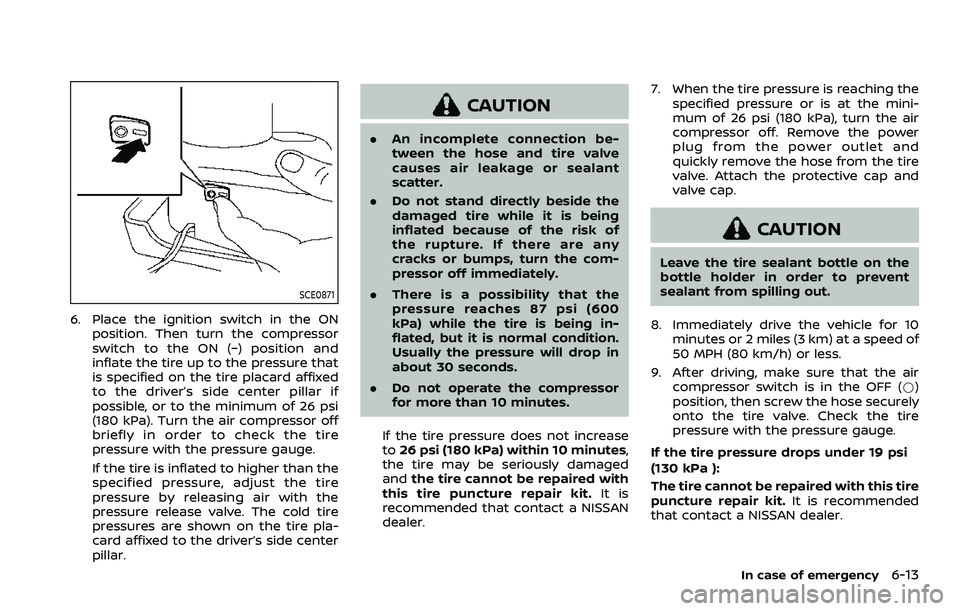
6. Place the ignition switch in the ONposition. Then turn the compressor
switch to the ON (−) position and
inflate the tire up to the pressure that
is specified on the tire placard affixed
to the driver’s side center pillar if
possible, or to the minimum of 26 psi
(180 kPa). Turn the air compressor off
briefly in order to check the tire
pressure with the pressure gauge.
If the tire is inflated to higher than the
specified pressure, adjust the tire
pressure by releasing air with the
pressure release valve. The cold tire
pressures are shown on the tire pla-
card affixed to the driver’s side center
pillar.
CAUTION
.An incomplete connection be-
tween the hose and tire valve
causes air leakage or sealant
scatter.
. Do not stand directly beside the
damaged tire while it is being
inflated because of the risk of
the rupture. If there are any
cracks or bumps, turn the com-
pressor off immediately.
. There is a possibility that the
pressure reaches 87 psi (600
kPa) while the tire is being in-
flated, but it is normal condition.
Usually the pressure will drop in
about 30 seconds.
. Do not operate the compressor
for more than 10 minutes.
If the tire pressure does not increase
to 26 psi (180 kPa) within 10 minutes,
the tire may be seriously damaged
and the tire cannot be repaired with
this tire puncture repair kit. It is
recommended that contact a NISSAN
dealer. 7. When the tire pressure is reaching the
specified pressure or is at the mini-
mum of 26 psi (180 kPa), turn the air
compressor off. Remove the power
plug from the power outlet and
quickly remove the hose from the tire
valve. Attach the protective cap and
valve cap.
CAUTION
Leave the tire sealant bottle on the
bottle holder in order to prevent
sealant from spilling out.
8. Immediately drive the vehicle for 10 minutes or 2 miles (3 km) at a speed of
50 MPH (80 km/h) or less.
9. After driving, make sure that the air compressor switch is in the OFF (*)
position, then screw the hose securely
onto the tire valve. Check the tire
pressure with the pressure gauge.
If the tire pressure drops under 19 psi
(130 kPa ):
The tire cannot be repaired with this tire
puncture repair kit. It is recommended
that contact a NISSAN dealer.
In case of emergency6-13