2022 NISSAN ROGUE SPORT ECU
[x] Cancel search: ECUPage 197 of 508
CAUTION
Do not use accessory carriers that
attach to the liftgate. Doing so will
cause damage to the vehicle.
JVP0396X
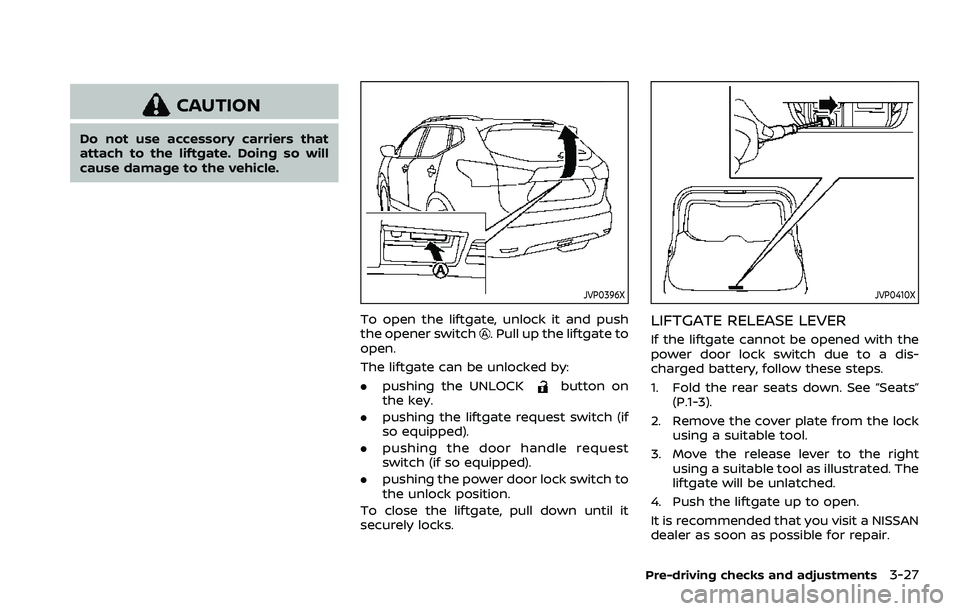
To open the liftgate, unlock it and push
the opener switch. Pull up the liftgate to
open.
The liftgate can be unlocked by:
. pushing the UNLOCK
button on
the key.
. pushing the liftgate request switch (if
so equipped).
. pushing the door handle request
switch (if so equipped).
. pushing the power door lock switch to
the unlock position.
To close the liftgate, pull down until it
securely locks.
JVP0410X
LIFTGATE RELEASE LEVER
If the liftgate cannot be opened with the
power door lock switch due to a dis-
charged battery, follow these steps.
1. Fold the rear seats down. See “Seats” (P.1-3).
2. Remove the cover plate from the lock using a suitable tool.
3. Move the release lever to the right using a suitable tool as illustrated. The
liftgate will be unlatched.
4. Push the liftgate up to open.
It is recommended that you visit a NISSAN
dealer as soon as possible for repair.
Pre-driving checks and adjustments3-27
Page 198 of 508
3-28Pre-driving checks and adjustments
WARNING
.Fuel is extremely flammable and
highly explosive under certain
conditions. You could be burned
or seriously injured if it is misused
or mishandled. Always stop the
engine and do not smoke or allow
open flames or sparks near the
vehicle when refueling.
. Fuel may be under pressure. Turn
the cap a half of a turn, and wait
for any “hissing” sound to stop to
prevent fuel from spraying out
and possibly causing personal
injury. Then remove the cap.
. Use only an original equipment
type fuel-filler cap as a replace-
ment. It has a built-in safety valve
needed for proper operation of
the fuel system and emission
control system. An incorrect cap
can result in a serious malfunc-
tion and possible injury.
JVP0540X
OPENING THE FUEL-FILLER DOOR
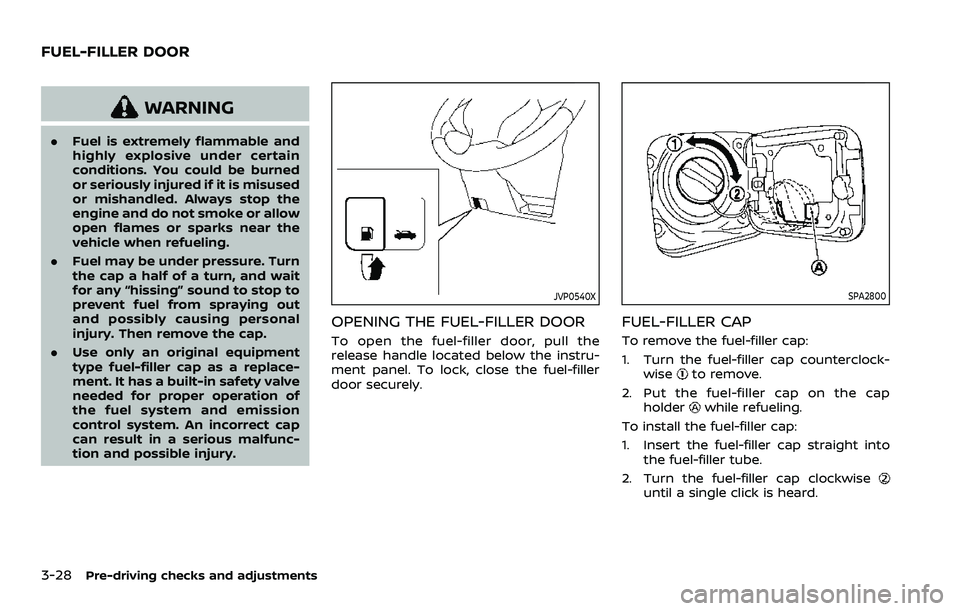
To open the fuel-filler door, pull the
release handle located below the instru-
ment panel. To lock, close the fuel-filler
door securely.
SPA2800
FUEL-FILLER CAP
To remove the fuel-filler cap:
1. Turn the fuel-filler cap counterclock-
wise
to remove.
2. Put the fuel-filler cap on the cap holder
while refueling.
To install the fuel-filler cap:
1. Insert the fuel-filler cap straight into the fuel-filler tube.
2. Turn the fuel-filler cap clockwise
until a single click is heard.
FUEL-FILLER DOOR
Page 201 of 508
JVP0301X
TILT OR TELESCOPIC OPERATION
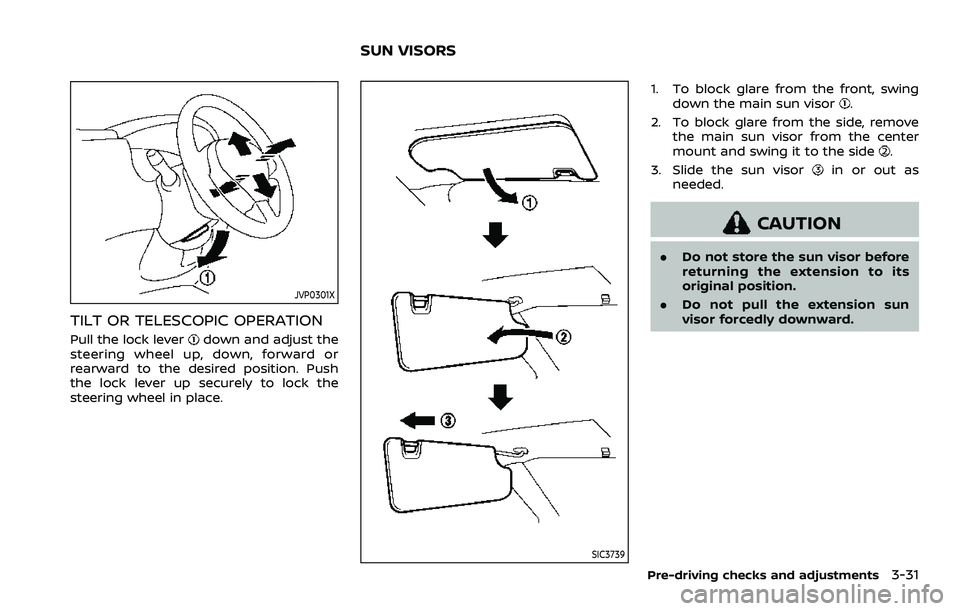
Pull the lock leverdown and adjust the
steering wheel up, down, forward or
rearward to the desired position. Push
the lock lever up securely to lock the
steering wheel in place.
SIC3739
1. To block glare from the front, swing down the main sun visor.
2. To block glare from the side, remove the main sun visor from the center
mount and swing it to the side
.
3. Slide the sun visor
in or out as
needed.
CAUTION
. Do not store the sun visor before
returning the extension to its
original position.
. Do not pull the extension sun
visor forcedly downward.
Pre-driving checks and adjustments3-31
SUN VISORS
Page 214 of 508
4-8Monitor, heater, air conditioner, audio and phone systems
WAE0058X
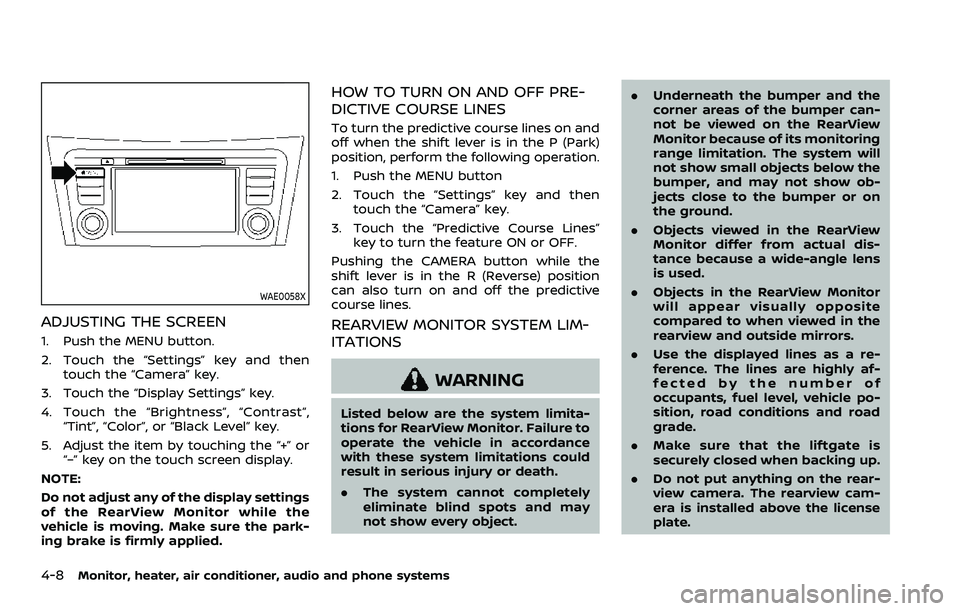
ADJUSTING THE SCREEN
1. Push the MENU button.
2. Touch the “Settings” key and thentouch the “Camera” key.
3. Touch the “Display Settings” key.
4. Touch the “Brightness”, “Contrast”, “Tint”, “Color”, or “Black Level” key.
5. Adjust the item by touching the “+” or “–” key on the touch screen display.
NOTE:
Do not adjust any of the display settings
of the RearView Monitor while the
vehicle is moving. Make sure the park-
ing brake is firmly applied.
HOW TO TURN ON AND OFF PRE-
DICTIVE COURSE LINES
To turn the predictive course lines on and
off when the shift lever is in the P (Park)
position, perform the following operation.
1. Push the MENU button
2. Touch the “Settings” key and then touch the “Camera” key.
3. Touch the “Predictive Course Lines” key to turn the feature ON or OFF.
Pushing the CAMERA button while the
shift lever is in the R (Reverse) position
can also turn on and off the predictive
course lines.
REARVIEW MONITOR SYSTEM LIM-
ITATIONS
WARNING
Listed below are the system limita-
tions for RearView Monitor. Failure to
operate the vehicle in accordance
with these system limitations could
result in serious injury or death.
. The system cannot completely
eliminate blind spots and may
not show every object. .
Underneath the bumper and the
corner areas of the bumper can-
not be viewed on the RearView
Monitor because of its monitoring
range limitation. The system will
not show small objects below the
bumper, and may not show ob-
jects close to the bumper or on
the ground.
. Objects viewed in the RearView
Monitor differ from actual dis-
tance because a wide-angle lens
is used.
. Objects in the RearView Monitor
will appear visually opposite
compared to when viewed in the
rearview and outside mirrors.
. Use the displayed lines as a re-
ference. The lines are highly af-
fected by the number of
occupants, fuel level, vehicle po-
sition, road conditions and road
grade.
. Make sure that the liftgate is
securely closed when backing up.
. Do not put anything on the rear-
view camera. The rearview cam-
era is installed above the license
plate.
Page 224 of 508
4-18Monitor, heater, air conditioner, audio and phone systems
.A different screen is selected.
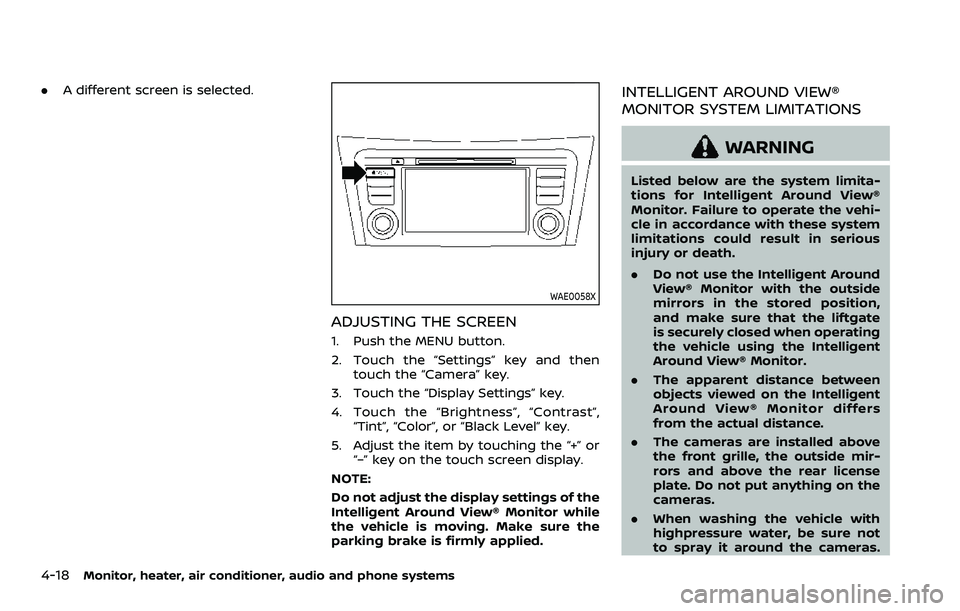
WAE0058X
ADJUSTING THE SCREEN
1. Push the MENU button.
2. Touch the “Settings” key and then
touch the “Camera” key.
3. Touch the “Display Settings” key.
4. Touch the “Brightness”, “Contrast”, “Tint”, “Color”, or “Black Level” key.
5. Adjust the item by touching the “+” or “–” key on the touch screen display.
NOTE:
Do not adjust the display settings of the
Intelligent Around View® Monitor while
the vehicle is moving. Make sure the
parking brake is firmly applied.
INTELLIGENT AROUND VIEW®
MONITOR SYSTEM LIMITATIONS
WARNING
Listed below are the system limita-
tions for Intelligent Around View®
Monitor. Failure to operate the vehi-
cle in accordance with these system
limitations could result in serious
injury or death.
. Do not use the Intelligent Around
View® Monitor with the outside
mirrors in the stored position,
and make sure that the liftgate
is securely closed when operating
the vehicle using the Intelligent
Around View® Monitor.
. The apparent distance between
objects viewed on the Intelligent
Around View® Monitor differs
from the actual distance.
. The cameras are installed above
the front grille, the outside mir-
rors and above the rear license
plate. Do not put anything on the
cameras.
. When washing the vehicle with
highpressure water, be sure not
to spray it around the cameras.
Page 244 of 508
5-4Starting and driving
WARNING
.Do not leave children or adults
who would normally require the
support of others alone in your
vehicle. Pets should not be left
alone either. They could acciden-
tally injure themselves or others
through inadvertent operation of
the vehicle. Also, on hot, sunny
days, temperatures in a closed
vehicle could quickly become
high enough to cause severe or
possibly fatal injuries to people or
animals.
. Properly secure all cargo with
ropes or straps to help prevent it
from sliding or shifting. Do not
place cargo higher than the seat-
backs. In a sudden stop or colli-
sion, unsecured cargo could
cause personal injury.
EXHAUST GAS (carbon monoxide)
WARNING
.Do not breathe exhaust gas; it
contains colorless and odorless
carbon monoxide. Carbon mon- oxide is dangerous. It can cause
unconsciousness or death.
. If you suspect that exhaust fumes
are entering the vehicle, drive
with all windows fully open, and
have the vehicle inspected imme-
diately.
. Do not run the engine in closed
spaces such as a garage.
. Do not park the vehicle with the
engine running for an extended
period of time.
. Keep the liftgate closed while
driving, otherwise exhaust gas
could be drawn into the passen-
ger compartment. If you must
drive with the liftgate open, fol-
low these precautions:
— Open all the windows.
— Turn the air recirculation
mode off and set the fan
speed control to the highest
level to circulate the air.
. If a special body or other equip-
ment is added for recreational or
other usage, follow the manufac-
turer’s recommendation to pre-
vent carbon monoxide entry into
the vehicle. (Some recreational
vehicle appliances such as stoves, refrigerators, heaters, etc. may
also generate carbon monoxide.)
. The exhaust system and body
should be inspected by a quali-
fied mechanic whenever:
— Your vehicle is raised while
being serviced.
— You suspect that exhaust fumes are entering into the
passenger compartment.
— You notice a change in the sound of the exhaust system.
— You have had an accident involving damage to the ex-
haust system, underbody, or
rear of the vehicle.
THREE-WAY CATALYST
The three-way catalyst is an emission
control device installed in the exhaust
system. Exhaust gases in the three-way
catalyst are burned at high temperatures
to help reduce pollutants.
WARNING
. The exhaust gas and the exhaust
system are very hot. Keep people,
animals and flammable materials
PRECAUTIONS WHEN STARTING
AND DRIVING
Page 251 of 508
keep you and your passengers in
position when driving over rough
terrain.
. Do not drive across steep slopes.
Instead drive either straight up or
straight down the slopes. Off-
road vehicles can tip over side-
ways much more easily than they
can forward or backward.
. Many hills are too steep for any
vehicle. If you drive up them, you
may stall. If you drive down them,
you may not be able to control
your speed. If you drive across
them, you may roll over.
. Do not shift ranges while driving
on downhill grades as this could
cause loss of control of the vehi-
cle.
. Stay alert when driving to the top
of a hill. At the top there could be
a drop-off or other hazard that
could cause an accident.
. If your engine stalls or you cannot
make it to the top of a steep hill,
never attempt to turn around.
Your vehicle could tip or roll over.
Always back straight down in R
(Reverse) range. Never back down
in N (Neutral), using only the
brake, as this could cause loss of control.
. Heavy braking going down a hill
could cause your brakes to over-
heat and fade, resulting in loss of
control and an accident. Apply
brakes lightly and use a low
range to control your speed.
. Unsecured cargo can be thrown
around when driving over rough
terrain. Properly secure all cargo
so it will not be thrown forward
and cause injury to you or your
passengers.
. To avoid raising the center of
gravity excessively, do not exceed
the rated capacity of the roof rack
(if so equipped) and evenly dis-
tribute the load. Secure heavy
loads in the cargo area as far
forward and as low as possible.
Do not equip the vehicle with tires
larger than specified in this man-
ual. This could cause your vehicle
to roll over.
. Do not grip the inside or spokes
of the steering wheel when driv-
ing off-road. The steering wheel
could move suddenly and injure
your hands. Instead drive with
your fingers and thumbs on the
outside of the rim. .
Before operating the vehicle, en-
sure that the driver and all pas-
sengers have their seat belts
fastened.
. Always drive with the floor mats
in place as the floor may became
hot.
. Lower your speed when encoun-
tering strong crosswinds. With a
higher center of gravity, your
vehicle is more affected by strong
side winds. Slower speeds ensure
better vehicle control.
. Do not drive beyond the perfor-
mance capability of the tires,
even with AWD engaged.
. For AWD equipped vehicles, do
not attempt to raise two wheels
off the ground and shift the
transmission to any drive or re-
verse position with the engine
running. Doing so may result in
drivetrain damage or unexpected
vehicle movement which could
result in serious vehicle damage
or personal injury.
. Do not attempt to test an AWD
equipped vehicle on a 2-wheel
dynamometer (such as the dy-
namometers used by some
states for emissions testing), or
Starting and driving5-11
Page 254 of 508
5-14Starting and driving
KEY POSITIONS
LOCK: Normal parking position (0)
OFF: (Not used) (1)
This position activates electrical acces-
sories such as the radio when the engine
is not running.
ON: Normal operating position (2)
This position turns on the ignition system
and the electrical accessories.
START: (3)
This position starts the engine. As soon as
the engine has started, release the key. It
automatically returns to the ON position.
WARNING
Do not operate the push-button
ignition switch while driving the ve-
hicle except in an emergency. (The
engine will stop when the ignition
switch is pushed 3 consecutive times
or the ignition switch is pushed and
held for more than 2 seconds.) If the
engine stops while the vehicle is
being driven, this could lead to a
crash and serious injury.
Before operating the push-button igni-
tion switch, be sure to move the shift
lever to the P (Park) position (for Con-
tinuously Variable Transmission (CVT)
models) or the shift lever to the N
(Neutral) position (for Manual Transmis-
sion (MT) models).
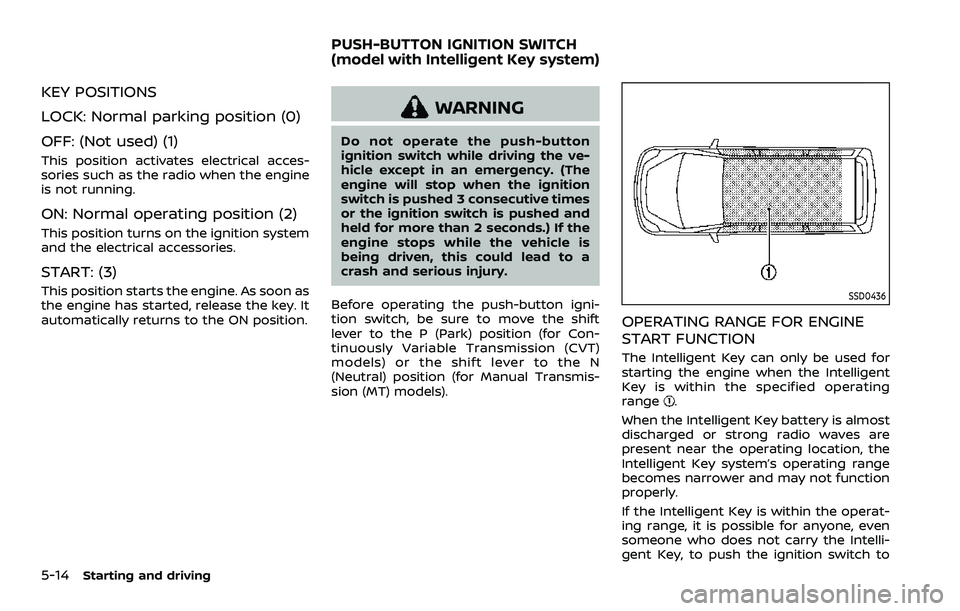
SSD0436
OPERATING RANGE FOR ENGINE
START FUNCTION
The Intelligent Key can only be used for
starting the engine when the Intelligent
Key is within the specified operating
range
.
When the Intelligent Key battery is almost
discharged or strong radio waves are
present near the operating location, the
Intelligent Key system’s operating range
becomes narrower and may not function
properly.
If the Intelligent Key is within the operat-
ing range, it is possible for anyone, even
someone who does not carry the Intelli-
gent Key, to push the ignition switch to
PUSH-BUTTON IGNITION SWITCH
(model with Intelligent Key system)