2022 NISSAN ROGUE SPORT ECU
[x] Cancel search: ECUPage 177 of 508
AUTOMATIC DOOR LOCKS
.All doors lock automatically when the
vehicle speed reaches 15 MPH (24
km/h).
. All doors unlock automatically when
the ignition switch is placed in the OFF
position or when the shift lever is
moved to the P (Park) position, if
selected (CVT model).
SPA2801
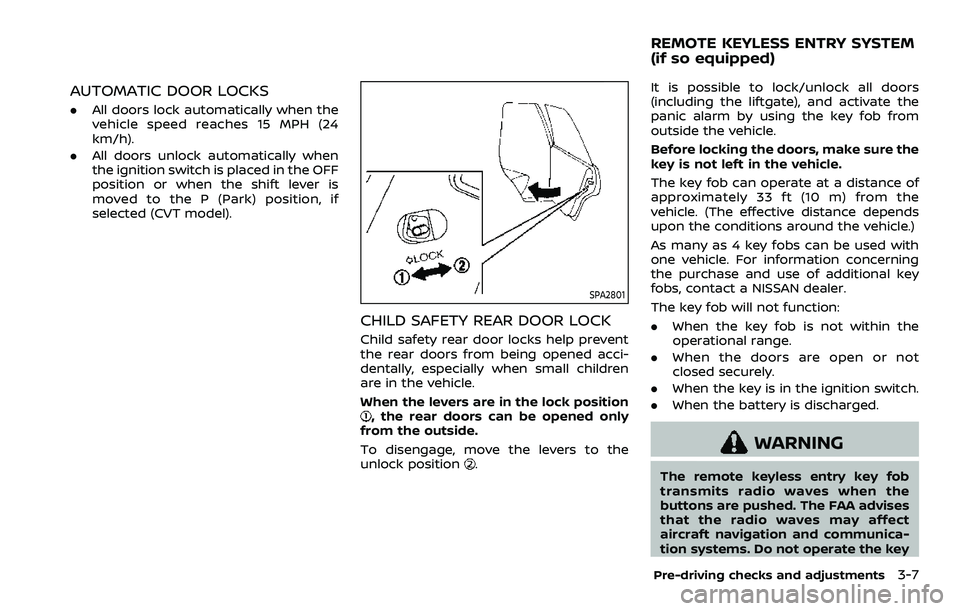
CHILD SAFETY REAR DOOR LOCK
Child safety rear door locks help prevent
the rear doors from being opened acci-
dentally, especially when small children
are in the vehicle.
When the levers are in the lock position
, the rear doors can be opened only
from the outside.
To disengage, move the levers to the
unlock position
.
It is possible to lock/unlock all doors
(including the liftgate), and activate the
panic alarm by using the key fob from
outside the vehicle.
Before locking the doors, make sure the
key is not left in the vehicle.
The key fob can operate at a distance of
approximately 33 ft (10 m) from the
vehicle. (The effective distance depends
upon the conditions around the vehicle.)
As many as 4 key fobs can be used with
one vehicle. For information concerning
the purchase and use of additional key
fobs, contact a NISSAN dealer.
The key fob will not function:
. When the key fob is not within the
operational range.
. When the doors are open or not
closed securely.
. When the key is in the ignition switch.
. When the battery is discharged.
WARNING
The remote keyless entry key fob
transmits radio waves when the
buttons are pushed. The FAA advises
that the radio waves may affect
aircraft navigation and communica-
tion systems. Do not operate the key
Pre-driving checks and adjustments3-7
REMOTE KEYLESS ENTRY SYSTEM
(if so equipped)
Page 179 of 508
the welcome light and farewell light
function, see “Vehicle Settings” (P.2-23).
Locking doors
1. Remove the key from the ignitionswitch.
2. Close all the doors.
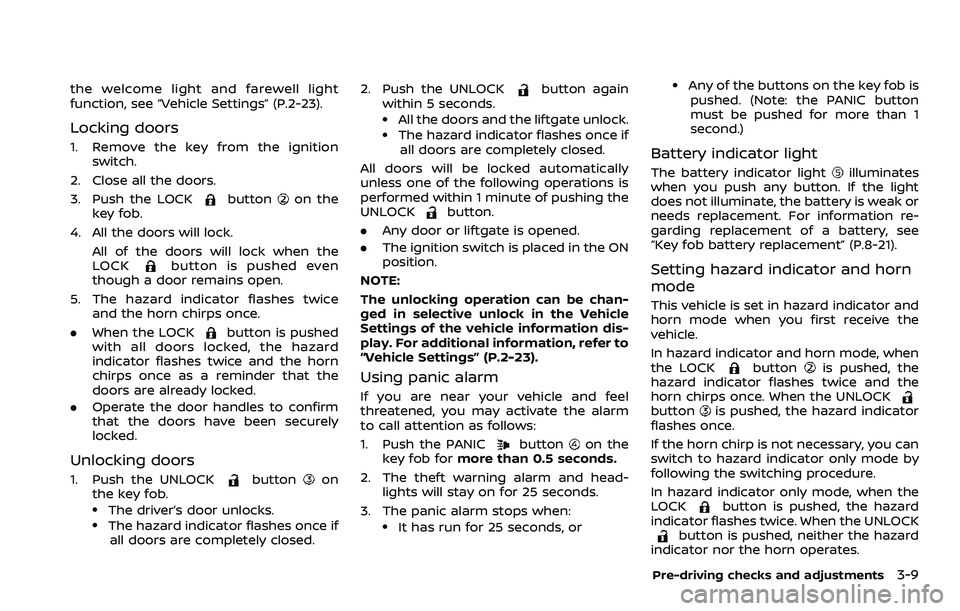
3. Push the LOCK
buttonon the
key fob.
4. All the doors will lock. All of the doors will lock when the
LOCK
button is pushed even
though a door remains open.
5. The hazard indicator flashes twice and the horn chirps once.
. When the LOCK
button is pushed
with all doors locked, the hazard
indicator flashes twice and the horn
chirps once as a reminder that the
doors are already locked.
. Operate the door handles to confirm
that the doors have been securely
locked.
Unlocking doors
1. Push the UNLOCKbuttonon
the key fob.
.The driver’s door unlocks..The hazard indicator flashes once if
all doors are completely closed. 2. Push the UNLOCK
button again
within 5 seconds.
.All the doors and the liftgate unlock..The hazard indicator flashes once if all doors are completely closed.
All doors will be locked automatically
unless one of the following operations is
performed within 1 minute of pushing the
UNLOCK
button.
. Any door or liftgate is opened.
. The ignition switch is placed in the ON
position.
NOTE:
The unlocking operation can be chan-
ged in selective unlock in the Vehicle
Settings of the vehicle information dis-
play. For additional information, refer to
“Vehicle Settings” (P.2-23).
Using panic alarm
If you are near your vehicle and feel
threatened, you may activate the alarm
to call attention as follows:
1. Push the PANIC
buttonon the
key fob for more than 0.5 seconds.
2. The theft warning alarm and head- lights will stay on for 25 seconds.
3. The panic alarm stops when:
.It has run for 25 seconds, or
.Any of the buttons on the key fob is pushed. (Note: the PANIC button
must be pushed for more than 1
second.)
Battery indicator light
The battery indicator lightilluminates
when you push any button. If the light
does not illuminate, the battery is weak or
needs replacement. For information re-
garding replacement of a battery, see
“Key fob battery replacement” (P.8-21).
Setting hazard indicator and horn
mode
This vehicle is set in hazard indicator and
horn mode when you first receive the
vehicle.
In hazard indicator and horn mode, when
the LOCK
buttonis pushed, the
hazard indicator flashes twice and the
horn chirps once. When the UNLOCK
buttonis pushed, the hazard indicator
flashes once.
If the horn chirp is not necessary, you can
switch to hazard indicator only mode by
following the switching procedure.
In hazard indicator only mode, when the
LOCK
button is pushed, the hazard
indicator flashes twice. When the UNLOCK
button is pushed, neither the hazard
indicator nor the horn operates.
Pre-driving checks and adjustments3-9
Page 183 of 508
SPA2074
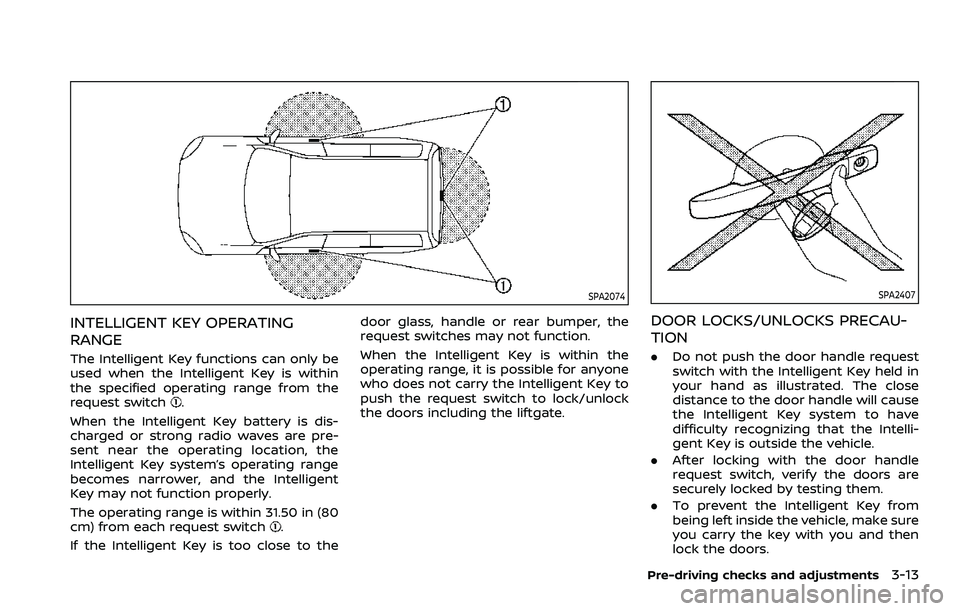
INTELLIGENT KEY OPERATING
RANGE
The Intelligent Key functions can only be
used when the Intelligent Key is within
the specified operating range from the
request switch
.
When the Intelligent Key battery is dis-
charged or strong radio waves are pre-
sent near the operating location, the
Intelligent Key system’s operating range
becomes narrower, and the Intelligent
Key may not function properly.
The operating range is within 31.50 in (80
cm) from each request switch
.
If the Intelligent Key is too close to the door glass, handle or rear bumper, the
request switches may not function.
When the Intelligent Key is within the
operating range, it is possible for anyone
who does not carry the Intelligent Key to
push the request switch to lock/unlock
the doors including the liftgate.
SPA2407
DOOR LOCKS/UNLOCKS PRECAU-
TION
.
Do not push the door handle request
switch with the Intelligent Key held in
your hand as illustrated. The close
distance to the door handle will cause
the Intelligent Key system to have
difficulty recognizing that the Intelli-
gent Key is outside the vehicle.
. After locking with the door handle
request switch, verify the doors are
securely locked by testing them.
. To prevent the Intelligent Key from
being left inside the vehicle, make sure
you carry the key with you and then
lock the doors.
Pre-driving checks and adjustments3-13
Page 185 of 508
Welcome light and farewell light
function
When you lock or unlock the doors or the
liftgate, the daytime running lights, park-
ing lights and the tail lights will illuminate
for a period of time. The welcome light
and farewell light function can be dis-
abled. For information about disabling
the welcome light and farewell light
function, see “Vehicle Settings” (P.2-23).
Locking doors
1. Move the shift lever to the P (Park)position (Continuously Variable Trans-
mission (CVT) models), or the shift
lever in the N (Neutral) position (Man-
ual Transmission (MT) models), place
the ignition switch in the OFF position
and make sure you carry the Intelli-
gent Key with you.
2. Close all doors.
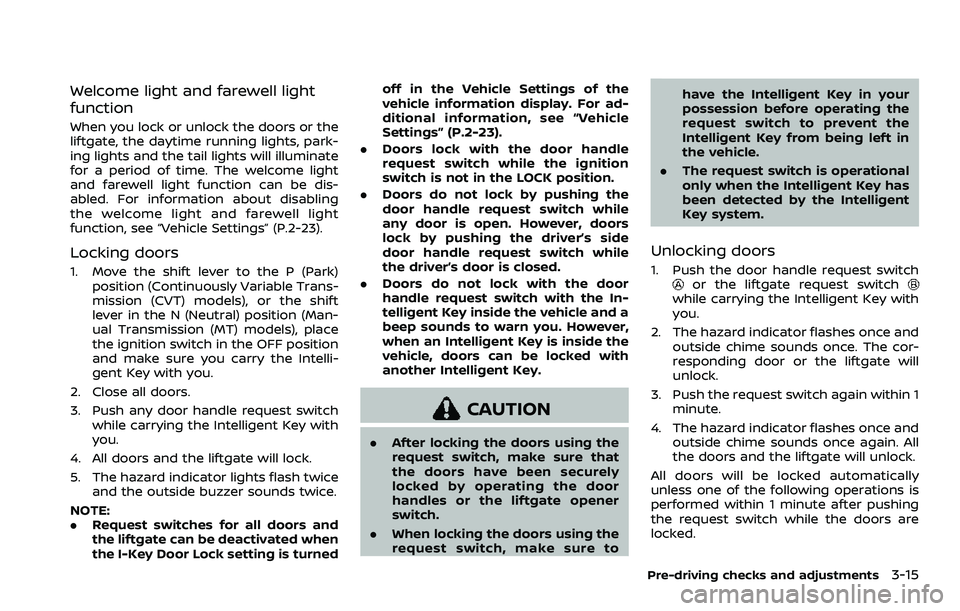
3. Push any door handle request switch while carrying the Intelligent Key with
you.
4. All doors and the liftgate will lock.
5. The hazard indicator lights flash twice and the outside buzzer sounds twice.
NOTE:
. Request switches for all doors and
the liftgate can be deactivated when
the I-Key Door Lock setting is turned off in the Vehicle Settings of the
vehicle information display. For ad-
ditional information, see “Vehicle
Settings” (P.2-23).
. Doors lock with the door handle
request switch while the ignition
switch is not in the LOCK position.
. Doors do not lock by pushing the
door handle request switch while
any door is open. However, doors
lock by pushing the driver’s side
door handle request switch while
the driver’s door is closed.
. Doors do not lock with the door
handle request switch with the In-
telligent Key inside the vehicle and a
beep sounds to warn you. However,
when an Intelligent Key is inside the
vehicle, doors can be locked with
another Intelligent Key.
CAUTION
.After locking the doors using the
request switch, make sure that
the doors have been securely
locked by operating the door
handles or the liftgate opener
switch.
. When locking the doors using the
request switch, make sure to have the Intelligent Key in your
possession before operating the
request switch to prevent the
Intelligent Key from being left in
the vehicle.
. The request switch is operational
only when the Intelligent Key has
been detected by the Intelligent
Key system.
Unlocking doors
1. Push the door handle request switchor the liftgate request switchwhile carrying the Intelligent Key with
you.
2. The hazard indicator flashes once and outside chime sounds once. The cor-
responding door or the liftgate will
unlock.
3. Push the request switch again within 1 minute.
4. The hazard indicator flashes once and outside chime sounds once again. All
the doors and the liftgate will unlock.
All doors will be locked automatically
unless one of the following operations is
performed within 1 minute after pushing
the request switch while the doors are
locked.
Pre-driving checks and adjustments3-15
Page 189 of 508
HOW TO USE REMOTE KEYLESS
ENTRY FUNCTION
WARNING
.Radio waves could adversely af-
fect electric medical equipment.
Those who use a pacemaker
should contact the electric med-
ical equipment manufacturer for
the possible influences before
use.
. The Intelligent Key transmits
radio waves when the buttons
are pushed. The FAA advises that
the radio waves may affect air-
craft navigation and communica-
tion systems. Do not operate the
Intelligent Key while on an air-
plane. Make sure the buttons are
not operated unintentionally
when the unit is stored during a
flight.
CAUTION
.Do not allow the Intelligent Key,
which contains electrical compo-
nents, to come into contact with
water or salt water. This could affect the system function.
. Do not drop the Intelligent Key.
. Do not strike the Intelligent Key
sharply against another object.
. Do not change or modify the
Intelligent Key.
. Wetting may damage the Intelli-
gent Key. If the Intelligent Key
gets wet, immediately wipe until
it is completely dry.
. If the outside temperature is be-
low 14°F (-10°C) degrees, the bat-
tery of the Intelligent Key may not
function properly.
. Do not place the Intelligent Key
for an extended period in an area
where temperatures exceed
140°F (60°C).
. Do not attach the Intelligent Key
with a key holder that contains a
magnet.
. Do not place the Intelligent Key
near equipment that produces a
magnetic field, such as a TV,
audio equipment, personal com-
puters or cellular phone.
The remote keyless entry function can
operate all door locks using the remote
keyless entry function of the Intelligent Key. The remote keyless entry function
can operate at a distance of approxi-
mately 33 ft (10 m) from the vehicle. (The
operating distance depends upon the
conditions around the vehicle.)
The remote keyless entry function will not
operate:
.
When the Intelligent Key is not within
the operational range.
. When the doors are open or not
closed securely.
. When the Intelligent Key battery is
discharged.
The remote keyless entry function can
also operate the vehicle alarm.
Pre-driving checks and adjustments3-19
Page 190 of 508
3-20Pre-driving checks and adjustments
JVP0541X
Type A
JVP0542XType B
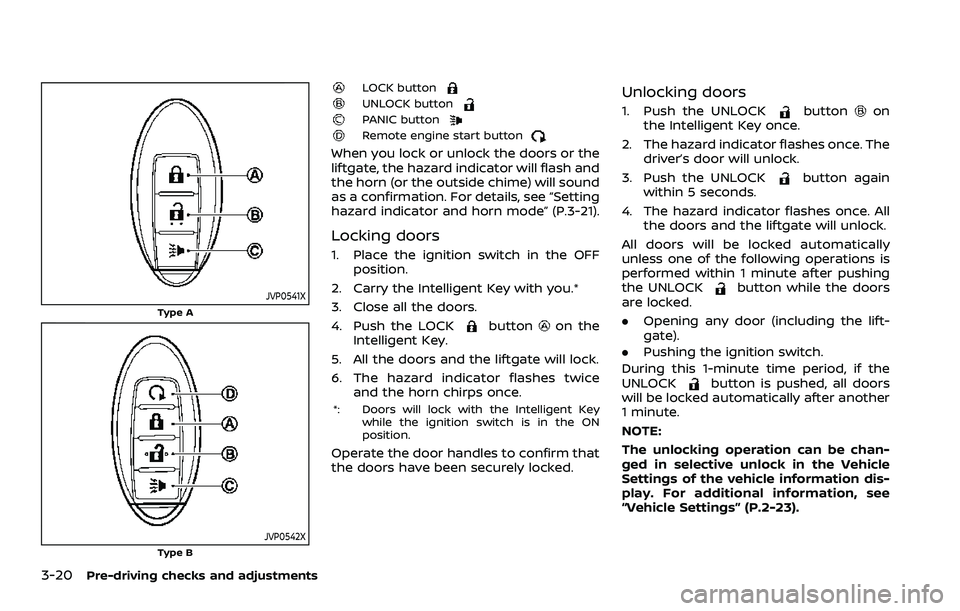
LOCK buttonUNLOCK buttonPANIC buttonRemote engine start button
When you lock or unlock the doors or the
liftgate, the hazard indicator will flash and
the horn (or the outside chime) will sound
as a confirmation. For details, see “Setting
hazard indicator and horn mode” (P.3-21).
Locking doors
1. Place the ignition switch in the OFFposition.
2. Carry the Intelligent Key with you.*
3. Close all the doors.
4. Push the LOCK
buttonon the
Intelligent Key.
5. All the doors and the liftgate will lock.
6. The hazard indicator flashes twice and the horn chirps once.
*: Doors will lock with the Intelligent Key
while the ignition switch is in the ON
position.
Operate the door handles to confirm that
the doors have been securely locked.
Unlocking doors
1. Push the UNLOCKbuttonon
the Intelligent Key once.
2. The hazard indicator flashes once. The driver’s door will unlock.
3. Push the UNLOCK
button again
within 5 seconds.
4. The hazard indicator flashes once. All the doors and the liftgate will unlock.
All doors will be locked automatically
unless one of the following operations is
performed within 1 minute after pushing
the UNLOCK
button while the doors
are locked.
. Opening any door (including the lift-
gate).
. Pushing the ignition switch.
During this 1-minute time period, if the
UNLOCK
button is pushed, all doors
will be locked automatically after another
1 minute.
NOTE:
The unlocking operation can be chan-
ged in selective unlock in the Vehicle
Settings of the vehicle information dis-
play. For additional information, see
“Vehicle Settings” (P.2-23).
Page 194 of 508
3-24Pre-driving checks and adjustments
3. Within 5 seconds push and hold theremote engine startbutton until
the turn signal lights flash and the tail
lights illuminate. If the vehicle is not
within view, push and hold the remote
engine start
button for at least 2
seconds.
The following events will occur when the
engine starts:
. The front parking lights will turn on
and remain on as long as the engine is
running.
. The doors will be locked and the air
conditioner system may turn on.
. The engine will continue to run for
about 10 minutes. Repeat the steps to
extend the time for an additional 10
minutes. See “Extending engine run
time” (P.3-24).
Depress and hold the brake pedal, then
place the ignition switch in the ON posi-
tion before driving. For further instruc-
tions, see “Driving the vehicle” (P.5-20).
EXTENDING ENGINE RUN TIME
The remote engine start function can be
extended one time by performing the
steps listed in “Remote starting the en-
gine” (P.3-23). Run time will be calculated
as follows:
. The first 10 minute run time will start
when the remote engine start func- tion is performed.
. The second 10 minutes will start im-
mediately when the remote engine
start function is performed. For exam-
ple, if the engine has been running for
5 minutes, and 10 minutes are added,
the engine will run for a total of 15
minutes.
. Extending engine run time will count
towards the two remote engine start
limit.
A maximum of two remote engine starts,
or a single start with an extension, are
allowed between ignition cycles.
The ignition switch must be cycled to the
ON position and then back to the OFF
position before the remote engine start
procedure can be used again.
CANCELING A REMOTE ENGINE
START
To cancel a remote engine start, perform
one of the following:
. Aim the Intelligent Key at the vehicle
and push and hold the remote engine
start
button until the front park-
ing lights turn off.
. Turn on the hazard indicator flashers.
. Cycle the ignition switch ON and then
OFF. .
The extended engine run time has
expired.
. The first 10 minute timer has expired.
. The engine hood has been opened.
. The shift lever is moved out of the P
(Park) position.
. The theft alarm sounds due to illegal
entry into the vehicle.
. The ignition switch is pushed without
an Intelligent Key in the vehicle.
. The ignition switch is pushed with an
Intelligent Key in the vehicle but the
brake pedal is not depressed.
CONDITIONS THE REMOTE ENGINE
START WILL NOT WORK
The remote engine start will not operate
if any of the following conditions are
present:
.The ignition switch is placed in the ON
position.
. The hood is not securely closed.
. The hazard indicator flashers are on.
. The engine is still running. The engine
must be completely stopped. Wait at
least 6 seconds if the engine goes
from running to off. This is not applic-
able when extending engine run time.
. The remote engine start
button is
not pushed and held for at least 2
seconds.
Page 196 of 508
3-26Pre-driving checks and adjustments
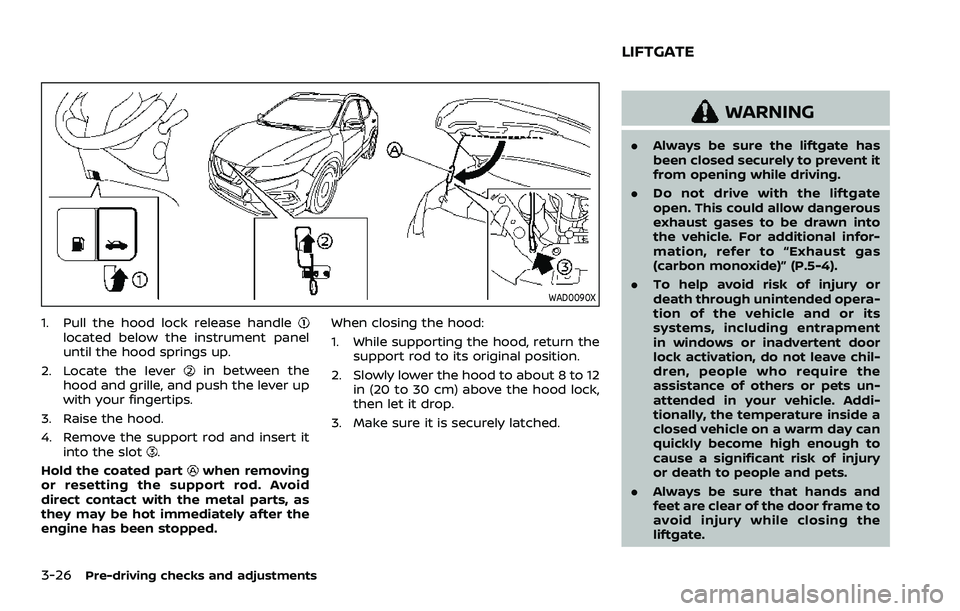
WAD0090X
1. Pull the hood lock release handlelocated below the instrument panel
until the hood springs up.
2. Locate the lever
in between the
hood and grille, and push the lever up
with your fingertips.
3. Raise the hood.
4. Remove the support rod and insert it into the slot
.
Hold the coated part
when removing
or resetting the support rod. Avoid
direct contact with the metal parts, as
they may be hot immediately after the
engine has been stopped. When closing the hood:
1. While supporting the hood, return the
support rod to its original position.
2. Slowly lower the hood to about 8 to 12 in (20 to 30 cm) above the hood lock,
then let it drop.
3. Make sure it is securely latched.
WARNING
. Always be sure the liftgate has
been closed securely to prevent it
from opening while driving.
. Do not drive with the liftgate
open. This could allow dangerous
exhaust gases to be drawn into
the vehicle. For additional infor-
mation, refer to “Exhaust gas
(carbon monoxide)” (P.5-4).
. To help avoid risk of injury or
death through unintended opera-
tion of the vehicle and or its
systems, including entrapment
in windows or inadvertent door
lock activation, do not leave chil-
dren, people who require the
assistance of others or pets un-
attended in your vehicle. Addi-
tionally, the temperature inside a
closed vehicle on a warm day can
quickly become high enough to
cause a significant risk of injury
or death to people and pets.
. Always be sure that hands and
feet are clear of the door frame to
avoid injury while closing the
liftgate.
LIFTGATE