Page 227 of 508
 system
could result in serious injury or death.
• The MOD system is not a substitu")
WARNING
• Failure to follow the warnings and in-
structions for proper use of the Mov-
ing Object Detection (MOD) system
could result in serious injury or death.
• The MOD system is not a substitute
for proper vehicle operation and is
not designed to prevent contact with
objects surrounding the vehicle.
When maneuvering, always use the
outside mirrors and rearview mirror
and turn and check the surroundings
to ensure it is safe to maneuver.
• The system is deactivated at speeds
above 6 mph (10 km/h). It is reacti-
vated at lower speeds.
• The MOD system is not designed to
detect surrounding stationary
objects.
The MOD system can inform the driver of
moving objects near the vehicle when
backing out of garages, maneuvering in
parking lots and in other such instances.
The MOD system detects moving objects
by using image processing technology on
the image shown in the display.MOD SYSTEM OPERATION
The MOD system will turn on automatically
under the following conditions:
• When the shif t lever is in the R (Reverse) position.
• When vehicle speed decreases below ap- proximately 6 mph (10 km/h) and the
camera screen is displayed.
The MOD system operates in the following
conditions when the camera view is
displayed:
• When the shif t lever is in the P (Park) or N(Neutral) position and the vehicle is
stopped, the MOD system detects mov-
ing objects in the bird’s-eye view. The
MOD system will not operate if the out-
side mirrors are moving in or out, in the
stowed position, or if either front door is
opened.
LHA4190
Front and bird’s-eye views
Monitor, climate, audio, phone and voice recognition systems4-23
Page 229 of 508
A blue MOD iconO3is displayed in the view
where the MOD system is operative. A gray
MOD icon is displayed in the view where the
MOD system is not operative.
If the MOD system is turned off, the MOD
icon
O3is not displayed.
TURNING MOD ON AND OFF
To turn the MOD system on or off, press and
hold the CAMERA button for more than 2
seconds.
MOD SYSTEM LIMITATIONS
Page 232 of 508
1. Temperature control dial (driver’s side)/AUTO button
2. ON-OFF button
3. Display screen
4. MODE (manual air flow control) button
5. Temperature control dial (passenger’s
side)/DUAL button
6.
Fresh air intake button 7.
Air recirculation button
8. A/C (air conditioner) button
9.
fan speed control buttons
10.REAR window and outside mirror
(if so equipped) defroster switch
11.
FRONT (defroster) button
Page 233 of 508

front defroster button on.
The indicator light on the button will
come on.
2. Turn the temperature control dial to set the maximum temperature to aid in de-
frosting or defogging.
• To quickly remove ice from the outside of the windows, use the
fan speed con-
trol buttons to set the fan speed to
maximum. • As soon as possible af ter the windshield
is clean, press the AUTO button to return
to the automatic mode.
•
When thefront defroster button is
pressed, the air conditioner will automati-
cally be turned on at outside temperatures
above 36°F (2°C). The air recirculate mode
automatically turns off, allowing outside air
to be drawn into the passenger compart-
ment to further improve the defogging
performance. When the air recirculate
mode automatically turns off, the air fresh
mode will automatically turn on.
Remote Engine Start with
Intelligent Climate Control (if so
equipped)
Vehicles equipped with automatic climate
controls and Remote Engine Start function
may go into automatic heating or cooling
mode when Remote Engine Start is acti-
vated depending on outside and cabin
temperatures. During this period, the cli-
mate control display and buttons will be
inoperable until the ignition switch is
turned on. In Remote Engine Start defrost-
ing mode, the rear window defroster,
heated seats (if so equipped) and heated
steering wheel (if so equipped) may be ac-
tivated automatically.
Monitor, climate, audio, phone and voice recognition systems4-29
Page 244 of 508

prevent the TPMS from functioning prop-
erly. Always check the TPMS malfunction
telltale af ter replacing one or more tires or
wheels on your vehicle to ensure that the
replacement or alternate tires and wheels
allow the TPMS to continue to function
properly.
Additional information:
• When using a wheel without the TPMSsuch as the spare tire, the TPMS does not
monitor the tire pressure of the spare tire.
• The TPMS will activate only when the ve- hicle is driven at speeds above 16 mph (25
km/h). Also, this system may not detect a
sudden drop in tire pressure (for example,
a flat tire while driving).
• The low tire pressure warning light does not automatically turn off when the tire
pressure is adjusted. Af ter the tire is in-
flated to the recommended pressure, the
vehicle must be driven at speeds above
16 mph (25 km/h) to activate the TPMS
and turn off the low tire pressure warning
light. Use a tire pressure gauge to check
the tire pressure. • The “Tire Pressure Low — Add Air” warning
appears in the vehicle information dis-
play when the low tire pressure warning
light is illuminated and low tire pressure is
detected. The “Tire Pressure Low — Add
Air” warning turns off when the low tire
pressure warning light turns off.
• The “Tire Pressure Low — Add Air” warning appears each time the ignition switch is
placed in the ON position as long as the
low tire pressure warning light remains
illuminated.
• The “Tire Pressure Low — Add Air” warning does not appear if the low tire pressure
warning light illuminates to indicate a
TPMS malfunction.
• Tire pressure rises and falls depending on the heat caused by the vehicle’s opera-
tion and the outside temperature. Do not
reduce the tire pressure af ter driving be-
cause the tire pressure rises af ter driving.
Low outside temperature can lower the
temperature of the air inside the tire
which can cause a lower tire inflation
pressure. This may cause the low tire
pressure warning light to illuminate. If the
warning light illuminates, check the tire
pressure for all four tires. • The Tire and Loading Information label is
located in the driver's door opening.
• You can also check the pressure of all tires (except the spare tire) on the vehicle
information display screen. The order of
the tire pressure figures displayed on the
screen corresponds with the actual order
of the tire position.
For additional information, see “Low tire
pressure warning light” (P. 2-12) and “Tire
Pressure Monitoring System (TPMS)” (P. 6-3).
Page 251 of 508
.")
•Whenever you drive off-road through
sand, mud or water as deep as the
wheel hub, more frequent mainte-
nance may be required. For addi-
tional information, see “Maintenance
schedules” (P. 9-7).
WARNING
Do not operate the push-button igni-
tion switch while driving the vehicle ex-
cept in an emergency. (The engine will
stop when the ignition switch is pushed
three consecutive times in less than 1.5
seconds or the ignition switch is
pushed and held for more than 2 sec-
onds.) If the engine stops while the ve-
hicle is being driven, this could lead to a
crash and serious injury. When the ignition switch is pushed without
depressing the brake pedal, the ignition
switch will illuminate.
If the ignition switch is in the LOCK or OFF
position, push the ignition switch center:
• Once to change to ACC.
• Two times to change to ON.
• Three times to change to OFF.
The shif t lever can be moved from the P
(Park) position if the ignition switch is in
the ON position and the brake pedal is
depressed.
If the battery of the vehicle is discharged,
the ignition switch cannot be moved
from the LOCK position.
Some indicators and warnings for opera-
tion are displayed on the vehicle informa-
tion display. For additional information, see
“Vehicle information display” (P. 2-17).
LSD2014
PUSH-BUTTON IGNITION SWITCH
Starting and driving5-13
Page 262 of 508

•To help avoid risk of injury or death
through unintended operation of the
vehicle and/or its systems, do not
leave children, people who require
the assistance of others or pets unat-
tended in your vehicle. Additionally,
the temperature inside a closed ve-
hicle on a warm day can quickly be-
come high enough to cause a signifi-
cant risk of injury or death to people
and pets.
To engage:
Firmly depress the parking brake.
To release:
1. Firmly apply the foot brake.
2. Move the shif t lever to the P (Park) position.
3. Firmly depress the parking brake pedal and it will release.
4. Before driving, be sure the brake warn- ing light goes out. The TSR system provides the driver with
information about the most recently de-
tected speed limit. The system captures
the road sign information with the multi-
sensing front camera unit
OAlocated on
the windshield in front of the inside rear-
view mirror and displays the detected
signs in the vehicle information display. For
vehicles equipped with a navigation sys-
tem, the speed limit displayed is based on a
combination of navigation system data
and live camera recognition. TSR informa-
tion is always displayed at the top of the
vehicle information display if the system is
enabled in the Driver Assistance settings.
Page 263 of 508
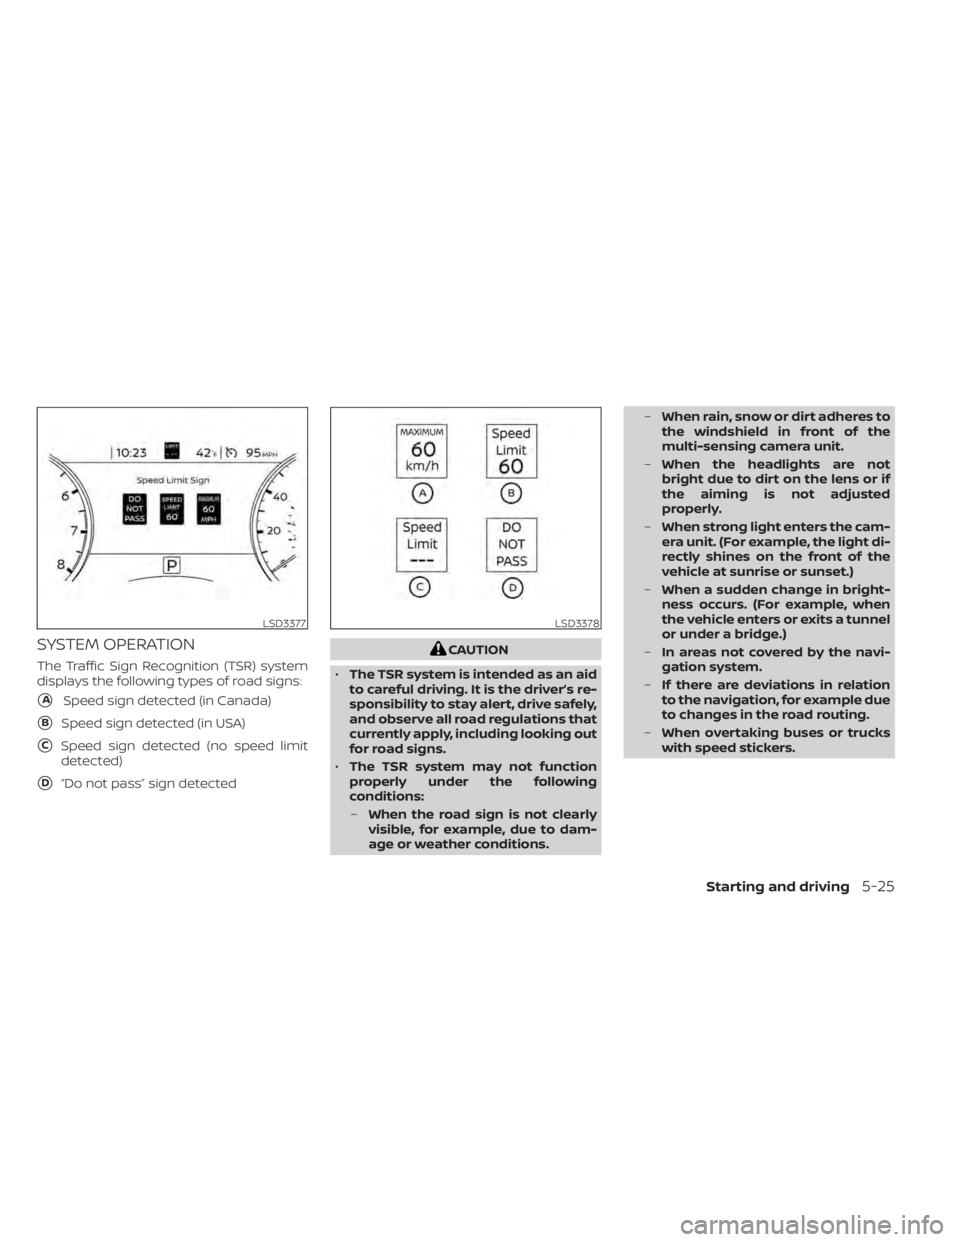
SYSTEM OPERATION
The Traffic Sign Recognition (TSR) system
displays the following types of road signs:
�ASpeed sign detected (in Canada)
�BSpeed sign detected (in USA)
�CSpeed sign detected (no speed limit
detected)
�D“Do not pass” sign detected
LSD3378

/AUTO button
2. ON-OFF button
3. Display screen
4. MODE (manual air flow control) button
5. Temperature control dial (passenger’s
side)/DUAL button
6.
Fr")