2022 NISSAN KICKS door
[x] Cancel search: doorPage 177 of 500
• The Remote Engine Start function hasbeen switched to the OFF position in “Ve-
hicle Settings” of the vehicle information
display (if so equipped). For additional in-
formation, refer to “Vehicle information
display” in the “Instruments and controls”
section of this manual.
The Remote Engine Start may display a
warning or indicator in the vehicle informa-
tion display (if so equipped). For additional
information, refer to “Vehicle information
display” in the “Instruments and controls”
section of this manual.
REMOTE ENGINE START
OPERATING RANGE
CAUTION
When the Intelligent Key battery is dis-
charged or other strong radio wave
sources are present near the operating
location, the Intelligent Key operating
range becomes narrower, and the Intel-
ligent Key may not function properly.
The Remote Engine Start function can only
be used when the Intelligent Key is within
the specified operating range from the ve-
hicle.
The Remote Engine Start operating range
is approximately 197 f t (60 m) from the ve-
hicle.
REMOTE STARTING THE VEHICLE
To use the Remote Engine Start feature
perform the following:
1. Aim the Intelligent Key at the vehicle.
2. Press the
button to lock all doors.
3. Within 5 seconds press and hold the
button until the turn signal lights
flash and the tail lamps turn on. If the
vehicle is not within view press and hold
the
button for at least 2 seconds. The following events will occur when the
engine starts:
• The parking lights will turn on and remain
on as long as the engine is running.
• The doors will be locked and the climate control system may come on.
• The engine will continue to run for 10 min- utes. Repeat the steps to extend the time
for an additional 10 minutes. For addi-
tional information, refer to “Extending en-
gine run time” in this section.
Press and hold the brake pedal while
switching the ignition to the ON position
before driving. For additional information,
refer to “Driving the vehicle” in the “Starting
and driving” section of this manual.
EXTENDING ENGINE RUN TIME
The Remote Engine Start feature can be
extended one time by performing the
steps listed in “Remote starting the vehicle”
in this section. Run time will be calculated
as follows:
• The first 10 minute run time will start when the Remote Engine Start function is
performed.
Pre-driving checks and adjustments3-19
Page 178 of 500
• The second 10 minutes will start immedi-ately when the Remote Engine Start
function is performed again. For example,
if the engine has been running for 5 min-
utes, and 10 minutes are added, the en-
gine will run for a total of 15 minutes.
• Extending engine run time will bring you to the two Remote Engine Start limit.
A maximum of two Remote Engine Starts,
or a single Remote Engine Start with an
extension, are allowed between ignition
cycles. The ignition switch must be cycled
to the ON position and then back to the
OFF position before the Remote Engine
Start procedure can be used again.
CANCELING A REMOTE ENGINE
START
To cancel a Remote Engine Start, perform
one of the following:
• Aim the Intelligent Key at the vehicle and press
until the parking lights turn off.
• Turn on the hazard warning flashers.
• Cycle the ignition switch on and then off.
• The extended engine run time has ex- pired.
• The first 10 minute timer has expired.
• Opening the engine hood.
• Shif ting the vehicle out of P (Park). • The alarm sounds due to illegal entry into
the vehicle.
• Pushing the ignition switch without the Intelligent Key in the vehicle.
• Not pressing the brake pedal while press- ing the ignition switch with the Intelligent
Key in the vehicle.
CONDITIONS THE REMOTE ENGINE
START WILL NOT WORK
The Remote Engine Start will not operate if
any of the following conditions are present:
• The ignition switch is placed in the ONposition.
• The hood is not securely closed.
• The hazard indicator lights are on.
• The engine is still running. The engine must be completely stopped. Wait at
least 6 seconds if the engine goes from
running to off. This is not applicable when
extending engine run time.
• The
button is not pressed and held
for at least 2 seconds.
• The
button is not pressed and held
within 5 seconds of pressing the lock but-
ton.
• The brake is pressed.
• The doors are not closed and locked. • The lif tgate is open.
• The I–Key System Error warning shows in
the vehicle information display (if so
equipped).
• The alarm sounds due to illegal entry into the vehicle.
• Two Remote Engine Starts, or a single Remote Engine Start with an extension,
have already been used.
• The vehicle is not in P (Park).
• There is a detected registered key already inside of the vehicle.
• The Remote Engine Start function has been switched to the OFF position in “Ve-
hicle Settings” of the vehicle information
display (if so equipped). For additional in-
formation, refer to “Vehicle information
display” in the “Instruments and controls”
section of this manual.
The Remote Engine Start may display a
warning or indicator in the vehicle informa-
tion display (if so equipped). For additional
information, refer to “Vehicle information
display” in the “Instruments and controls”
section of this manual.
3-20Pre-driving checks and adjustments
Page 180 of 500
WARNING
• Always be sure the lif tgate has been
closed securely to prevent it from
opening while driving.
• Do not drive with the lif tgate open.
This could allow dangerous exhaust
gases to be drawn into the vehicle.
For additional information, refer to
“Exhaust gas (carbon monoxide)” in
the “Starting and driving” section of
this manual.
• Do not leave children or adults who
would normally require the assis-
tance of others alone in your vehicle.
Pets should also not be lef t alone.
They could accidently injure them-
selves or others through inadvertent
operation of the vehicle. Also, on hot,
sunny days, temperatures in a closed
vehicle could quickly become high
enough to cause severe or possibly
fatal injuries to people or animals.
• Always be sure that hands and feet
are clear of the door frame to avoid
injury while closing the lif tgate.CAUTION
• Before opening the lif tgate, be sure
to clear away snow, ice or dust that
may be stuck to the lif tgate. If the
lif tgate is opened while materials are
still stuck to it, it may suddenly close
again due to the weight of these
materials.
• Always be sure to fully open the lif t-
gate. If it is not fully opened, it may
suddenly shut.
• Be especially careful when opening
the lif tgate in strong wind. The door
could be caught by a gust of wind
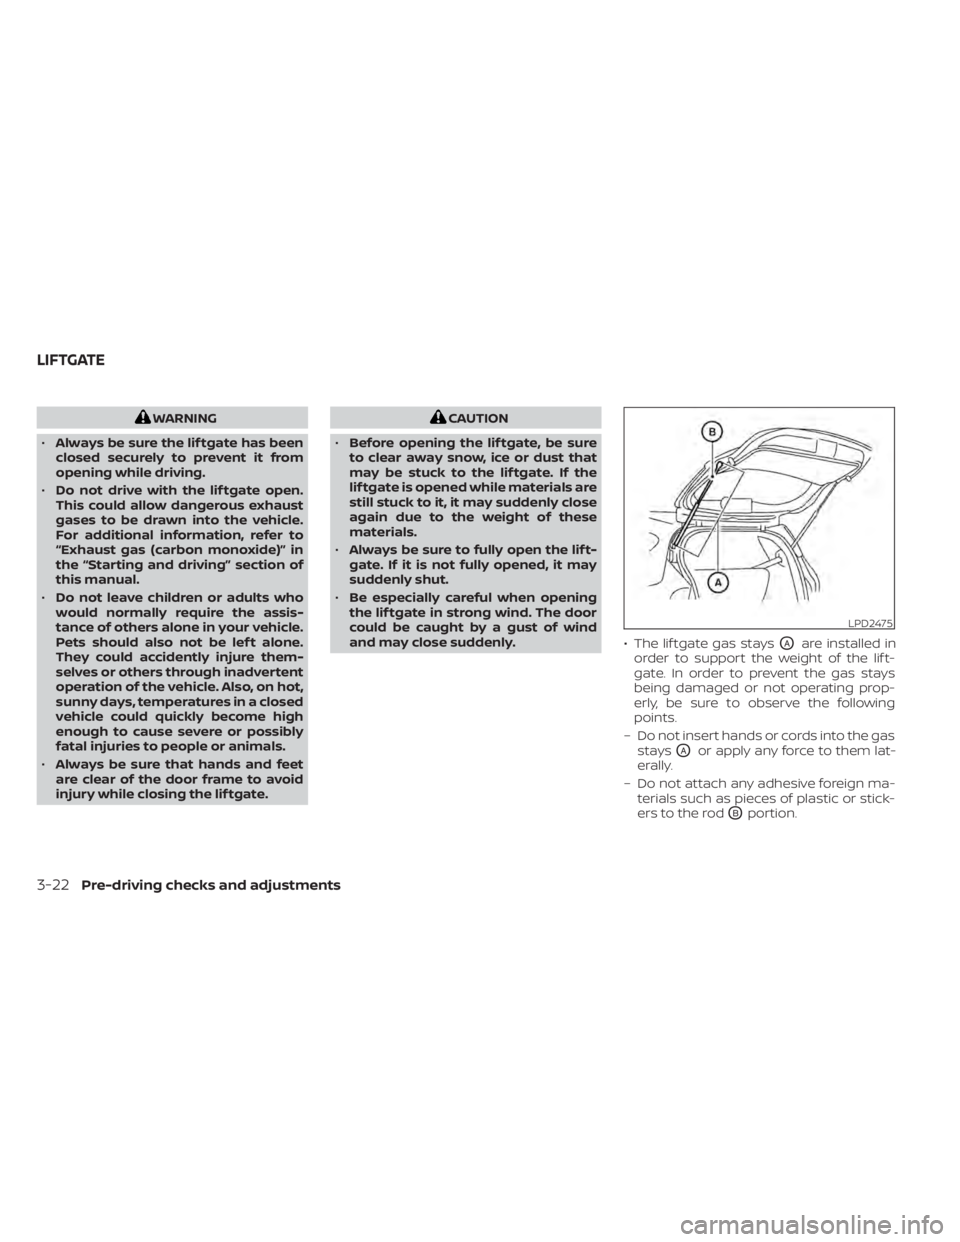
and may close suddenly. • The lif tgate gas stays
OAare installed in
order to support the weight of the lif t-
gate. In order to prevent the gas stays
being damaged or not operating prop-
erly, be sure to observe the following
points.
– Do not insert hands or cords into the gas stays
OAor apply any force to them lat-
erally.
– Do not attach any adhesive foreign ma- terials such as pieces of plastic or stick-
ers to the rod
OBportion.
LPD2475
LIFTGATE
Page 183 of 500
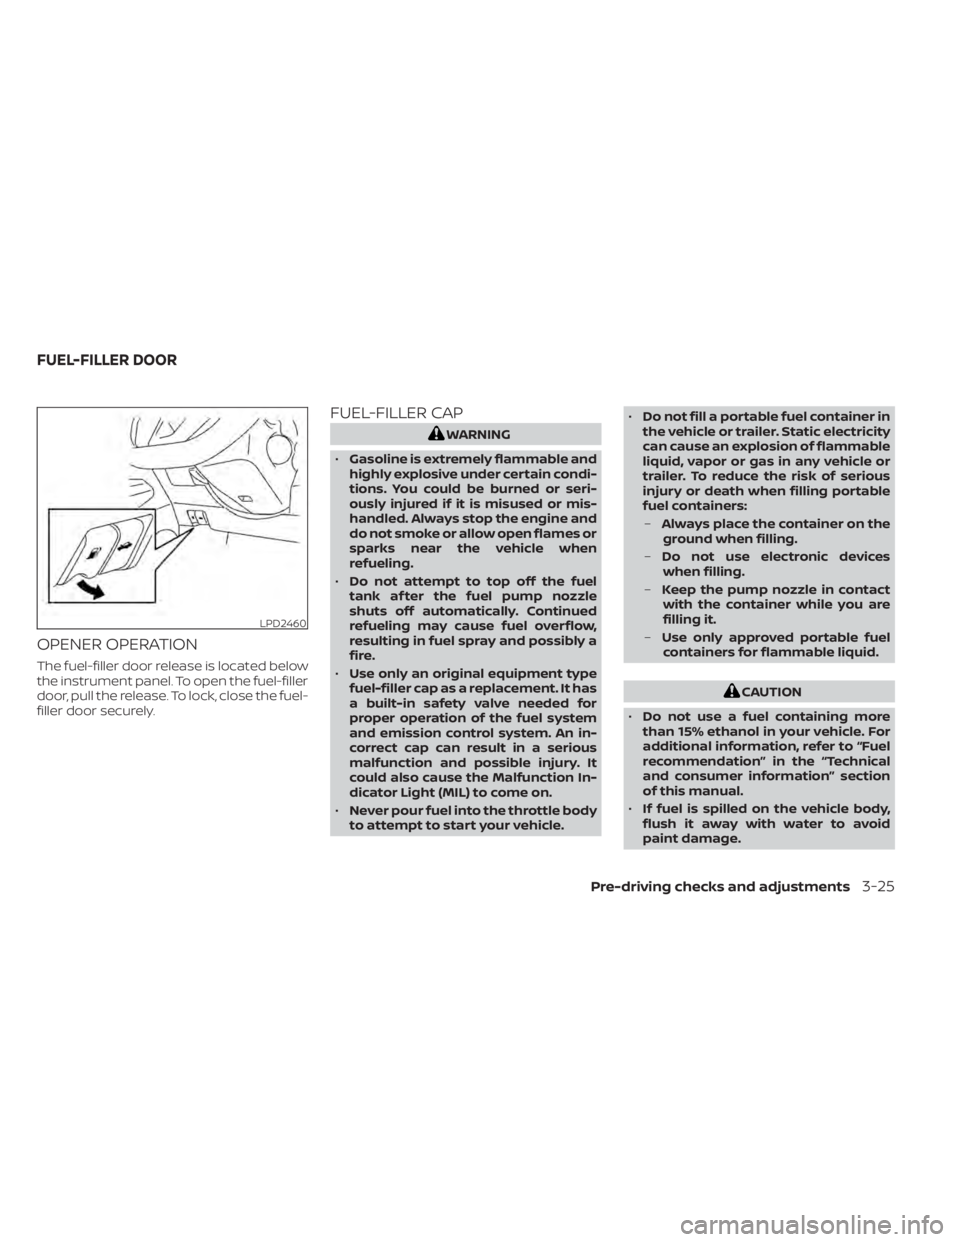
OPENER OPERATION
The fuel-filler door release is located below
the instrument panel. To open the fuel-filler
door, pull the release. To lock, close the fuel-
filler door securely.
FUEL-FILLER CAP
CAUTION
• Do not use a fuel containing more
than 15% ethanol in your vehicle. For
additional information, refer to “Fuel
recommendation” in the “Technical
and consumer information” section
of this manual.
• If fuel is spilled on the vehicle body,
flush it away with water to avoid
paint damage.
Pre-driving checks and adjustments3-25
Page 187 of 500
•Objects viewed in the outside mirror
on the passenger side are closer than
they appear. Be careful when moving
to the right. Using only this mirror
could cause an accident. Use the in-
side mirror or glance over your
shoulder to properly judge distances
to other objects.
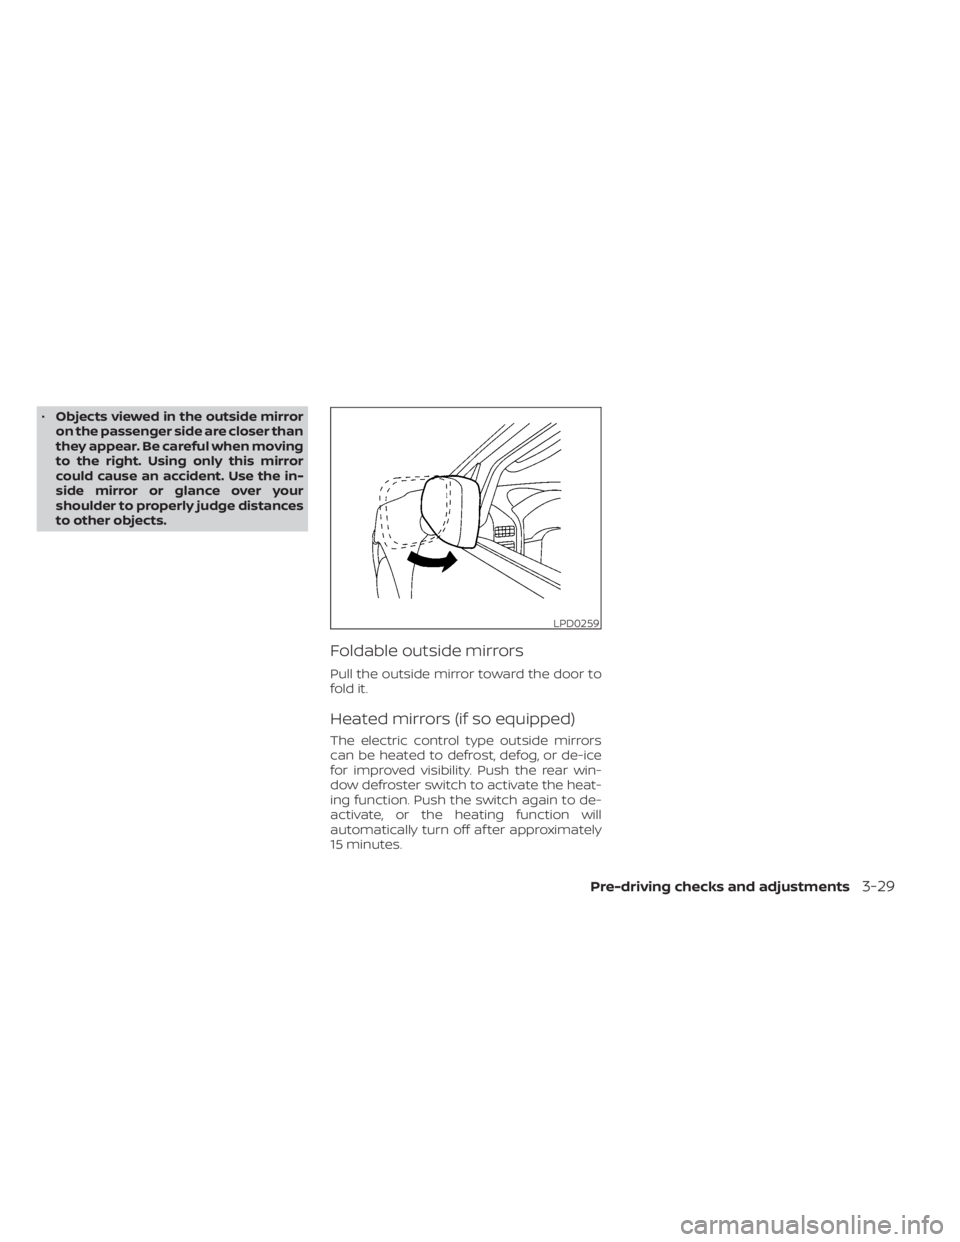
Foldable outside mirrors
Pull the outside mirror toward the door to
fold it.
Heated mirrors (if so equipped)
The electric control type outside mirrors
can be heated to defrost, defog, or de-ice
for improved visibility. Push the rear win-
dow defroster switch to activate the heat-
ing function. Push the switch again to de-
activate, or the heating function will
automatically turn off af ter approximately
15 minutes.
LPD0259
Page 218 of 500
The MOD system operates in the following
conditions when the camera view is dis-
played:
• When the shif t lever is in the P (Park) or N(Neutral) position and the vehicle is
stopped, the MOD system detects mov-
ing objects in the bird’s-eye view. The
MOD system will not operate if the out-
side mirrors are moving in or out, in the
stowed position, or if either front door is
opened. • When the shif t lever is in the D (Drive)
position and the vehicle speed is below
approximately 5 mph (8 km/h), the MOD
system detects moving objects in the
front view.
• When the shif t lever is in the R (Reverse) position and the vehicle speed is below
approximately 5 mph (8 km/h), the MOD
system detects moving objects in the
rear view. The MOD system will not oper-
ate if the lif tgate is open. The MOD system does not detect moving
objects in the front-side view. The MOD
icon is not displayed on the screen when in
this view.
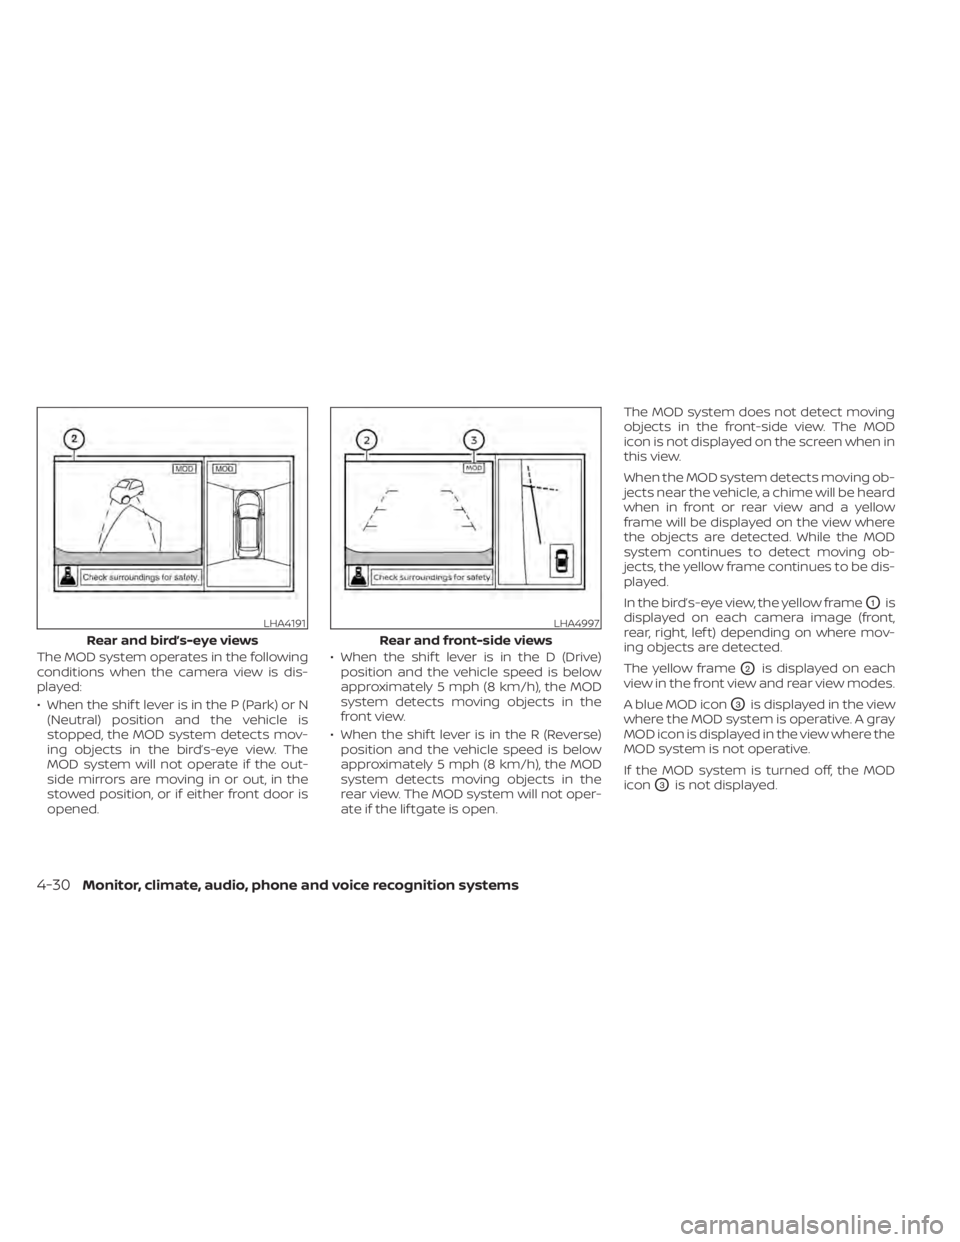
When the MOD system detects moving ob-
jects near the vehicle, a chime will be heard
when in front or rear view and a yellow
frame will be displayed on the view where
the objects are detected. While the MOD
system continues to detect moving ob-
jects, the yellow frame continues to be dis-
played.
In the bird’s-eye view, the yellow frame
O1is
displayed on each camera image (front,
rear, right, lef t) depending on where mov-
ing objects are detected.
The yellow frame
O2is displayed on each
view in the front view and rear view modes.
A blue MOD icon
O3is displayed in the view
where the MOD system is operative. A gray
MOD icon is displayed in the view where the
MOD system is not operative.
If the MOD system is turned off, the MOD
icon
O3is not displayed.
LHA4191
Rear and bird’s-eye views
Page 275 of 500
Vehicle Dynamic Control (VDC) system........5-100
Brake force distribution ....................5-102
Chassis Control (if so equipped) ...............5-103
Intelligent Trace Control (I-TC) ..............5-103
Intelligent Engine Brake (I-EB) ...............5-103
Active Ride Control (ARC) ...................5-104
Hill start assist system ........................5-104
Rear Sonar System (RSS) (if so equipped) ......5-105
System operation .......................... 5-106
How to enable/disable the sonar
system ..................................... 5-108
Sonar limitations ........................... 5-109System temporarily unavailable
............5-110
System maintenance ......................5-110
Cold weather driving ........................... 5-111
Freeing a frozen door lock ...................5-111
Antifreeze ................................... 5-111
Battery...................................... 5-111
Draining of coolant water ...................5-111
Tire equipment .............................. 5-111
Special winter equipment ..................5-112
Driving on snow or ice ......................5-112
Parking brake .............................. 5-112
Engine block heater (if so equipped) ........5-112
Page 278 of 500
prevent the TPMS from functioning prop-
erly. Always check the TPMS malfunction
telltale af ter replacing one or more tires or
wheels on your vehicle to ensure that the
replacement or alternate tires and wheels
allow the TPMS to continue to function
properly.
Additional information:
• When replacing a wheel without theTPMS such as a spare tire, the TPMS does
not monitor the tire pressure of the spare
tire.
• The TPMS will activate only when the ve- hicle is driven at speeds above 16 mph (25
km/h). Also, this system may not detect a
sudden drop in tire pressure (for example,
a flat tire while driving).
• The low tire pressure warning light does not automatically turn off when the tire
pressure is adjusted. Af ter the tire is in-
flated to the recommended pressure, the
vehicle must be driven at speeds above
16 mph (25 km/h) to activate the TPMS
and turn off the low tire pressure warning
light. Use a tire pressure gauge to check
the tire pressure. • The “Tire Pressure Low — Add Air” or
“CHECK TIRE PRES” warning appears each
time the ignition switch is placed in the
ON position as long as the low tire pres-
sure warning light remains illuminated.
• The “Tire Pressure Low — Add Air” warning appears in the vehicle information dis-
play, or the “CHECK TIRE PRES” warning
appears in the trip computer when the
low tire pressure warning light is illumi-
nated and low tire pressure is detected.
The “Tire Pressure Low — Add Air” or
“CHECK TIRE PRES” warning turns off
when the low tire pressure warning light
turns off.
• The “Tire Pressure Low — Add Air” or “CHECK TIRE PRES” warning does not ap-
pear if the low tire pressure warning light
illuminates to indicate a TPMS malfunc-
tion. • Tire pressure rises and falls depending on
the heat caused by the vehicle’s opera-
tion and the outside temperature. Do not
reduce the tire pressure af ter driving be-
cause the tire pressure rises af ter driving.
Low outside temperature can lower the
temperature of the air inside the tire
which can cause a lower tire inflation
pressure. This may cause the low tire
pressure warning light to illuminate. If the
warning light illuminates, check the tire
pressure for all four tires.
• The Tire and Loading Information label is located in the driver's door opening.
• You can also check the pressure of all tires (except the spare tire) on the vehicle
information display screen. The order of
the tire pressure figures displayed on the
screen corresponds with the actual order
of the tire position.
For additional information, refer to “Low tire
pressure warning light” in the “Instruments
and controls” section and “Tire Pressure
Monitoring System (TPMS)” in the “In case of
emergency” section of this manual.
5-6Starting and driving