2022 NISSAN ARMADA child lock
[x] Cancel search: child lockPage 194 of 604
3-6Pre-driving checks and adjustments
Lockout protection
When the power door lock switch (driver
or front passenger) is moved to the lock
position with any door open, all doors will
lock and unlock automatically. With the
Intelligent Key left in the vehicle and any
door open, all doors will unlock automa-
tically and a chime will sound after the
door is closed.
These functions help to prevent the
Intelligent Key from being accidentally
locked inside the vehicle.
AUTOMATIC DOOR LOCKS
.All doors lock automatically when the
vehicle speed reaches 15 MPH (24
km/h).
. All doors unlock automatically when
the ignition switch is placed in the OFF
position or when the shift lever is
moved to the P (Park) position, if
selected.
The automatic unlock function can be
deactivated or activated. To deactivate
or activate the automatic door unlock
system, perform the following procedure:
1. Close all doors.
2. Place the ignition switch in the ON
position.
3. Within 20 seconds of performing Step 2, push and hold the power door lock switch to the
position (UNLOCK)
for more than 5 seconds.
4. When activated, the hazard indicator will flash twice. When deactivated, the
hazard indicator will flash once.
5. The ignition switch must be placed in the OFF and ON position again be-
tween each setting change.
When the automatic door unlock system
is deactivated, the doors do not unlock
when the ignition switch is placed in the
OFF position. To unlock the door manu-
ally, use the inside lock knob or the power
door lock switch (driver’s or front passen-
ger’s side).
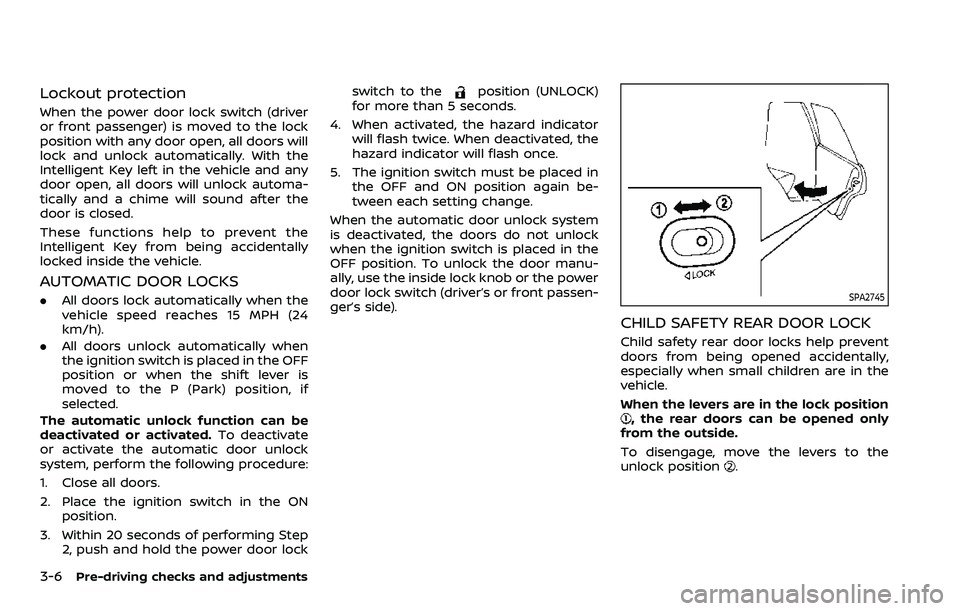
SPA2745
CHILD SAFETY REAR DOOR LOCK
Child safety rear door locks help prevent
doors from being opened accidentally,
especially when small children are in the
vehicle.
When the levers are in the lock position
, the rear doors can be opened only
from the outside.
To disengage, move the levers to the
unlock position
.
Page 210 of 604
3-22Pre-driving checks and adjustments
WARNING
.Always be sure the liftgate has
been closed securely to prevent it
from opening while driving.
. Do not drive with the liftgate
open. This could allow dangerous
exhaust gases to be drawn into
the vehicle. See “Exhaust gas
(carbon monoxide)” (P.5-4).
. Do not leave children unattended
inside the vehicle. They could
unknowingly activate switches
or controls. Unattended children
could become involved in serious
accidents.
. Always be sure that hands and
feet are clear of the door frame to
avoid injury while closing the
liftgate.
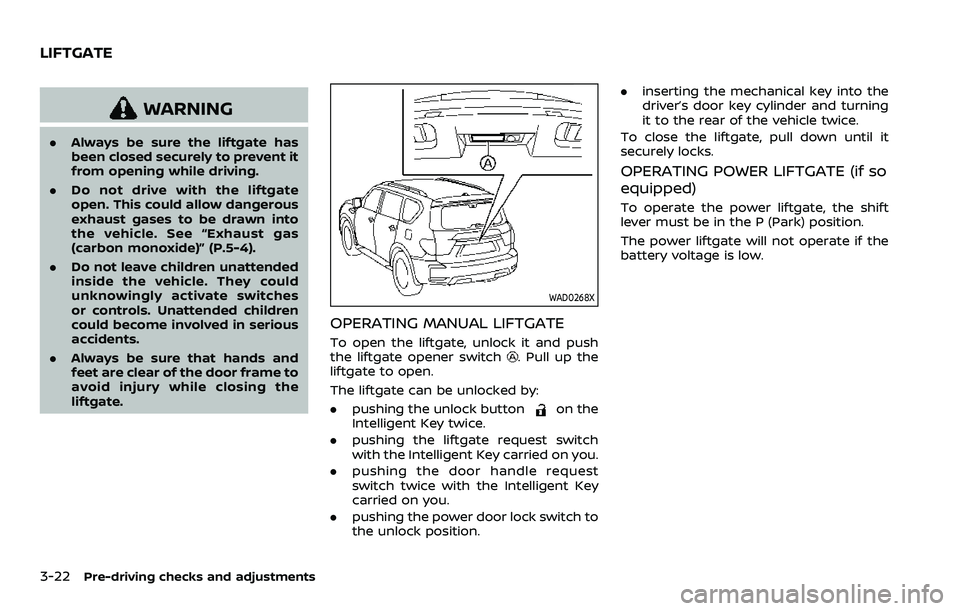
WAD0268X
OPERATING MANUAL LIFTGATE
To open the liftgate, unlock it and push
the liftgate opener switch. Pull up the
liftgate to open.
The liftgate can be unlocked by:
. pushing the unlock button
on the
Intelligent Key twice.
. pushing the liftgate request switch
with the Intelligent Key carried on you.
. pushing the door handle request
switch twice with the Intelligent Key
carried on you.
. pushing the power door lock switch to
the unlock position. .
inserting the mechanical key into the
driver’s door key cylinder and turning
it to the rear of the vehicle twice.
To close the liftgate, pull down until it
securely locks.
OPERATING POWER LIFTGATE (if so
equipped)
To operate the power liftgate, the shift
lever must be in the P (Park) position.
The power liftgate will not operate if the
battery voltage is low.
LIFTGATE
Page 214 of 604
3-26Pre-driving checks and adjustments
CAUTION
.The liftgate will automatically
close from a partly open position.
To avoid pinching, keep hands
and fingers away from liftgate
opening.
. Do not let children operate the
liftgate.
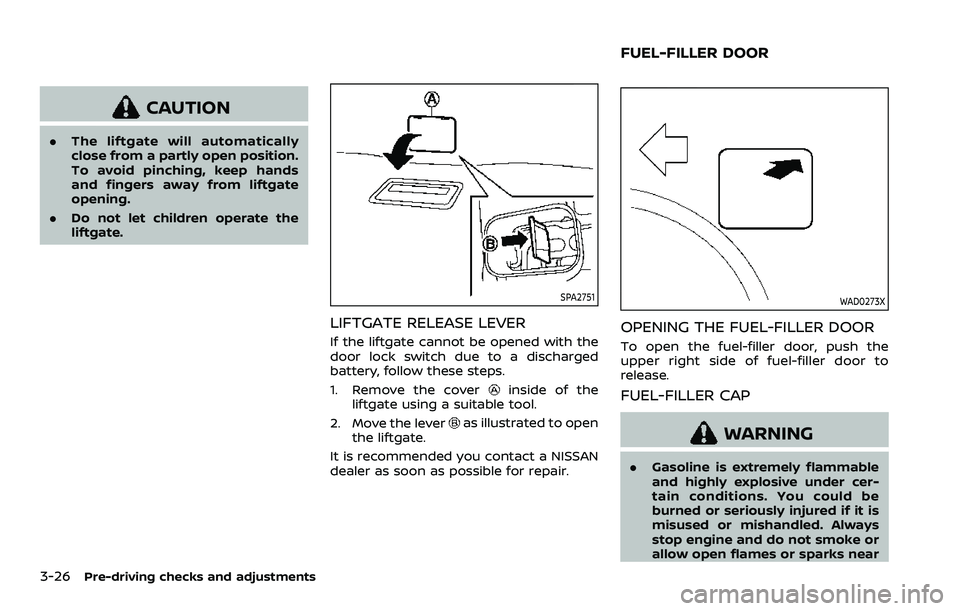
SPA2751
LIFTGATE RELEASE LEVER
If the liftgate cannot be opened with the
door lock switch due to a discharged
battery, follow these steps.
1. Remove the cover
inside of the
liftgate using a suitable tool.
2. Move the lever
as illustrated to open
the liftgate.
It is recommended you contact a NISSAN
dealer as soon as possible for repair.
WAD0273X
OPENING THE FUEL-FILLER DOOR
To open the fuel-filler door, push the
upper right side of fuel-filler door to
release.
FUEL-FILLER CAP
WARNING
. Gasoline is extremely flammable
and highly explosive under cer-
tain conditions. You could be
burned or seriously injured if it is
misused or mishandled. Always
stop engine and do not smoke or
allow open flames or sparks near
FUEL-FILLER DOOR
Page 281 of 604
6.HDMI port
Connect an external audio/video
source using a full-size HDMI connec-
tor. Supports MHL 2.0 playback and
charging.
7. USB 2.0 port
Play videos, music, and images stored
on most USB devices. Provides up to 2
amps of output to charge most mo-
bile devices.
8. Headphone output jack
Connect wired headphones using a
1/8 in (3.5 mm) stereo connector.
CAUTION
.Do not use any harsh solvents or
chemicals when cleaning the
monitor.
. Do not use any abrasive cleaners
that may scratch the screen. Use
only a lightly dampened lint free
cloth to wipe the screen if it is
dirty.
. The LCD display screen is not
touchscreen. Do not put pressure
or add suction cups on the
screen. .
Caution children to avoid touch-
ing or scratching the screen, as it
may become dirty or damaged.
. Place the monitor in the fully
closed position when not in use.
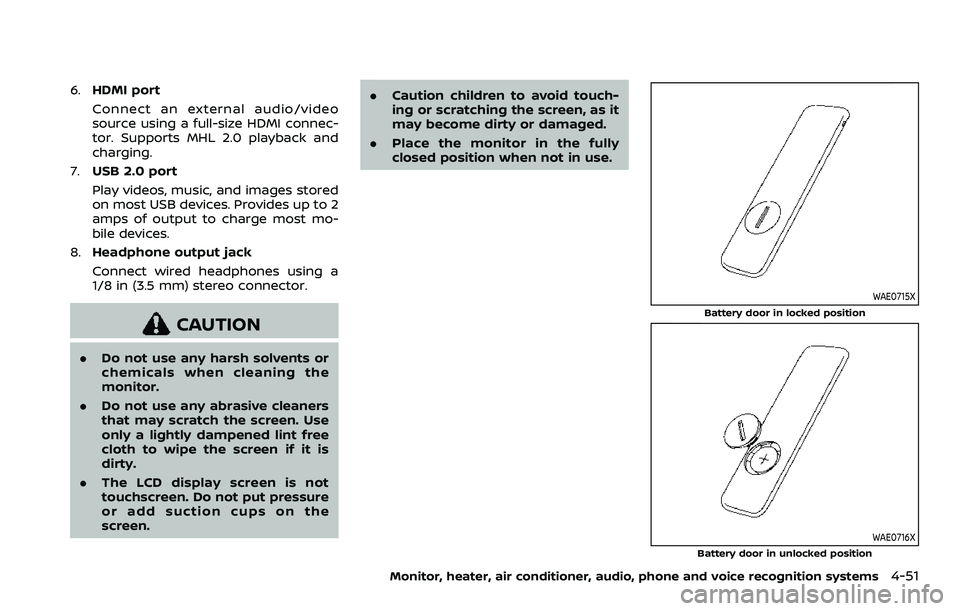
WAE0715X
Battery door in locked position
WAE0716X
Battery door in unlocked position
Monitor, heater, air conditioner, audio, phone and voice recognition systems4-51
Page 282 of 604
4-52Monitor, heater, air conditioner, audio, phone and voice recognition systems
REMOTE CONTROL OPERATION
Before use
Before attempting to operate your re-
mote control, turn the remote control
face down and remove the battery in-
sulator by pulling the clear plastic tab
away from the remote control.
Replacing the battery
1. Turn the remote control face down.Use a coin to turn the battery cover
counter-clockwise and remove it.
2. Replace the battery with a CR2032 or equivalent. Make sure that proper
polarity is observed. The positive (+)
side of the battery should face up-
wards.
3. Place the cover back into position and turn it clockwise until it locks into
place.
The remote control will only operate this
device. It is not a universal remote control
and will not control other equipment.
WARNING
Keep the battery out of the reach of
children. In case the battery is acci-
dentally swallowed, immediately
consult a doctor. Also, when dispos-
ing of used batteries, please comply with governmental regulations or
environmental public institution
rules that apply in your country/
area.
CAUTION
.
Always ensure that the battery is
inserted in the correct direction
as shown in the battery compart-
ment.
. When the battery fails to function,
replace it immediately.
. Remove the battery if the remote
control is not used for a month or
longer.
. Storage in extreme cold can
weaken the battery. Keep the
remote control stored in a cool,
dry place.
WAE0717X
REMOTE CONTROL BUTTONS
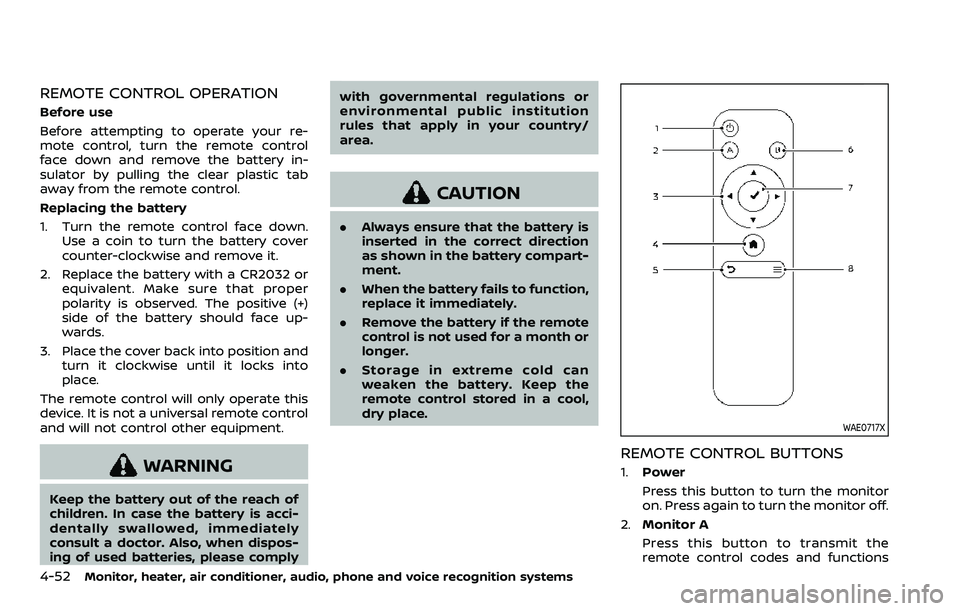
1.Power
Press this button to turn the monitor
on. Press again to turn the monitor off.
2. Monitor A
Press this button to transmit the
remote control codes and functions
Page 334 of 604
5-22Starting and driving
WAF0756X
Shift lock release
If the battery charge is low or discharged,
the shift lever may not be moved from the
P (Park) position even with the brake
pedal depressed and the shift lever but-
ton pushed.
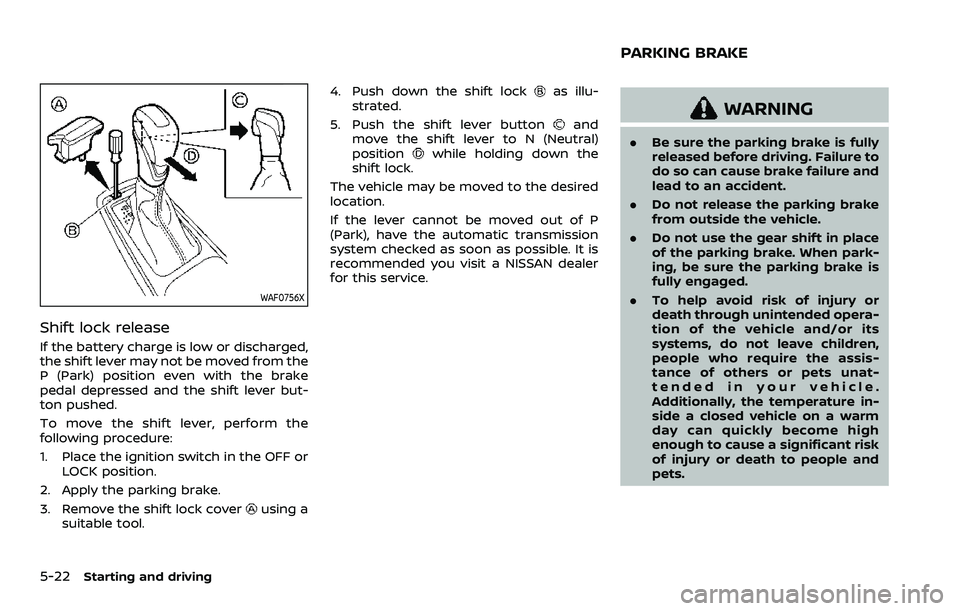
To move the shift lever, perform the
following procedure:
1. Place the ignition switch in the OFF orLOCK position.
2. Apply the parking brake.
3. Remove the shift lock cover
using a
suitable tool. 4. Push down the shift lock
as illu-
strated.
5. Push the shift lever button
and
move the shift lever to N (Neutral)
position
while holding down the
shift lock.
The vehicle may be moved to the desired
location.
If the lever cannot be moved out of P
(Park), have the automatic transmission
system checked as soon as possible. It is
recommended you visit a NISSAN dealer
for this service.
WARNING
. Be sure the parking brake is fully
released before driving. Failure to
do so can cause brake failure and
lead to an accident.
. Do not release the parking brake
from outside the vehicle.
. Do not use the gear shift in place
of the parking brake. When park-
ing, be sure the parking brake is
fully engaged.
. To help avoid risk of injury or
death through unintended opera-
tion of the vehicle and/or its
systems, do not leave children,
people who require the assis-
tance of others or pets unat-
tended in your vehicle.
Additionally, the temperature in-
side a closed vehicle on a warm
day can quickly become high
enough to cause a significant risk
of injury or death to people and
pets.
PARKING BRAKE
Page 502 of 604
8-10Do-it-yourself
SDI2513
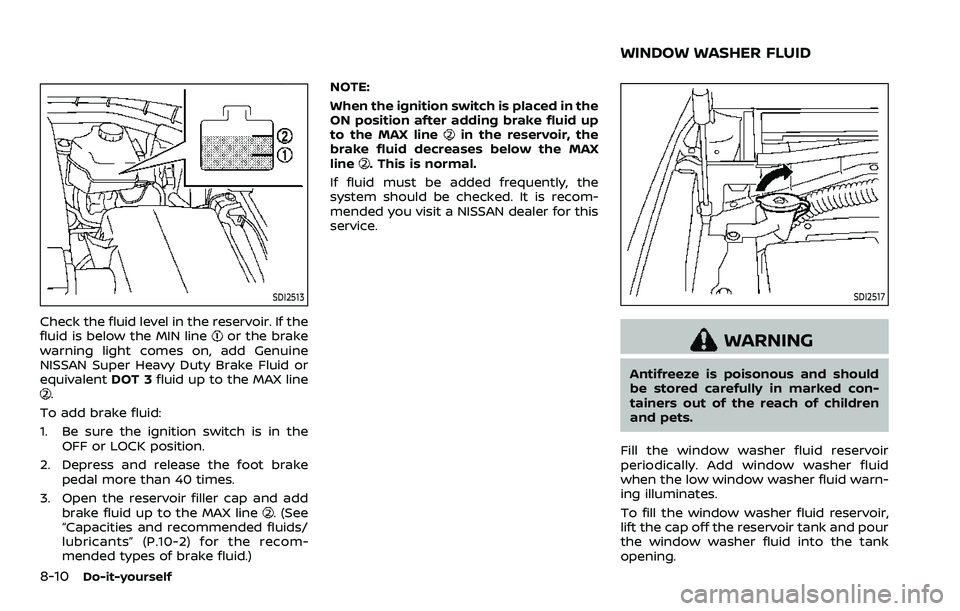
Check the fluid level in the reservoir. If the
fluid is below the MIN lineor the brake
warning light comes on, add Genuine
NISSAN Super Heavy Duty Brake Fluid or
equivalent DOT 3fluid up to the MAX line
.
To add brake fluid:
1. Be sure the ignition switch is in the OFF or LOCK position.
2. Depress and release the foot brake pedal more than 40 times.
3. Open the reservoir filler cap and add brake fluid up to the MAX line
. (See
“Capacities and recommended fluids/
lubricants” (P.10-2) for the recom-
mended types of brake fluid.) NOTE:
When the ignition switch is placed in the
ON position after adding brake fluid up
to the MAX line
in the reservoir, the
brake fluid decreases below the MAX
line
. This is normal.
If fluid must be added frequently, the
system should be checked. It is recom-
mended you visit a NISSAN dealer for this
service.
SDI2517
WARNING
Antifreeze is poisonous and should
be stored carefully in marked con-
tainers out of the reach of children
and pets.
Fill the window washer fluid reservoir
periodically. Add window washer fluid
when the low window washer fluid warn-
ing illuminates.
To fill the window washer fluid reservoir,
lift the cap off the reservoir tank and pour
the window washer fluid into the tank
opening.
WINDOW WASHER FLUID
Page 513 of 604

SDI2704
Extended storage fuse switch (if so
equipped)
To reduce battery drain, the extended
storage fuse switch comes from the
factory switched off. Prior to delivery of
your vehicle, the switch is pushed in
(switched on) and should always remain
on.
If the extended storage fuse switch is not
pushed in (switched on), the “Shipping
Mode On, Push Storage Fuse” warning
may appear on the vehicle information
display (if so equipped). See “Vehicle
information display” (P.2-20).
If any electrical equipment does not
operate, remove the extended storagefuse switch and check for an open fuse.
NOTE:
If the extended storage fuse switch
malfunctions or if the fuse is open, it is
not necessary to replace the switch. In
this case, remove the extended storage
fuse switch and replace it with a new
fuse of the same rating.
How to remove the extended storage
fuse switch:
1. To remove the extended storage fuse
switch, be sure the ignition switch is in
the OFF or LOCK position.
2. Be sure the headlights are off. (See “Headlight switch” (P.2-47), “Intelligent
Auto Headlight system (Type A)” (P.2-
47), or “Autolight system (Type B)” (P.2-
48).)
3. Remove the fuse box cover.
4. Pinch the locking tabs
found on
each side of the storage fuse switch.
5. Pull the storage fuse switch straight out from the fuse box
.
CAUTION
Be careful not to allow children to
swallow the battery and removed
parts.
Do-it-yourself8-21
INTELLIGENT KEY BATTERY REPLACEMENT