2022 NISSAN ARMADA display
[x] Cancel search: displayPage 265 of 604
.The MOD system might detect
flowing water droplets on the
camera lens, white smoke from
the muffler, moving shadows, etc.
. The MOD system may not func-
tion properly depending on the
speed, direction, distance or
shape of the moving objects.
. If your vehicle sustains damage
to the parts where the camera is
installed, leaving it misaligned or
bent, the sensing zone may be
altered and the MOD system may
not detect objects properly.
. When the temperature is extre-
mely high or low, the screen may
not display objects clearly. This is
not a malfunction.
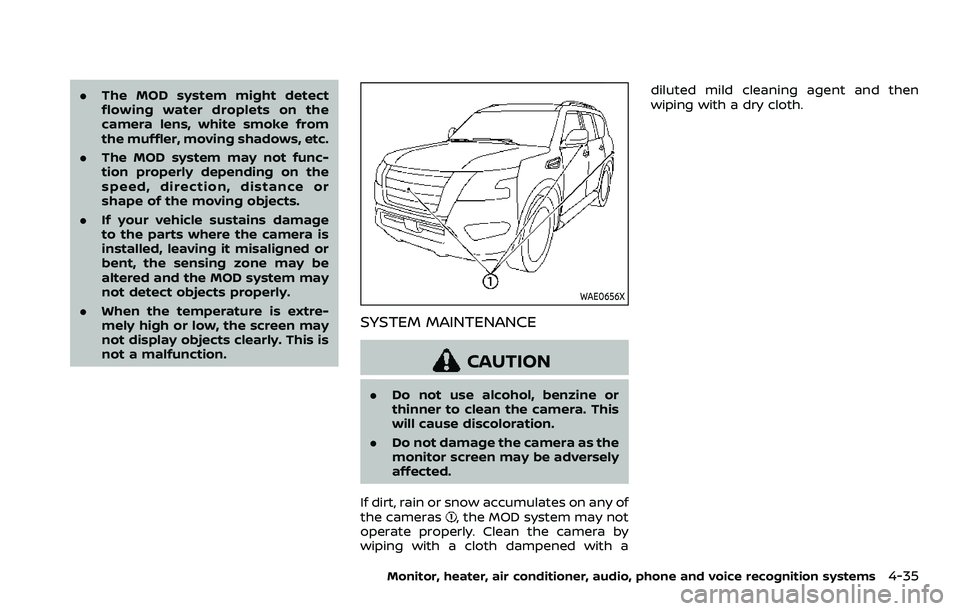
WAE0656X
SYSTEM MAINTENANCE
CAUTION
.Do not use alcohol, benzine or
thinner to clean the camera. This
will cause discoloration.
. Do not damage the camera as the
monitor screen may be adversely
affected.
If dirt, rain or snow accumulates on any of
the cameras
, the MOD system may not
operate properly. Clean the camera by
wiping with a cloth dampened with a diluted mild cleaning agent and then
wiping with a dry cloth.
Monitor, heater, air conditioner, audio, phone and voice recognition systems4-35
Page 268 of 604
4-38Monitor, heater, air conditioner, audio, phone and voice recognition systems
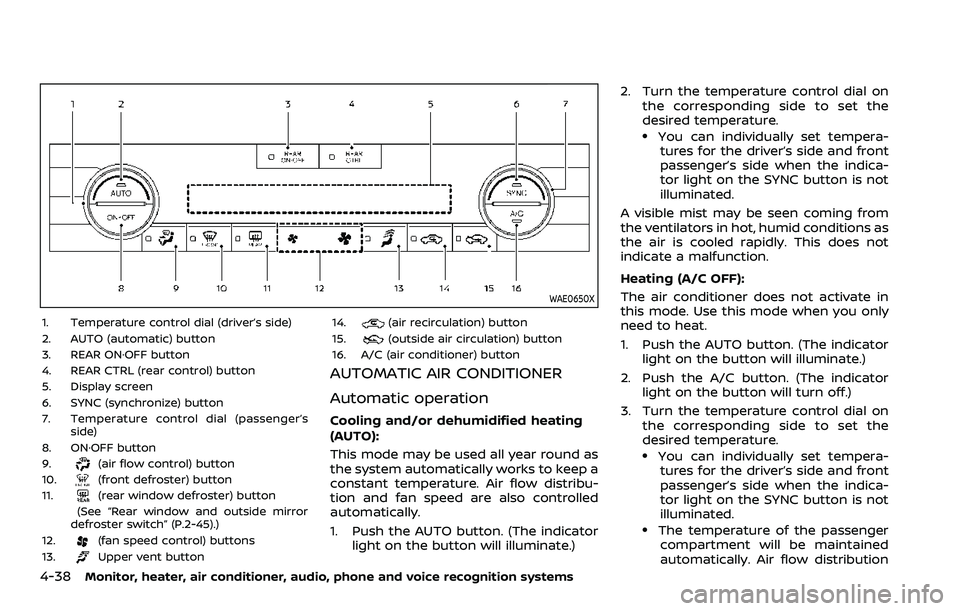
WAE0650X
1. Temperature control dial (driver’s side)
2. AUTO (automatic) button
3. REAR ON·OFF button
4. REAR CTRL (rear control) button
5. Display screen
6. SYNC (synchronize) button
7. Temperature control dial (passenger’sside)
8. ON·OFF button
9.
(air flow control) button
10.(front defroster) button
11.(rear window defroster) button
(See “Rear window and outside mirror
defroster switch” (P.2-45).)
12.
(fan speed control) buttons
13.Upper vent button 14.
(air recirculation) button
15.(outside air circulation) button
16. A/C (air conditioner) button
AUTOMATIC AIR CONDITIONER
Automatic operation
Cooling and/or dehumidified heating
(AUTO):
This mode may be used all year round as
the system automatically works to keep a
constant temperature. Air flow distribu-
tion and fan speed are also controlled
automatically.
1. Push the AUTO button. (The indicator light on the button will illuminate.) 2. Turn the temperature control dial on
the corresponding side to set the
desired temperature.
.You can individually set tempera-tures for the driver’s side and front
passenger’s side when the indica-
tor light on the SYNC button is not
illuminated.
A visible mist may be seen coming from
the ventilators in hot, humid conditions as
the air is cooled rapidly. This does not
indicate a malfunction.
Heating (A/C OFF):
The air conditioner does not activate in
this mode. Use this mode when you only
need to heat.
1. Push the AUTO button. (The indicator light on the button will illuminate.)
2. Push the A/C button. (The indicator light on the button will turn off.)
3. Turn the temperature control dial on the corresponding side to set the
desired temperature.
.You can individually set tempera-tures for the driver’s side and front
passenger’s side when the indica-
tor light on the SYNC button is not
illuminated.
.The temperature of the passengercompartment will be maintained
automatically. Air flow distribution
Page 270 of 604
4-40Monitor, heater, air conditioner, audio, phone and voice recognition systems
Turning the system on/off
Push the ON·OFF button.
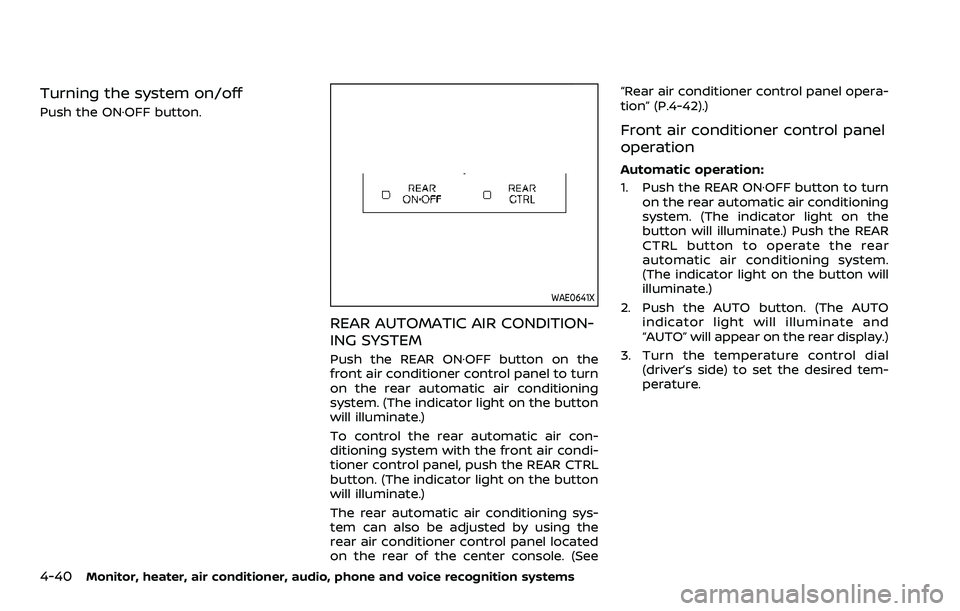
WAE0641X
REAR AUTOMATIC AIR CONDITION-
ING SYSTEM
Push the REAR ON·OFF button on the
front air conditioner control panel to turn
on the rear automatic air conditioning
system. (The indicator light on the button
will illuminate.)
To control the rear automatic air con-
ditioning system with the front air condi-
tioner control panel, push the REAR CTRL
button. (The indicator light on the button
will illuminate.)
The rear automatic air conditioning sys-
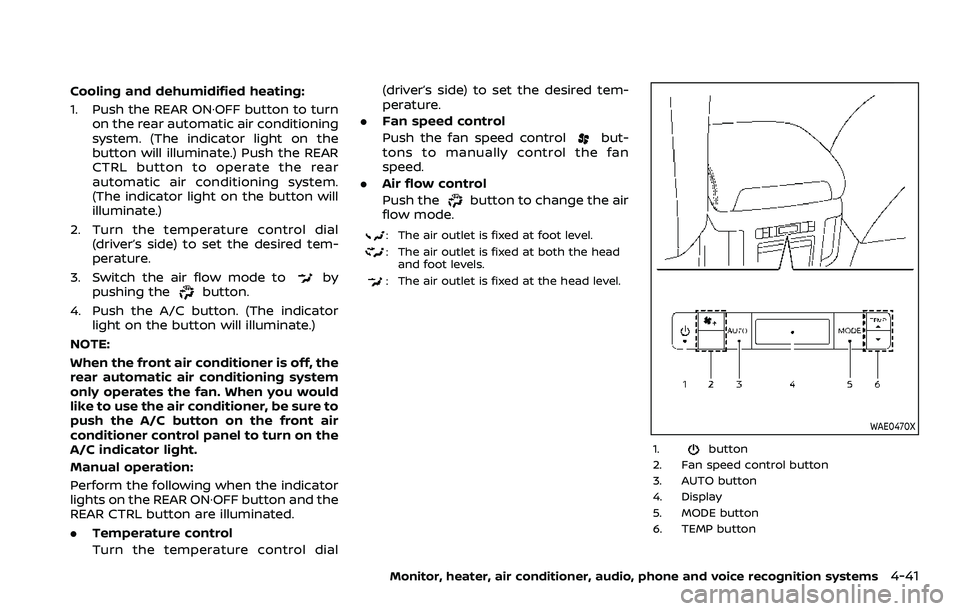
tem can also be adjusted by using the
rear air conditioner control panel located
on the rear of the center console. (See“Rear air conditioner control panel opera-
tion” (P.4-42).)
Front air conditioner control panel
operation
Automatic operation:
1. Push the REAR ON·OFF button to turn
on the rear automatic air conditioning
system. (The indicator light on the
button will illuminate.) Push the REAR
CTRL button to operate the rear
automatic air conditioning system.
(The indicator light on the button will
illuminate.)
2. Push the AUTO button. (The AUTO indicator light will illuminate and
“AUTO” will appear on the rear display.)
3. Turn the temperature control dial (driver’s side) to set the desired tem-
perature.
Page 271 of 604
Cooling and dehumidified heating:
1. Push the REAR ON·OFF button to turnon the rear automatic air conditioning
system. (The indicator light on the
button will illuminate.) Push the REAR
CTRL button to operate the rear
automatic air conditioning system.
(The indicator light on the button will
illuminate.)
2. Turn the temperature control dial (driver’s side) to set the desired tem-
perature.
3. Switch the air flow mode to
by
pushing thebutton.
4. Push the A/C button. (The indicator light on the button will illuminate.)
NOTE:
When the front air conditioner is off, the
rear automatic air conditioning system
only operates the fan. When you would
like to use the air conditioner, be sure to
push the A/C button on the front air
conditioner control panel to turn on the
A/C indicator light.
Manual operation:
Perform the following when the indicator
lights on the REAR ON·OFF button and the
REAR CTRL button are illuminated.
. Temperature control
Turn the temperature control dial (driver’s side) to set the desired tem-
perature.
. Fan speed control
Push the fan speed control
but-
tons to manually control the fan
speed.
. Air flow control
Push the
button to change the air
flow mode.
: The air outlet is fixed at foot level.
: The air outlet is fixed at both the head and foot levels.
: The air outlet is fixed at the head level.
WAE0470X
1.button
2. Fan speed control button
3. AUTO button
4. Display
5. MODE button
6. TEMP button
Monitor, heater, air conditioner, audio, phone and voice recognition systems4-41
Page 275 of 604

WARNING
.It is unlawful in most jurisdictions
for a person to drive a motor
vehicle which is equipped with a
television monitor or screen that
is visible, directly or indirectly, to
the driver while operating the
vehicle. In the interest of safety,
the unit should never be installed
where it will be directly or indir-
ectly visible, by the operator of
the motor vehicle.
. For safety reasons when chan-
ging discs, it is recommended
that the vehicle is not in motion,
and that you do not allow chil-
dren to unfasten safety belts to
change discs or make any adjust-
ments to the system. System
adjustments can be accom-
plished using the remote control,
while safety belts remain fas-
tened.
. Enjoy your RSI system but re-
member that safety of all pas-
sengers remains the number one
priority. Devices installed in the
USB, HDMI, or headphone jack
may protrude and create a po-
tential eye impact hazard for un- belted passengers during a vehi-
cle accident. To reduce the risk of
injury, use only SD cards (hidden
on left side of driver side monitor)
or low-profile USB storage de-
vices.
CAUTION
.
If your vehicle is equipped with a
wireless rear seat audio system
or any other wireless infrared
device, make sure it is powered
off when operating the RSI sys-
tem. If both systems are powered
on at the same time, the two
systems may obstruct each other,
possibly creating undesirable
audio interference through the
wireless headphones.
. Do not touch the inner pins of the
jacks on the front panel. Electro-
static discharge may cause per-
manent damage to the device.
. The LCD display screen is not
touchscreen. Do not put pressure
or add suction cups on the
screen. .
Caution children to avoid touch-
ing or scratching the screen, as it
may become dirty or damaged.
. Be sure to run the vehicle engine
while using the system. Using this
system without running the en-
gine can result in battery drain.
To avoid the risk of battery drain,
please remember to turn off the
system when the vehicle is not in
use.
WELCOME
This Rear Seat Infotainment (RSI) system,
with built-in Wi-Fi, has some advanced
features. Before operating this system,
read this section thoroughly and retain it
for future reference.
System features
.Twin 8-inch Color TFT-LCD Panels
with 1024 x 600 Resolution
. Internal Wi-Fi Network
. Bluetooth® 4.1 Audio Streaming
. Miracast®/Smart View Capability
. SmartStream Content Sharing
. USB 2.0 Port, SDXC Card Input
. HDMI 1.4 Input with MHL 2.0 Support
. Exclusive Slingplayer® Application
Monitor, heater, air conditioner, audio, phone and voice recognition systems4-45
REAR SEAT INFOTAINMENT (RSI) (if
so equipped)
Page 276 of 604

4-46Monitor, heater, air conditioner, audio, phone and voice recognition systems
.3.5mm Stereo Headphone Output
. Front Panel Capacitive Touch Controls
. Infrared Wireless Headphones
. Full-Function Slimline Remote Control
. Monitor Screen Sharing
WAE0712X
GETTING STARTED
Turning the monitor on or off
1. Press thebuttonon the top of
the monitor or the remote control to
turn the monitor on or off. When in
use, the front panel controls will
illuminate.
2. After the monitor has been turned on and is displaying a picture, the up/
down viewing angle can be adjusted
to optimize the picture quality. Press
the push-button latch
located on
the top of the monitor to pivot the
screen.
Power up tips
1. After the ignition switch is placed in the ON position, there is a 12 second
delay before the monitor
(power)
button is operable.
2. On some vehicles after the ignition is turned off, the system will continue to
work for 10 minutes, or until the
driver’s door is opened.
3. Remember to turn the monitor off and pivot the screen to the locked
(latched) position when not in use.
Audio options
Wireless headphones
Each monitor includes a built-in dual
channel infrared transmitter for use with
wireless headphones. The wireless head-
phones must be used within a line of
sight from the transmitter as infrared
signals, like visible light, travel only in a
straight line.
How to use the wireless headphones
When placing the headphones on your
head, make sure to observe the left and
right orientation. The headphones must
be oriented correctly (facing forward) to
receive the audio signal. Press the
(power) button on the headphones, then
select channel “A” to listen to monitor A,
or channel “B” to listen to monitor B.
Page 277 of 604

Adjust the audio level using the volume
control on each headphone.
Wired headphones
There is a 3.5mm stereo headphone out-
put on each monitor which can be used
with most standard stereo headphones
(wired headphones sold separately).
Bluetooth® streaming audio
To listen to audio throughout the entire
vehicle, the system includes the ability to
stream audio over a Bluetooth® connec-
tion to the vehicle’s stereo system.
When monitor A is selected as the source
to stream from, the audio output to the
wireless and wired headphones will be
disabled (only on monitor A). To use the
wireless or wired headphones with moni-
tor A, you must turn off the Bluetooth®
streaming feature. To enable/disable
Bluetooth® streaming, navigate to the
“SETTINGS” menu, or press
on the
remote control during content playback.
For additional information, see “Settings”
(P.4-69).
Media compatibility
For a list of compatible media formats for
this system, see “Storage device format-
ting” (P.4-47).
. The metadata or file information of
some audio and video files may not be
correctly displayed.
. It is not possible to play content that is
protected by DRM (Digital Rights Man-
agement).
. There may be a delay before playback
begins when using USB flash drives or
SD cards with complex folder hierar-
chies or many files.
. Some audio, video, and image files
may be incompatible with this system
due to file characteristics, file format,
recording software used, directory
structure, and/or the type of audio/
video encoding used.
Storage device formatting
This system is compatible with several
types of formatting for USB flash drives
and SD cards. Refer to the documentation
that comes with your storage device for
more details on how to format.
FAT32 - USB and SDHC
Good for smaller capacity storage de-
vices, but individual files on the drive must
be less than 4GB. This format is good for music and images.
EX-FAT - USB and SDXC
Better choice for larger capacity storage
devices with files that are more than 4GB.
This format is better for larger files such
as full-length movies.
NTFS - USB and SDXC
Best choice for very large capacity sto-
rage devices - with no limitations on file
size. This format can be used for all file
sizes.
Monitor, heater, air conditioner, audio, phone and voice recognition systems4-47
Page 280 of 604
4-50Monitor, heater, air conditioner, audio, phone and voice recognition systems
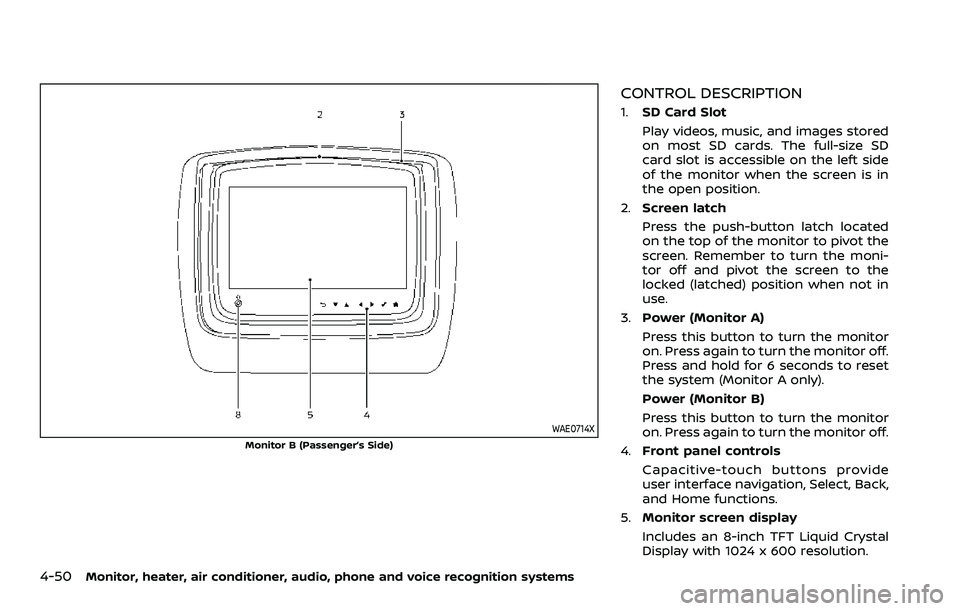
WAE0714X
Monitor B (Passenger’s Side)
CONTROL DESCRIPTION
1.SD Card Slot
Play videos, music, and images stored
on most SD cards. The full-size SD
card slot is accessible on the left side
of the monitor when the screen is in
the open position.
2. Screen latch
Press the push-button latch located
on the top of the monitor to pivot the
screen. Remember to turn the moni-
tor off and pivot the screen to the
locked (latched) position when not in
use.
3. Power (Monitor A)
Press this button to turn the monitor
on. Press again to turn the monitor off.
Press and hold for 6 seconds to reset
the system (Monitor A only).
Power (Monitor B)
Press this button to turn the monitor
on. Press again to turn the monitor off.
4. Front panel controls
Capacitive-touch buttons provide
user interface navigation, Select, Back,
and Home functions.
5. Monitor screen display
Includes an 8-inch TFT Liquid Crystal
Display with 1024 x 600 resolution.